
Network Scan Drivers
Page 3
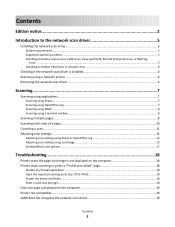
......6 Removing the network scan driver...6 Scanning...7 Scanning using applications...7 Scanning using XSane...7 Scanning using OpenOffice.org...7 Scanning using GIMP ...8 Scanning using a terminal window ...8 Scanning multiple pages...8 Scanning both sides of a page...10 Canceling a scan...11 Adjusting scan settings...12 Adjusting scan settings using XSane or OpenOffice.org 12 Adjusting scan settings using scanimage ...13 Setting default scan options ...17 Troubleshooting 18 Printer scans the page, but...
......6 Removing the network scan driver...6 Scanning...7 Scanning using applications...7 Scanning using XSane...7 Scanning using OpenOffice.org...7 Scanning using GIMP ...8 Scanning using a terminal window ...8 Scanning multiple pages...8 Scanning both sides of a page...10 Canceling a scan...11 Adjusting scan settings...12 Adjusting scan settings using XSane or OpenOffice.org 12 Adjusting scan settings using scanimage ...13 Setting default scan options ...17 Troubleshooting 18 Printer scans the page, but...
Network Scan Drivers
Page 7
... your printer > OK 3 From the "Network:scanner" dialog, click Window > Show standard options. 4 If necessary, adjust other options, and then click OK. 4 From the application toolbar, do either of the following : • Click Insert > Picture > Scan > Select Source. • Click Insert > Graphics > Scan > Select Source. 2 From the "Device Used" menu, select your printer. 3 If...
... your printer > OK 3 From the "Network:scanner" dialog, click Window > Show standard options. 4 If necessary, adjust other options, and then click OK. 4 From the application toolbar, do either of the following : • Click Insert > Picture > Scan > Select Source. • Click Insert > Graphics > Scan > Select Source. 2 From the "Device Used" menu, select your printer. 3 If...
Network Scan Drivers
Page 9
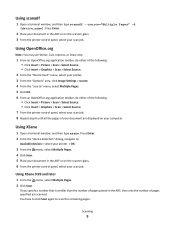
... only. 1 From an OpenOffice.org application toolbar, do either of the following: • Click Insert > Picture > Scan > Select Source. • Click Insert > Graphics > Scan > Select Source. 2 From the "Device Used" menu, select your printer. 3 From the "Options" area, click Image Settings > source. 4 From the "source" menu, select Multiple Pages. 5 Click OK. 6 From an...
... only. 1 From an OpenOffice.org application toolbar, do either of the following: • Click Insert > Picture > Scan > Select Source. • Click Insert > Graphics > Scan > Select Source. 2 From the "Device Used" menu, select your printer. 3 From the "Options" area, click Image Settings > source. 4 From the "source" menu, select Multiple Pages. 5 Click OK. 6 From an...
Network Scan Drivers
Page 11
... all the pages of your document are displayed on your scan job. 11 Repeat step 8. 3 From the "Options" area, navigate to: Image Settings > source 4 From the "source" menu, select Multiple Pages. 5 From the "Options" area, navigate to the network printer. Press Enter. 2 From the "device detection" ...to: Available devices > select your printer > OK 3 From the menu, select Multiple Pages. 4 From the toolbar, click Window > Show standard options. 5 Select the Scan both -sides check box. 7 Click OK. 8 From the application toolbar, do one of the following : • From the dialog displayed after ...
... all the pages of your document are displayed on your scan job. 11 Repeat step 8. 3 From the "Options" area, navigate to: Image Settings > source 4 From the "source" menu, select Multiple Pages. 5 From the "Options" area, navigate to the network printer. Press Enter. 2 From the "device detection" ...to: Available devices > select your printer > OK 3 From the menu, select Multiple Pages. 4 From the toolbar, click Window > Show standard options. 5 Select the Scan both -sides check box. 7 Click OK. 8 From the application toolbar, do one of the following : • From the dialog displayed after ...

Network Scan Drivers
Page 12
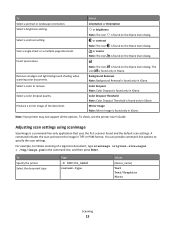
...sure the printer supports the size you select. Scanning 12 Perform a duplex scan. Click Insert > Picture > Scan > Select Source. - or mode Note: The icon is found on the XSane main dialog. Click Window > Show standard options. - Scan both sides or scan-both-sides Notes: • Make sure ...that the printer has a duplex scanner and an Automatic Document Feeder (ADF). • Make sure to access the scan options: • Using XSane 1 Open a terminal window...
...sure the printer supports the size you select. Scanning 12 Perform a duplex scan. Click Insert > Picture > Scan > Select Source. - or mode Note: The icon is found on the XSane main dialog. Click Window > Show standard options. - Scan both sides or scan-both-sides Notes: • Make sure ...that the printer has a duplex scanner and an Automatic Document Feeder (ADF). • Make sure to access the scan options: • Using XSane 1 Open a terminal window...
Network Scan Drivers
Page 13
...the image in the command line, and then press Enter. You can provide command-line options to remove Select a color dropout quality. Remove smudges and light background shading when scanning color documents. Note: The icon is found on the XSane main dialog. Select a contrast...Dropout Note: Color Dropout is found only in XSane. Select a color to specify the scan settings. For example, to initiate scanning of the document. Note: Your printer may not support all the options. Select a brightness setting. To Specify the printer Select the document type Type -d [device_name...
...the image in the command line, and then press Enter. You can provide command-line options to remove Select a color dropout quality. Remove smudges and light background shading when scanning color documents. Note: The icon is found on the XSane main dialog. Select a contrast...Dropout Note: Color Dropout is found only in XSane. Select a color to specify the scan settings. For example, to initiate scanning of the document. Note: Your printer may not support all the options. Select a brightness setting. To Specify the printer Select the document type Type -d [device_name...
Network Scan Drivers
Page 14
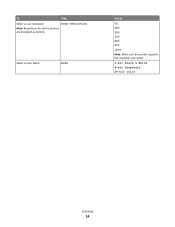
To Type Select a scan resolution scan-resolution Note: Resolutions for all the printers are displayed as options. Select a color depth mode Values 75 150 200 300 400 600 1200 Note: Make sure the printer supports the resolution you select. 1-bit Black & White 8-bit Grayscale 24-bit Color Scanning 14
To Type Select a scan resolution scan-resolution Note: Resolutions for all the printers are displayed as options. Select a color depth mode Values 75 150 200 300 400 600 1200 Note: Make sure the printer supports the resolution you select. 1-bit Black & White 8-bit Grayscale 24-bit Color Scanning 14
Network Scan Drivers
Page 15
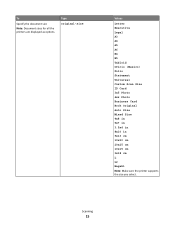
Type original-size Values Letter Executive Legal A3 A4 A5 A6 B4 B5 Tabloid Oficio (Mexico) Folio Statement Universal Custom Scan Size ID Card 3x5 Photo 4x6 Photo Business Card Book Original Auto Size Mixed Size 4x8 in 5x7 in 3.5x4 in 8x10 in 9x13 cm 10x20 cm 20x25 cm 10x15 cm 3x18 cm L L2 Hagaki Note: Make sure the printer supports the size you select. Scanning 15 To Specify the document size Note: Document sizes for all the printers are displayed as options.
Type original-size Values Letter Executive Legal A3 A4 A5 A6 B4 B5 Tabloid Oficio (Mexico) Folio Statement Universal Custom Scan Size ID Card 3x5 Photo 4x6 Photo Business Card Book Original Auto Size Mixed Size 4x8 in 5x7 in 3.5x4 in 8x10 in 9x13 cm 10x20 cm 20x25 cm 10x15 cm 3x18 cm L L2 Hagaki Note: Make sure the printer supports the size you select. Scanning 15 To Specify the document size Note: Document sizes for all the printers are displayed as options.
Network Scan Drivers
Page 16
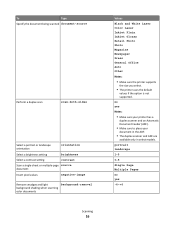
...sheet or multiple-page source document Invert pixel values negative-image Remove smudges and light background-removal background shading when scanning color documents Scanning 16 Values Black and White Laser Color Laser Inkjet Plain Inkjet Glossy Retail Photo Photo Magazine Newspaper Press General ...Office Auto Other Notes: • Make sure the printer supports the size you select. • The printer uses the default values if the option is ...
...sheet or multiple-page source document Invert pixel values negative-image Remove smudges and light background-removal background shading when scanning color documents Scanning 16 Values Black and White Laser Color Laser Inkjet Plain Inkjet Glossy Retail Photo Photo Magazine Newspaper Press General ...Office Auto Other Notes: • Make sure the printer supports the size you select. • The printer uses the default values if the option is ...
Network Scan Drivers
Page 17
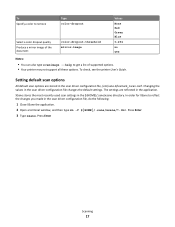
... Changing the values in the ${HOME}/.sane/xsane directory. Setting default scan options All default scan options are reflected in the application. XSane stores the most recently used scan settings in the scan driver configuration file changes the default settings. Press Enter 3 Type xsane. To check, see the printer ...None Red Green Blue 0-254 no yes Notes: • You can also type scanimage --help to reflect the changes you made in the scan driver configuration file, do the following: 1 Close XSane the application. 2 Open a terminal window, and then type rm -f ${HOME}/.sane/...
... Changing the values in the ${HOME}/.sane/xsane directory. Setting default scan options All default scan options are reflected in the application. XSane stores the most recently used scan settings in the scan driver configuration file changes the default settings. Press Enter 3 Type xsane. To check, see the printer ...None Red Green Blue 0-254 no yes Notes: • You can also type scanimage --help to reflect the changes you made in the scan driver configuration file, do the following: 1 Close XSane the application. 2 Open a terminal window, and then type rm -f ${HOME}/.sane/...
Network Scan Drivers
Page 19
..., Calc, Impress, or Draw only. 1 From an OpenOffice.org application toolbar, do either of the following: • Click Insert > Picture > Scan > Select Source. • Click Insert > Graphics > Scan > Select Source. 2 From the "Options" area, click Image Settings > source. 3 From the "source" menu, select Multiple Pages. 4 Click OK. For more information on the computer...
..., Calc, Impress, or Draw only. 1 From an OpenOffice.org application toolbar, do either of the following: • Click Insert > Picture > Scan > Select Source. • Click Insert > Graphics > Scan > Select Source. 2 From the "Options" area, click Image Settings > source. 3 From the "source" menu, select Multiple Pages. 4 Click OK. For more information on the computer...
Card Stock & Label Guide
Page 123
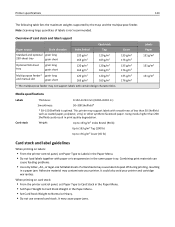
...result in .) Smoothness: 50-300 Sheffield* * 50-150 Sheffield is not recommended. Note: Scanning large quantities of card stock and label support Card stock Paper source Grain direction Index Bristol Tag Standard and optional grain long 250‑sheet tray grain short 120 g/m2 163 g/m2 120 g/m2 163 ...g/m2 Optional 550‑sheet tray grain long grain short 120 g/m2 163 g/m2 120 g/m2 ...
...result in .) Smoothness: 50-300 Sheffield* * 50-150 Sheffield is not recommended. Note: Scanning large quantities of card stock and label support Card stock Paper source Grain direction Index Bristol Tag Standard and optional grain long 250‑sheet tray grain short 120 g/m2 163 g/m2 120 g/m2 163 ...g/m2 Optional 550‑sheet tray grain long grain short 120 g/m2 163 g/m2 120 g/m2 ...

Card Stock & Label Guide
Page 127
...the maximum weights supported by the trays and the multipurpose feeder. Printer specifications 127 Lexmark X642e The Lexmark X642e prints on many labels designed for use with laser printers. Overview of labels is optimal. Note: Scanning large quantities of card stock and label support Card stock Labels Grain Index Dual&#... long) (grain short) 120 g/m2 163 g/m2 120 g/m2 163 g/m2 135 g/m2 176 g/m2 163 g/m2 163 g/m2 220 g/m2 260 g/m2 Optional 500‑sheet drawer (grain long) (grain short) 163 g/m2 199 g/m2 163 g/m2 203 g/m2 176 g/m2 216 g/m2 180 g/m2 180 g/m2...
...the maximum weights supported by the trays and the multipurpose feeder. Printer specifications 127 Lexmark X642e The Lexmark X642e prints on many labels designed for use with laser printers. Overview of labels is optimal. Note: Scanning large quantities of card stock and label support Card stock Labels Grain Index Dual&#... long) (grain short) 120 g/m2 163 g/m2 120 g/m2 163 g/m2 135 g/m2 176 g/m2 163 g/m2 163 g/m2 220 g/m2 260 g/m2 Optional 500‑sheet drawer (grain long) (grain short) 163 g/m2 199 g/m2 163 g/m2 203 g/m2 176 g/m2 216 g/m2 180 g/m2 180 g/m2...

Card Stock & Label Guide
Page 132
... long grain short 120 g/m2 120 g/m2 135 g/m2 163 g/m2 163 g/m2 163 g/m2 163 g/m2 176 g/m2 220 g/m2 260 g/m2 Optional 550‑sheet drawer grain long grain short 163 g/m2 163 g/m2 176 g/m2 180 g/m2 180 g/m2 199 g/m2 203 g/m2 216 g/m2... 100-400* Sheffield * 150-250 Sheffield is not recommended. Printer specifications 132 Lexmark X651de, X652de, X654de, X656de, and X658de The Lexmark X651de, X652de, X654de, X656de, and X658de print on many labels designed for use with laser printers. Note: Scanning labels through the ADF is optimal. The following table lists the maximum weights...
... long grain short 120 g/m2 120 g/m2 135 g/m2 163 g/m2 163 g/m2 163 g/m2 163 g/m2 176 g/m2 220 g/m2 260 g/m2 Optional 550‑sheet drawer grain long grain short 163 g/m2 163 g/m2 176 g/m2 180 g/m2 180 g/m2 199 g/m2 203 g/m2 216 g/m2... 100-400* Sheffield * 150-250 Sheffield is not recommended. Printer specifications 132 Lexmark X651de, X652de, X654de, X656de, and X658de The Lexmark X651de, X652de, X654de, X656de, and X658de print on many labels designed for use with laser printers. Note: Scanning labels through the ADF is optimal. The following table lists the maximum weights...

Copy Guide
Page 1
... right arrow button to scroll to be printed. Note: If you set the number of copies, and then press . Understanding the copy options Copies This option lets you want to scan another document, then place the next document on when the paper is loaded properly. 2 If you are the same. 3 From the printer... items on the scanner glass. • The ADF indicator light comes on the scanner glass, press the left or right arrow button to scroll to Scan the Next Page, and then press . 3 Press the left corner. 2 From the printer control panel, use the keypad to enter the number of copies to...
... right arrow button to scroll to be printed. Note: If you set the number of copies, and then press . Understanding the copy options Copies This option lets you want to scan another document, then place the next document on when the paper is loaded properly. 2 If you are the same. 3 From the printer... items on the scanner glass. • The ADF indicator light comes on the scanner glass, press the left or right arrow button to scroll to Scan the Next Page, and then press . 3 Press the left corner. 2 From the printer control panel, use the keypad to enter the number of copies to...

Copy Guide
Page 2
...right arrow button, and then press . • If the settings for two or more seconds. or two-sided original documents. Sides (Duplex) This option lets you make a continuous decrease or increase in sequence when printing multiple copies of the original document, set "Copy to" to Auto Size Sense, ...of 3 Copy from This option opens a screen where you can also set automatic scaling. • When copying to a different paper size, such as from legal‑size to letter‑size paper, set the "Copy from" and "Copy to" paper sizes automatically to scale the scan image to the original ...
...right arrow button, and then press . • If the settings for two or more seconds. or two-sided original documents. Sides (Duplex) This option lets you make a continuous decrease or increase in sequence when printing multiple copies of the original document, set "Copy to" to Auto Size Sense, ...of 3 Copy from This option opens a screen where you can also set automatic scaling. • When copying to a different paper size, such as from legal‑size to letter‑size paper, set the "Copy from" and "Copy to" paper sizes automatically to scale the scan image to the original ...

Fax Guide
Page 3
... the faxes are in relation to be scanned for inclusion in the fax. Fax Guide Page 3 of 3 Resolution This option lets you set the original document type. Select one side) or duplex (printed on both sides). Sides (Duplex) This option informs the printer if the original document ...resolution reduces the file size. Increasing the image resolution increases the file size and the time needed to match the orientation. Orientation This option lets you specify if the original document is simplex (printed on one of the following content types: • Graphics-The original document...
... the faxes are in relation to be scanned for inclusion in the fax. Fax Guide Page 3 of 3 Resolution This option lets you set the original document type. Select one side) or duplex (printed on both sides). Sides (Duplex) This option informs the printer if the original document ...resolution reduces the file size. Increasing the image resolution increases the file size and the time needed to match the orientation. Orientation This option lets you specify if the original document is simplex (printed on one of the following content types: • Graphics-The original document...
Quick Reference
Page 7
... Setup. Using the printer control panel 1 From the printer control panel, navigate to see more options. 2 From the Print dialog and pop‑up menus adjust the settings if necessary. Canceling a print job from the printer control panel From the .... • If you want to cancel. 4 Click Delete. 7 For Macintosh users 1 From the Apple Menu, navigate to either of the following: • System Preferences > Print & Scan > select a printer > Open Print Queue • System Preferences > Print & Fax > select a printer > Open Print Queue 2 From the printer window, select the print job you...
... Setup. Using the printer control panel 1 From the printer control panel, navigate to see more options. 2 From the Print dialog and pop‑up menus adjust the settings if necessary. Canceling a print job from the printer control panel From the .... • If you want to cancel. 4 Click Delete. 7 For Macintosh users 1 From the Apple Menu, navigate to either of the following: • System Preferences > Print & Scan > select a printer > Open Print Queue • System Preferences > Print & Fax > select a printer > Open Print Queue 2 From the printer window, select the print job you...

Quick Reference
Page 9
...faxing check box is selected, then you are loading a document into the ADF tray or facedown on a telephone or fax machine. Note: The document is scanned, and then faxed at a scheduled time 1 Load an original document faceup, short edge first into the ADF tray. Notes: • View the printer... a cover page with the fax, then select Include cover page with the PostScript driver or the Universal Fax Driver. Notes: • The Fax option is available for bookmarks and network directory servers. 1 Load an original document faceup, short edge first into the ADF tray. If this check box ...
...faxing check box is selected, then you are loading a document into the ADF tray or facedown on a telephone or fax machine. Note: The document is scanned, and then faxed at a scheduled time 1 Load an original document faceup, short edge first into the ADF tray. Notes: • View the printer... a cover page with the fax, then select Include cover page with the PostScript driver or the Universal Fax Driver. Notes: • The Fax option is available for bookmarks and network directory servers. 1 Load an original document faceup, short edge first into the ADF tray. If this check box ...

User's Guide
Page 3
...photos...57 Copying on specialty media...57 Customizing copy settings...59 Placing information on copies...64 Canceling a copy job...65 Understanding the copy options...65 E-mailing...68 Setting up the printer to e-mail...68 Creating an e-mail shortcut...69 E-mailing a document...69 Canceling an ... 87 Customizing fax settings...88 Canceling an outgoing fax...89 Holding and forwarding faxes...90 Understanding the fax options...91 Scanning...93 Scanning to an FTP address...93 Scanning to a computer...95 Understanding printer menus 97 Menus list...97 Paper menu...98 Reports menu...107 Network/...
...photos...57 Copying on specialty media...57 Customizing copy settings...59 Placing information on copies...64 Canceling a copy job...65 Understanding the copy options...65 E-mailing...68 Setting up the printer to e-mail...68 Creating an e-mail shortcut...69 E-mailing a document...69 Canceling an ... 87 Customizing fax settings...88 Canceling an outgoing fax...89 Holding and forwarding faxes...90 Understanding the fax options...91 Scanning...93 Scanning to an FTP address...93 Scanning to a computer...95 Understanding printer menus 97 Menus list...97 Paper menu...98 Reports menu...107 Network/...

