
User's Guide
Page 3
... Information x Online Documents x Trademarks xi 1 Setting Up Your Printer 1 Unpacking Your Printer 1 Removing Print Cartridge Packaging 2 Installing the Print Cartridge 5 Loading the Standard Input Tray 6 Installing the Paper Bail 11 Connecting Your Printer to a Computer 12 Using a Parallel Cable 12 Using a ...USB Cable 14 Plugging the Printer In 20 Turning the Printer Power On 20 Printing the Menu Settings Page 21 Installing the Operator ...
... Information x Online Documents x Trademarks xi 1 Setting Up Your Printer 1 Unpacking Your Printer 1 Removing Print Cartridge Packaging 2 Installing the Print Cartridge 5 Loading the Standard Input Tray 6 Installing the Paper Bail 11 Connecting Your Printer to a Computer 12 Using a Parallel Cable 12 Using a ...USB Cable 14 Plugging the Printer In 20 Turning the Printer Power On 20 Printing the Menu Settings Page 21 Installing the Operator ...

User's Guide
Page 4
... 25 Introducing MarkVision 25 MarkVision for Intranet Servers 26 Introducing MarkVision for Intranet Servers 26 MarkVision for UNIX Networks 27 Lexmark MarkTrack 28 Lexmark NetPnP 29 Software Installation and Distribution Tools 29 Optra Forms 30 Solaris Ready Printers for Sun Customers 31 3 Using the Operator Panel and Menus 33 Using the Operator Panel 34...
... 25 Introducing MarkVision 25 MarkVision for Intranet Servers 26 Introducing MarkVision for Intranet Servers 26 MarkVision for UNIX Networks 27 Lexmark MarkTrack 28 Lexmark NetPnP 29 Software Installation and Distribution Tools 29 Optra Forms 30 Solaris Ready Printers for Sun Customers 31 3 Using the Operator Panel and Menus 33 Using the Operator Panel 34...
User's Guide
Page 6
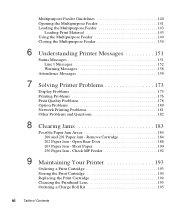
Remove Cartridge 184 202 Paper Jam - Check MP Feeder 192 9 Maintaining Your Printer 193 Ordering a Print Cartridge 193 Storing the Print Cartridge 194 Replacing the Print Cartridge 194 Cleaning the Printhead Lens 195 Ordering ...Loading Print Material 143 Using the Multipurpose Feeder 149 Closing the Multipurpose Feeder 150 6 Understanding Printer Messages 151 Status Messages 151 Line 1 Messages 152 Warning Messages 158 Attendance Messages 159 7 Solving Printer Problems 173 Display Problems 175 Printing Problems 176 Print Quality Problems 178 Option Problems 180 ...
Remove Cartridge 184 202 Paper Jam - Check MP Feeder 192 9 Maintaining Your Printer 193 Ordering a Print Cartridge 193 Storing the Print Cartridge 194 Replacing the Print Cartridge 194 Cleaning the Printhead Lens 195 Ordering ...Loading Print Material 143 Using the Multipurpose Feeder 149 Closing the Multipurpose Feeder 150 6 Understanding Printer Messages 151 Status Messages 151 Line 1 Messages 152 Warning Messages 158 Attendance Messages 159 7 Solving Printer Problems 173 Display Problems 175 Printing Problems 176 Print Quality Problems 178 Option Problems 180 ...
User's Guide
Page 7
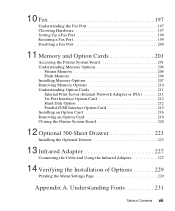
...Port 198 Resetting a Fax Port 199 Disabling a Fax Port 200 11 Memory and Option Cards 201 Accessing the Printer System Board 201 Understanding Memory Options 206 Printer Memory 206 Flash Memory 206 Installing Memory Options 207 Removing Memory Options 210 Understanding Option Cards 211 Internal Print Server ... Hard Disk Option 212 Parallel/USB Interface Option Card 215 Installing an Option Card 216 Removing an Option Card 219 Closing the Printer System Board 220 12 Optional 500-Sheet Drawer 223 Installing the Optional Drawer 223 13 Infrared Adapter 227 Connecting the Cable and...
...Port 198 Resetting a Fax Port 199 Disabling a Fax Port 200 11 Memory and Option Cards 201 Accessing the Printer System Board 201 Understanding Memory Options 206 Printer Memory 206 Flash Memory 206 Installing Memory Options 207 Removing Memory Options 210 Understanding Option Cards 211 Internal Print Server ... Hard Disk Option 212 Parallel/USB Interface Option Card 215 Installing an Option Card 216 Removing an Option Card 219 Closing the Printer System Board 220 12 Optional 500-Sheet Drawer 223 Installing the Optional Drawer 223 13 Infrared Adapter 227 Connecting the Cable and...
User's Guide
Page 9
... for easy reference. Introduction ix Caution! tion you may be helpful for the printer and printer options as well as information about loading print material, changing printer settings, replacing printer supplies, and troubleshooting problems. Keep this book in tray 1 and press Go before... a handy place and use it as a reference when you have a question about the Lexmark Optra M410 and M412 laser printers. Introduction About This Book This User's Guide contains information about printer function or if you to recognize the following conventions used throughout this book: Note: A note...
... for easy reference. Introduction ix Caution! tion you may be helpful for the printer and printer options as well as information about loading print material, changing printer settings, replacing printer supplies, and troubleshooting problems. Keep this book in tray 1 and press Go before... a handy place and use it as a reference when you have a question about the Lexmark Optra M410 and M412 laser printers. Introduction About This Book This User's Guide contains information about printer function or if you to recognize the following conventions used throughout this book: Note: A note...
User's Guide
Page 10
... documents. Once you launch the CD, click View Documentation to this User's Guide, Lexmark offers the following sources of available documents. Online Documents The Drivers, MarkVision and Utilities compact disc (CD) that comes with your printer and other Lexmark products and services. Other Information In addition to display a list of information about your...
... documents. Once you launch the CD, click View Documentation to this User's Guide, Lexmark offers the following sources of available documents. Online Documents The Drivers, MarkVision and Utilities compact disc (CD) that comes with your printer and other Lexmark products and services. Other Information In addition to display a list of information about your...

User's Guide
Page 11
... States and/or other countries. Details relating to be compatible with diamond design, MarkNet, MarkVision, and Optra are trademarks of printer commands (language), fonts, and functions included in the Technical Reference. PCL® is a registered trademark...is a registered trademark of Adobe Systems Incorporated. MarkTrack, Optra Forms, and PictureGrade are included in its printer products. Trademarks Lexmark, Lexmark with the PostScript 3 language. This printer is a service mark of Lexmark International, Inc. Operation ReSource is intended to compatibility are...
... States and/or other countries. Details relating to be compatible with diamond design, MarkNet, MarkVision, and Optra are trademarks of printer commands (language), fonts, and functions included in the Technical Reference. PCL® is a registered trademark...is a registered trademark of Adobe Systems Incorporated. MarkTrack, Optra Forms, and PictureGrade are included in its printer products. Trademarks Lexmark, Lexmark with the PostScript 3 language. This printer is a service mark of Lexmark International, Inc. Operation ReSource is intended to compatibility are...
User's Guide
Page 13
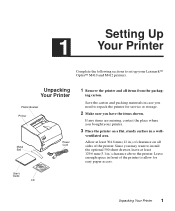
...materials in case you need to repack the printer for easy paper access. Unpacking Your Printer Plastic Bracket Printer Metal Bail User's Guide CD Power Cord 1 Remove the printer and all sides of the printer to allow for service or storage. 2 ...printer. Unpacking Your Printer 1 Setting Up 1 Your Printer Complete the following sections to set up your printer. 3 Place the printer on all items from the packag- Allow at least 129.6 mm (5.1 in front of the printer. If any items are missing, contact the place where you bought your Lexmark™ Optra™ M410 and M412 printers...
...materials in case you need to repack the printer for easy paper access. Unpacking Your Printer Plastic Bracket Printer Metal Bail User's Guide CD Power Cord 1 Remove the printer and all sides of the printer to allow for service or storage. 2 ...printer. Unpacking Your Printer 1 Setting Up 1 Your Printer Complete the following sections to set up your printer. 3 Place the printer on all items from the packag- Allow at least 129.6 mm (5.1 in front of the printer. If any items are missing, contact the place where you bought your Lexmark™ Optra™ M410 and M412 printers...
User's Guide
Page 14
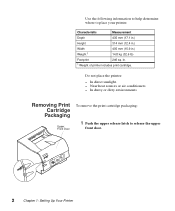
... To remove the print cartridge packaging: 1 Push the upper release latch to place your printer. Use the following information to help determine where to release the upper front door. 2 Chapter 1: Setting Up Your Printer Do not place the printer: - Characteristic Measurement Depth 435 mm (17.1 in.) Height 314 mm (12.4 in.) Width Weight...
... To remove the print cartridge packaging: 1 Push the upper release latch to place your printer. Use the following information to help determine where to release the upper front door. 2 Chapter 1: Setting Up Your Printer Do not place the printer: - Characteristic Measurement Depth 435 mm (17.1 in.) Height 314 mm (12.4 in.) Width Weight...
User's Guide
Page 16
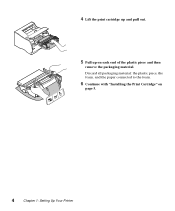
4 Lift the print cartridge up and pull out. 5 Pull up on page 5. 4 Chapter 1: Setting Up Your Printer Discard all packaging material: the plastic piece, the foam, and the paper connected to the foam. 6 Continue with "Installing the Print Cartridge" on each end of the plastic piece and then remove the packaging material.
4 Lift the print cartridge up and pull out. 5 Pull up on page 5. 4 Chapter 1: Setting Up Your Printer Discard all packaging material: the plastic piece, the foam, and the paper connected to the foam. 6 Continue with "Installing the Print Cartridge" on each end of the plastic piece and then remove the packaging material.
User's Guide
Page 17
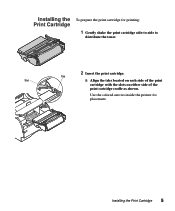
Use the colored arrows inside the printer for printing: 1 Gently shake the print cartridge side-to-side to distribute the toner. 2 Insert the print cartridge: Tab Slot a Align the tabs located on each side of the print cartridge with the slots on either side of the print cartridge cradle as shown. Installing the Print Cartridge To prepare the print cartridge for placement. Installing the Print Cartridge 5
Use the colored arrows inside the printer for printing: 1 Gently shake the print cartridge side-to-side to distribute the toner. 2 Insert the print cartridge: Tab Slot a Align the tabs located on each side of the print cartridge with the slots on either side of the print cartridge cradle as shown. Installing the Print Cartridge To prepare the print cartridge for placement. Installing the Print Cartridge 5
User's Guide
Page 18
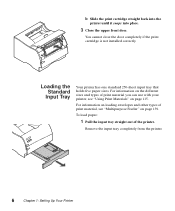
b Slide the print cartridge straight back into the printer until it snaps into place. 3 Close the upper front door. You cannot close the door completely if the print cartridge is not installed correctly. For ... of print material you can use with your printer, see "Multipurpose Feeder" on page 115. Remove the input tray completely from the printer. 6 Chapter 1: Setting Up Your Printer To load paper: 1 Pull the input tray straight out of the printer. Loading the Standard Input Tray Your printer has one standard 250-sheet input tray that...
b Slide the print cartridge straight back into the printer until it snaps into place. 3 Close the upper front door. You cannot close the door completely if the print cartridge is not installed correctly. For ... of print material you can use with your printer, see "Multipurpose Feeder" on page 115. Remove the input tray completely from the printer. 6 Chapter 1: Setting Up Your Printer To load paper: 1 Pull the input tray straight out of the printer. Loading the Standard Input Tray Your printer has one standard 250-sheet input tray that...
User's Guide
Page 20
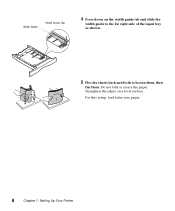
Straighten the edges on the width guide tab and slide the width guide to the far right side of the input tray as shown. 5 Flex the sheets back and forth to loosen them, then fan them. Do not fold or crease the paper. For this setup, load letter-size paper. 8 Chapter 1: Setting Up Your Printer Width Guide Width Guide Tab 4 Press down on a level surface.
Straighten the edges on the width guide tab and slide the width guide to the far right side of the input tray as shown. 5 Flex the sheets back and forth to loosen them, then fan them. Do not fold or crease the paper. For this setup, load letter-size paper. 8 Chapter 1: Setting Up Your Printer Width Guide Width Guide Tab 4 Press down on a level surface.
User's Guide
Page 22
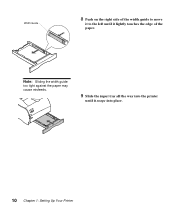
Width Guide 8 Push on the right side of the width guide to move it to the left until it lightly touches the edge of the paper. Note: Sliding the width guide too tight against the paper may cause misfeeds. 9 Slide the input tray all the way into the printer until it snaps into place. 10 Chapter 1: Setting Up Your Printer
Width Guide 8 Push on the right side of the width guide to move it to the left until it lightly touches the edge of the paper. Note: Sliding the width guide too tight against the paper may cause misfeeds. 9 Slide the input tray all the way into the printer until it snaps into place. 10 Chapter 1: Setting Up Your Printer
User's Guide
Page 23
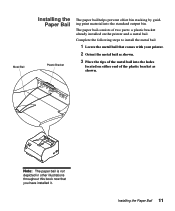
... Bail Installing the Paper Bail Plastic Bracket The paper bail helps prevent offset bin stacking by guiding print material into the holes located on the printer and a metal bail. Note: The paper bail is not depicted in other illustrations throughout this book now that comes with your... printer. 2 Orient the metal bail as shown. 3 Place the tips of two parts: a plastic bracket already installed on either end of the plastic bracket as shown. ...
... Bail Installing the Paper Bail Plastic Bracket The paper bail helps prevent offset bin stacking by guiding print material into the holes located on the printer and a metal bail. Note: The paper bail is not depicted in other illustrations throughout this book now that comes with your... printer. 2 Orient the metal bail as shown. 3 Place the tips of two parts: a plastic bracket already installed on either end of the plastic bracket as shown. ...

User's Guide
Page 24
...Lexmark part number 1329605 (10 ft) or 1427498 (20 ft). If you use a cable other than an IEEE-compliant cable, you may not be able to access all computer equipment before connecting cables. 2 Align and plug the parallel cable into the parallel connector as shown. Using a Parallel Cable Your printer...Serial Bus (USB) cable. Connecting Your Printer to your computer power is Off (O) and unplug all of your printer functions. 1 Turn the printer power Off (O) and unplug the printer power cord from your computer, you need to connect your printer to a Computer To print from the electrical...
...Lexmark part number 1329605 (10 ft) or 1427498 (20 ft). If you use a cable other than an IEEE-compliant cable, you may not be able to access all computer equipment before connecting cables. 2 Align and plug the parallel cable into the parallel connector as shown. Using a Parallel Cable Your printer...Serial Bus (USB) cable. Connecting Your Printer to your computer power is Off (O) and unplug all of your printer functions. 1 Turn the printer power Off (O) and unplug the printer power cord from your computer, you need to connect your printer to a Computer To print from the electrical...
User's Guide
Page 25
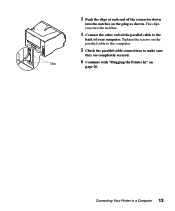
Tighten the screws on page 20. Connecting Your Printer to a Computer 13 Clips 6 Continue with "Plugging the Printer In" on the parallel cable to the computer. 5 Check the parallel cable connections to make sure they are completely secured. The clips snap into the notches on the plug as shown. 3 Push the clips at each end of the connector down into the notches. 4 Connect the other end of the parallel cable to the back of your computer.
Tighten the screws on page 20. Connecting Your Printer to a Computer 13 Clips 6 Continue with "Plugging the Printer In" on the parallel cable to the computer. 5 Check the parallel cable connections to make sure they are completely secured. The clips snap into the notches on the plug as shown. 3 Push the clips at each end of the connector down into the notches. 4 Connect the other end of the parallel cable to the back of your computer.
User's Guide
Page 26
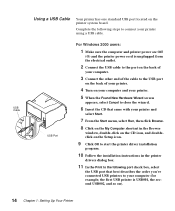
... a USB cable. Complete the following port check box, select the USB port that best describes the order you've connected USB printers to connect your computer (for example, the first USB printer is unplugged from the electrical outlet. 2 Connect the USB cable to the port on the back of your computer. 3 Connect... the other end of the cable to the USB port on the back of your printer. 4 Turn on your computer and your printer. 5 When the Found New Hardware Wizard screen appears, select Cancel to close the wizard. 6 Insert the CD that came with your...
... a USB cable. Complete the following port check box, select the USB port that best describes the order you've connected USB printers to connect your computer (for example, the first USB printer is unplugged from the electrical outlet. 2 Connect the USB cable to the port on the back of your computer. 3 Connect... the other end of the cable to the USB port on the back of your printer. 4 Turn on your computer and your printer. 5 When the Found New Hardware Wizard screen appears, select Cancel to close the wizard. 6 Insert the CD that came with your...
User's Guide
Page 27
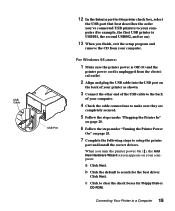
... CD-ROM. a Click Next. c Click to clear the check boxes for the best driver. USB Cable USB Port 12 In the Select a port for this printer check box, select the USB port that best describes the order you finish, exit the setup program and remove the CD from the electrical outlet.... 2 Align and plug the USB cable into the USB port on the back of your printer as shown. 3 Connect the other end of the USB cable to the back of your computer. 4 Check the cable connections to make sure they are...
... CD-ROM. a Click Next. c Click to clear the check boxes for the best driver. USB Cable USB Port 12 In the Select a port for this printer check box, select the USB port that best describes the order you finish, exit the setup program and remove the CD from the electrical outlet.... 2 Align and plug the USB cable into the USB port on the back of your printer as shown. 3 Connect the other end of the USB cable to the back of your computer. 4 Check the cable connections to make sure they are...

User's Guide
Page 28
.... o Select Custom Install and click Next. i Click Next. k Click Install Software. m Select Install from this laser printer to select Optra M410 or Optra M412. h Highlight the folder for this CD. The Choose your printer. f Click Browse. Double-click to install the printer driver. l Click Printer Software. Printer Drivers is selected as the information processes. q Scroll through the list of...
.... o Select Custom Install and click Next. i Click Next. k Click Install Software. m Select Install from this laser printer to select Optra M410 or Optra M412. h Highlight the folder for this CD. The Choose your printer. f Click Browse. Double-click to install the printer driver. l Click Printer Software. Printer Drivers is selected as the information processes. q Scroll through the list of...

