
Wireless Setup Guide
Page 6
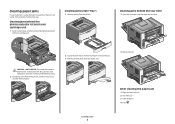
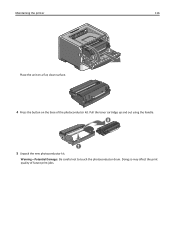
Pull the toner cartridge up the printer 6 Firmly shake the cartridge side-to-side and front-toback several times to distribute toner. Press the button on the base of the photoconductor kit and the toner cartridge from the unit. Setting up and out using the handle. Remove the tape and packaging material from the printer. Remove the unit consisting of the photoconductor kit. Reinsert the unit into the printer.
Pull the toner cartridge up the printer 6 Firmly shake the cartridge side-to-side and front-toback several times to distribute toner. Press the button on the base of the photoconductor kit and the toner cartridge from the unit. Setting up and out using the handle. Remove the tape and packaging material from the printer. Remove the unit consisting of the photoconductor kit. Reinsert the unit into the printer.

Wireless Setup Guide
Page 7
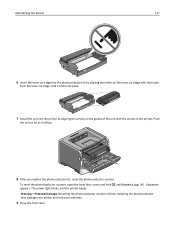
Insert the toner cartridge into place. Setting up the printer 7 Close the front door. Squeeze the length guide tabs together ... that the two width guides move in unison when you move just the right width guide. Straighten the edges on the toner cartridge with the tracks. Squeeze the width guide tabs on the right guide as shown, and then slide the length guide to... loosen them, and then fan them. Do not fold or crease the paper. Push the toner cartridge until it clicks into the photoconductor kit by aligning the rollers on a level surface. Pull the tray completely out.
Insert the toner cartridge into place. Setting up the printer 7 Close the front door. Squeeze the length guide tabs together ... that the two width guides move in unison when you move just the right width guide. Straighten the edges on the toner cartridge with the tracks. Squeeze the width guide tabs on the right guide as shown, and then slide the length guide to... loosen them, and then fan them. Do not fold or crease the paper. Push the toner cartridge until it clicks into the photoconductor kit by aligning the rollers on a level surface. Pull the tray completely out.
Quick Reference
Page 2
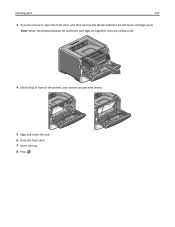
... rear door 1 Open the front door, and then open the rear door. Clearing jams behind the photoconductor kit and toner cartridge unit 1 Open the front door, and then remove the photoconductor kit and toner cartridge unit. CAUTION-HOT SURFACE: The inside of paper. 2 Locate the lever shown. If the jam is visible, then pull...
... rear door 1 Open the front door, and then open the rear door. Clearing jams behind the photoconductor kit and toner cartridge unit 1 Open the front door, and then remove the photoconductor kit and toner cartridge unit. CAUTION-HOT SURFACE: The inside of paper. 2 Locate the lever shown. If the jam is visible, then pull...
Print Defects
Page 1
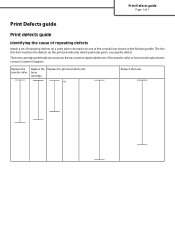
... repeating defects Match a set of repeating defects on a print job to the marks on the print job indicates which particular part is causing the defect. toner cartridge. The toner cartridge and the photoconductor kit are customer replaceable items. If the transfer roller or fuser needs replacement, contact Customer Support.
... repeating defects Match a set of repeating defects on a print job to the marks on the print job indicates which particular part is causing the defect. toner cartridge. The toner cartridge and the photoconductor kit are customer replaceable items. If the transfer roller or fuser needs replacement, contact Customer Support.
Supplies guide
Page 1
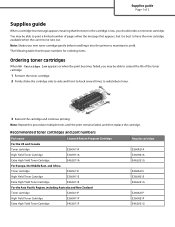
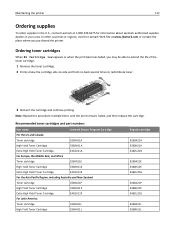
... name Lexmark Return Program Cartridge For the US and Canada Toner cartridge E260A11A High Yield Toner Cartridge E360H11A Extra High Yield Toner Cartridge E462U11A For Europe, the Middle East, and Africa Toner cartridge E260A11E High Yield Toner Cartridge E360H11E Extra High Yield Toner Cartridge E462U11E For the Asia Pacific Region, including Australia and New Zealand Toner cartridge E260A11P High Yield Toner Cartridge E360H11P Extra High Yield Toner Cartridge E462U11P Regular cartridge...
... name Lexmark Return Program Cartridge For the US and Canada Toner cartridge E260A11A High Yield Toner Cartridge E360H11A Extra High Yield Toner Cartridge E462U11A For Europe, the Middle East, and Africa Toner cartridge E260A11E High Yield Toner Cartridge E360H11E Extra High Yield Toner Cartridge E462U11E For the Asia Pacific Region, including Australia and New Zealand Toner cartridge E260A11P High Yield Toner Cartridge E360H11P Extra High Yield Toner Cartridge E462U11P Regular cartridge...

Supplies guide
Page 2
... status of the photoconductor kit by printing a network setup page. Supplies guide Page 2 of 2 Part name For Latin America Toner cartridge High Yield Toner Cartridge Extra High Yield Toner Cartridge Lexmark Return Program Cartridge E260A11L E360H11L E462U11L Regular cartridge E260A21L E360H21L E462U21G Ordering a photoconductor kit Depending on the display after 120,000 pages have printed to let you know...
... status of the photoconductor kit by printing a network setup page. Supplies guide Page 2 of 2 Part name For Latin America Toner cartridge High Yield Toner Cartridge Extra High Yield Toner Cartridge Lexmark Return Program Cartridge E260A11L E360H11L E462U11L Regular cartridge E260A21L E360H21L E462U21G Ordering a photoconductor kit Depending on the display after 120,000 pages have printed to let you know...
User Guide
Page 5
... printer...111 Storing supplies...111 Checking the status of supplies from a network computer 111 Ordering supplies...112 Ordering toner cartridges ...112 Ordering a photoconductor kit ...113 Ordering a maintenance kit ...113 Replacing supplies...113 Replacing the toner cartridge ...113 Replacing the photoconductor kit ...115 Moving the printer...118 Moving the printer to another location...118 Shipping...
... printer...111 Storing supplies...111 Checking the status of supplies from a network computer 111 Ordering supplies...112 Ordering toner cartridges ...112 Ordering a photoconductor kit ...113 Ordering a maintenance kit ...113 Replacing supplies...113 Replacing the toner cartridge ...113 Replacing the photoconductor kit ...115 Moving the printer...118 Moving the printer to another location...118 Shipping...
User Guide
Page 43
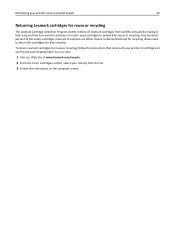
... on the computer screen. To return Lexmark cartridges for reuse or recycling. Minimizing your printer or cartridge and use the pre‑paid shipping label. You can also: 1 Visit our Web site at www.lexmark.com/recycle. 2 From the Toner Cartridges section, select your country from landfills annually... by making it both easy and free for Lexmark customers to return used to Lexmark for reuse or recycling, follow the instructions that came ...
... on the computer screen. To return Lexmark cartridges for reuse or recycling. Minimizing your printer or cartridge and use the pre‑paid shipping label. You can also: 1 Visit our Web site at www.lexmark.com/recycle. 2 From the Toner Cartridges section, select your country from landfills annually... by making it both easy and free for Lexmark customers to return used to Lexmark for reuse or recycling, follow the instructions that came ...
User Guide
Page 112
.... Recommended toner cartridges and part numbers Part name Lexmark Return Program Cartridge For the US and Canada Toner cartridge E260A11A High Yield Toner Cartridge E360H11A Extra High Yield Toner Cartridge E462U11A For Europe, the Middle East, and Africa Toner cartridge E260A11E High Yield Toner Cartridge E360H11E Extra High Yield Toner Cartridge E462U11E For the Asia Pacific Region, including Australia and New Zealand Toner cartridge E260A11P High Yield Toner Cartridge E360H11P...
.... Recommended toner cartridges and part numbers Part name Lexmark Return Program Cartridge For the US and Canada Toner cartridge E260A11A High Yield Toner Cartridge E360H11A Extra High Yield Toner Cartridge E462U11A For Europe, the Middle East, and Africa Toner cartridge E260A11E High Yield Toner Cartridge E360H11E Extra High Yield Toner Cartridge E462U11E For the Asia Pacific Region, including Australia and New Zealand Toner cartridge E260A11P High Yield Toner Cartridge E360H11P...

User Guide
Page 113
... after 120,000 pages have printed to let you know it and continue printing. Maintaining the printer 113 Part name Extra High Yield Toner Cartridge Lexmark Return Program Cartridge E462U11L Regular cartridge E462U21G Ordering a photoconductor kit The printer issues a message to let you know the photoconductor kit is near its end of the maintenance kit...
... after 120,000 pages have printed to let you know it and continue printing. Maintaining the printer 113 Part name Extra High Yield Toner Cartridge Lexmark Return Program Cartridge E462U11L Regular cartridge E462U21G Ordering a photoconductor kit The printer issues a message to let you know the photoconductor kit is near its end of the maintenance kit...
User Guide
Page 114
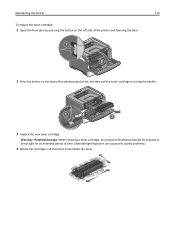
Maintaining the printer 114 To replace the toner cartridge: 1 Open the front door by pressing the button on the left side of the printer and lowering the door. 2 Press the button on the base of time. Extended light exposure can cause print quality problems. 4 Rotate the cartridge in all directions to direct light for an extended period of the photoconductor kit, and then pull the toner cartridge out using the handle. 3 Unpack the new toner cartridge. Warning-Potential Damage: When replacing a toner cartridge, do not leave the photoconductor kit exposed to distribute the toner.
Maintaining the printer 114 To replace the toner cartridge: 1 Open the front door by pressing the button on the left side of the printer and lowering the door. 2 Press the button on the base of time. Extended light exposure can cause print quality problems. 4 Rotate the cartridge in all directions to direct light for an extended period of the photoconductor kit, and then pull the toner cartridge out using the handle. 3 Unpack the new toner cartridge. Warning-Potential Damage: When replacing a toner cartridge, do not leave the photoconductor kit exposed to distribute the toner.

User Guide
Page 115
... the front door. 3 Pull the photoconductor kit and toner cartridge out of the photoconductor kit by pulling on the toner cartridge handle. Note: The photoconductor kit and toner cartridge form a unit. Maintaining the printer 115 5 Install the new toner cartridge by showing 84 PC Kit life warning or 84 Replace... or 84 Replace PC Kit first appears, you before the photoconductor kit reaches a page maximum by aligning the rollers on the toner cartridge with the arrows on the tracks of ‑life, print quality significantly decreases. While the printer may continue to function properly...
... the front door. 3 Pull the photoconductor kit and toner cartridge out of the photoconductor kit by pulling on the toner cartridge handle. Note: The photoconductor kit and toner cartridge form a unit. Maintaining the printer 115 5 Install the new toner cartridge by showing 84 PC Kit life warning or 84 Replace... or 84 Replace PC Kit first appears, you before the photoconductor kit reaches a page maximum by aligning the rollers on the toner cartridge with the arrows on the tracks of ‑life, print quality significantly decreases. While the printer may continue to function properly...
User Guide
Page 116
Pull the toner cartridge up and out using the handle. 5 Unpack the new photoconductor kit. Doing so may affect the print quality of the photoconductor kit. Maintaining the printer 116 Place the unit on a flat, clean surface. 4 Press the button on the base of future print jobs. Warning-Potential Damage: Be careful not to touch the photoconductor drum.
Pull the toner cartridge up and out using the handle. 5 Unpack the new photoconductor kit. Doing so may affect the print quality of the photoconductor kit. Maintaining the printer 116 Place the unit on a flat, clean surface. 4 Press the button on the base of future print jobs. Warning-Potential Damage: Be careful not to touch the photoconductor drum.
User Guide
Page 117
... open the front door, press and hold until it will go. 8 After you replace the photoconductor kit, reset the photoconductor counter. Push the toner cartridge until Resetting PC Counter appears. The power light blinks, and the printer beeps. Push the unit as far as it clicks into place. 7 ...Install the unit into the photoconductor kit by aligning the arrows on the toner cartridge with the arrows in the printer. Maintaining the printer 117 6 Insert the toner cartridge into the printer by aligning the rollers on the guides of the unit with the tracks.
... open the front door, press and hold until it will go. 8 After you replace the photoconductor kit, reset the photoconductor counter. Push the toner cartridge until Resetting PC Counter appears. The power light blinks, and the printer beeps. Push the unit as far as it clicks into place. 7 ...Install the unit into the photoconductor kit by aligning the arrows on the toner cartridge with the arrows in the printer. Maintaining the printer 117 6 Insert the toner cartridge into the printer by aligning the rollers on the guides of the unit with the tracks.
User Guide
Page 127
Note: When the photoconductor kit and toner cartridge are together, they are called a unit. 4 Lift the flap in front of the printer, and remove any jammed sheets. 5 Align and insert the unit. 6 Close the front door. 7 Insert the tray. 8 Press . Clearing jams 127 3 If you do not see it, open the front door, and then remove the photoconductor kit and toner cartridge (unit).
Note: When the photoconductor kit and toner cartridge are together, they are called a unit. 4 Lift the flap in front of the printer, and remove any jammed sheets. 5 Align and insert the unit. 6 Close the front door. 7 Insert the tray. 8 Press . Clearing jams 127 3 If you do not see it, open the front door, and then remove the photoconductor kit and toner cartridge (unit).
User Guide
Page 136
...; For more information, press the up or down arrow button until Show me or Tell me more appears, and then press . Cartridge Life Exceeded The toner cartridge is exhausted. 1 Remove the used toner cartridge, and then install a new one or more of the following : • To select the paper tray with the correct paper size...
...; For more information, press the up or down arrow button until Show me or Tell me more appears, and then press . Cartridge Life Exceeded The toner cartridge is exhausted. 1 Remove the used toner cartridge, and then install a new one or more of the following : • To select the paper tray with the correct paper size...

User Guide
Page 140
... On, then the printer stops printing. If the setting is exhausted. 1 Remove the used toner cartridge, and then install a new one. 2 Press to clear the message. Resetting the printer Wait for the message to clear. Order a maintenance kit, which contains a fuser ... and continue printing. Remove paper from standard bin The standard exit bin has reached its capacity. The printer continues printing unless the value for the Cartridge Alarm is the early warning message for the message to the factory defaults except the Display Language setting in the Setup menu and the custom...
... On, then the printer stops printing. If the setting is exhausted. 1 Remove the used toner cartridge, and then install a new one. 2 Press to clear the message. Resetting the printer Wait for the message to clear. Order a maintenance kit, which contains a fuser ... and continue printing. Remove paper from standard bin The standard exit bin has reached its capacity. The printer continues printing unless the value for the Cartridge Alarm is the early warning message for the message to the factory defaults except the Display Language setting in the Setup menu and the custom...
User Guide
Page 141
... then install a new one. 31.yy Replace defective or missing cartridge The toner cartridge is a defined limit on the printer control panel, and any held jobs • See your use without the number. Troubleshooting 141 Standard Bin Full Remove ... is reached, this message appears and the printer enters a lockout mode. Tray Missing Insert the specified tray into the printer. 30.yy Invalid refill, change cartridge An unsupported, refilled toner cartridge is installed.
... then install a new one. 31.yy Replace defective or missing cartridge The toner cartridge is a defined limit on the printer control panel, and any held jobs • See your use without the number. Troubleshooting 141 Standard Bin Full Remove ... is reached, this message appears and the printer enters a lockout mode. Tray Missing Insert the specified tray into the printer. 30.yy Invalid refill, change cartridge An unsupported, refilled toner cartridge is installed.

User Guide
Page 142
... Try one or more of the following: • Remove the toner cartridge, and then reinstall it. • Remove the toner cartridge, and then install a new one. 32.yy Cartridge part number unsupported by device Remove the toner cartridge, and then install a supported one. 32 Replace unsupported cartridge Remove the toner cartridge, and then install a supported one. 34 Short paper Try...
... Try one or more of the following: • Remove the toner cartridge, and then reinstall it. • Remove the toner cartridge, and then install a new one. 32.yy Cartridge part number unsupported by device Remove the toner cartridge, and then install a supported one. 32 Replace unsupported cartridge Remove the toner cartridge, and then install a supported one. 34 Short paper Try...

User Guide
Page 143
...Press the up or down arrow button until Cancel job appears, and then press . • Install additional printer memory. 42.xy Cartridge region mismatch Install a toner cartridge that matches the region number of the printer. Press the down arrow button until Continue appears, and then press to clear the ... until Continue appears, and then press to clear the message. • Cancel the current print job. x indicates the value of the cartridge region. to print the portion of the job already 37 Insufficient memory, some Held Jobs were deleted The printer deleted some data may not...
...Press the up or down arrow button until Cancel job appears, and then press . • Install additional printer memory. 42.xy Cartridge region mismatch Install a toner cartridge that matches the region number of the printer. Press the down arrow button until Continue appears, and then press to clear the ... until Continue appears, and then press to clear the message. • Cancel the current print job. x indicates the value of the cartridge region. to print the portion of the job already 37 Insufficient memory, some Held Jobs were deleted The printer deleted some data may not...


