
Wireless Setup Guide
Page 6
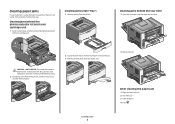
Pull the toner cartridge up the printer 6 Firmly shake the cartridge side-to-side and front-toback several times to distribute toner. Remove the unit consisting of the photoconductor kit. Reinsert the unit into the printer. Setting up and out using the handle. Remove the tape and packaging material from the printer. Press the button on the base of the photoconductor kit and the toner cartridge from the unit.
Pull the toner cartridge up the printer 6 Firmly shake the cartridge side-to-side and front-toback several times to distribute toner. Remove the unit consisting of the photoconductor kit. Reinsert the unit into the printer. Setting up and out using the handle. Remove the tape and packaging material from the printer. Press the button on the base of the photoconductor kit and the toner cartridge from the unit.

Wireless Setup Guide
Page 7
...position for the paper size being loaded. Do not fold or crease the paper. Pull the tray completely out. Straighten the edges on the toner cartridge with the tracks. Notice that the two width guides move in unison when you move just the right width guide. Squeeze the length guide tabs...together as shown, and then slide the width guides to the sides of the tray. Setting up the printer 7 Insert the toner cartridge into place. Push the toner cartridge until it clicks into the photoconductor kit by aligning the rollers on a level surface. Squeeze the width guide tabs on the right ...
...position for the paper size being loaded. Do not fold or crease the paper. Pull the tray completely out. Straighten the edges on the toner cartridge with the tracks. Notice that the two width guides move in unison when you move just the right width guide. Squeeze the length guide tabs...together as shown, and then slide the width guides to the sides of the tray. Setting up the printer 7 Insert the toner cartridge into place. Push the toner cartridge until it clicks into the photoconductor kit by aligning the rollers on a level surface. Squeeze the width guide tabs on the right ...
Quick Reference
Page 2
... to release the jam. 3 Pull the jammed sheets from the printer. Clearing jams behind the photoconductor kit and toner cartridge unit 1 Open the front door, and then remove the photoconductor kit and toner cartridge unit. CAUTION-HOT SURFACE: The inside of paper. 2 Locate the lever shown. Clearing jams under Tray 1 1 Remove the...
... to release the jam. 3 Pull the jammed sheets from the printer. Clearing jams behind the photoconductor kit and toner cartridge unit 1 Open the front door, and then remove the photoconductor kit and toner cartridge unit. CAUTION-HOT SURFACE: The inside of paper. 2 Locate the lever shown. Clearing jams under Tray 1 1 Remove the...
Print Defects
Page 1
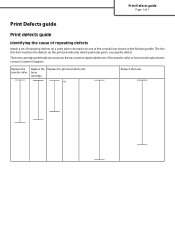
... Match a set of repeating defects on a print job to the marks on the print job indicates which particular part is causing the defect. toner cartridge. The toner cartridge and the photoconductor kit are customer replaceable items. If the transfer roller or fuser needs replacement, contact Customer Support. or Replace the fuser. Replace...
... Match a set of repeating defects on a print job to the marks on the print job indicates which particular part is causing the defect. toner cartridge. The toner cartridge and the photoconductor kit are customer replaceable items. If the transfer roller or fuser needs replacement, contact Customer Support. or Replace the fuser. Replace...
Supplies guide
Page 1
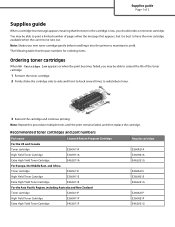
... part numbers Part name Lexmark Return Program Cartridge For the US and Canada Toner cartridge E260A11A High Yield Toner Cartridge E360H11A Extra High Yield Toner Cartridge E462U11A For Europe, the Middle East, and Africa Toner cartridge E260A11E High Yield Toner Cartridge E360H11E Extra High Yield Toner Cartridge E462U11E For the Asia Pacific Region, including Australia and New Zealand...
... part numbers Part name Lexmark Return Program Cartridge For the US and Canada Toner cartridge E260A11A High Yield Toner Cartridge E360H11A Extra High Yield Toner Cartridge E462U11A For Europe, the Middle East, and Africa Toner cartridge E260A11E High Yield Toner Cartridge E360H11E Extra High Yield Toner Cartridge E462U11E For the Asia Pacific Region, including Australia and New Zealand...

Supplies guide
Page 2
... a maintenance kit when this time, order a photoconductor kit. Supplies guide Page 2 of 2 Part name For Latin America Toner cartridge High Yield Toner Cartridge Extra High Yield Toner Cartridge Lexmark Return Program Cartridge E260A11L E360H11L E462U11L Regular cartridge E260A21L E360H21L E462U21G Ordering a photoconductor kit Depending on the display after 120,000 pages have printed to let you...
... a maintenance kit when this time, order a photoconductor kit. Supplies guide Page 2 of 2 Part name For Latin America Toner cartridge High Yield Toner Cartridge Extra High Yield Toner Cartridge Lexmark Return Program Cartridge E260A11L E360H11L E462U11L Regular cartridge E260A21L E360H21L E462U21G Ordering a photoconductor kit Depending on the display after 120,000 pages have printed to let you...
User Guide
Page 3
Contents 3 Adjusting Power Saver ...41 Recycling...42 Recycling Lexmark products ...42 Recycling Lexmark packaging...42 Returning Lexmark cartridges for reuse or recycling 43 Loading paper and specialty media 44 Setting the paper size and type...44 Configuring Universal paper settings...44 Loading trays......
Contents 3 Adjusting Power Saver ...41 Recycling...42 Recycling Lexmark products ...42 Recycling Lexmark packaging...42 Returning Lexmark cartridges for reuse or recycling 43 Loading paper and specialty media 44 Setting the paper size and type...44 Configuring Universal paper settings...44 Loading trays......
User Guide
Page 5
......111 Storing supplies...111 Checking the status of supplies from a network computer 111 Ordering supplies...112 Ordering toner cartridges ...112 Ordering a photoconductor kit ...113 Ordering a maintenance kit ...113 Replacing supplies...113 Replacing the toner cartridge ...113 Replacing the photoconductor kit ...115 Moving the printer...118 Moving the printer to another location...118...
......111 Storing supplies...111 Checking the status of supplies from a network computer 111 Ordering supplies...112 Ordering toner cartridges ...112 Ordering a photoconductor kit ...113 Ordering a maintenance kit ...113 Replacing supplies...113 Replacing the toner cartridge ...113 Replacing the photoconductor kit ...115 Moving the printer...118 Moving the printer to another location...118...

User Guide
Page 6
Contents 6 Understanding jam messages and locations 124 200 paper jam...126 201 paper jam...128 202 paper jam...129 231 paper jam...130 233 paper jam...132 234 paper jam...132 235 paper jam...133 24x paper jam...133 251 paper jam...134 Troubleshooting 136 Understanding printer messages...136 Calibrating ...136 Cartridge Life Exceeded ...136 Change to ...136 Change to ...136 Change to ...137 Change to ...137 Close front door ...137 Load with ...137 Load with ...138 Load with ...138 Load with ...138 Load Manual Feeder with
Contents 6 Understanding jam messages and locations 124 200 paper jam...126 201 paper jam...128 202 paper jam...129 231 paper jam...130 233 paper jam...132 234 paper jam...132 235 paper jam...133 24x paper jam...133 251 paper jam...134 Troubleshooting 136 Understanding printer messages...136 Calibrating ...136 Cartridge Life Exceeded ...136 Change to ...136 Change to ...136 Change to ...137 Change to ...137 Close front door ...137 Load with ...137 Load with ...138 Load with ...138 Load with ...138 Load Manual Feeder with
User Guide
Page 7
... memory, some Held Jobs were deleted 143 38 Memory full ...143 39 Complex page, some data may not have printed 143 42.xy Cartridge region mismatch...143 51 Defective flash detected ...144 52 Not enough free space in flash memory for resources 144 53 Unformatted flash detected ...144......145 58 Too many trays attached ...145 80 Routine Maintenance ...145 84 PC Kit life warning ...145 84 Replace PC Kit ...145 88 Cartridge low ...145 1565 Emulation error, load emulation option 146 Solving basic printer problems...146 Printer control panel display is blank or displays only diamonds 146...
... memory, some Held Jobs were deleted 143 38 Memory full ...143 39 Complex page, some data may not have printed 143 42.xy Cartridge region mismatch...143 51 Defective flash detected ...144 52 Not enough free space in flash memory for resources 144 53 Unformatted flash detected ...144......145 58 Too many trays attached ...145 80 Routine Maintenance ...145 84 PC Kit life warning ...145 84 Replace PC Kit ...145 88 Cartridge low ...145 1565 Emulation error, load emulation option 146 Solving basic printer problems...146 Printer control panel display is blank or displays only diamonds 146...

User Guide
Page 41
... know the IP address of the printer, then print a network setup page and locate the IP address in standby mode. • The alarm control and cartridge alarm sounds are processed at the correct setting.
... know the IP address of the printer, then print a network setup page and locate the IP address in standby mode. • The alarm control and cartridge alarm sounds are processed at the correct setting.

User Guide
Page 42
... want to increase or decrease the number of . When you can reuse the box that there is recyclable where foam recycling facilities exist. Recycling Lexmark provides collection programs and environmentally progressive approaches to Lexmark, you return a cartridge to recycling. Lexmark cartons are transported in the most efficient and environmentally sensitive manner and that the...
... want to increase or decrease the number of . When you can reuse the box that there is recyclable where foam recycling facilities exist. Recycling Lexmark provides collection programs and environmentally progressive approaches to Lexmark, you return a cartridge to recycling. Lexmark cartons are transported in the most efficient and environmentally sensitive manner and that the...
User Guide
Page 43
... shipping label. Boxes used cartridges to Lexmark for reuse or recycling. One hundred percent of Lexmark cartridges from the list. 3 Follow the instructions on the computer screen. Minimizing your printer's environmental impact 43 Returning Lexmark cartridges for reuse or recycling The Lexmark Cartridge Collection Program diverts millions of the empty cartridges returned to return the cartridges are either reused or...
... shipping label. Boxes used cartridges to Lexmark for reuse or recycling. One hundred percent of Lexmark cartridges from the list. 3 Follow the instructions on the computer screen. Minimizing your printer's environmental impact 43 Returning Lexmark cartridges for reuse or recycling The Lexmark Cartridge Collection Program diverts millions of the empty cartridges returned to return the cartridges are either reused or...
User Guide
Page 66
...a higher fusing temperature up to Heavy. Partial sheets also contaminate the printer and the cartridge with adhesive, and could void the warranty. • If zone coating of the adhesive at http://support.lexmark.com. Tips on the leading and driver edge, and use a non‑oozing...;mm (0.06‑in a jam. Partial sheets may contaminate the printer. Adhesive material contaminates the printer and could void the printer and cartridge warranties. • Do not use before buying large quantities. Print samples on labels: • Use labels designed specifically for use labels ...
...a higher fusing temperature up to Heavy. Partial sheets also contaminate the printer and the cartridge with adhesive, and could void the warranty. • If zone coating of the adhesive at http://support.lexmark.com. Tips on the leading and driver edge, and use a non‑oozing...;mm (0.06‑in a jam. Partial sheets may contaminate the printer. Adhesive material contaminates the printer and could void the printer and cartridge warranties. • Do not use before buying large quantities. Print samples on labels: • Use labels designed specifically for use labels ...
User Guide
Page 98
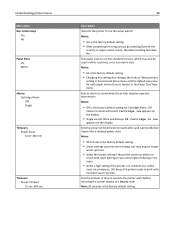
...; Select a high setting if the printer is the factory default setting. Off means no alarm will sound. Cartridge low appears on the display. • Single sounds three quick beeps. 88 Cartridge is the factory default setting. • After completing the setup wizard by selecting Done at the country or ... Note: 30 seconds is in the Univeral Setup menu and the default size value for Cartridge Alarm. Understanding printer menus Menu item Run Initial setup Yes No Paper Sizes US Metric Alarms Cartridge Alarm Off Single Timeouts Power Saver 1min-240 min Timeouts Screen Timeout 15 sec-300 sec...
...; Select a high setting if the printer is the factory default setting. Off means no alarm will sound. Cartridge low appears on the display. • Single sounds three quick beeps. 88 Cartridge is the factory default setting. • After completing the setup wizard by selecting Done at the country or ... Note: 30 seconds is in the Univeral Setup menu and the default size value for Cartridge Alarm. Understanding printer menus Menu item Run Initial setup Yes No Paper Sizes US Metric Alarms Cartridge Alarm Off Single Timeouts Power Saver 1min-240 min Timeouts Screen Timeout 15 sec-300 sec...
User Guide
Page 112
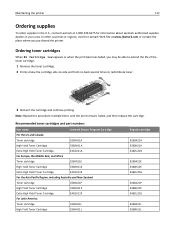
... in your area. Recommended toner cartridges and part numbers Part name Lexmark Return Program Cartridge For the US and Canada Toner cartridge E260A11A High Yield Toner Cartridge E360H11A Extra High Yield Toner Cartridge E462U11A For Europe, the Middle East, and Africa Toner cartridge E260A11E High Yield Toner Cartridge E360H11E Extra High Yield Toner Cartridge E462U11E For the Asia Pacific...
... in your area. Recommended toner cartridges and part numbers Part name Lexmark Return Program Cartridge For the US and Canada Toner cartridge E260A11A High Yield Toner Cartridge E360H11A Extra High Yield Toner Cartridge E462U11A For Europe, the Middle East, and Africa Toner cartridge E260A11E High Yield Toner Cartridge E360H11E Extra High Yield Toner Cartridge E462U11E For the Asia Pacific...

User Guide
Page 113
...it and continue printing. At this message first appears. Maintaining the printer 113 Part name Extra High Yield Toner Cartridge Lexmark Return Program Cartridge E462U11L Regular cartridge E462U21G Ordering a photoconductor kit The printer issues a message to replace the fuser and transfer roller. You can...necessary to let you know the photoconductor kit is left in your printer: Part name Maintenance kit * Designed for your cartridge by printing a network setup page. Part name Photoconductor kit Part number E260X22G Ordering a maintenance kit 80 Routine maintenance needed...
...it and continue printing. At this message first appears. Maintaining the printer 113 Part name Extra High Yield Toner Cartridge Lexmark Return Program Cartridge E462U11L Regular cartridge E462U21G Ordering a photoconductor kit The printer issues a message to replace the fuser and transfer roller. You can...necessary to let you know the photoconductor kit is left in your printer: Part name Maintenance kit * Designed for your cartridge by printing a network setup page. Part name Photoconductor kit Part number E260X22G Ordering a maintenance kit 80 Routine maintenance needed...
User Guide
Page 114
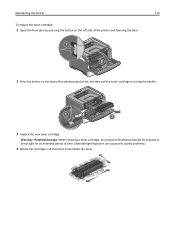
Maintaining the printer 114 To replace the toner cartridge: 1 Open the front door by pressing the button on the left side of the printer and lowering the door. 2 Press the button on the base of time. Warning-Potential Damage: When replacing a toner cartridge, do not leave the photoconductor kit exposed to distribute the toner. Extended light exposure can cause print quality problems. 4 Rotate the cartridge in all directions to direct light for an extended period of the photoconductor kit, and then pull the toner cartridge out using the handle. 3 Unpack the new toner cartridge.
Maintaining the printer 114 To replace the toner cartridge: 1 Open the front door by pressing the button on the left side of the printer and lowering the door. 2 Press the button on the base of time. Warning-Potential Damage: When replacing a toner cartridge, do not leave the photoconductor kit exposed to distribute the toner. Extended light exposure can cause print quality problems. 4 Rotate the cartridge in all directions to direct light for an extended period of the photoconductor kit, and then pull the toner cartridge out using the handle. 3 Unpack the new toner cartridge.

User Guide
Page 115
... door by pressing the button on the left side of the printer and lowering the front door. 3 Pull the photoconductor kit and toner cartridge out of the photoconductor kit. Replacing the photoconductor kit The printer automatically notifies you should immediately order a new photoconductor kit. Note: The... photoconductor kit and toner cartridge form a unit. Push the toner cartridge in as far as a unit by pulling on the toner cartridge handle. When 84 PC Kit life warning or 84 Replace PC Kit first appears, you ...
... door by pressing the button on the left side of the printer and lowering the front door. 3 Pull the photoconductor kit and toner cartridge out of the photoconductor kit. Replacing the photoconductor kit The printer automatically notifies you should immediately order a new photoconductor kit. Note: The... photoconductor kit and toner cartridge form a unit. Push the toner cartridge in as far as a unit by pulling on the toner cartridge handle. When 84 PC Kit life warning or 84 Replace PC Kit first appears, you ...
User Guide
Page 116
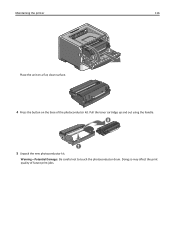
Warning-Potential Damage: Be careful not to touch the photoconductor drum. Maintaining the printer 116 Place the unit on a flat, clean surface. 4 Press the button on the base of future print jobs. Doing so may affect the print quality of the photoconductor kit. Pull the toner cartridge up and out using the handle. 5 Unpack the new photoconductor kit.
Warning-Potential Damage: Be careful not to touch the photoconductor drum. Maintaining the printer 116 Place the unit on a flat, clean surface. 4 Press the button on the base of future print jobs. Doing so may affect the print quality of the photoconductor kit. Pull the toner cartridge up and out using the handle. 5 Unpack the new photoconductor kit.


