Quick Reference
Page 1
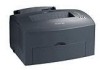
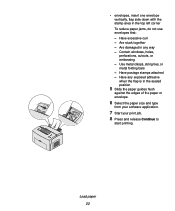
... cartridge (it may be warm) and cover it. 1 If loading: • letterhead paper, insert letterhead face down before inserting the paper tray into the printer. Clearing jams The Paper Jam light prompts you hear a click. 2 Straighten the edges on either side of the paper tray and pull it completely out of the media. 6 Open the front output...
... cartridge (it may be warm) and cover it. 1 If loading: • letterhead paper, insert letterhead face down before inserting the paper tray into the printer. Clearing jams The Paper Jam light prompts you hear a click. 2 Straighten the edges on either side of the paper tray and pull it completely out of the media. 6 Open the front output...
Quick Reference
Page 2
... or is unsatisfactory, replace the print cartridge. When the Error light and Press Continue lights are on solid, the printer detects a jam. When the Paper Jam light and the Press Continue lights are on solid, a secondary error has occurred. To use the remaining toner, ...printer is data. Lexmark International, Inc. When the Load Paper light is blinking and the Press Continue light is on solid, the printer is out of media in Korea 01/03 P/N 21S0282 EC 1SP004a Printed in the manual feed. Common operator panel light sequences Ready/Data Toner Low Load Paper Paper Jam...
... or is unsatisfactory, replace the print cartridge. When the Error light and Press Continue lights are on solid, the printer detects a jam. When the Paper Jam light and the Press Continue lights are on solid, a secondary error has occurred. To use the remaining toner, ...printer is data. Lexmark International, Inc. When the Load Paper light is blinking and the Press Continue light is on solid, the printer is out of media in Korea 01/03 P/N 21S0282 EC 1SP004a Printed in the manual feed. Common operator panel light sequences Ready/Data Toner Low Load Paper Paper Jam...

Setup Guide
Page 8
... additional documentation. Visit our Web site at www.lexmark.com/publications. Introduction ix The printer Quick Reference card provides easy access to get your printer up and running. The drivers CD contains the necessary printer drivers to information about choosing media, understanding the operator panel lights, clearing paper jams, and solving printing problems. The information on...
... additional documentation. Visit our Web site at www.lexmark.com/publications. Introduction ix The printer Quick Reference card provides easy access to get your printer up and running. The drivers CD contains the necessary printer drivers to information about choosing media, understanding the operator panel lights, clearing paper jams, and solving printing problems. The information on...
Setup Guide
Page 22
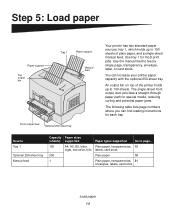
... stock. Step 5: Load paper Paper support Top output bin Tray 1 Paper support Manual feed Front output door Optional 250-sheet tray Your printer has two standard paper sources: tray 1, which holds up to 100 sheets. The single-sheet front output door provides a straight-through paper path for special media, reducing curling and potential paper jams. The following table...
... stock. Step 5: Load paper Paper support Top output bin Tray 1 Paper support Manual feed Front output door Optional 250-sheet tray Your printer has two standard paper sources: tray 1, which holds up to 100 sheets. The single-sheet front output door provides a straight-through paper path for special media, reducing curling and potential paper jams. The following table...

Setup Guide
Page 24
Have excessive curl - Contain windows, holes, perforations, cutouts, or embossing - Use metal clasps, string ties, or metal folding bars - Have postage stamps attached - Have any exposed adhesive when the flap is in any way - Are stuck together - Are damaged in the sealed position Load paper 16 3 If loading: • letterhead paper, insert letterhead with the top of the page pointing down, facing you • envelopes, insert them vertically, flap side down with the stamp area in the top left corner To reduce paper jams, do not use envelopes that: -
Have excessive curl - Contain windows, holes, perforations, cutouts, or embossing - Use metal clasps, string ties, or metal folding bars - Have postage stamps attached - Have any exposed adhesive when the flap is in any way - Are stuck together - Are damaged in the sealed position Load paper 16 3 If loading: • letterhead paper, insert letterhead with the top of the page pointing down, facing you • envelopes, insert them vertically, flap side down with the stamp area in the top left corner To reduce paper jams, do not use envelopes that: -

Setup Guide
Page 28
Load paper 20 . 6 Make sure the paper is under both corner bucklers and lying flat in the tray. Corner bucklers Note: When you load the tray, do not exceed the maximum stack height indicated by the label in the tray. Overfilling the tray may cause paper jams. 7 Slide the paper guides flush against the edges of the paper.
Load paper 20 . 6 Make sure the paper is under both corner bucklers and lying flat in the tray. Corner bucklers Note: When you load the tray, do not exceed the maximum stack height indicated by the label in the tray. Overfilling the tray may cause paper jams. 7 Slide the paper guides flush against the edges of the paper.
Setup Guide
Page 30
... is in the top left corner To reduce paper jams, do not use envelopes that: - • envelopes, insert one envelope vertically, flap side down with the stamp area in the sealed position 5 Slide the paper guides flush against the edges of the paper or envelope. 6 Select the paper size and type from your software application...
... is in the top left corner To reduce paper jams, do not use envelopes that: - • envelopes, insert one envelope vertically, flap side down with the stamp area in the sealed position 5 Slide the paper guides flush against the edges of the paper or envelope. 6 Select the paper size and type from your software application...
Setup Guide
Page 31
Ready/Data Toner Low Load Paper Paper Jam Error Press Continue Continue Cancel 9 When the Load Paper light and the Press Continue light come on, place another piece of media in the manual feed. 10 Press and release Continue to print another page. Load paper 23
Ready/Data Toner Low Load Paper Paper Jam Error Press Continue Continue Cancel 9 When the Load Paper light and the Press Continue light come on, place another piece of media in the manual feed. 10 Press and release Continue to print another page. Load paper 23

Setup Guide
Page 50
... Ways to improve print quality • Information about using the printer operator panel • Instructions for replacing supplies • Solutions to common printing problems • Methods for clearing paper jams • Overview of printer menus • Explanation of full text searching, we have ...a version of Acrobat capable of printer messages Distribute information to help you find the information you have ...
... Ways to improve print quality • Information about using the printer operator panel • Instructions for replacing supplies • Solutions to common printing problems • Methods for clearing paper jams • Overview of printer menus • Explanation of full text searching, we have ...a version of Acrobat capable of printer messages Distribute information to help you find the information you have ...
Setup Guide
Page 52
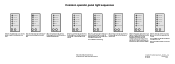
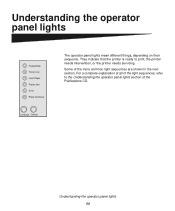
For a complete explanation of all of the light sequences, refer to print, the printer needs intervention, or the printer needs servicing. Some of the Publications CD. Understanding the operator panel lights 44 They indicate that the printer is ready to the Understanding the operator panel lights section of the more common light sequences are shown in the next section. Understanding the operator panel lights Ready/Data Toner Low Load Paper Paper Jam Error Press Continue Continue Cancel The operator panel lights mean different things, depending on their sequence.
For a complete explanation of all of the light sequences, refer to print, the printer needs intervention, or the printer needs servicing. Some of the Publications CD. Understanding the operator panel lights 44 They indicate that the printer is ready to the Understanding the operator panel lights section of the more common light sequences are shown in the next section. Understanding the operator panel lights Ready/Data Toner Low Load Paper Paper Jam Error Press Continue Continue Cancel The operator panel lights mean different things, depending on their sequence.
Setup Guide
Page 54
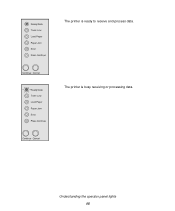
Understanding the operator panel lights 46 Ready/Data Toner Low Load Paper Paper Jam Error Press Continue Continue Cancel Ready/Data Toner Low Load Paper Paper Jam Error Press Continue Continue Cancel The printer is busy receiving or processing data. The printer is ready to receive and process data.
Understanding the operator panel lights 46 Ready/Data Toner Low Load Paper Paper Jam Error Press Continue Continue Cancel Ready/Data Toner Low Load Paper Paper Jam Error Press Continue Continue Cancel The printer is busy receiving or processing data. The printer is ready to receive and process data.
Setup Guide
Page 55
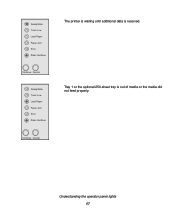
Ready/Data Toner Low Load Paper Paper Jam Error Press Continue Continue Cancel Ready/Data Toner Low Load Paper Paper Jam Error Press Continue Continue Cancel The printer is waiting until additional data is out of media or the media did not feed properly. Understanding the operator panel lights 47 Tray 1 or the optional 250-sheet tray is received.
Ready/Data Toner Low Load Paper Paper Jam Error Press Continue Continue Cancel Ready/Data Toner Low Load Paper Paper Jam Error Press Continue Continue Cancel The printer is waiting until additional data is out of media or the media did not feed properly. Understanding the operator panel lights 47 Tray 1 or the optional 250-sheet tray is received.
Setup Guide
Page 56
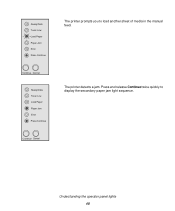
The printer detects a jam. Understanding the operator panel lights 48 Press and release Continue twice quickly to load another sheet of media in the manual feed. Ready/Data Toner Low Load Paper Paper Jam Error Press Continue Continue Cancel Ready/Data Toner Low Load Paper Paper Jam Error Press Continue Continue Cancel The printer prompts you to display the secondary paper jam light sequence.
The printer detects a jam. Understanding the operator panel lights 48 Press and release Continue twice quickly to load another sheet of media in the manual feed. Ready/Data Toner Low Load Paper Paper Jam Error Press Continue Continue Cancel Ready/Data Toner Low Load Paper Paper Jam Error Press Continue Continue Cancel The printer prompts you to display the secondary paper jam light sequence.
Setup Guide
Page 57
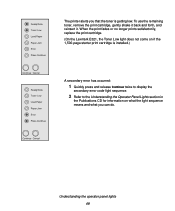
When the print fades or no longer prints satisfactorily, replace the print cartridge. (On the Lexmark E321, the Toner Low light does not come on if the 1,500-page starter print cartridge is installed.) A secondary error has occurred: 1 Quickly press and ... toner, remove the print cartridge, gently shake it back and forth, and reinsert it. Understanding the operator panel lights 49 Ready/Data Toner Low Load Paper Paper Jam Error Press Continue Continue Cancel Ready/Data Toner Low Load Paper Paper Jam Error Press Continue Continue Cancel The printer alerts you can do.
When the print fades or no longer prints satisfactorily, replace the print cartridge. (On the Lexmark E321, the Toner Low light does not come on if the 1,500-page starter print cartridge is installed.) A secondary error has occurred: 1 Quickly press and ... toner, remove the print cartridge, gently shake it back and forth, and reinsert it. Understanding the operator panel lights 49 Ready/Data Toner Low Load Paper Paper Jam Error Press Continue Continue Cancel Ready/Data Toner Low Load Paper Paper Jam Error Press Continue Continue Cancel The printer alerts you can do.
Setup Guide
Page 58
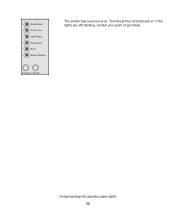
If the lights are still blinking, contact your point of purchase. Turn the printer off and back on. Understanding the operator panel lights 50 Ready/Data Toner Low Load Paper Paper Jam Error Press Continue Continue Cancel The printer has a service error.
If the lights are still blinking, contact your point of purchase. Turn the printer off and back on. Understanding the operator panel lights 50 Ready/Data Toner Low Load Paper Paper Jam Error Press Continue Continue Cancel The printer has a service error.
User's Reference
Page 11
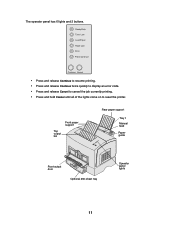
Front paper support Top output bin Rear paper support Tray 1 Manual feed Paper guide Front output door Optional 250-sheet tray Operator panel lights 11 The operator panel has 6 lights and 2 buttons. Ready/Data Toner Low Load Paper Paper Jam Error Press Continue Continue Cancel • Press and release Continue to resume printing. • Press and release Continue twice quickly to display an error code. • Press and release Cancel to cancel the job currently printing. • Press and hold Cancel until all of the lights come on to reset the printer.
Front paper support Top output bin Rear paper support Tray 1 Manual feed Paper guide Front output door Optional 250-sheet tray Operator panel lights 11 The operator panel has 6 lights and 2 buttons. Ready/Data Toner Low Load Paper Paper Jam Error Press Continue Continue Cancel • Press and release Continue to resume printing. • Press and release Continue twice quickly to display an error code. • Press and release Cancel to cancel the job currently printing. • Press and hold Cancel until all of the lights come on to reset the printer.

User's Reference
Page 13
... receive and process data. is ready to load media in tray 1, manual feed, or the optional 250sheet tray (if installed). Ready/Data Toner Low Load Paper Paper Jam Error Press Continue Continue Cancel When the: Ready/Data light is on Ready/Data light is blinking Toner Low light is on Load... Paper light is on Paper Jam light is on Error light is on Press Continue light is on Error light and Press Continue light are both on The printer: is busy receiving or processing data. prompts you that a secondary error occurred...
... receive and process data. is ready to load media in tray 1, manual feed, or the optional 250sheet tray (if installed). Ready/Data Toner Low Load Paper Paper Jam Error Press Continue Continue Cancel When the: Ready/Data light is on Ready/Data light is blinking Toner Low light is on Load... Paper light is on Paper Jam light is on Error light is on Press Continue light is on Error light and Press Continue light are both on The printer: is busy receiving or processing data. prompts you that a secondary error occurred...

User's Reference
Page 17
Follow the instructions from your printer driver to format your driver pop-up menu to print the corresponding back side to print the first side of the document first. Although you want your job prints, the Load Paper light comes on and the Press Continue light blinks. Landscape Portrait ... Back of sheet Front of next sheet Front of the page (left edge for portrait, top edge for landscape). Ready/Data Toner Low Load Paper Paper Jam Error Press Continue Continue Cancel Note: Manual duplex is only available on Windows NT 4.0, Windows 2000, and Windows XP. Long Edge means pages...
Follow the instructions from your printer driver to format your driver pop-up menu to print the corresponding back side to print the first side of the document first. Although you want your job prints, the Load Paper light comes on and the Press Continue light blinks. Landscape Portrait ... Back of sheet Front of next sheet Front of the page (left edge for portrait, top edge for landscape). Ready/Data Toner Low Load Paper Paper Jam Error Press Continue Continue Cancel Note: Manual duplex is only available on Windows NT 4.0, Windows 2000, and Windows XP. Long Edge means pages...

User's Reference
Page 19
...paper jams, do not use labels that : - Contain windows, holes, perforations, cutouts, or embossing - Have excessive curl - Use metal clasps, string ties, or metal folding bars - Are stuck together - Have postage stamps attached - Are damaged in any exposed adhesive when the flap is in .). 19 Have any way - We recommend Lexmark laser printer... transparencies: for A4 size transparencies, part number 12A5010. • Use envelopes made from 24 lb (90 g/m2) bond paper. 3 Paper handling Choosing the right print media Selecting the right paper or...
...paper jams, do not use labels that : - Contain windows, holes, perforations, cutouts, or embossing - Have excessive curl - Use metal clasps, string ties, or metal folding bars - Are stuck together - Have postage stamps attached - Are damaged in any exposed adhesive when the flap is in .). 19 Have any way - We recommend Lexmark laser printer... transparencies: for A4 size transparencies, part number 12A5010. • Use envelopes made from 24 lb (90 g/m2) bond paper. 3 Paper handling Choosing the right print media Selecting the right paper or...

User's Reference
Page 21
The single-sheet front output door provides a straight-through paper path for most print jobs. Paper support Top output bin Paper support Tray 1 Manual feed Front output door Optional 250sheet tray An exit output bin on top of paper, transparency, envelope, label, or index card. Use tray... curling and potential paper jams. To increase paper capacity, you can purchase the optional 250-sheet tray. 21 Use the manual feed for a single piece of the printer holds up to 100 sheets. Printer media sources Your printer has two standard paper sources: an automatic paper feeder (tray 1),...
The single-sheet front output door provides a straight-through paper path for most print jobs. Paper support Top output bin Paper support Tray 1 Manual feed Front output door Optional 250sheet tray An exit output bin on top of paper, transparency, envelope, label, or index card. Use tray... curling and potential paper jams. To increase paper capacity, you can purchase the optional 250-sheet tray. 21 Use the manual feed for a single piece of the printer holds up to 100 sheets. Printer media sources Your printer has two standard paper sources: an automatic paper feeder (tray 1),...


