
User's Guide
Page 2
... technical inaccuracies or typographical errors. You can purchase additional copies of publications related to this product by Lexmark International, Inc. Lexmark, MarkVision and Optra are included in the Technical Reference. and other countries, contact your point of purchase. Other trademarks are...A form for reader's comments is a service mark of this statement may be compatible with RESTRICTED RIGHTS. This printer is a registered trademark of Lexmark International, Inc. If the form has been removed, comments may use or distribute any of the information you ....
... technical inaccuracies or typographical errors. You can purchase additional copies of publications related to this product by Lexmark International, Inc. Lexmark, MarkVision and Optra are included in the Technical Reference. and other countries, contact your point of purchase. Other trademarks are...A form for reader's comments is a service mark of this statement may be compatible with RESTRICTED RIGHTS. This printer is a registered trademark of Lexmark International, Inc. If the form has been removed, comments may use or distribute any of the information you ....
User's Guide
Page 3
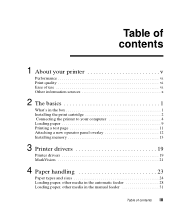
Table of contents 1 About your printer v Performance vi Print quality vi Ease of use vi Other information sources x 2 The basics 1 What's in the box 1 Installing the print cartridge 2 Connecting the printer to your computer 4 Loading paper 9 Printing a test page 11 Attaching a new operator panel overlay 12 Installing memory 13 3 Printer drivers 19 Printer drivers 19 MarkVision 21 4 Paper handling 23 Paper types and sizes 24 Loading paper, other media in the automatic feeder 28 Loading paper, other media in the manual feeder 31 Table of contents iii
Table of contents 1 About your printer v Performance vi Print quality vi Ease of use vi Other information sources x 2 The basics 1 What's in the box 1 Installing the print cartridge 2 Connecting the printer to your computer 4 Loading paper 9 Printing a test page 11 Attaching a new operator panel overlay 12 Installing memory 13 3 Printer drivers 19 Printer drivers 19 MarkVision 21 4 Paper handling 23 Paper types and sizes 24 Loading paper, other media in the automatic feeder 28 Loading paper, other media in the manual feeder 31 Table of contents iii

User's Guide
Page 4
Clearing paper jams 32 5 Troubleshooting 35 Indicator lights 37 6 Supplies 57 Print cartridge maintenance 57 Appendix A: Printer specifications 59 Printer features 59 Printer dimensions 60 Appendix B: Advanced troubleshooting 61 Appendix C: Safety information 73 Appendix D: Notices 79 Glossary X-1 Index X-5 iv Table of contents
Clearing paper jams 32 5 Troubleshooting 35 Indicator lights 37 6 Supplies 57 Print cartridge maintenance 57 Appendix A: Printer specifications 59 Printer features 59 Printer dimensions 60 Appendix B: Advanced troubleshooting 61 Appendix C: Safety information 73 Appendix D: Notices 79 Glossary X-1 Index X-5 iv Table of contents

User's Guide
Page 5
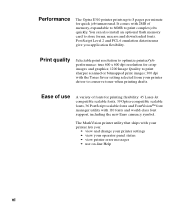
... If you informed of upgrades for your printer and new products as they become available, so be printing in the back of a laser printer with a conveniently small footprint for information on: • installing printer memory options • installing printer drivers • loading paper • ... sequences • maintaining your printer We'd like to keep you have any comments about the printer documentation, use the Reader's Comment Form in no time. v Use this book for a perfect fit. We'd like to hear your printer The Optra E310 printer combines the quality of this ...
... If you informed of upgrades for your printer and new products as they become available, so be printing in the back of a laser printer with a conveniently small footprint for information on: • installing printer memory options • installing printer drivers • loading paper • ... sequences • maintaining your printer We'd like to keep you have any comments about the printer documentation, use the Reader's Comment Form in no time. v Use this book for a perfect fit. We'd like to hear your printer The Optra E310 printer combines the quality of this ...
User's Guide
Page 6
Print quality Selectable print resolution to optimize printer/job performance: true 600 x 600 dpi resolution for printing flexibility: 45 Laser-Jet compatible scalable fonts, 39 Optra-compatible scalable fonts, 36 PostScript scalable fonts and FontVisionTM font manager utility with 2MB of fonts ...on-line Help vi PostScript Level 2 and PCL 6 emulation datastreams give you : • view and change your printer settings • view your printer driver to 8 pages per minute for quick job turnaround. Performance The Optra E310 printer prints up to conserve toner when printing drafts.
Print quality Selectable print resolution to optimize printer/job performance: true 600 x 600 dpi resolution for printing flexibility: 45 Laser-Jet compatible scalable fonts, 39 Optra-compatible scalable fonts, 36 PostScript scalable fonts and FontVisionTM font manager utility with 2MB of fonts ...on-line Help vi PostScript Level 2 and PCL 6 emulation datastreams give you : • view and change your printer settings • view your printer driver to 8 pages per minute for quick job turnaround. Performance The Optra E310 printer prints up to conserve toner when printing drafts.
User's Guide
Page 7
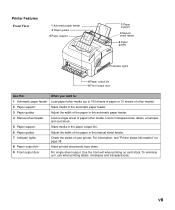
Printer Features Front View 1 Automatic paper feeder 3 Paper guides 5 Paper support 2 Paper support 4 Manual sheet feeder 6 Paper guides 7 Indicator lights 8 Paper output bin 9 Front output door ... the paper output bin. 6 Paper guides Adjust the width of the paper in the automatic paper feeder. 4 Manual sheet feeder Load a single sheet of your printer. To minimize curl, use when printing labels, envelopes and transparencies. vii Use the front exit when printing on page 38. 8 Paper output bin Stack printed...
Printer Features Front View 1 Automatic paper feeder 3 Paper guides 5 Paper support 2 Paper support 4 Manual sheet feeder 6 Paper guides 7 Indicator lights 8 Paper output bin 9 Front output door ... the paper output bin. 6 Paper guides Adjust the width of the paper in the automatic paper feeder. 4 Manual sheet feeder Load a single sheet of your printer. To minimize curl, use when printing labels, envelopes and transparencies. vii Use the front exit when printing on page 38. 8 Paper output bin Stack printed...

User's Guide
Page 8
Rear view 10 Printer cable connector 13 Power switch 11 USB connector 12 Power cord connector Use the: When you want to: 10 Printer cable connector Connect your computer to the printer's parallel port with a parallel interface cable. 11 USB connector Connect your computer to the printer's USB port with a Universal Serial Bus cable. 12 Power cord connector Connect your printer to a properly grounded wall outlet with a power cord. 13 Power switch Turn your printer on or off. viii
Rear view 10 Printer cable connector 13 Power switch 11 USB connector 12 Power cord connector Use the: When you want to: 10 Printer cable connector Connect your computer to the printer's parallel port with a parallel interface cable. 11 USB connector Connect your computer to the printer's USB port with a Universal Serial Bus cable. 12 Power cord connector Connect your printer to a properly grounded wall outlet with a power cord. 13 Power switch Turn your printer on or off. viii
User's Guide
Page 9
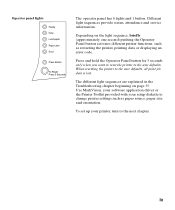
Press and hold the Operator Panel button for 3 seconds only when you want to reset the printer to the user defaults, all print job data is lost. When resetting the printer to the user defaults. Operator panel lights The operator panel has 6 lights and 1 button. Different ... are explained in the Troubleshooting chapter beginning on the light sequence, briefly (approximately one second) pushing the Operator Panel button activates different printer functions, such as paper source, paper size and orientation. To set up your setup diskette to the next chapter. Depending on page...
Press and hold the Operator Panel button for 3 seconds only when you want to reset the printer to the user defaults, all print job data is lost. When resetting the printer to the user defaults. Operator panel lights The operator panel has 6 lights and 1 button. Different ... are explained in the Troubleshooting chapter beginning on the light sequence, briefly (approximately one second) pushing the Operator Panel button activates different printer functions, such as paper source, paper size and orientation. To set up your setup diskette to the next chapter. Depending on page...

User's Guide
Page 10
...documents. The CD includes: • Getting Started with the CD for launching instructions. Once you can purchase a Lexmark Technical Reference. Technical Reference For more information about printer languages and commands, you have launched the CD, click the View On-line Documentation icon to display a list ...of the available documents. Other information sources In addition to this User's Guide, Lexmark offers other sources of information about your printer or about selecting media appropriate for Windows 95, Windows 98 and Windows NT 4.0. It also describes some ...
...documents. The CD includes: • Getting Started with the CD for launching instructions. Once you can purchase a Lexmark Technical Reference. Technical Reference For more information about printer languages and commands, you have launched the CD, click the View On-line Documentation icon to display a list ...of the available documents. Other information sources In addition to this User's Guide, Lexmark offers other sources of information about your printer or about selecting media appropriate for Windows 95, Windows 98 and Windows NT 4.0. It also describes some ...
User's Guide
Page 11
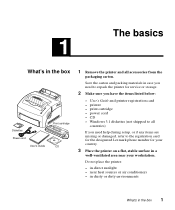
...Lexmark phone number for service or storage. 2 Make sure you need help during setup, or if any items are missing or damaged, refer to all accessories from the packaging carton. The basics 1 What's in the box Diskettes Power cord User's Guide Print cartridge CD 1 Remove the printer... and all countries) If you have the items listed below: - User's Guide and printer registration card - print cartridge - CD - Do not place the printer: - in the box 1 printer - near your workstation. power cord - in dusty or...
...Lexmark phone number for service or storage. 2 Make sure you need help during setup, or if any items are missing or damaged, refer to all accessories from the packaging carton. The basics 1 What's in the box Diskettes Power cord User's Guide Print cartridge CD 1 Remove the printer... and all countries) If you have the items listed below: - User's Guide and printer registration card - print cartridge - CD - Do not place the printer: - in the box 1 printer - near your workstation. power cord - in dusty or...

User's Guide
Page 12
Installing the print cartridge 1 Use the finger tab to pull down the printer cover. 2 Unpack the print cartridge. 3 Holding the cartridge level, pull out the sealing tape. 2 Chapter 1: The basics
Installing the print cartridge 1 Use the finger tab to pull down the printer cover. 2 Unpack the print cartridge. 3 Holding the cartridge level, pull out the sealing tape. 2 Chapter 1: The basics
User's Guide
Page 14
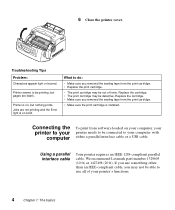
...the Error light is on your computer, your printer needs to be connected to be printing, but nothing prints. Using a parallel interface cable Your printer requires an IEEE-1284 compliant parallel cable. Connecting the printer to your computer To print from the print... computer with either a parallel interface cable or a USB cable. Printer seems to your printer's functions. 4 Chapter 1: The basics We recommend Lexmark part number 1329605 (10 ft) or 1427498 (20 ft). 6 Close the printer cover. Troubleshooting Tips Problem: Characters appear light or blurred. Replace ...
...the Error light is on your computer, your printer needs to be connected to be printing, but nothing prints. Using a parallel interface cable Your printer requires an IEEE-1284 compliant parallel cable. Connecting the printer to your computer To print from the print... computer with either a parallel interface cable or a USB cable. Printer seems to your printer's functions. 4 Chapter 1: The basics We recommend Lexmark part number 1329605 (10 ft) or 1427498 (20 ft). 6 Close the printer cover. Troubleshooting Tips Problem: Characters appear light or blurred. Replace ...

User's Guide
Page 15
Connecting the printer to your computer 5 1 Make sure your printer is turned off. 2 Plug the parallel interface cable into the connector on the back of the printer. 3 Push the metal clips toward the plug until they snap in the notches on the plug. 4 Attach the other end of the parallel cable to your computer. 5 Turn on the printer.
Connecting the printer to your computer 5 1 Make sure your printer is turned off. 2 Plug the parallel interface cable into the connector on the back of the printer. 3 Push the metal clips toward the plug until they snap in the notches on the plug. 4 Attach the other end of the parallel cable to your computer. 5 Turn on the printer.
User's Guide
Page 16
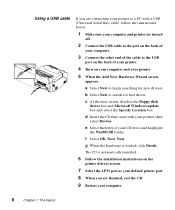
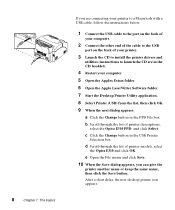
... folder. d Insert the CD that came with a USB (Universal Serial Bus) cable, follow the instructions below. 1 Make sure your computer and printer are turned off. 2 Connect the USB cable to the port on the back of your computer. 3 Connect the other end of the cable to...back of your computer. 6 Chapter 1: The basics g When the hardware is automatically launched. 6 Follow the installation instructions on your computer and your printer, then select Browse. c At the next screen, deselect the floppy disk drives box and Microsoft Windows update box and select the Specify Location box....
... folder. d Insert the CD that came with a USB (Universal Serial Bus) cable, follow the instructions below. 1 Make sure your computer and printer are turned off. 2 Connect the USB cable to the port on the back of your computer. 3 Connect the other end of the cable to...back of your computer. 6 Chapter 1: The basics g When the hardware is automatically launched. 6 Follow the installation instructions on your computer and your printer, then select Browse. c At the next screen, deselect the floppy disk drives box and Microsoft Windows update box and select the Specify Location box....

User's Guide
Page 17
10 To select the USB port, choose Settings, then choose Printers from the Start menu. 11 From the Printers folder, highlight the Optra E310 icon. 12 Open the File menu and click Properties. 13 Select the Details tab. 14 In the Print to your computer 7 Connecting the printer to the following port box, select USB port USB001 (Lexmark USB port). 15 Click OK.
10 To select the USB port, choose Settings, then choose Printers from the Start menu. 11 From the Printers folder, highlight the Optra E310 icon. 12 Open the File menu and click Properties. 13 Select the Details tab. 14 In the Print to your computer 7 Connecting the printer to the following port box, select USB port USB001 (Lexmark USB port). 15 Click OK.
User's Guide
Page 18
... the next dialog appears: a Click the Change button in the USB Printer Selection box. d Scroll through the list of printer models, select the Optra E310 and click OK. After a short delay, the new desktop printer icon appears. b Scroll through the list of printer descriptions, select the Optra E310 PPD, and click Select. 8 Chapter 1: The basics If you can...
... the next dialog appears: a Click the Change button in the USB Printer Selection box. d Scroll through the list of printer models, select the Optra E310 and click OK. After a short delay, the new desktop printer icon appears. b Scroll through the list of printer descriptions, select the Optra E310 PPD, and click Select. 8 Chapter 1: The basics If you can...

User's Guide
Page 19
...which holds 1 sheet at the back of the printer. • If you want to the USB port, but the printer will not print. You are missing. 11 Quit the Desktop Printer Utility application. 12 Select the new desktop printer icon. Loading paper Automatic paper feeder Manual paper... to loosen them, then fan them. Troubleshooting Tips Problem: Unexpected characters print or characters are connected to use this printer as your default printer, select Set Default Printer from the automatic paper feeder, extend the paper support. 2 Before loading paper, flex the sheets back and forth to...
...which holds 1 sheet at the back of the printer. • If you want to the USB port, but the printer will not print. You are missing. 11 Quit the Desktop Printer Utility application. 12 Select the new desktop printer icon. Loading paper Automatic paper feeder Manual paper... to loosen them, then fan them. Troubleshooting Tips Problem: Unexpected characters print or characters are connected to use this printer as your default printer, select Set Default Printer from the automatic paper feeder, extend the paper support. 2 Before loading paper, flex the sheets back and forth to...

User's Guide
Page 21
... sure the paper is working correctly, print a test page. Paper fails to 150 sheets, depending on the thickness of the paper. Paper sticks together/printer feeds multiple sheets of the page. The automatic paper feeder holds up to feed from the automatic • Remove the paper from the paper feeder... and fan the paper. • Make sure there isn't too much paper in the paper feeder. Printing a test page To check that your printer is straight and unwrinkled. back of paper. • Remove the paper from the paper feeder and fan the paper. Printing a test page 11
... sure the paper is working correctly, print a test page. Paper fails to 150 sheets, depending on the thickness of the paper. Paper sticks together/printer feeds multiple sheets of the page. The automatic paper feeder holds up to feed from the automatic • Remove the paper from the paper feeder... and fan the paper. • Make sure there isn't too much paper in the paper feeder. Printing a test page To check that your printer is straight and unwrinkled. back of paper. • Remove the paper from the paper feeder and fan the paper. Printing a test page 11

User's Guide
Page 22
...-English overlay sheet in at the wall outlet. If it over the overlay currently on your printer. 12 Chapter 1: The basics A test page listing your printer box and wish to do not come on when the printer is turned on. If this does not happen, see "Printing problems" on page 36. 4 ...When the Data light stops blinking and Ready is firmly plugged in your printer model and default settings should print out. Troubleshooting Tips Problem: The operator panel lights do : • Make sure the power cord is the only light...
...-English overlay sheet in at the wall outlet. If it over the overlay currently on your printer. 12 Chapter 1: The basics A test page listing your printer box and wish to do not come on when the printer is turned on. If this does not happen, see "Printing problems" on page 36. 4 ...When the Data light stops blinking and Ready is firmly plugged in your printer model and default settings should print out. Troubleshooting Tips Problem: The operator panel lights do : • Make sure the power cord is the only light...

User's Guide
Page 23
...Chapter 2 for storing downloaded fonts or macros. Installing memory 13 Removing the system board shield Before installing any of printer memory. Refer to the booklet that came with 2MB of printer memory. You can buy and install a 4MB, 8MB, 16MB, 32MB or 64MB optional memory card for installation instructions... to the next section. You can also install a 1MB, 2MB or 4MB optional flash memory card for more information about the printer utilities and drivers. Installing memory To install a memory card or a flash memory card, go on to remove the metal shield covering the...
...Chapter 2 for storing downloaded fonts or macros. Installing memory 13 Removing the system board shield Before installing any of printer memory. Refer to the booklet that came with 2MB of printer memory. You can buy and install a 4MB, 8MB, 16MB, 32MB or 64MB optional memory card for installation instructions... to the next section. You can also install a 1MB, 2MB or 4MB optional flash memory card for more information about the printer utilities and drivers. Installing memory To install a memory card or a flash memory card, go on to remove the metal shield covering the...


