

Quick Reference
Page 5
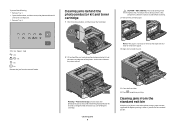
...lights and access locations The following : • Remove Tray 1. • Open the front door, and then remove the photoconductor kit and toner cartridge unit. 201.yy Paper jam - More detailed instructions follow. On - Accessing jam areas Open doors and remove trays to come on the virtual ...removed: Load paper - On - On - Inside this door is printing. On Open the front door, and then remove the photoconductor kit and toner cartridge unit. Make sure the stack height does not exceed the indicated maximum height. • Do not load wrinkled, creased, damp, or curled paper. ...
...lights and access locations The following : • Remove Tray 1. • Open the front door, and then remove the photoconductor kit and toner cartridge unit. 201.yy Paper jam - More detailed instructions follow. On - Accessing jam areas Open doors and remove trays to come on the virtual ...removed: Load paper - On - On - Inside this door is printing. On Open the front door, and then remove the photoconductor kit and toner cartridge unit. Make sure the stack height does not exceed the indicated maximum height. • Do not load wrinkled, creased, damp, or curled paper. ...
Quick Reference
Page 7
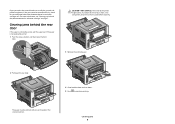
...On - On - Warning-Potential Damage: Do not touch the photoconductor on a flat, clean surface. Clearing jams behind the photoconductor kit and toner cartridge 1 Push the release button, and then lower the front door. CAUTION-HOT SURFACE: The inside of the following: • Remove Tray 1.... • Open the front door, and then remove the photoconductor kit and toner cartridge unit. • Remove Tray 2. Use the cartridge handle whenever you are holding the cartridge. Clearing jams from the manual feeder. 2 Lift and pull the unit containing the photoconductor kit and...
...On - On - Warning-Potential Damage: Do not touch the photoconductor on a flat, clean surface. Clearing jams behind the photoconductor kit and toner cartridge 1 Push the release button, and then lower the front door. CAUTION-HOT SURFACE: The inside of the following: • Remove Tray 1.... • Open the front door, and then remove the photoconductor kit and toner cartridge unit. • Remove Tray 2. Use the cartridge handle whenever you are holding the cartridge. Clearing jams from the manual feeder. 2 Lift and pull the unit containing the photoconductor kit and...
Quick Reference
Page 9
Clearing jams behind the photoconductor kit and toner cartridge" on page 7. Clearing jams 9 Paper jammed in the standard exit bin. For more information, see "Clearing jams behind the rear door If the paper is ... pulled straight out. To reduce the risk of the printer might be removed this way, check for jammed paper behind the photoconductor kit and toner cartridge unit.
Clearing jams behind the photoconductor kit and toner cartridge" on page 7. Clearing jams 9 Paper jammed in the standard exit bin. For more information, see "Clearing jams behind the rear door If the paper is ... pulled straight out. To reduce the risk of the printer might be removed this way, check for jammed paper behind the photoconductor kit and toner cartridge unit.
Maintenance Guide
Page 2
Contents Maintaining the printer 3 Cleaning the exterior of the printer...3 Storing supplies...3 Conserving supplies...3 Checking the status of supplies...4 Checking the status of supplies from a network computer 4 Ordering supplies...5 Ordering toner cartridges ...5 Ordering a photoconductor kit ...5 Replacing supplies...6 Replacing the toner cartridge ...6 Replacing the photoconductor kit ...8 Recycling Lexmark products...11 Moving the printer...11 Before moving the printer ...11 Moving the printer to another location...11 Shipping the printer ...11 Contents 2
Contents Maintaining the printer 3 Cleaning the exterior of the printer...3 Storing supplies...3 Conserving supplies...3 Checking the status of supplies...4 Checking the status of supplies from a network computer 4 Ordering supplies...5 Ordering toner cartridges ...5 Ordering a photoconductor kit ...5 Replacing supplies...6 Replacing the toner cartridge ...6 Replacing the photoconductor kit ...8 Recycling Lexmark products...11 Moving the printer...11 Before moving the printer ...11 Moving the printer to another location...11 Shipping the printer ...11 Contents 2

Maintenance Guide
Page 5
... printer issues a message or a light sequence to redistribute toner. 3 Reinsert the cartridge and continue printing. Maintaining the printer 5 Part name Regular cartridge Lexmark Return Program Cartridge For the US and Canada Toner cartridge E260A21A E260A11A For Europe, the Middle East, and Africa Toner cartridge E260A21E E260A11E For the Asia Pacific Region, including Australia, New Zealand, and...
... printer issues a message or a light sequence to redistribute toner. 3 Reinsert the cartridge and continue printing. Maintaining the printer 5 Part name Regular cartridge Lexmark Return Program Cartridge For the US and Canada Toner cartridge E260A21A E260A11A For Europe, the Middle East, and Africa Toner cartridge E260A21E E260A11E For the Asia Pacific Region, including Australia, New Zealand, and...

Maintenance Guide
Page 6
...sequence Toner is low Part number E260X22G • ‑ On • ‑ On When the "Toner is left in your cartridge by pressing the button on the left side of the printer and lowering the door. Note: You can check to redistribute the toner,...how much toner is low" light sequence appears, or when you experience faded print, remove the toner cartridge. When shaking the cartridge no longer improves the print quality, replace the toner cartridge. To replace the toner cartridge: 1 Open the front door by printing a menu settings page. Maintaining the printer 6 Firmly shake ...
...sequence Toner is low Part number E260X22G • ‑ On • ‑ On When the "Toner is left in your cartridge by pressing the button on the left side of the printer and lowering the door. Note: You can check to redistribute the toner,...how much toner is low" light sequence appears, or when you experience faded print, remove the toner cartridge. When shaking the cartridge no longer improves the print quality, replace the toner cartridge. To replace the toner cartridge: 1 Open the front door by printing a menu settings page. Maintaining the printer 6 Firmly shake ...
Maintenance Guide
Page 7
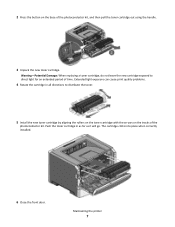
... on the base of the photoconductor kit, and then pull the toner cartridge out using the handle. 3 Unpack the new toner cartridge. Extended light exposure can cause print quality problems. 4 Rotate the cartridge in as far as it will go. The cartridge clicks into place when correctly installed. 6 Close the front door. 2 Press the...
... on the base of the photoconductor kit, and then pull the toner cartridge out using the handle. 3 Unpack the new toner cartridge. Extended light exposure can cause print quality problems. 4 Rotate the cartridge in as far as it will go. The cartridge clicks into place when correctly installed. 6 Close the front door. 2 Press the...

Maintenance Guide
Page 9
... and out using the handle. 4 Unpack the new photoconductor kit. Note: The photoconductor kit and toner cartridge form a unit. Place the unit on a flat, clean surface. 3 Press the button on the toner cartridge handle. Warning-Potential Damage: Be careful not to touch the photoconductor drum. Doing so may affect the print quality... the front door by pressing the button on the left side of the printer and lowering the front door. 2 Pull the photoconductor kit and toner cartridge together as a unit out of the printer by pulling on the base of future print jobs.
... and out using the handle. 4 Unpack the new photoconductor kit. Note: The photoconductor kit and toner cartridge form a unit. Place the unit on a flat, clean surface. 3 Press the button on the toner cartridge handle. Warning-Potential Damage: Be careful not to touch the photoconductor drum. Doing so may affect the print quality... the front door by pressing the button on the left side of the printer and lowering the front door. 2 Pull the photoconductor kit and toner cartridge together as a unit out of the printer by pulling on the base of future print jobs.

Maintenance Guide
Page 10
... the photoconductor counter without replacing the photoconductor kit may damage your printer and void your warranty. 8 Close the front door. Push the toner cartridge in until it will go. 7 After you replace the photoconductor kit, reset the photoconductor counter. To reset the counter, see the instruction ... as it clicks into place. 6 Install the unit into the photoconductor kit by aligning the arrows on the toner cartridge with the tracks. 5 Insert the toner cartridge into the printer by aligning the rollers on the guides of the unit with the arrows in the printer. Maintaining...
... the photoconductor counter without replacing the photoconductor kit may damage your printer and void your warranty. 8 Close the front door. Push the toner cartridge in until it will go. 7 After you replace the photoconductor kit, reset the photoconductor counter. To reset the counter, see the instruction ... as it clicks into place. 6 Install the unit into the photoconductor kit by aligning the arrows on the toner cartridge with the tracks. 5 Insert the toner cartridge into the printer by aligning the rollers on the guides of the unit with the arrows in the printer. Maintaining...

User Guide
Page 2
......26 Using recycled paper and other office papers 26 Conserving supplies ...26 Saving energy...27 Adjusting Power Saver ...27 Recycling...27 Recycling Lexmark products ...28 Recycling Lexmark packaging...28 Returning Lexmark cartridges for the printer...10 Printer configurations...11 Understanding the printer control panel 14 Additional printer setup 16 Installing internal options...16 Available...
......26 Using recycled paper and other office papers 26 Conserving supplies ...26 Saving energy...27 Adjusting Power Saver ...27 Recycling...27 Recycling Lexmark products ...28 Recycling Lexmark packaging...28 Returning Lexmark cartridges for the printer...10 Printer configurations...11 Understanding the printer control panel 14 Additional printer setup 16 Installing internal options...16 Available...

User Guide
Page 4
... Checking the status of supplies...84 Checking the status of supplies from a network computer 84 Ordering supplies...85 Ordering toner cartridges ...85 Ordering a photoconductor kit ...86 Replacing supplies...86 Replacing the toner cartridge ...86 Replacing the photoconductor kit ...88 Moving the printer...91 Before moving the printer ...91 Moving the printer to...
... Checking the status of supplies...84 Checking the status of supplies from a network computer 84 Ordering supplies...85 Ordering toner cartridges ...85 Ordering a photoconductor kit ...86 Replacing supplies...86 Replacing the toner cartridge ...86 Replacing the photoconductor kit ...88 Moving the printer...91 Before moving the printer ...91 Moving the printer to...
User Guide
Page 5
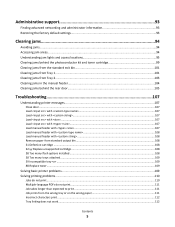
Administrative support 93 Finding advanced networking and administrator information 93 Restoring the factory default settings...93 Clearing jams 94 Avoiding jams...94 Accessing jam areas...94 Understanding jam lights and access locations 95 Clearing jams behind the photoconductor kit and toner cartridge 99 Clearing jams from the standard exit bin 101 Clearing jams from Tray 1...101 Clearing jams from Tray 2...103 Clearing jams in the manual feeder...104 Clearing jams behind the rear door...105 Troubleshooting 107 Understanding printer messages...107 Close door ...107 Load with
Administrative support 93 Finding advanced networking and administrator information 93 Restoring the factory default settings...93 Clearing jams 94 Avoiding jams...94 Accessing jam areas...94 Understanding jam lights and access locations 95 Clearing jams behind the photoconductor kit and toner cartridge 99 Clearing jams from the standard exit bin 101 Clearing jams from Tray 1...101 Clearing jams from Tray 2...103 Clearing jams in the manual feeder...104 Clearing jams behind the rear door...105 Troubleshooting 107 Understanding printer messages...107 Close door ...107 Load with

User Guide
Page 28
... demanufactured for reuse or recycling, follow the instructions that there is recyclable where foam recycling facilities exist. When you return a cartridge to return the cartridges are transported in your area. To return Lexmark cartridges for recycling. Facilities may not exist in the most efficient and environmentally sensitive manner and that came in your area...
... demanufactured for reuse or recycling, follow the instructions that there is recyclable where foam recycling facilities exist. When you return a cartridge to return the cartridges are transported in your area. To return Lexmark cartridges for recycling. Facilities may not exist in the most efficient and environmentally sensitive manner and that came in your area...
User Guide
Page 33
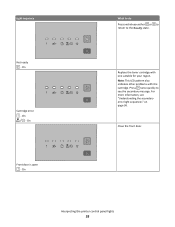
For more information, see the secondary message. Press twice quickly to the Ready state. Interpreting the printer control panel lights 33 On Cartridge error - On Front door is open - Close the front door. Replace the toner cartridge with the cartridge. Note: This LED pattern also indicates other problems with one suitable for your region. On What to do Press and release either or to return to see "Understanding the secondary error light sequences" on page 36. On - Light sequence Not ready -
For more information, see the secondary message. Press twice quickly to the Ready state. Interpreting the printer control panel lights 33 On Cartridge error - On Front door is open - Close the front door. Replace the toner cartridge with the cartridge. Note: This LED pattern also indicates other problems with one suitable for your region. On What to do Press and release either or to return to see "Understanding the secondary error light sequences" on page 36. On - Light sequence Not ready -

User Guide
Page 35
... quickly to clear the light sequence and continue processing the print job. • Replace the photoconductor kit. PC Kit life warning - Light sequence Cartridge is a secondary error code or secondary jam code to read: Light sequence What to do • Press and release to clear the light sequence... and continue processing the print job. • With the printer turned off, remove the toner cartridge and shake it to extend its life. • Replace the toner cartridge, and then turn the printer on. • Press and release to see the secondary error code.
... quickly to clear the light sequence and continue processing the print job. • Replace the photoconductor kit. PC Kit life warning - Light sequence Cartridge is a secondary error code or secondary jam code to read: Light sequence What to do • Press and release to clear the light sequence... and continue processing the print job. • With the printer turned off, remove the toner cartridge and shake it to extend its life. • Replace the toner cartridge, and then turn the printer on. • Press and release to see the secondary error code.

User Guide
Page 38
... to clear the code and continue the print job. Blinking - On Interpreting the printer control panel lights 38 For more information, see "Replacing the toner cartridge" on page 86. Host interface disabled - On - On - Blinking - Blinking - Light sequences What you loaded is small - The printer discards any paper jam. • Press...
... to clear the code and continue the print job. Blinking - On Interpreting the printer control panel lights 38 For more information, see "Replacing the toner cartridge" on page 86. Host interface disabled - On - On - Blinking - Blinking - Light sequences What you loaded is small - The printer discards any paper jam. • Press...

User Guide
Page 39
For more information, see "Replacing the toner cartridge" on page 86. For more information, see "Replacing the toner cartridge" on page 86. Remove the toner cartridge and replace it with a supported toner cartridge. Interpreting the printer control panel lights 39 Blinking - On - On - On Cartridge part number not supported by device - On - On What you can do Replace the toner cartridge. Light sequences Replace missing or defective cartridge -
For more information, see "Replacing the toner cartridge" on page 86. For more information, see "Replacing the toner cartridge" on page 86. Remove the toner cartridge and replace it with a supported toner cartridge. Interpreting the printer control panel lights 39 Blinking - On - On - On Cartridge part number not supported by device - On - On What you can do Replace the toner cartridge. Light sequences Replace missing or defective cartridge -

User Guide
Page 61
...• If zone coating of its variable characteristics, such as moisture content, thickness, and texture, can be printed at http://support.lexmark.com. Note: Labels can significantly impact print quality. Zone coating of the envelopes. Tips on labels: • Use labels designed ...for use labels with slick backing material. • Use full label sheets. Adhesive material contaminates the printer and could void the printer and cartridge warranties. • Do not use a non-oozing adhesive. • Portrait orientation works best, especially when printing bar codes. Note:...
...• If zone coating of its variable characteristics, such as moisture content, thickness, and texture, can be printed at http://support.lexmark.com. Note: Labels can significantly impact print quality. Zone coating of the envelopes. Tips on labels: • Use labels designed ...for use labels with slick backing material. • Use full label sheets. Adhesive material contaminates the printer and could void the printer and cartridge warranties. • Do not use a non-oozing adhesive. • Portrait orientation works best, especially when printing bar codes. Note:...
User Guide
Page 63
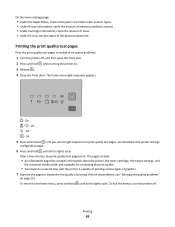
...cycle. If there are listed under Custom Types. • Under Device Information, verify the amount of memory installed is correct . • Under Cartridge Information, check the amount of toner. • Under PC Unit, see the light sequence for evaluating the print quality • Two pages to... On - The home menu light sequence appears. - The pages include: • An information page that contains information about the printer, the toner cartridge, the margin settings, and the minimum stroke width, and a graphic for print quality test pages, as indicated on page 115. To exit the ...
...cycle. If there are listed under Custom Types. • Under Device Information, verify the amount of memory installed is correct . • Under Cartridge Information, check the amount of toner. • Under PC Unit, see the light sequence for evaluating the print quality • Two pages to... On - The home menu light sequence appears. - The pages include: • An information page that contains information about the printer, the toner cartridge, the margin settings, and the minimum stroke width, and a graphic for print quality test pages, as indicated on page 115. To exit the ...
User Guide
Page 75
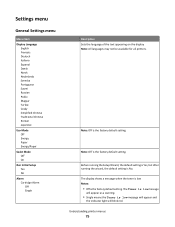
... Turkce Cesky Simplified Chinese Traditional Chinese Korean Japanese Eco-Mode Off Energy Paper Energy/Paper Quiet Mode Off On Run Initial Setup Yes No Alarm Cartridge Alarm Off Single Description Sets the language of the text appearing on the display Note: All languages may not be available for all printers. Before...
... Turkce Cesky Simplified Chinese Traditional Chinese Korean Japanese Eco-Mode Off Energy Paper Energy/Paper Quiet Mode Off On Run Initial Setup Yes No Alarm Cartridge Alarm Off Single Description Sets the language of the text appearing on the display Note: All languages may not be available for all printers. Before...


