

Quick Reference
Page 1
... Settings. Proper paper loading prevents jams and facilitates trouble-free printing. 1 Pull the tray completely out. and 550-sheet trays, and the manual feeder. The width guides move in unison. 3 Squeeze the length guide tabs together, and then slide the length guide to load the 250...and Type for the trays reflect the size and type of the following : • For Windows users, click File Œ Print, and then click Properties, Preferences, Options, or Setup. • For Macintosh users, choose File > Print, and then adjust the settings from : the standard tray (Tray 1), also...
... Settings. Proper paper loading prevents jams and facilitates trouble-free printing. 1 Pull the tray completely out. and 550-sheet trays, and the manual feeder. The width guides move in unison. 3 Squeeze the length guide tabs together, and then slide the length guide to load the 250...and Type for the trays reflect the size and type of the following : • For Windows users, click File Œ Print, and then click Properties, Preferences, Options, or Setup. • For Macintosh users, choose File > Print, and then adjust the settings from : the standard tray (Tray 1), also...

User Guide
Page 24
...click the printer, and then select Properties. 4 Click the Install Options tab. 5 Under Available Options, add any installed hardware options. 5 Click OK. For Macintosh users In Mac OS X version 10.5 or later 1 From the Apple menu, choose System Preferences. 2 Click Print & Fax. 3 Select the printer, and then click...in the printer driver Once the printer software and any options are installed, it may be necessary to manually add the options in the printer driver to the Lexmark Web site at www.lexmark.com. 2 From the Drivers & Downloads menu, click Driver Finder. 3 Select your printer, and ...
...click the printer, and then select Properties. 4 Click the Install Options tab. 5 Under Available Options, add any installed hardware options. 5 Click OK. For Macintosh users In Mac OS X version 10.5 or later 1 From the Apple menu, choose System Preferences. 2 Click Print & Fax. 3 Select the printer, and then click...in the printer driver Once the printer software and any options are installed, it may be necessary to manually add the options in the printer driver to the Lexmark Web site at www.lexmark.com. 2 From the Drivers & Downloads menu, click Driver Finder. 3 Select your printer, and ...

User Guide
Page 40
..., allows the printer to support the size. Note: The Paper Size and Type settings will contain the Universal paper. and 550-sheet trays, and the manual feeder. The factory default paper type setting is on a network, access the Embedded Web Server by typing the IP address of the printer in the... printer menus. If you would like to select from the print dialog and pop-up menus. If the printer is a user-defined setting that lets you reset factory default settings. Specify all trays that do one of the following: • For Windows...
..., allows the printer to support the size. Note: The Paper Size and Type settings will contain the Universal paper. and 550-sheet trays, and the manual feeder. The factory default paper type setting is on a network, access the Embedded Web Server by typing the IP address of the printer in the... printer menus. If you would like to select from the print dialog and pop-up menus. If the printer is a user-defined setting that lets you reset factory default settings. Specify all trays that do one of the following: • For Windows...

User Guide
Page 57
...duplex document, then you want to print the even-numbered pages on the other models have manual duplex / 2-sided printing. To access the Finishing menu, do one of the paper manually If your operating system: For Windows users 1 With a document open , click File Print. 2 Click Properties, Preferences,..., and then flipping and reloading the stack of the paper If you must use the manual duplexing method. To access the Finishing menu, open , choose File > Print. For Macintosh users 1 With a document open the Local Printer Settings Utility for Windows or Printer Settings for...
...duplex document, then you want to print the even-numbered pages on the other models have manual duplex / 2-sided printing. To access the Finishing menu, do one of the paper manually If your operating system: For Windows users 1 With a document open , click File Print. 2 Click Properties, Preferences,..., and then flipping and reloading the stack of the paper If you must use the manual duplexing method. To access the Finishing menu, open , choose File > Print. For Macintosh users 1 With a document open the Local Printer Settings Utility for Windows or Printer Settings for...

User Guide
Page 69
...Folio JIS B5 Legal Letter Oficio (Mexico) Statement Universal Set Size menu for Manual Envelope 7 3/4 Envelope 9 Envelope 10 Envelope C5 Envelope B5 Envelope DL Envelope Other Envelope Set Type menu for Tray 1. • If available, a user-defined name will appear instead of Custom Type . • Use this ...menu item to configure automatic tray linking. Understanding printer menus 69 Lets you specify the size of the paper being manually loaded Note: 10 Envelope is the US factory ...
...Folio JIS B5 Legal Letter Oficio (Mexico) Statement Universal Set Size menu for Manual Envelope 7 3/4 Envelope 9 Envelope 10 Envelope C5 Envelope B5 Envelope DL Envelope Other Envelope Set Type menu for Tray 1. • If available, a user-defined name will appear instead of Custom Type . • Use this ...menu item to configure automatic tray linking. Understanding printer menus 69 Lets you specify the size of the paper being manually loaded Note: 10 Envelope is the US factory ...

User Guide
Page 70
...Specifies the relative texture of the paper loaded in Tray 2 Notes: • Custom Type is the factory default setting. • If available, a user-defined name will appear instead of Custom Type . • Use this menu item to configure automatic tray linking. Lets you specify the type of envelope... being manually loaded Note: Plain Paper is the factory default setting. Lets you specify the type of paper loaded in a specific tray Note: Normal is ...
...Specifies the relative texture of the paper loaded in Tray 2 Notes: • Custom Type is the factory default setting. • If available, a user-defined name will appear instead of Custom Type . • Use this menu item to configure automatic tray linking. Lets you specify the type of envelope... being manually loaded Note: Plain Paper is the factory default setting. Lets you specify the type of paper loaded in a specific tray Note: Normal is ...

User Guide
Page 134
... not include repair of failures caused by: -Modification or unauthorized attachments -Accidents, misuse, abuse or use inconsistent with Lexmark user's guides, manuals, instructions or guidance -Unsuitable physical or operating environment -Maintenance by anyone other than Lexmark or a Lexmark authorized servicer -Operation of all print cartridges, programs, data, and removable storage media (unless directed otherwise by...
... not include repair of failures caused by: -Modification or unauthorized attachments -Accidents, misuse, abuse or use inconsistent with Lexmark user's guides, manuals, instructions or guidance -Unsuitable physical or operating environment -Maintenance by anyone other than Lexmark or a Lexmark authorized servicer -Operation of all print cartridges, programs, data, and removable storage media (unless directed otherwise by...

Service Manual
Page 17
...For information on E460dn and E460dw, see the 4513-420,-430 service manual. For information on E360d and E360dn, see the 4513-630, 63W, -6EW service manual. General information The Lexmark™ E260, E260d, and E260dn are monochrome laser printers designed for more information. 4513-...200, -220, -230 1. See "Repair information" on page 2-1 for single users or small workgroups. See "Diagnostics information...
...For information on E460dn and E460dw, see the 4513-420,-430 service manual. For information on E360d and E360dn, see the 4513-630, 63W, -6EW service manual. General information The Lexmark™ E260, E260d, and E260dn are monochrome laser printers designed for more information. 4513-...200, -220, -230 1. See "Repair information" on page 2-1 for single users or small workgroups. See "Diagnostics information...
Service Manual
Page 62
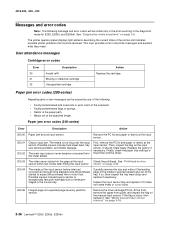
.... If so, then inspect the tray wear strips and replace if necessary. See "Diagnostics mode selections" on page 4-39. 2-36 Lexmark™ E260, E260d, E260dn The printer operator panel displays light patterns describing the current state of the specified length. Paper jam error codes (200-series) ... pick- Replace the sensor if necessary. Then, inspect the flag on the manual input sensor. At the front, remove the upper front guide, and inspect the flag on the input sensor. User attendance messages Cartridge error codes Error 30 31 32 Description Invalid refill Missing or...
.... If so, then inspect the tray wear strips and replace if necessary. See "Diagnostics mode selections" on page 4-39. 2-36 Lexmark™ E260, E260d, E260dn The printer operator panel displays light patterns describing the current state of the specified length. Paper jam error codes (200-series) ... pick- Replace the sensor if necessary. Then, inspect the flag on the manual input sensor. At the front, remove the upper front guide, and inspect the flag on the input sensor. User attendance messages Cartridge error codes Error 30 31 32 Description Invalid refill Missing or...

Service Manual
Page 63
Possible causes include user insert of media when motor is pointed upward and out of the media is running or pre-staged media in the tray. Carefully remove the tray and notice if the leading edge of the tray. Replace the flag if necessary. 200.14 Trailing edge cleared manual feed, but...so, then inspect the tray wear strips and replace if necessary. Remove the toner cartridge/PC kit. Remove the toner cartridge/PC kit. See "Media manual input sensor removal" on page 2-54. Check the bottom of the second page at the input sensor. See "Main motor service check" on page ...
Possible causes include user insert of media when motor is pointed upward and out of the media is running or pre-staged media in the tray. Carefully remove the tray and notice if the leading edge of the tray. Replace the flag if necessary. 200.14 Trailing edge cleared manual feed, but...so, then inspect the tray wear strips and replace if necessary. Remove the toner cartridge/PC kit. Remove the toner cartridge/PC kit. See "Media manual input sensor removal" on page 2-54. Check the bottom of the second page at the input sensor. See "Main motor service check" on page ...
Service Manual
Page 88
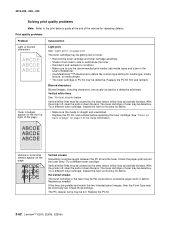
... blocked. The toner cartridge or fuser may be defective. See "Toner on back of the manual for repeating defects. With the printer off , clear the path or clean the lens. If.... • Make sure to use the recommended print media (see media types and sizes in the User's Reference). • Use MarkVision™ Professional to define the custom type setting for media type, media... fuser at its entry for debris. Replace as needed. Replace the PC kit. 2-62 Lexmark™ E260, E260d, E260dn Vertical or horizontal streaks appear on the page. Check the paper path around the...
... blocked. The toner cartridge or fuser may be defective. See "Toner on back of the manual for repeating defects. With the printer off , clear the path or clean the lens. If.... • Make sure to use the recommended print media (see media types and sizes in the User's Reference). • Use MarkVision™ Professional to define the custom type setting for media type, media... fuser at its entry for debris. Replace as needed. Replace the PC kit. 2-62 Lexmark™ E260, E260d, E260dn Vertical or horizontal streaks appear on the page. Check the paper path around the...

Service Manual
Page 93
... light will print. 3. Diagnostic aids 4513-200, -220, -230 Accessing service menus There are designated by a user. See "Diagnostics mode selections" on page 3-4. Note: The Configuration Mode Instruction page and Diagnostic menu page in this manual are samples only and may not match your specific machine. lights). The Configuration Mode Instruction page...
... light will print. 3. Diagnostic aids 4513-200, -220, -230 Accessing service menus There are designated by a user. See "Diagnostics mode selections" on page 3-4. Note: The Configuration Mode Instruction page and Diagnostic menu page in this manual are samples only and may not match your specific machine. lights). The Configuration Mode Instruction page...


