
Maintenance Guide
Page 8
... warning ‑ Blinking ‑ On Replace photoconductor ‑ Blinking ‑ Blinking ‑ On When you first receive either light sequence, you when the photoconductor kit reaches a page maximum. Note: The photoconductor kit is one item only. The printer does this by displaying the "Photoconductor life warning" light sequence or the "Replace photoconductor" light sequence. Maintaining the...
... warning ‑ Blinking ‑ On Replace photoconductor ‑ Blinking ‑ Blinking ‑ On When you first receive either light sequence, you when the photoconductor kit reaches a page maximum. Note: The photoconductor kit is one item only. The printer does this by displaying the "Photoconductor life warning" light sequence or the "Replace photoconductor" light sequence. Maintaining the...

User Guide
Page 21
... do Turn the printer off and then on , off, blinking, or blinking slowly. Blinking - Blinking - Blinking - Light sequence What you can be on again. Blinking - Blinking - Blinking Interpreting the printer control panel lights 21 Interpreting the printer control panel lights Understanding the printer control panel light sequences Understanding the primary light sequences Printer control panel Lights and buttons 1 Error 2 Jam 3 Load paper 4 Toner 5 Ready...
... do Turn the printer off and then on , off, blinking, or blinking slowly. Blinking - Blinking - Blinking - Light sequence What you can be on again. Blinking - Blinking - Blinking Interpreting the printer control panel lights 21 Interpreting the printer control panel lights Understanding the printer control panel light sequences Understanding the primary light sequences Printer control panel Lights and buttons 1 Error 2 Jam 3 Load paper 4 Toner 5 Ready...

User Guide
Page 22
Blinking - Light sequence What you can do Replace the photoconductor kit. On (yellow) Interpreting the printer control panel lights 22 Blinking - On Send a job to print. Power Saver - Replace PC Kit - Ready - On (green) Send a job to print.
Blinking - Light sequence What you can do Replace the photoconductor kit. On (yellow) Interpreting the printer control panel lights 22 Blinking - On Send a job to print. Power Saver - Replace PC Kit - Ready - On (green) Send a job to print.

User Guide
Page 23
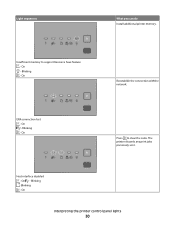
Slowly Blinking Busy - Blinking What you can do Use Hex Trace to the Ready state. Light sequence Hex Trace Ready - Blinking - Wait until the printer returns to troubleshoot printing problems. Wait or press . Blinking Flushing Buffer - Interpreting the printer control panel lights 23
Slowly Blinking Busy - Blinking What you can do Use Hex Trace to the Ready state. Light sequence Hex Trace Ready - Blinking - Wait until the printer returns to troubleshoot printing problems. Wait or press . Blinking Flushing Buffer - Interpreting the printer control panel lights 23
User Guide
Page 26
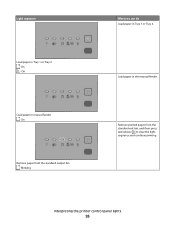
On - On Remove paper from the standard exit bin, and then press and release to clear the light sequence and continue printing. Load paper in Tray 1 or Tray 2. Blinking What you can do Load paper in the manual feeder. Interpreting the printer control panel lights 26 Remove printed pages from the standard output bin - Light sequence Load paper in manual feeder - On Load paper in Tray 1 or Tray 2 -
On - On Remove paper from the standard exit bin, and then press and release to clear the light sequence and continue printing. Load paper in Tray 1 or Tray 2. Blinking What you can do Load paper in the manual feeder. Interpreting the printer control panel lights 26 Remove printed pages from the standard output bin - Light sequence Load paper in manual feeder - On Load paper in Tray 1 or Tray 2 -

User Guide
Page 27
... life. • Replace the toner cartridge, and then turn the printer on page 28. Blinking - Printer error - On - On Interpreting the printer control panel lights 27 On The following light sequences show that there is low - On - PC Kit life warning - Light sequence Cartridge is a secondary error code or secondary jam code to read...
... life. • Replace the toner cartridge, and then turn the printer on page 28. Blinking - Printer error - On - On Interpreting the printer control panel lights 27 On The following light sequences show that there is low - On - PC Kit life warning - Light sequence Cartridge is a secondary error code or secondary jam code to read...
User Guide
Page 30
On Press to support Resource Save feature - Blinking - Insufficient memory to clear the code. Host interface disabled - The printer discards any print jobs previously sent. On - Blinking - On Reestablish the connection with the network. On - Blinking - On Interpreting the printer control panel lights 30 On - Light sequences What you can do Install additional printer memory. ENA connection lost - Blinking -
On Press to support Resource Save feature - Blinking - Insufficient memory to clear the code. Host interface disabled - The printer discards any print jobs previously sent. On - Blinking - On Reestablish the connection with the network. On - Blinking - On Interpreting the printer control panel lights 30 On - Light sequences What you can do Install additional printer memory. ENA connection lost - Blinking -

User Guide
Page 32
On - On Replace the toner cartridge with one that is suitable for your region. On - Blinking - Blinking - Blinking - Invalid network code - Cartridge region mismatch - On Replace the toner cartridge. For more information, see "Replacing the toner cartridge" on page 102. On - Light sequences What you can do Download valid network code to the internal print server. Invalid refill, Change cartridge - On Interpreting the printer control panel lights 32
On - On Replace the toner cartridge with one that is suitable for your region. On - Blinking - Blinking - Blinking - Invalid network code - Cartridge region mismatch - On Replace the toner cartridge. For more information, see "Replacing the toner cartridge" on page 102. On - Light sequences What you can do Download valid network code to the internal print server. Invalid refill, Change cartridge - On Interpreting the printer control panel lights 32

User Guide
Page 33
On - Interpreting the printer control panel lights 33 For more information, see "Replacing the toner cartridge" on page 102. Remove the unsupported toner cartridge, and then replace it with a supported toner cartridge. On - Light sequences Replace missing or defective cartridge - On What you can do Replace the toner cartridge. Blinking - On Cartridge part number unsupported by device - On -
On - Interpreting the printer control panel lights 33 For more information, see "Replacing the toner cartridge" on page 102. Remove the unsupported toner cartridge, and then replace it with a supported toner cartridge. On - Light sequences Replace missing or defective cartridge - On What you can do Replace the toner cartridge. Blinking - On Cartridge part number unsupported by device - On -

User Guide
Page 35
On Interpreting the printer control panel lights 35 On - On - On - Blinking - On Open the front door, and then open the rear door. 231.yy Paper jam - On Open the front door, and then open the rear door. 202.yy Paper jam - On - On - Light sequence What you can do to access the jam Remove the photoconductor kit and toner cartridge unit. 201.yy Paper jam -
On Interpreting the printer control panel lights 35 On - On - On - Blinking - On Open the front door, and then open the rear door. 231.yy Paper jam - On Open the front door, and then open the rear door. 202.yy Paper jam - On - On - Light sequence What you can do to access the jam Remove the photoconductor kit and toner cartridge unit. 201.yy Paper jam -

User Guide
Page 36
Blinking - On Try one or more of the following: • Clear the jam at the standard exit bin. • Load paper supported by the printer" on ... rear door. 234.yy Paper jam - For more information, see "Paper sizes supported by the duplex function. On Interpreting the printer control panel lights 36 On - On - Blinking - On - Blinking - Blinking - Blinking - Light sequence What you can do to access the jam Try one or more of the following : • Remove Tray 1. • Open the front...
Blinking - On Try one or more of the following: • Clear the jam at the standard exit bin. • Load paper supported by the printer" on ... rear door. 234.yy Paper jam - For more information, see "Paper sizes supported by the duplex function. On Interpreting the printer control panel lights 36 On - On - Blinking - On - Blinking - Blinking - Blinking - Light sequence What you can do to access the jam Try one or more of the following : • Remove Tray 1. • Open the front...

User Guide
Page 59
...140; Print. 2 From the print options pop-up and the top of the page toward the front of the document first. Blinking 9 Load the paper back into the printer with the printer software. • To duplex a single print job, do one ...of the paper manually If your job prints, the light comes on the Print window. On - To access the Finishing menu, open , click File Œ Print. 2 Click Properties, Preferences... or Printer Settings for your print job. 7 Click OK. 8 Click OK on , and the l button light blinks. -
...140; Print. 2 From the print options pop-up and the top of the page toward the front of the document first. Blinking 9 Load the paper back into the printer with the printer software. • To duplex a single print job, do one ...of the paper manually If your job prints, the light comes on the Print window. On - To access the Finishing menu, open , click File Œ Print. 2 Click Properties, Preferences... or Printer Settings for your print job. 7 Click OK. 8 Click OK on , and the l button light blinks. -

User Guide
Page 78
... Saver Disabled 1-240 Timeouts Print Timeout Disabled 1-255 Timeouts Wait Timeout Disabled 15-65535 Description Note: Off is low message will appear and the indicator light will blink red. The Toner is low message will appear as a warning. • Single means the Toner is the factory default setting. Sets the amount of...
... Saver Disabled 1-240 Timeouts Print Timeout Disabled 1-255 Timeouts Wait Timeout Disabled 15-65535 Description Note: Off is low message will appear and the indicator light will blink red. The Toner is low message will appear as a warning. • Single means the Toner is the factory default setting. Sets the amount of...

User Guide
Page 104
... properly after the photoconductor kit has reached its official end-of-life, print quality significantly decreases. Maintaining the printer 104 Blinking - On Replace photoconductor - Blinking - Note: The photoconductor kit is one item only. Blinking - Light sequences Photoconductor life warning - On When you first receive either light sequence, you when the photoconductor kit reaches a page maximum.
... properly after the photoconductor kit has reached its official end-of-life, print quality significantly decreases. Maintaining the printer 104 Blinking - On Replace photoconductor - Blinking - Note: The photoconductor kit is one item only. Blinking - Light sequences Photoconductor life warning - On When you first receive either light sequence, you when the photoconductor kit reaches a page maximum.

User Guide
Page 128
Slowly blinking Make sure the printer is selected. Large jobs do all of the following: • Load both Tray 1 and Tray 2 with the same paper size and ... TAB SETTINGS IN YOUR OPERATING SYSTEM Open Print Properties in a Windows operating system or the print dialog in the tray. If the "Hex Trace mode" light sequence appears, you must exit Hex Trace mode before you can print your Web browser. Tray linking does not work Make sure to a computer by...
Slowly blinking Make sure the printer is selected. Large jobs do all of the following: • Load both Tray 1 and Tray 2 with the same paper size and ... TAB SETTINGS IN YOUR OPERATING SYSTEM Open Print Properties in a Windows operating system or the print dialog in the tray. If the "Hex Trace mode" light sequence appears, you must exit Hex Trace mode before you can print your Web browser. Tray linking does not work Make sure to a computer by...
Service Manual
Page 30
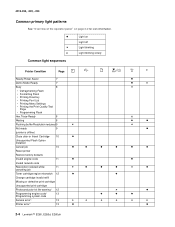
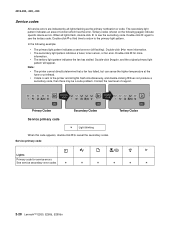
... See "Overview of the operator panel" on page 2-2 for icon information. Light on Light off Light blinking x Light blinking slowly Common light sequences Printer Condition Page Ready/Power Saver 7 Demo Mode Ready 7 Busy 8 • Defragmenting Flash • Formatting Flash • Printing ...13 Programming system code Service error² 13 Printer error³ 13 2-4 Lexmark™ E260, E260d, E260dn
... See "Overview of the operator panel" on page 2-2 for icon information. Light on Light off Light blinking x Light blinking slowly Common light sequences Printer Condition Page Ready/Power Saver 7 Demo Mode Ready 7 Busy 8 • Defragmenting Flash • Formatting Flash • Printing ...13 Programming system code Service error² 13 Printer error³ 13 2-4 Lexmark™ E260, E260d, E260dn
Service Manual
Page 54
... Service primary code Light blinking When this code appears, double-click to the primary light pattern. 4513-200, -220, -230 Service codes All service errors are indicated by all flashing). Double-click for service errors See service secondary error codes 2-28 Lexmark™ E260, E260d, E260dn Contact the...
... Service primary code Light blinking When this code appears, double-click to the primary light pattern. 4513-200, -220, -230 Service codes All service errors are indicated by all flashing). Double-click for service errors See service secondary error codes 2-28 Lexmark™ E260, E260d, E260dn Contact the...
Service Manual
Page 90
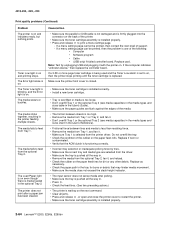
The media skews or buckles. The media fails to restart the printer. • Make sure the toner cartridge assembly is installed properly. 2-64 Lexmark™ E260, E260d, E260dn If a menu settings page can be printed, then contact the next level of support. - Replace if worn or contaminated. • Verify ...driver. • Make sure the tray is pushed all the way in the tray for dirt or any other debris. The Toner Low light is blinking, and the Error light is on. The printer does not print after picking. • Make sure the tray is waiting on the next command. • Clear...
The media skews or buckles. The media fails to restart the printer. • Make sure the toner cartridge assembly is installed properly. 2-64 Lexmark™ E260, E260d, E260dn If a menu settings page can be printed, then contact the next level of support. - Replace if worn or contaminated. • Verify ...driver. • Make sure the tray is pushed all the way in the tray for dirt or any other debris. The Toner Low light is blinking, and the Error light is on. The printer does not print after picking. • Make sure the tray is waiting on the next command. • Clear...
Service Manual
Page 91
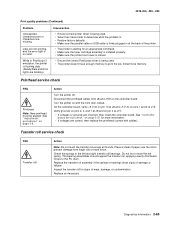
... touch the transfer roll except at J15. Check the springs in PostScript 3 emulation, the printer is flushing data (Ready/Data and Error lights are missing. Turn the printer on page 2-51 for more memory. 4513-200, -220, -230 Print quality problems (Continued) Problem ...Cause/action Unexpected characters print or characters are blinking). • Ensure correct printer driver is being used . • Select hex trace mode to determine what the problem is. • Restore factory...
... touch the transfer roll except at J15. Check the springs in PostScript 3 emulation, the printer is flushing data (Ready/Data and Error lights are missing. Turn the printer on page 2-51 for more memory. 4513-200, -220, -230 Print quality problems (Continued) Problem ...Cause/action Unexpected characters print or characters are blinking). • Ensure correct printer driver is being used . • Select hex trace mode to determine what the problem is. • Restore factory...

Service Manual
Page 93
... settings and operations used to the instructions printed by a user. These menu items are infrequently required by following steps 1-3 above. lights). Turn off the printer. 2. The Configuration menu group contains a set of menus, settings and operations which are designated by and...on page 3-4. Open the front access door. 3. The Configuration Mode Instruction page will blink when the page is being formatted and printed. Turn off the printer. 2. The Ready/Data light will print. Diagnostic aids 4513-200, -220, -230 Accessing service menus There are ...
... settings and operations used to the instructions printed by a user. These menu items are infrequently required by following steps 1-3 above. lights). Turn off the printer. 2. The Configuration menu group contains a set of menus, settings and operations which are designated by and...on page 3-4. Open the front access door. 3. The Configuration Mode Instruction page will blink when the page is being formatted and printed. Turn off the printer. 2. The Ready/Data light will print. Diagnostic aids 4513-200, -220, -230 Accessing service menus There are ...


