User's Guide
Page 97
...may be required to the Remarketer or the Lexmark designated location. You are substantially used with the printer shall end earlier if it, or its original...lexmark.com. For products no longer covered by a Lexmark warranty, technical support may not be available or only be limited to a Lexmark designated location. To obtain warranty service you paid for Lexmark E250d and E250dn... option with Lexmark user's guides, manuals, instructions or guidance • Unsuitable physical or operating environment • Maintenance by anyone other than Lexmark or a Lexmark authorized servicer ...
...may be required to the Remarketer or the Lexmark designated location. You are substantially used with the printer shall end earlier if it, or its original...lexmark.com. For products no longer covered by a Lexmark warranty, technical support may not be available or only be limited to a Lexmark designated location. To obtain warranty service you paid for Lexmark E250d and E250dn... option with Lexmark user's guides, manuals, instructions or guidance • Unsuitable physical or operating environment • Maintenance by anyone other than Lexmark or a Lexmark authorized servicer ...
Service Manual
Page 14
... voltage in order to locate or repeat symptoms of the printer and the maintenance approach used to perform the task. Parts catalog ...manual contains maintenance procedures for individual FRUs. General information contains a general description of printer problems. 4. Diagnostic aids contains tests and checks used to prevent problems. 7. Repair information provides instructions for making printer adjustments and removing and installing FRUs. 5. CAUTION: A caution identifies something that might damage the product hardware or software. xiv Lexmark™ E250d and E250dn...
... voltage in order to locate or repeat symptoms of the printer and the maintenance approach used to perform the task. Parts catalog ...manual contains maintenance procedures for individual FRUs. General information contains a general description of printer problems. 4. Diagnostic aids contains tests and checks used to prevent problems. 7. Repair information provides instructions for making printer adjustments and removing and installing FRUs. 5. CAUTION: A caution identifies something that might damage the product hardware or software. xiv Lexmark™ E250d and E250dn...

Service Manual
Page 15
..., perform tests as needed to determine the symptom and repair the failure. Models There are monochrome laser printers designed for single users or small workgroups. General information The Lexmark™ E250d and E250dn are two models covered in this manual: • E250d-16MB memory standard, a parallel USB (universal serial bus) connector, ENA support for USB and/or...
..., perform tests as needed to determine the symptom and repair the failure. Models There are monochrome laser printers designed for single users or small workgroups. General information The Lexmark™ E250d and E250dn are two models covered in this manual: • E250d-16MB memory standard, a parallel USB (universal serial bus) connector, ENA support for USB and/or...

Service Manual
Page 36
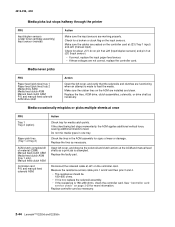
...sequence. Press and release Continue twice quickly to go for help. Secondary light sequences (paper jams) Printer Condition Page Paper jam at the input sensor 14 Paper jam in the manual feeder 14 Paper jam between the input 14 and exit sensor Paper jams at the exit sensor 14... has occurred with a secondary error code. location 16 unknown) Paper jam (duplex - 16 unsupported size) z z z z z z z z z z z z z z z z z z z z z z ✷ ✷ z z ✷ z z ✷ z z ✷ z z ✷ ✷ z 2-12 Lexmark™ E250d and E250dn
...sequence. Press and release Continue twice quickly to go for help. Secondary light sequences (paper jams) Printer Condition Page Paper jam at the input sensor 14 Paper jam in the manual feeder 14 Paper jam between the input 14 and exit sensor Paper jams at the exit sensor 14... has occurred with a secondary error code. location 16 unknown) Paper jam (duplex - 16 unsupported size) z z z z z z z z z z z z z z z z z z z z z z ✷ ✷ z z ✷ z z ✷ z z ✷ z z ✷ ✷ z 2-12 Lexmark™ E250d and E250dn

Service Manual
Page 38
...The jammed media is exiting the printer. Paper jams between the input and exit sensors z z z Meaning A paper jam has occurred. Action Clear the paper jam. Action Clear the paper jam. 2-14 Lexmark™ E250d and E250dn Action Clear the paper jam. Paper jam in the manual feeder z z z z Meaning... A paper jam has occurred at the input sensor, which can be either after the print media leaves the tray and enters the printer or in the fuser...
...The jammed media is exiting the printer. Paper jams between the input and exit sensors z z z Meaning A paper jam has occurred. Action Clear the paper jam. Action Clear the paper jam. 2-14 Lexmark™ E250d and E250dn Action Clear the paper jam. Paper jam in the manual feeder z z z z Meaning... A paper jam has occurred at the input sensor, which can be either after the print media leaves the tray and enters the printer or in the fuser...

Service Manual
Page 53
... gap at the input sensor. The printer operator panel displays light patterns describing the current state of the printer and indicates possible printer problems that must be visible only in the print history in machine during warm-up) Trailing edge cleared manual feed, but no trailing edge was ...(bouncy passthru sensor) Media reached the input sensor before interrupt occurred - The media is not expected (media in the diagnostic mode for E250d and E250dn. The input sensor is covered when the media is too long over the input sensor. 4512-220, -230 Messages and error codes ...
... gap at the input sensor. The printer operator panel displays light patterns describing the current state of the printer and indicates possible printer problems that must be visible only in the print history in machine during warm-up) Trailing edge cleared manual feed, but no trailing edge was ...(bouncy passthru sensor) Media reached the input sensor before interrupt occurred - The media is not expected (media in the diagnostic mode for E250d and E250dn. The input sensor is covered when the media is too long over the input sensor. 4512-220, -230 Messages and error codes ...
Service Manual
Page 68
...2) ACM clutch complete bill of wear or damage. Media occasionally mispicks or picks multiple sheets at the ACM and manual feed shafts as necessary. 2-44 Lexmark™ E250d and E250dn Action Check tray for more information. Do not mix media types in the ACM assembly for signs of material (...Replace controller card as a print job is attempted. 4512-220, -230 Media picks but stops halfway through the printer FRU Input/duplex sensors (under toner cartridge assembly) Input sensor (manual) Action Make sure the input sensors are installed and clean. Check the tires in one tray.
...2) ACM clutch complete bill of wear or damage. Media occasionally mispicks or picks multiple sheets at the ACM and manual feed shafts as necessary. 2-44 Lexmark™ E250d and E250dn Action Check tray for more information. Do not mix media types in the ACM assembly for signs of material (...Replace controller card as a print job is attempted. 4512-220, -230 Media picks but stops halfway through the printer FRU Input/duplex sensors (under toner cartridge assembly) Input sensor (manual) Action Make sure the input sensors are installed and clean. Check the tires in one tray.
Service Manual
Page 70
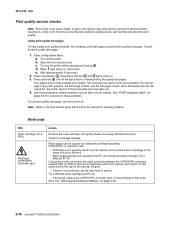
...the manual for repeating defects. Use the test pages to evenly distribute the toner. See "POST symptom table" on . 3. Blank pages can be caused by the PC roll not being properly charged. Try a different PC kit. c. When light stays on page 3-50. 2-46 Lexmark™ E250d and E250dn Press... and hold until the and lights come on page 2-37 for cartridge damage. A gap in the opening may allow light to these problems. To exit print quality test pages, turn the printer off the printer. Using print quality test pages To...
...the manual for repeating defects. Use the test pages to evenly distribute the toner. See "POST symptom table" on . 3. Blank pages can be caused by the PC roll not being properly charged. Try a different PC kit. c. When light stays on page 3-50. 2-46 Lexmark™ E250d and E250dn Press... and hold until the and lights come on page 2-37 for cartridge damage. A gap in the opening may allow light to these problems. To exit print quality test pages, turn the printer off the printer. Using print quality test pages To...

Service Manual
Page 74
... those settings. Replace as needed. Replace the PC kit. 2-50 Lexmark™ E250d and E250dn Replace the PC Kit first and recheck. With the printer off , clear the path or clean the lens. Horizontal streaks The...PC Kit, and recheck before replacing the toner cartridge. Vertical white lines may be caused by the laser beam, which may be caught between the PC kit and the fuser. Cause/action Light print See... to the print defects guide at the end of the manual for debris. Vertical or horizontal streaks appear on page 2-49. Print quality problems Problem Light or ...
... those settings. Replace as needed. Replace the PC kit. 2-50 Lexmark™ E250d and E250dn Replace the PC Kit first and recheck. With the printer off , clear the path or clean the lens. Horizontal streaks The...PC Kit, and recheck before replacing the toner cartridge. Vertical white lines may be caused by the laser beam, which may be caught between the PC kit and the fuser. Cause/action Light print See... to the print defects guide at the end of the manual for debris. Vertical or horizontal streaks appear on page 2-49. Print quality problems Problem Light or ...

Service Manual
Page 122
... cable on the duplex and auto comp. 6. Re-installation note: • Insert the hook end of the printer. 5. Remove the right side cover. Remove the screw (A). 7. 4512-220, -230 Manual feed sensor removal 1. Disconnect the sensor from its top. Note: Be careful not to mar the finish of ...sensor connector can be sure to the connector, and pull it through the three retainers between the sensor and side frame. 4-30 Lexmark™ E250d and E250dn Remove the controller card cover by loosening the four screws and sliding the cover free from the controller card side. Lift the door...
... cable on the duplex and auto comp. 6. Re-installation note: • Insert the hook end of the printer. 5. Remove the right side cover. Remove the screw (A). 7. 4512-220, -230 Manual feed sensor removal 1. Disconnect the sensor from its top. Note: Be careful not to mar the finish of ...sensor connector can be sure to the connector, and pull it through the three retainers between the sensor and side frame. 4-30 Lexmark™ E250d and E250dn Remove the controller card cover by loosening the four screws and sliding the cover free from the controller card side. Lift the door...


