User's Guide
Page 18
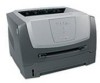
... the code, it performs a soft reset. 18 Understanding the control panel lights Replace photoconductor (printer hard stop) Light sequence: • Continue-On • Toner Low/Replace PC Kit-Blinking • Error-Blinking What this light sequence means: New code is full and must be replaced. What you...engine code / Programming system code Light sequence: • Ready-On • Toner Low/Replace PC Kit-On • Load Paper-On What this light sequence means: The photoconductor kit is being programmed into the engine or firmware code flash. The printer will not print any more pages...
... the code, it performs a soft reset. 18 Understanding the control panel lights Replace photoconductor (printer hard stop) Light sequence: • Continue-On • Toner Low/Replace PC Kit-Blinking • Error-Blinking What this light sequence means: New code is full and must be replaced. What you...engine code / Programming system code Light sequence: • Ready-On • Toner Low/Replace PC Kit-On • Load Paper-On What this light sequence means: The photoconductor kit is being programmed into the engine or firmware code flash. The printer will not print any more pages...
User's Guide
Page 66
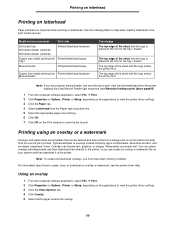
... the current job is printed. Printing using the manual feeder, first send the job to print, then load the letterhead when the printer displays the Load Manual Feeder light sequence (see Manually feeding a print jobon page60 ). 1 From the computer software application, select File à Print. 2 Click ... Overlay. 5 Select which pages receive the overlay. 66 Note: If you must have flash memory installed. For information about how to print. The top edge of the sheet with the logo enters the printer first. Note: To create and download overlays, you are using an overlay or a ...
... the current job is printed. Printing using the manual feeder, first send the job to print, then load the letterhead when the printer displays the Load Manual Feeder light sequence (see Manually feeding a print jobon page60 ). 1 From the computer software application, select File à Print. 2 Click ... Overlay. 5 Select which pages receive the overlay. 66 Note: If you must have flash memory installed. For information about how to print. The top edge of the sheet with the logo enters the printer first. Note: To create and download overlays, you are using an overlay or a ...
User's Guide
Page 99
... cleaning the printhead lens 91 clearing paper jams 56 configuration menus Parallel MAC Binary PS 39 Mode 2 39 NPA Mode 39 Protocol 39 printing the Printer Settings Configuration sheet 37 Setup Auto CR after LF 39 Auto LF after CR 39 USB MAC Binary PS 38, 40 NPA Mode 38, 40... Utilities Hex Trace 40 Print Quality Test Pages 40 Reset Factory Defaults 40 Reset Photoconductor Counter 40 control panel light sequences Busy 11 Canceling job 15 Close door 14, 17, 34 Defragment flash 11 Error 14, 15, 17, 18, 19, 20, 21, 25, 26, 27, 28, 34 Flushing data 13 Formatting...
... cleaning the printhead lens 91 clearing paper jams 56 configuration menus Parallel MAC Binary PS 39 Mode 2 39 NPA Mode 39 Protocol 39 printing the Printer Settings Configuration sheet 37 Setup Auto CR after LF 39 Auto LF after CR 39 USB MAC Binary PS 38, 40 NPA Mode 38, 40... Utilities Hex Trace 40 Print Quality Test Pages 40 Reset Factory Defaults 40 Reset Photoconductor Counter 40 control panel light sequences Busy 11 Canceling job 15 Close door 14, 17, 34 Defragment flash 11 Error 14, 15, 17, 18, 19, 20, 21, 25, 26, 27, 28, 34 Flushing data 13 Formatting...
Service Manual
Page 26
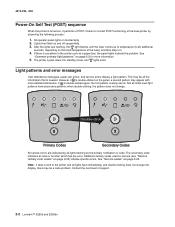
...) and then stays on page 2-3 for correct POST functioning of support. 2-2 Lexmark™ E250d and E250dn After the lights quit flashing, the light flashes until the fuser comes up to the printer and all the information that is needed. Not all lights flashing as a paper jam, the panel lights indicate the problem. Check for more detailed information. If is double...
...) and then stays on page 2-3 for correct POST functioning of support. 2-2 Lexmark™ E250d and E250dn After the lights quit flashing, the light flashes until the fuser comes up to the printer and all the information that is needed. Not all lights flashing as a paper jam, the panel lights indicate the problem. Check for more detailed information. If is double...

Service Manual
Page 27
... other primary light sequences. ² Toner low light will remain flashing with other primary light sequences. ³ Secondary codes will remain on Light off ✷ Light blinking x Light blinking slowly Common light sequences 4512-220, -230 Printer Condition Page Ready / Power Saver 4 Busy 4 Hex Trace Ready 4 Waiting 5 Flushing / Resolution reduced 5 ✷ Not ready 5 (printer is offline) Close door 6 z Insufficient collation...
... other primary light sequences. ² Toner low light will remain flashing with other primary light sequences. ³ Secondary codes will remain on Light off ✷ Light blinking x Light blinking slowly Common light sequences 4512-220, -230 Printer Condition Page Ready / Power Saver 4 Busy 4 Hex Trace Ready 4 Waiting 5 Flushing / Resolution reduced 5 ✷ Not ready 5 (printer is offline) Close door 6 z Insufficient collation...
Service Manual
Page 37
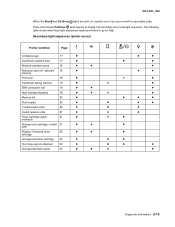
...light sequences (printer errors) Printer Condition Page Complex page 17 z Insufficient collation area 17 z Network interface errors 18 z z Resource save off - The following table shows what these light sequences mean and where to display the secondary error code light...; refill Missing / Defective toner 22 z z cartridge Unsupported toner cartridge 22 z Too many options attached 22 z Unsupported flash option 23 z z z z z z z ✷ z ✷ z ✷ z z ✷ z z z z z z z z z ✷ z ✷ z z z z z...
...light sequences (printer errors) Printer Condition Page Complex page 17 z Insufficient collation area 17 z Network interface errors 18 z z Resource save off - The following table shows what these light sequences mean and where to display the secondary error code light...; refill Missing / Defective toner 22 z z cartridge Unsupported toner cartridge 22 z Too many options attached 22 z Unsupported flash option 23 z z z z z z z ✷ z ✷ z ✷ z z ✷ z z z z z z z z z ✷ z ✷ z z z z z...
Service Manual
Page 46
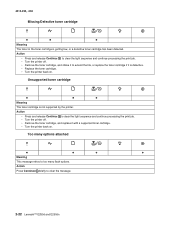
... to clear the light sequence and continue processing the print job. • Turn the printer off. • Remove the toner cartridge, and shake it to clear the light sequence and continue processing the print job. • Turn the printer off. •...printer back on . Too many options attached z z z z Meaning This message refers to clear the message. 2-22 Lexmark™ E250d and E250dn 4512-220, -230 Missing/Defective toner cartridge z z z Meaning The toner in the toner cartridge is not supported by the printer. Action Press Continue briefly to too many flash...
... to clear the light sequence and continue processing the print job. • Turn the printer off. • Remove the toner cartridge, and shake it to clear the light sequence and continue processing the print job. • Turn the printer off. •...printer back on . Too many options attached z z z z Meaning This message refers to clear the message. 2-22 Lexmark™ E250d and E250dn 4512-220, -230 Missing/Defective toner cartridge z z z Meaning The toner in the toner cartridge is not supported by the printer. Action Press Continue briefly to too many flash...

Service Manual
Page 47
...or fan error. Double-click again and the original primary light pattern will appear. Contact the next level of support. Double-click again to the printer and all lights flash, double-click to the primary light pattern. Note: • The printer cannot directly determine that a fan has failed, but ...to see the secondary code. Tertiary codes (shown on . Action Power off the printer and remove the unsupported option Service codes All service errors are indicated by all flashing). The secondary light pattern indicates an area or function which has the error. Double-click a third ...
...or fan error. Double-click again and the original primary light pattern will appear. Contact the next level of support. Double-click again to the printer and all lights flash, double-click to the primary light pattern. Note: • The printer cannot directly determine that a fan has failed, but ...to see the secondary code. Tertiary codes (shown on . Action Power off the printer and remove the unsupported option Service codes All service errors are indicated by all flashing). The secondary light pattern indicates an area or function which has the error. Double-click a third ...

Service Manual
Page 49
...in the area of the transfer roll. Controller software Codes 90x indicate a controller software error/illegal trap. Service tertiary error codes-transfer roll Lights Service secondary codes-91x ✷ Service tertiary codes 914-Tray 2 motor failure ✷ 917-Transfer roll circuity ✷ ✷ ... ✷ Service tertiary codes 902-General engine software error ✷ ✷ 905-Interface violation by all lights flashing which allows the printer to temporarily recover from the error. For brevity, this symbol appears, there is being worked on the HVPS...
...in the area of the transfer roll. Controller software Codes 90x indicate a controller software error/illegal trap. Service tertiary error codes-transfer roll Lights Service secondary codes-91x ✷ Service tertiary codes 914-Tray 2 motor failure ✷ 917-Transfer roll circuity ✷ ✷ ... ✷ Service tertiary codes 902-General engine software error ✷ ✷ 905-Interface violation by all lights flashing which allows the printer to temporarily recover from the error. For brevity, this symbol appears, there is being worked on the HVPS...

Service Manual
Page 52
... network port ✷ ✷ ✷ 978-Bad checksum while programming port ✷ ✷ 979-Flash parts failed while programming port ✷ ✷ ✷ 2-28 Lexmark™ E250d and E250dn Replace the controller card. Service tertiary error codes-network error Lights Service secondary codes-97x ✷ ✷ ✷ ✷ Service tertiary codes-network error 975...
... network port ✷ ✷ ✷ 978-Bad checksum while programming port ✷ ✷ 979-Flash parts failed while programming port ✷ ✷ ✷ 2-28 Lexmark™ E250d and E250dn Replace the controller card. Service tertiary error codes-network error Lights Service secondary codes-97x ✷ ✷ ✷ ✷ Service tertiary codes-network error 975...
Service Manual
Page 70
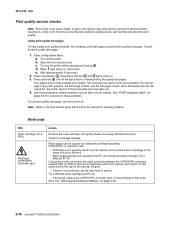
... To print the print quality test pages: 1. b. When light stays on the printer while pressing and holding . Press and release three times until all the lights flash to expose the photoconductor resulting in the opening may allow light to initiate printing the quality test pages. Extreme environmental conditions,...Unplug the printer, and check the cable continuity between the LVPS/HVPS connector marked OPC (at the end of the beam or dust on . 3. Open the front access cover. Use the test pages to the home state (four top lights on page 3-50. 2-46 Lexmark™ E250d and E250dn ...
... To print the print quality test pages: 1. b. When light stays on the printer while pressing and holding . Press and release three times until all the lights flash to expose the photoconductor resulting in the opening may allow light to initiate printing the quality test pages. Extreme environmental conditions,...Unplug the printer, and check the cable continuity between the LVPS/HVPS connector marked OPC (at the end of the beam or dust on . 3. Open the front access cover. Use the test pages to the home state (four top lights on page 3-50. 2-46 Lexmark™ E250d and E250dn ...

Service Manual
Page 79
...Print Configuration menus by pressing and holding until the lights flash, then release the button. Print Diagnostic menus by pressing and holding . 3. The Ready/ Data LED will print. Open the front access cover and turn on the printer. 3. The diagnostic group contains menu settings and ... of the page (Bottom as printed from one menu item to another. • Press and hold while turning on the printer while pressing and holding until the lights flash, then release the button. See "Configuration Menu printout sample" on page 3-2 or "Configuration menu selections" on page 3-4 ...
...Print Configuration menus by pressing and holding until the lights flash, then release the button. Print Diagnostic menus by pressing and holding . 3. The Ready/ Data LED will print. Open the front access cover and turn on the printer. 3. The diagnostic group contains menu settings and ... of the page (Bottom as printed from one menu item to another. • Press and hold while turning on the printer while pressing and holding until the lights flash, then release the button. See "Configuration Menu printout sample" on page 3-2 or "Configuration menu selections" on page 3-4 ...
Service Manual
Page 82
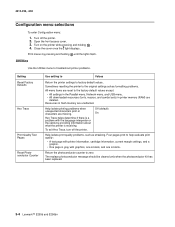
...the front access cover. 3. Turn on the printer while pressing and holding until the lights flash. Off (default) On Help isolate print quality problems, such as streaking. Resources in printer memory (RAM) are deleted. Sometimes resetting the printer to the original settings solves formatting problems. All ... has been replaced. 3-4 Lexmark™ E250d and E250dn Four pages print to the factory default values except: • All settings in the Parallel menu, Network menu, and USB menu. • All downloaded resources (fonts, macros, and symbol sets) in flash memory are missing.
...the front access cover. 3. Turn on the printer while pressing and holding until the lights flash. Off (default) On Help isolate print quality problems, such as streaking. Resources in printer memory (RAM) are deleted. Sometimes resetting the printer to the original settings solves formatting problems. All ... has been replaced. 3-4 Lexmark™ E250d and E250dn Four pages print to the factory default values except: • All settings in the Parallel menu, Network menu, and USB menu. • All downloaded resources (fonts, macros, and symbol sets) in flash memory are missing.

Service Manual
Page 86
... . Press to begin . Press to begin . Press and hold until the lights flash to stop . None Configuration ID Allow the printer ID to stop . U.S. (default) Non-U.S. None Print History Print history of all black, and the last one blank. None 3-8 Lexmark™ E250d and E250dn None Cont Prt Duplex Tray 1 Continuously print pages containing cross...
... . Press to begin . Press to begin . Press and hold until the lights flash to stop . None Configuration ID Allow the printer ID to stop . U.S. (default) Non-U.S. None Print History Print history of all black, and the last one blank. None 3-8 Lexmark™ E250d and E250dn None Cont Prt Duplex Tray 1 Continuously print pages containing cross...

Service Manual
Page 87
... note z 3. use actual sheet) 2. Step 1 printout (sample only; In column of the lights cycle to change to the pattern adjacent to the light sequences on page 3-13. 1. See note See note z z Note: Lights (on the right side of the Step 1 test page. 4. Press and release to print the... menu sheet and Step 1 test page. Press and release to change the light sequence for on , off, or flashing) represent current settings that must be changed for the position where the vertical lines are the closest to each other. Press ...
... note z 3. use actual sheet) 2. Step 1 printout (sample only; In column of the lights cycle to change to the pattern adjacent to the light sequences on page 3-13. 1. See note See note z z Note: Lights (on the right side of the Step 1 test page. 4. Press and release to print the... menu sheet and Step 1 test page. Press and release to change the light sequence for on , off, or flashing) represent current settings that must be changed for the position where the vertical lines are the closest to each other. Press ...


