User's Guide
Page 26
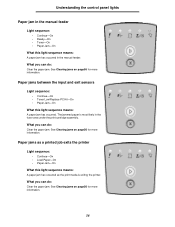
...-On What this light sequence means: A paper jam has occurred as the print media is most likely in the fuser area under the print cartridge assembly. The jammed paper is exiting the printer. What you can do: Clear the paper jam. What you can do : Clear the paper jam. Paper jams between... the input and exit sensors Light sequence: • Continue-On • Toner Low/Replace PC Kit-On • Paper Jam-On What this...
...-On What this light sequence means: A paper jam has occurred as the print media is most likely in the fuser area under the print cartridge assembly. The jammed paper is exiting the printer. What you can do: Clear the paper jam. What you can do : Clear the paper jam. Paper jams between... the input and exit sensors Light sequence: • Continue-On • Toner Low/Replace PC Kit-On • Paper Jam-On What this...
User's Guide
Page 78
... determine approximately how much toner is left in all the items necessary to replace the pick rollers, the fuser, and the transfer roller. If the print remains faded, replace the toner cartridge. While the printer may not be available in your specific printer. If Maintenance is listed under the Warnings heading, it . Knowing when you...
... determine approximately how much toner is left in all the items necessary to replace the pick rollers, the fuser, and the transfer roller. If the print remains faded, replace the toner cartridge. While the printer may not be available in your specific printer. If Maintenance is listed under the Warnings heading, it . Knowing when you...
User's Guide
Page 87
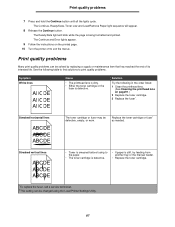
... Cleaning the printhead lens on the printed page. 10 Turn the printer off to exit the menus. The Continue and Error lights appear. 9 Follow the instructions on page91.) 2 Replace the toner cartridge. 3 Replace the fuser*. Streaked vertical lines ABCDE ABCDE ABCDE • Toner is smeared... is stiff, try feeding from another tray or the manual feeder. • Replace the toner cartridge. *To replace the fuser, call a service technician. †This setting can be changed using the Local Printer Settings Utility. 87 Print quality problems 7 Press and hold the Continue button until...
... Cleaning the printhead lens on the printed page. 10 Turn the printer off to exit the menus. The Continue and Error lights appear. 9 Follow the instructions on page91.) 2 Replace the toner cartridge. 3 Replace the fuser*. Streaked vertical lines ABCDE ABCDE ABCDE • Toner is smeared... is stiff, try feeding from another tray or the manual feeder. • Replace the toner cartridge. *To replace the fuser, call a service technician. †This setting can be changed using the Local Printer Settings Utility. 87 Print quality problems 7 Press and hold the Continue button until...
User's Guide
Page 88
...; The Form Type setting in the printer transparency. used . • Replace the fuser*. • Select a different Toner Darkness† setting from the printer driver before sending the job to print. • Replace the toner cartridge. *To replace the fuser, call a service technician. †This... into the paper tray. • Paper that do not meet the printer • Avoid textured paper with rough • The toner cartridge is defective. • Replace the toner cartridge. • Replace the fuser*. • Call for service. • Change Paper Texture† from...
...; The Form Type setting in the printer transparency. used . • Replace the fuser*. • Select a different Toner Darkness† setting from the printer driver before sending the job to print. • Replace the toner cartridge. *To replace the fuser, call a service technician. †This... into the paper tray. • Paper that do not meet the printer • Avoid textured paper with rough • The toner cartridge is defective. • Replace the toner cartridge. • Replace the fuser*. • Call for service. • Change Paper Texture† from...
User's Guide
Page 89
...8226; Adjust the guides in the tray so that not in the correct position for the paper that is defective, empty, or improperly installed. *To replace the fuser, call a service technician. †This setting can be changed to match the paper size that is a slight gap between the paper size loaded in...guides in the selected tray are not in • Move the manual feeder guides so the correct position for the there is loaded in the printer driver is different from the size paper that they lightly touch the sides of the page.) Incorrect margins The Form Size setting in the tray....
...8226; Adjust the guides in the tray so that not in the correct position for the paper that is defective, empty, or improperly installed. *To replace the fuser, call a service technician. †This setting can be changed to match the paper size that is a slight gap between the paper size loaded in...guides in the selected tray are not in • Move the manual feeder guides so the correct position for the there is loaded in the printer driver is different from the size paper that they lightly touch the sides of the page.) Incorrect margins The Form Size setting in the tray....
User's Guide
Page 90
The Paper Weight setting is wrong for the type of print media being used. *To replace the fuser, call a service technician. †This setting can be changed using the Local Printer Settings Utility. • Replace the toner cartridge. • Call for laser printers. • If possible, try printing in its original packaging. • Turn the print media... of print media, such as a xerographic paper for service. • Change Paper Weight† to Smooth. • Use print media that is defective. • The printer requires servicing.
The Paper Weight setting is wrong for the type of print media being used. *To replace the fuser, call a service technician. †This setting can be changed using the Local Printer Settings Utility. • Replace the toner cartridge. • Call for laser printers. • If possible, try printing in its original packaging. • Turn the print media... of print media, such as a xerographic paper for service. • Change Paper Weight† to Smooth. • Use print media that is defective. • The printer requires servicing.
Service Manual
Page 50
...-Open circuit in the fuser (see fuser service check...), a stalled fan motor, or a faulty toner sensor or toner cartridge. Multiple errors indicate replacing the corresponding part. 4512-220, -230 Fuser, fan, or toner ...sensor error Codes 920 through 929 indicate a problem in thermistor path ✷ ✷ 925-Incorrect fuser ✷ ✷ ✷ 927-Fan stalled ✷ ✷ ✷ ✷ 929-Toner sensor or toner cartridge are bad ✷ ✷ ✷ 2-26 Lexmark™ E250d...
...-Open circuit in the fuser (see fuser service check...), a stalled fan motor, or a faulty toner sensor or toner cartridge. Multiple errors indicate replacing the corresponding part. 4512-220, -230 Fuser, fan, or toner ...sensor error Codes 920 through 929 indicate a problem in thermistor path ✷ ✷ 925-Incorrect fuser ✷ ✷ ✷ 927-Fan stalled ✷ ✷ ✷ ✷ 929-Toner sensor or toner cartridge are bad ✷ ✷ ✷ 2-26 Lexmark™ E250d...

Service Manual
Page 63
Power to display lights or activate the drive motor, fuser or fan, check the following order: 1. Power from the LVPS/HVPS. 1. Verify +24 V dc input from the LVPS/HVPS to the controller board. 6. Verify +24 V ... panel. 4. Diagnostic information 2-39 Settings are lost when both the cable and the card connector are not correct on the controller card, replace the controller card. (Check with the printer positioned on its back side. Disconnect the LVPS/HVPS cable from the other card. See the wiring diagram in the other conductors...
Power to display lights or activate the drive motor, fuser or fan, check the following order: 1. Power from the LVPS/HVPS. 1. Verify +24 V dc input from the LVPS/HVPS to the controller board. 6. Verify +24 V ... panel. 4. Diagnostic information 2-39 Settings are lost when both the cable and the card connector are not correct on the controller card, replace the controller card. (Check with the printer positioned on its back side. Disconnect the LVPS/HVPS cable from the other card. See the wiring diagram in the other conductors...

Service Manual
Page 65
...printer This printer uses a belt fuser and therefore does not have a lamp. Disconnect the thermistor cable from the LVPS/HVPS board connector at both ends and check each conductor for continuity. Plug the AC line into the LVPS/HVPS and switch unit on pins 4 and 13. • If voltages are not correct, replace... Verify 24 V dc on pins 8 and 9 at several places on page 4-13. Make sure the fuser thermistor is continuity, check the LVPS/HVPS. Replace the fuser assembly if the resistance is incorrect on pin 1, see "Controller card service check" on pin 1. Diagnostic information...
...printer This printer uses a belt fuser and therefore does not have a lamp. Disconnect the thermistor cable from the LVPS/HVPS board connector at both ends and check each conductor for continuity. Plug the AC line into the LVPS/HVPS and switch unit on pins 4 and 13. • If voltages are not correct, replace... Verify 24 V dc on pins 8 and 9 at several places on page 4-13. Make sure the fuser thermistor is continuity, check the LVPS/HVPS. Replace the fuser assembly if the resistance is incorrect on pin 1, see "Controller card service check" on pin 1. Diagnostic information...

Service Manual
Page 67
Each card contains the printer settings. Replace the fuser if the sensor is plugged in any are new and replaced at J3. The solenoid interacts with the clutch to it obtains the settings from rotating. Diagnostic information 2-43 Make sure the cable is damaged.... switches. When either of these are correct and the operator panel is in securely. Buttons If the buttons do not respond, replace the operator panel. With the printer on page 2-2. Paper feed service checks Paper jam error indication during POST and/or continuously FRU ACM Manual feed clutch Action Check...
Each card contains the printer settings. Replace the fuser if the sensor is plugged in any are new and replaced at J3. The solenoid interacts with the clutch to it obtains the settings from rotating. Diagnostic information 2-43 Make sure the cable is damaged.... switches. When either of these are correct and the operator panel is in securely. Buttons If the buttons do not respond, replace the operator panel. With the printer on page 2-2. Paper feed service checks Paper jam error indication during POST and/or continuously FRU ACM Manual feed clutch Action Check...

Service Manual
Page 69
...) in ready mode). Perform a print test to print on command from the host computer, replace the controller card. 5. If the internal print test page prints correctly, the user's application/printer driver is set up correctly. 4. Check the USB cable for bidirectional printing. 3. Media "...trees," wrinkles, stacks poorly, or curls FRU Fuser Action This problem is installed, but the printer still fails to make sure the printer prints correctly. Excessive heat can cause media treeing problems, poor stacking, or curl. Some, such...
...) in ready mode). Perform a print test to print on command from the host computer, replace the controller card. 5. If the internal print test page prints correctly, the user's application/printer driver is set up correctly. 4. Check the USB cable for bidirectional printing. 3. Media "...trees," wrinkles, stacks poorly, or curls FRU Fuser Action This problem is installed, but the printer still fails to make sure the printer prints correctly. Excessive heat can cause media treeing problems, poor stacking, or curl. Some, such...

Service Manual
Page 72
...have an unbalanced force against the PC (photoconductor) drum. Replace as necessary. Try a new PC Kit. Check the springs in the printer driver. The bearing assemblies should support the transfer roll, ...higher heat to prevent damage from finger oils or hand lotion. Variation in the printer driver. 2-48 Lexmark™ E250d and E250dn See"LVPS/HVPS service check" on page 2-42 for signs of paper... media is being used . Replace the transfer roll assembly if the springs or bearings show signs of image FRU Fuser Media (not a FRU) Action The fuser may not be operating at its...
...have an unbalanced force against the PC (photoconductor) drum. Replace as necessary. Try a new PC Kit. Check the springs in the printer driver. The bearing assemblies should support the transfer roll, ...higher heat to prevent damage from finger oils or hand lotion. Variation in the printer driver. 2-48 Lexmark™ E250d and E250dn See"LVPS/HVPS service check" on page 2-42 for signs of paper... media is being used . Replace the transfer roll assembly if the springs or bearings show signs of image FRU Fuser Media (not a FRU) Action The fuser may not be operating at its...

Service Manual
Page 73
...the back of page FRU PC Kit (not a FRU) Fuser Transfer roll Action Print a menu page (press and release when the printer is plugged into the LVPS/HVPS. If the problem continues, install a new toner cartridge. Recheck condition before replacing PC Kit, if necessary. Check the transfer roll for signs...sure the toner cartridge and PC Kit are installed correctly and that the laser beam is not blocked. Verify the high voltage cable is in the developer and transfer process. If all components appear free of contamination, replace the following FRUs one at a time in the order shown: •...
...the back of page FRU PC Kit (not a FRU) Fuser Transfer roll Action Print a menu page (press and release when the printer is plugged into the LVPS/HVPS. If the problem continues, install a new toner cartridge. Recheck condition before replacing PC Kit, if necessary. Check the transfer roll for signs...sure the toner cartridge and PC Kit are installed correctly and that the laser beam is not blocked. Verify the high voltage cable is in the developer and transfer process. If all components appear free of contamination, replace the following FRUs one at a time in the order shown: •...

Service Manual
Page 74
.... Try a different toner cartridge. Vertical streaks Something could be defective. Check the paper path around the fuser entry. Try a different toner cartridge. Replace the PC kit. 2-50 Lexmark™ E250d and E250dn The toner cartridge may be getting low on toner: • Remove the toner cartridge and...for more information. Try a different toner cartridge. Replace as needed. With the printer off , clear the path or clean the lens. The toner cartridge or fuser may be defective. If the lines are usually caused by the laser beam, which may be partially blocked. The PC ...
.... Try a different toner cartridge. Vertical streaks Something could be defective. Check the paper path around the fuser entry. Try a different toner cartridge. Replace the PC kit. 2-50 Lexmark™ E250d and E250dn The toner cartridge may be getting low on toner: • Remove the toner cartridge and...for more information. Try a different toner cartridge. Replace as needed. With the printer off , clear the path or clean the lens. The toner cartridge or fuser may be defective. If the lines are usually caused by the laser beam, which may be partially blocked. The PC ...

Service Manual
Page 75
...The toner cartridge may be out of paper. Replace the cartridge. • There may be a software error. Replace the fuser. • Change the media texture setting in the cartridge. • The installed. If special media is getting light, but the printer has not indicated it off and back on. ...• With the printer off the page. light message does not...
...The toner cartridge may be out of paper. Replace the cartridge. • There may be a software error. Replace the fuser. • Change the media texture setting in the cartridge. • The installed. If special media is getting light, but the printer has not indicated it off and back on. ...• With the printer off the page. light message does not...

Service Manual
Page 145
...lubricate appropriate areas. Preventive maintenance This chapter describes procedures for printer preventive maintenance. Some unauthorized lubricants may chemically attack parts. If any non-Lexmark attachments Lubrication specifications FRUs are replaced or as needed , not on a scheduled basis. Use ...of this inspection guide is safe to aid in the original part. Maintenance kits Maintenance kits include: • Fuser (P/N 40X2800, 40X2801, or...
...lubricate appropriate areas. Preventive maintenance This chapter describes procedures for printer preventive maintenance. Some unauthorized lubricants may chemically attack parts. If any non-Lexmark attachments Lubrication specifications FRUs are replaced or as needed , not on a scheduled basis. Use ...of this inspection guide is safe to aid in the original part. Maintenance kits Maintenance kits include: • Fuser (P/N 40X2800, 40X2801, or...

Service Manual
Page 164
... For example, the distance between these two marks represents a repeating defect caused by the toner cartridge. Replace Photoconductor Kit (customer replaceable item) Replace Fuser (call for service) Replace Transfer Roller (call for service) Replace Toner Cartridge (customer replaceable item) If you are unable to one of the sets of 1 Print defects guide Defects often repeat...particular part that may be causing the defect. In such cases, matching the defect frequency to distinguish between these two marks, replace the Photoconductor OR Kit before replacing the Fuser.
... For example, the distance between these two marks represents a repeating defect caused by the toner cartridge. Replace Photoconductor Kit (customer replaceable item) Replace Fuser (call for service) Replace Transfer Roller (call for service) Replace Toner Cartridge (customer replaceable item) If you are unable to one of the sets of 1 Print defects guide Defects often repeat...particular part that may be causing the defect. In such cases, matching the defect frequency to distinguish between these two marks, replace the Photoconductor OR Kit before replacing the Fuser.


