
Users Guide PDF
Page 169
... Yellow Part number 77B00K0 77B00C0 77B00M0 77B00Y0 Ordering a photoconductor unit Item Black photoconductor unit Color photoconductor unit Part number 76C0PK0 76C0PV0 Ordering a waste toner bottle Item Waste toner bottle Part number 54G0W00 Ordering staple cartridges Item Staple cartridges Part number 25A0013 Ordering maintenance kits Lexmark CX920, CX921, CX922, CX923, CX924, and CX927 maintenance kits Maintenance...
... Yellow Part number 77B00K0 77B00C0 77B00M0 77B00Y0 Ordering a photoconductor unit Item Black photoconductor unit Color photoconductor unit Part number 76C0PK0 76C0PV0 Ordering a waste toner bottle Item Waste toner bottle Part number 54G0W00 Ordering staple cartridges Item Staple cartridges Part number 25A0013 Ordering maintenance kits Lexmark CX920, CX921, CX922, CX923, CX924, and CX927 maintenance kits Maintenance...

Users Guide PDF
Page 174
Maintaining the printer 174 Replacing a photoconductor unit 1 Open door A. 2 Remove the waste toner bottle. 3 Remove the photoconductor unit. Warning-Potential Damage: Some parts of the printer are easily damaged by static electricity. Before touching any parts or components in an area marked with the static‑sensitive symbol, touch a metal surface in an area away from the symbol.
Maintaining the printer 174 Replacing a photoconductor unit 1 Open door A. 2 Remove the waste toner bottle. 3 Remove the photoconductor unit. Warning-Potential Damage: Some parts of the printer are easily damaged by static electricity. Before touching any parts or components in an area marked with the static‑sensitive symbol, touch a metal surface in an area away from the symbol.
Users Guide PDF
Page 175
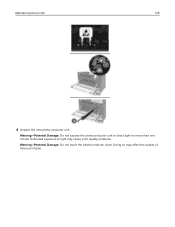
Doing so may cause print quality problems. Warning-Potential Damage: Do not touch the photoconductor drum. Warning-Potential Damage: Do not expose the photoconductor unit to light may affect the quality of future print jobs. Maintaining the printer 175 4 Unpack the new photoconductor unit. Extended exposure to direct light for more than one minute.
Doing so may cause print quality problems. Warning-Potential Damage: Do not touch the photoconductor drum. Warning-Potential Damage: Do not expose the photoconductor unit to light may affect the quality of future print jobs. Maintaining the printer 175 4 Unpack the new photoconductor unit. Extended exposure to direct light for more than one minute.
Users Guide PDF
Page 176
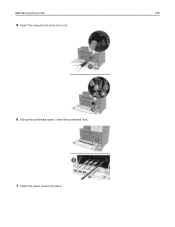
Maintaining the printer 176 5 Insert the new photoconductor unit. 6 Using the printhead wiper, clean the printhead lens. 7 Insert the wiper back into place.
Maintaining the printer 176 5 Insert the new photoconductor unit. 6 Using the printhead wiper, clean the printhead lens. 7 Insert the wiper back into place.
Users Guide PDF
Page 235
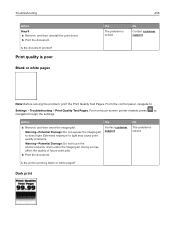
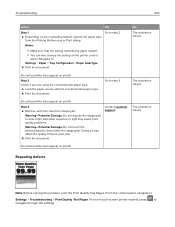
... reinstall the print driver. For non-touch-screen printer models, press to Settings > Troubleshooting > Print Quality Test Pages. Warning-Potential Damage: Do not touch the photoconductor drum under the imaging kit. Is the document printed? Is the printer printing blank or white pages? b Print the document.
... reinstall the print driver. For non-touch-screen printer models, press to Settings > Troubleshooting > Print Quality Test Pages. Warning-Potential Damage: Do not touch the photoconductor drum under the imaging kit. Is the document printed? Is the printer printing blank or white pages? b Print the document.
Users Guide PDF
Page 238
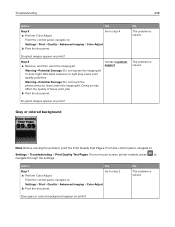
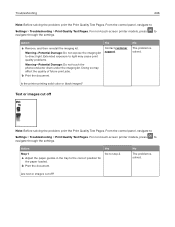
... jobs. Do ghost images appear on prints? Extended exposure to step 2. Doing so may cause print quality problems. Warning-Potential Damage: Do not touch the photoconductor drum under the imaging kit. Gray or colored background Note: Before solving the problem, print the Print Quality Test Pages. a Perform Color Adjust. From the...
... jobs. Do ghost images appear on prints? Extended exposure to step 2. Doing so may cause print quality problems. Warning-Potential Damage: Do not touch the photoconductor drum under the imaging kit. Gray or colored background Note: Before solving the problem, print the Print Quality Test Pages. a Perform Color Adjust. From the...
Users Guide PDF
Page 239
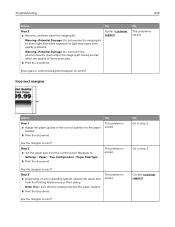
... 1 a Adjust the paper guides to direct light. The problem is solved. Doing so may cause print quality problems. Warning-Potential Damage: Do not touch the photoconductor drum under the imaging kit. Step 2 a Set the paper size from the Printing Preferences or Print dialog. Are the margins correct? Go to : Settings > Paper...
... 1 a Adjust the paper guides to direct light. The problem is solved. Doing so may cause print quality problems. Warning-Potential Damage: Do not touch the photoconductor drum under the imaging kit. Step 2 a Set the paper size from the Printing Preferences or Print dialog. Are the margins correct? Go to : Settings > Paper...
Users Guide PDF
Page 241
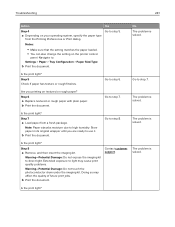
... from the Printing Preferences or Print dialog. Is the print light? Doing so may cause print quality problems. Warning-Potential Damage: Do not touch the photoconductor drum under the imaging kit.
... from the Printing Preferences or Print dialog. Is the print light? Doing so may cause print quality problems. Warning-Potential Damage: Do not touch the photoconductor drum under the imaging kit.
Users Guide PDF
Page 242
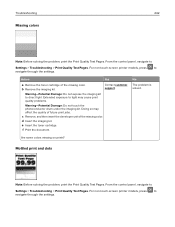
... expose the imaging kit to Settings > Troubleshooting > Print Quality Test Pages. Doing so may cause print quality problems. Warning-Potential Damage: Do not touch the photoconductor drum under the imaging kit. d Insert the imaging kit. No The problem is solved. From the control panel, navigate to direct light. For non-touch...
... expose the imaging kit to Settings > Troubleshooting > Print Quality Test Pages. Doing so may cause print quality problems. Warning-Potential Damage: Do not touch the photoconductor drum under the imaging kit. d Insert the imaging kit. No The problem is solved. From the control panel, navigate to direct light. For non-touch...

Users Guide PDF
Page 243
...? Note: Paper absorbs moisture due to step 2. Is the print mottled? Doing so may cause print quality problems. Warning-Potential Damage: Do not touch the photoconductor drum under the imaging kit. The problem is solved. Yes Go to high humidity. Go to step 5. Go to step 4. Extended exposure to : Settings > Paper...
...? Note: Paper absorbs moisture due to step 2. Is the print mottled? Doing so may cause print quality problems. Warning-Potential Damage: Do not touch the photoconductor drum under the imaging kit. The problem is solved. Yes Go to high humidity. Go to step 5. Go to step 4. Extended exposure to : Settings > Paper...
Users Guide PDF
Page 246
... Pages. From the control panel, navigate to navigate through the settings. Doing so may cause print quality problems. Warning-Potential Damage: Do not touch the photoconductor drum under the imaging kit. b Print the document. From the control panel, navigate to the correct position for the paper loaded. Action Yes Step 1 a Adjust...
... Pages. From the control panel, navigate to navigate through the settings. Doing so may cause print quality problems. Warning-Potential Damage: Do not touch the photoconductor drum under the imaging kit. b Print the document. From the control panel, navigate to the correct position for the paper loaded. Action Yes Step 1 a Adjust...
Users Guide PDF
Page 247
... printer control panel. Step 3 a Remove, and then insert the imaging kit. Doing so may cause print quality problems. Warning-Potential Damage: Do not touch the photoconductor drum under the imaging kit.
... printer control panel. Step 3 a Remove, and then insert the imaging kit. Doing so may cause print quality problems. Warning-Potential Damage: Do not touch the photoconductor drum under the imaging kit.

Users Guide PDF
Page 249
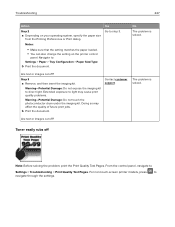
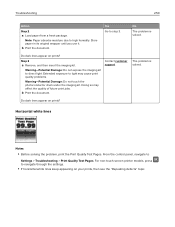
... of future print jobs. Is the print density uneven? For non-touch-screen printer models, press to step 2. Warning-Potential Damage: Do not touch the photoconductor drum under the imaging kit. a Depending on the prints, then see the "Repeating defects" topic. Troubleshooting 249 Action Yes a Remove, and then insert the imaging...
... of future print jobs. Is the print density uneven? For non-touch-screen printer models, press to step 2. Warning-Potential Damage: Do not touch the photoconductor drum under the imaging kit. a Depending on the prints, then see the "Repeating defects" topic. Troubleshooting 249 Action Yes a Remove, and then insert the imaging...
Users Guide PDF
Page 250
... the quality of future print jobs. Yes Go to direct light. Doing so may cause print quality problems. Warning-Potential Damage: Do not touch the photoconductor drum under the imaging kit. b Print the document. No The problem is solved. For non-touch-screen printer models, press to Settings > Troubleshooting > Print Quality...
... the quality of future print jobs. Yes Go to direct light. Doing so may cause print quality problems. Warning-Potential Damage: Do not touch the photoconductor drum under the imaging kit. b Print the document. No The problem is solved. For non-touch-screen printer models, press to Settings > Troubleshooting > Print Quality...
Users Guide PDF
Page 251
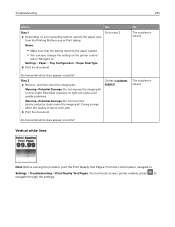
...? Notes: • Make sure that the setting matches the paper loaded. • You can cause print quality problems. Warning-Potential Damage: Do not touch the photoconductor drum under the imaging kit. Contact customer support. b Print the document. Do horizontal white lines appear on the printer control panel. Navigate to Settings > Troubleshooting...
...? Notes: • Make sure that the setting matches the paper loaded. • You can cause print quality problems. Warning-Potential Damage: Do not touch the photoconductor drum under the imaging kit. Contact customer support. b Print the document. Do horizontal white lines appear on the printer control panel. Navigate to Settings > Troubleshooting...
Users Guide PDF
Page 252
No The problem is solved. The problem is solved. Doing so may cause print quality problems. Warning-Potential Damage: Do not touch the photoconductor drum under the imaging kit. Troubleshooting 252 Action Yes Step 1 Go to navigate through the settings. a Load the paper source with the recommended paper type. ...
No The problem is solved. The problem is solved. Doing so may cause print quality problems. Warning-Potential Damage: Do not touch the photoconductor drum under the imaging kit. Troubleshooting 252 Action Yes Step 1 Go to navigate through the settings. a Load the paper source with the recommended paper type. ...

Users Guide PDF
Page 331
... gestures 25 navigating the screen using gestures 25 network folder creating a shortcut 72 noise emission levels 315 nonvolatile memory erasing 156 Non‑Lexmark supply 227 non‑volatile memory 157 Not enough free space in flash memory for resources 227 notices 315, 316, 317, ... 27 parts status checking 168 personal identification number method 160 personal identification numbers enabling 25 phone splitter 62 photoconductor unit ordering 169 replacing 174 photos copying 51 placing separator sheets between copies copying 52 poor fax print quality 261 power button ...
... gestures 25 navigating the screen using gestures 25 network folder creating a shortcut 72 noise emission levels 315 nonvolatile memory erasing 156 Non‑Lexmark supply 227 non‑volatile memory 157 Not enough free space in flash memory for resources 227 notices 315, 316, 317, ... 27 parts status checking 168 personal identification number method 160 personal identification numbers enabling 25 phone splitter 62 photoconductor unit ordering 169 replacing 174 photos copying 51 placing separator sheets between copies copying 52 poor fax print quality 261 power button ...

Users Guide PDF
Page 332
... 253 printer memory erasing 156 printer menus 75 printer messages Check tray connection 229 Defective flash detected 226 Non‑Lexmark supply 227 Not enough free space in flash memory for resources 227 Scanner maintenance required, use ADF Kit 228 Unformatted... R received fax forwarding 71 received faxes holding 71 recycling Lexmark packaging 200 Lexmark products 200 reducing copies 52 repeat print jobs 48 printing from a Macintosh computer 49 printing from Windows 49 repeating defects 252 replacing a photoconductor unit 174 replacing a toner cartridge 171 replacing parts ADF...
... 253 printer memory erasing 156 printer menus 75 printer messages Check tray connection 229 Defective flash detected 226 Non‑Lexmark supply 227 Not enough free space in flash memory for resources 227 Scanner maintenance required, use ADF Kit 228 Unformatted... R received fax forwarding 71 received faxes holding 71 recycling Lexmark packaging 200 Lexmark products 200 reducing copies 52 repeat print jobs 48 printing from a Macintosh computer 49 printing from Windows 49 repeating defects 252 replacing a photoconductor unit 174 replacing a toner cartridge 171 replacing parts ADF...

Users Guide PDF
Page 333
..., hole punch or booklet finisher installing 305 statement of volatility 157 storing print jobs 48 supplies conserving 199 supplies status checking 168 supplies, ordering photoconductor unit 169 staple cartridges 169 waste toner bottle 169 supply notifications configuring 170 supply usage counters resetting 227 supported file...
..., hole punch or booklet finisher installing 305 statement of volatility 157 storing print jobs 48 supplies conserving 199 supplies status checking 168 supplies, ordering photoconductor unit 169 staple cartridges 169 waste toner bottle 169 supply notifications configuring 170 supply usage counters resetting 227 supported file...


