
Troubleshooting Guide
Page 1
... the connection is displayed. The toner waste container door is not connected properly Verify that you selected the printer driver associated with the Lexmark ABC. • If you are using the wrong printer driver or are experiencing, the message on . You are using a USB port, make sure: • The power... cord is plugged into the outlet is working. • The printer is not ready to receive data Make sure Ready or Power Saver appears on the Lexmark Web site ...
... the connection is displayed. The toner waste container door is not connected properly Verify that you selected the printer driver associated with the Lexmark ABC. • If you are using the wrong printer driver or are experiencing, the message on . You are using a USB port, make sure: • The power... cord is plugged into the outlet is working. • The printer is not ready to receive data Make sure Ready or Power Saver appears on the Lexmark Web site ...

Troubleshooting Guide
Page 2
...in the software application you are using . Job takes longer than expected to Off in the driver overrides the setting in the Finishing Menu or through the list of held jobs and deleting others ...you have enough memory Add printer memory or an optional hard disk. We recommend Lexmark part number 1329605 (10 ft) or 1427498 (20 ft) for about 10 seconds, and then turn...you must exit Hex Trace mode before you can print your print job by scrolling through the printer driver. If this does not fix the problem, unplug the printer, and check the connection between the ...
...in the software application you are using . Job takes longer than expected to Off in the driver overrides the setting in the Finishing Menu or through the list of held jobs and deleting others ...you have enough memory Add printer memory or an optional hard disk. We recommend Lexmark part number 1329605 (10 ft) or 1427498 (20 ft) for about 10 seconds, and then turn...you must exit Hex Trace mode before you can print your print job by scrolling through the printer driver. If this does not fix the problem, unplug the printer, and check the connection between the ...
Troubleshooting Guide
Page 4
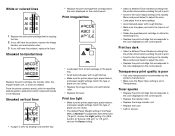
... 28 lb bond to 47 lb bond (105 g/m2 to 175 g/m2), choose the Heavy setting. • Select a different Toner Darkness setting from the printer driver before sending the job to print. • Scroll to the Color Adjust setting in the Quality Menu and press Select to adjust the color. •...; Load paper from the printer driver before sending the job to print. • Scroll to the Color Adjust setting in the Quality Menu and press Select to adjust the color. •...
... 28 lb bond to 47 lb bond (105 g/m2 to 175 g/m2), choose the Heavy setting. • Select a different Toner Darkness setting from the printer driver before sending the job to print. • Scroll to the Color Adjust setting in the Quality Menu and press Select to adjust the color. •...; Load paper from the printer driver before sending the job to print. • Scroll to the Color Adjust setting in the Quality Menu and press Select to adjust the color. •...

User Reference
Page 2
... information 7 Cautions and warnings 8 Electronic emission notices 8 Noise emission levels 12 ENERGY STAR 12 Laser notice ...12 Chapter 2: More about installing drivers 13 Installing drivers for local printing 13 Installing drivers for network printing 17 Chapter 3: Printing 21 Understanding the printer operator panel 21 Sending a job to print 22 Canceling a print job 23...
... information 7 Cautions and warnings 8 Electronic emission notices 8 Noise emission levels 12 ENERGY STAR 12 Laser notice ...12 Chapter 2: More about installing drivers 13 Installing drivers for local printing 13 Installing drivers for network printing 17 Chapter 3: Printing 21 Understanding the printer operator panel 21 Sending a job to print 22 Canceling a print job 23...

User Reference
Page 7
... are the property of the document you want to the Lexmark copyrighted software in the referenced licenses for the Lexmark modified GNU licensed software, launch the drivers CD that is similarly provided without warranty, use of the licenses referenced above. To obtain source ... Click the title of their respective owners. Licensing notice The printer resident software contains: • Software developed and copyrighted by Lexmark • Lexmark modified software licensed under the provisions of the GNU General Public License version 2 and the GNU Lesser General Public License version ...
... are the property of the document you want to the Lexmark copyrighted software in the referenced licenses for the Lexmark modified GNU licensed software, launch the drivers CD that is similarly provided without warranty, use of the licenses referenced above. To obtain source ... Click the title of their respective owners. Licensing notice The printer resident software contains: • Software developed and copyrighted by Lexmark • Lexmark modified software licensed under the provisions of the GNU General Public License version 2 and the GNU Lesser General Public License version ...

User Reference
Page 13
... on the operating system you are also available in the Printers folder. Using Windows 95 and Windows 98 (first edition) 1 Turn on our Lexmark Web site at www.lexmark.com. Drivers are using. Note: USB support is not available for the Windows 95 operating system. 3 When prompted, select Local printer. 4 Select the manufacturer...
... on the operating system you are also available in the Printers folder. Using Windows 95 and Windows 98 (first edition) 1 Turn on our Lexmark Web site at www.lexmark.com. Drivers are using. Note: USB support is not available for the Windows 95 operating system. 3 When prompted, select Local printer. 4 Select the manufacturer...

User Reference
Page 14
...Creating a desktop printer icon (Mac 8.6-9.x) 1 Install a printer PostScript Printer Description (PPD) file on our Lexmark Web site at www.lexmark.com. 2 Do one of a printer to load. 8 Close the drivers CD. b Double-click Classic, and then double-click the installer package for USB printing. e Click Continue... Applications, and then click Utilities. 3 Double-click Desktop Printer Utility. 4 Select Printer (USB), and then click OK. 14 5 Insert the drivers CD. It may take some time for your printer. g On the Easy Install screen, click Install. c Choose the language you want to ...
...Creating a desktop printer icon (Mac 8.6-9.x) 1 Install a printer PostScript Printer Description (PPD) file on our Lexmark Web site at www.lexmark.com. 2 Do one of a printer to load. 8 Close the drivers CD. b Double-click Classic, and then double-click the installer package for USB printing. e Click Continue... Applications, and then click Utilities. 3 Double-click Desktop Printer Utility. 4 Select Printer (USB), and then click OK. 14 5 Insert the drivers CD. It may take some time for your printer. g On the Easy Install screen, click Install. c Choose the language you want to ...

User Reference
Page 15
... do this page for later use. Maximum baud rate supported is not available. Stop Bits must be set serial parameters in the printer, 2) install a printer driver on the display, and then press Select. Make sure your printer PPD now matches your printer and computer. Setting parameters in the USB Printer Selection...
... do this page for later use. Maximum baud rate supported is not available. Stop Bits must be set serial parameters in the printer, 2) install a printer driver on the display, and then press Select. Make sure your printer PPD now matches your printer and computer. Setting parameters in the USB Printer Selection...
User Reference
Page 16
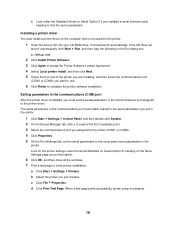
... Print Test Page. c Click File Properties. When a test page prints successfully, printer setup is complete. 16 Installing a printer driver You must install a printer driver on the Menu Settings page you must match exactly to the serial parameters you set in the printer. The serial parameters in the... If the CD does not launch automatically, click Start Run, and then type the following in the communications port assigned to the printer driver. It should launch automatically. b Select the printer you want to use. 6 Click Finish to the printer you are installing, and then...
... Print Test Page. c Click File Properties. When a test page prints successfully, printer setup is complete. 16 Installing a printer driver You must install a printer driver on the Menu Settings page you must match exactly to the serial parameters you set in the printer. The serial parameters in the... If the CD does not launch automatically, click Start Run, and then type the following in the communications port assigned to the printer driver. It should launch automatically. b Select the printer you want to use. 6 Click Finish to the printer you are installing, and then...

User Reference
Page 17
...Press Menu until you configure for network printing Printing a network setup page If the printer is installed, you are available on our Lexmark Web site at www.lexmark.com. 17 Utilities Menu 1 Menu 2 Select 3 Return 4 Go 5 Stop 6 1 Make sure the printer is on....Menu until you see Print Net Setup, and then press Select. Supported printer drivers • Windows system printer driver • Lexmark custom printer driver System drivers are built into Windows operating systems. Custom drivers are ready to your network support person for direct printing or shared printing. ...
...Press Menu until you configure for network printing Printing a network setup page If the printer is installed, you are available on our Lexmark Web site at www.lexmark.com. 17 Utilities Menu 1 Menu 2 Select 3 Return 4 Go 5 Stop 6 1 Make sure the printer is on....Menu until you see Print Net Setup, and then press Select. Supported printer drivers • Windows system printer driver • Lexmark custom printer driver System drivers are built into Windows operating systems. Custom drivers are ready to your network support person for direct printing or shared printing. ...

User Reference
Page 18
... a Enter a port name. This can be any name that you can install a system printer driver and use with the printer, such as Color1-lab4. Supported network printer ports • Lexmark network port For basic printer functionality, you associate with all the printers on each network computer. After..."Configure for use a system network printer port, such as Ethernet. • Printer drivers are typically installed on your printer model from the list and then click Next. 8 Click Add Port. 9 Select Lexmark TCP/IP Network Port, and then click Add. 10 Enter the information to the network...
... a Enter a port name. This can be any name that you can install a system printer driver and use with the printer, such as Color1-lab4. Supported network printer ports • Lexmark network port For basic printer functionality, you associate with all the printers on each network computer. After..."Configure for use a system network printer port, such as Ethernet. • Printer drivers are typically installed on your printer model from the list and then click Next. 8 Click Add Port. 9 Select Lexmark TCP/IP Network Port, and then click Add. 10 Enter the information to the network...

User Reference
Page 19
... a default paper size. 7 On the Easy Install screen, click Install. Mac 8.6-9.x Step 1: Install a custom PPD file 1 Insert the drivers CD. 2 Double-click Classic, and then double-click the installer package for your Macintosh computer. 3 Choose the language you want to use,... www.lexmark.com. Note: A PPD file provides detailed information about the capabilities of a printer to your computer. 8 Click Quit when installation is also available in a downloadable software package on your Macintosh computer. Step 2: Create a desktop printer 1 In the Chooser, select the LaserWriter 8 driver. ...
... a default paper size. 7 On the Easy Install screen, click Install. Mac 8.6-9.x Step 1: Install a custom PPD file 1 Insert the drivers CD. 2 Double-click Classic, and then double-click the installer package for your Macintosh computer. 3 Choose the language you want to use,... www.lexmark.com. Note: A PPD file provides detailed information about the capabilities of a printer to your computer. 8 Click Quit when installation is also available in a downloadable software package on your Macintosh computer. Step 2: Create a desktop printer 1 In the Chooser, select the LaserWriter 8 driver. ...

User Reference
Page 21
... numerical values, such as Copies, press and hold Menu to select the settings you will not be able to change printer properties in the printer driver to scroll through the menus and menu items. • List the menu items in the Job Menu (during Busy state). If you see a Menus Disabled...
... numerical values, such as Copies, press and hold Menu to select the settings you will not be able to change printer properties in the printer driver to scroll through the menus and menu items. • List the menu items in the Job Menu (during Busy state). If you see a Menus Disabled...

User Reference
Page 30
... to return the printer to the Ready state. 3 From the computer software application, set the Paper Type and Paper Size according to view the printer driver settings. f Click OK, and then send your word processor, spreadsheet, browser, or other application, select File Print. Windows a In your media type (transparencies, envelopes, and...
... to return the printer to the Ready state. 3 From the computer software application, set the Paper Type and Paper Size according to view the printer driver settings. f Click OK, and then send your word processor, spreadsheet, browser, or other application, select File Print. Windows a In your media type (transparencies, envelopes, and...

User Reference
Page 32
... value you see Configure Bins, and then press Select. Holding a job in the printer When sending a job to the printer, you can specify in the driver that when one or more information, see Paper Menu, and then press Select. 2 Press Menu until you see Configure Bins and Bin Full. To change... the Configure Bins setting: 1 Press Menu until you want the printer to hold the job in the driver when you sent the job. Linking output bins If you attach an optional finisher or mailbox to your printer, you can link output bins, or...
... value you see Configure Bins, and then press Select. Holding a job in the printer When sending a job to the printer, you can specify in the driver that when one or more information, see Paper Menu, and then press Select. 2 Press Menu until you see Configure Bins and Bin Full. To change... the Configure Bins setting: 1 Press Menu until you want the printer to hold the job in the driver when you sent the job. Linking output bins If you attach an optional finisher or mailbox to your printer, you can link output bins, or...

User Reference
Page 34
... copies later. Use Verify Print to examine the first copy to see if it is held jobs and deleting others you delete it from the driver in memory until you have sent to free up additional printer memory by scrolling through the list of held in printer memory. Reserve Print If...
... copies later. Use Verify Print to examine the first copy to see if it is held jobs and deleting others you delete it from the driver in memory until you have sent to free up additional printer memory by scrolling through the list of held in printer memory. Reserve Print If...

User Reference
Page 35
... is then held jobs for each digit (1-6). This ensures that the job does not print until you enter the same four-digit PIN from the driver. Enter PIN =**** 1 Menu 2 Select 3 Return4 Go5 Stop 6 If you entered. When you select Confidential Job from memory. 35 As you enter the PIN, asterisks are...
... is then held jobs for each digit (1-6). This ensures that the job does not print until you enter the same four-digit PIN from the driver. Enter PIN =**** 1 Menu 2 Select 3 Return4 Go5 Stop 6 If you entered. When you select Confidential Job from memory. 35 As you enter the PIN, asterisks are...

User Reference
Page 43
...: Values marked by increasing or decreasing the amount of object and how the color for this operation. Note: This function is performed using the PostScript driver. Off No color correction is specified. To provide users with the ability to make subtle color adjustments to printed output by an asterisk (*) are impossible...
...: Values marked by increasing or decreasing the amount of object and how the color for this operation. Note: This function is performed using the PostScript driver. Off No color correction is specified. To provide users with the ability to make subtle color adjustments to printed output by an asterisk (*) are impossible...

User Reference
Page 46
... consumption. For example, if you want for the printer default value. (Set the number of 1, 2, or 3 is only effective when using the PostScript driver. On Copies Duplex To set the number of copies you set Copies to 2 and send three pages to define how the printer delivers the printed... 1, page 1, page 2, page 2, page 3, page 3. Menu Item Blank Pages Purpose To specify whether to all Off* print jobs. (Select Duplex from the printer driver. Prints each page of a job the number of a print job Off* stacked in toner consumption. Prints on one side of the job. Menu Item Toner...
... consumption. For example, if you want for the printer default value. (Set the number of 1, 2, or 3 is only effective when using the PostScript driver. On Copies Duplex To set the number of copies you set Copies to 2 and send three pages to define how the printer delivers the printed... 1, page 1, page 2, page 2, page 3, page 3. Menu Item Blank Pages Purpose To specify whether to all Off* print jobs. (Select Duplex from the printer driver. Prints each page of a job the number of a print job Off* stacked in toner consumption. Prints on one side of the job. Menu Item Toner...

User Reference
Page 47
... edge for landscape orientation). Long Edge* Short Edge Assumes binding along the short edge of all Off* printed output. (Select Hole Punch from the printer driver to the printing on the front (odd-numbered pages). To punch holes along the edge of the page (top edge for portrait orientation and left...
... edge for landscape orientation). Long Edge* Short Edge Assumes binding along the short edge of all Off* printed output. (Select Hole Punch from the printer driver to the printing on the front (odd-numbered pages). To punch holes along the edge of the page (top edge for portrait orientation and left...

