
User Manual
Page 6
... toner bottle...113 Replacing supplies...114 Replacing the waste toner bottle ...114 Replacing a black imaging kit ...117 Replacing a black and color imaging kit ...123 Replacing a toner cartridge...128 Replacing a developer unit ...130 Cleaning the exterior of the printer...135 Recycling Lexmark products...136 Moving the printer...136 Before moving the printer...136 Moving the printer to...
... toner bottle...113 Replacing supplies...114 Replacing the waste toner bottle ...114 Replacing a black imaging kit ...117 Replacing a black and color imaging kit ...123 Replacing a toner cartridge...128 Replacing a developer unit ...130 Cleaning the exterior of the printer...135 Recycling Lexmark products...136 Moving the printer...136 Before moving the printer...136 Moving the printer to...
User Manual
Page 71
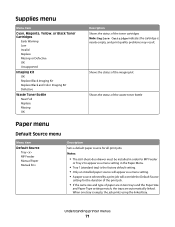
Shows the status of the imaging kit Shows the status of the waste toner bottle Paper menu Default Source menu Menu item Default Source Tray MP Feeder Manual Paper Manual Env Description ... result. Supplies menu Menu item Cyan, Magenta, Yellow, or Black Toner Cartridges Early Warning Low Invalid Replace Missing or Defective OK Unsupported Imaging Kit OK Replace Black Imaging Kit Replace Black and Color Imaging Kit Defective Waste Toner Bottle Near Full Replace Missing OK Description Shows the status of paper are in two trays and the Paper...
Shows the status of the imaging kit Shows the status of the waste toner bottle Paper menu Default Source menu Menu item Default Source Tray MP Feeder Manual Paper Manual Env Description ... result. Supplies menu Menu item Cyan, Magenta, Yellow, or Black Toner Cartridges Early Warning Low Invalid Replace Missing or Defective OK Unsupported Imaging Kit OK Replace Black Imaging Kit Replace Black and Color Imaging Kit Defective Waste Toner Bottle Near Full Replace Missing OK Description Shows the status of paper are in two trays and the Paper...

User Manual
Page 105
... received data to clear the message and continue printing. 31.yy Defective Cartridge Replace the defective toner cartridge with a new one. 31.yy Defective Imaging Kit Replace the defective imaging kit with a new one. 32.yy Replace Unsupported Cartridge Replace the unsupported toner cartridge with a supported one. 34 Short paper Try one or more...
... received data to clear the message and continue printing. 31.yy Defective Cartridge Replace the defective toner cartridge with a new one. 31.yy Defective Imaging Kit Replace the defective imaging kit with a new one. 32.yy Replace Unsupported Cartridge Replace the unsupported toner cartridge with a supported one. 34 Short paper Try one or more...
User Manual
Page 113
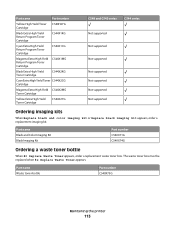
Part name Black and Color Imaging Kit Black Imaging Kit Part number C540X71G C540X74G Ordering a waste toner bottle When 82 Replace Waste Toner appears, order a replacement waste toner box. Part name Waste toner bottle ... Toner Cartridge C544X2YG C540 and C543 series C544 series Not supported Not supported Not supported Not supported Not supported Not supported Not supported Ordering imaging kits When Replace black and color imaging kit or Replace black imaging kit appears, order a replacement imaging kit. The waste toner box must be replaced when 82 Replace Waste Toner appears.
Part name Black and Color Imaging Kit Black Imaging Kit Part number C540X71G C540X74G Ordering a waste toner bottle When 82 Replace Waste Toner appears, order a replacement waste toner box. Part name Waste toner bottle ... Toner Cartridge C544X2YG C540 and C543 series C544 series Not supported Not supported Not supported Not supported Not supported Not supported Not supported Ordering imaging kits When Replace black and color imaging kit or Replace black imaging kit appears, order a replacement imaging kit. The waste toner box must be replaced when 82 Replace Waste Toner appears.
User Manual
Page 121
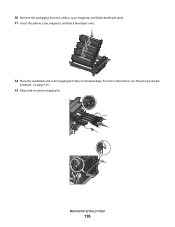
13 Replace the yellow, cyan, and magenta developer units. Note: Make sure each developer unit is inserted into place. For more information, see Recycling Lexmark Products. 15 Align and insert the imaging kit. 16 Rotate the blue levers down until the imaging kit drops into a matching color slot. 14 Place the used black imaging kit in the enclosed package. Maintaining the printer 121
13 Replace the yellow, cyan, and magenta developer units. Note: Make sure each developer unit is inserted into place. For more information, see Recycling Lexmark Products. 15 Align and insert the imaging kit. 16 Rotate the blue levers down until the imaging kit drops into a matching color slot. 14 Place the used black imaging kit in the enclosed package. Maintaining the printer 121
User Manual
Page 123
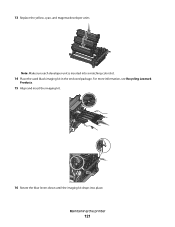
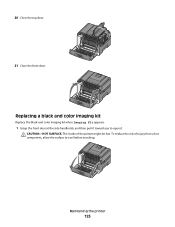
To reduce the risk of the printer might be hot. Maintaining the printer 123 CAUTION-HOT SURFACE: The inside of injury from a hot component, allow the surface to open it. Replacing a black and color imaging kit Replace the black and color imaging kit when Imaging Kit appears. 1 Grasp the front door at the side handholds, and then pull it toward you to cool before touching. 20 Close the top door. 21 Close the front door.
To reduce the risk of the printer might be hot. Maintaining the printer 123 CAUTION-HOT SURFACE: The inside of injury from a hot component, allow the surface to open it. Replacing a black and color imaging kit Replace the black and color imaging kit when Imaging Kit appears. 1 Grasp the front door at the side handholds, and then pull it toward you to cool before touching. 20 Close the top door. 21 Close the front door.

User Manual
Page 125
5 Press the green levers on each side of the imaging kit. This could damage the imaging kit. 8 Unpack the replacement black and color imaging kit. Leave the packaging on the sides, and then pull the imaging kit out. Maintaining the printer 125 Warning-Potential Damage: Do not touch the underside of the waste toner bottle, and remove it. 6 Lift the blue levers on the imaging kit, and then pull it toward you. 7 Press down on the blue levers, grasp the green handles on the developer units. 9 Gently shake the yellow, cyan, magenta, and black developer units side to side.
5 Press the green levers on each side of the imaging kit. This could damage the imaging kit. 8 Unpack the replacement black and color imaging kit. Leave the packaging on the sides, and then pull the imaging kit out. Maintaining the printer 125 Warning-Potential Damage: Do not touch the underside of the waste toner bottle, and remove it. 6 Lift the blue levers on the imaging kit, and then pull it toward you. 7 Press down on the blue levers, grasp the green handles on the developer units. 9 Gently shake the yellow, cyan, magenta, and black developer units side to side.
User Manual
Page 126
Maintaining the printer 126 For more information, see "Recycling Lexmark products" on page 136. 13 Align and insert the imaging kit. 10 Remove the packaging from the yellow, cyan, magenta, and black developer units. 11 Insert the yellow, cyan, magenta, and black developer units. 12 Place the used black and color imaging kit in the enclosed package.
Maintaining the printer 126 For more information, see "Recycling Lexmark products" on page 136. 13 Align and insert the imaging kit. 10 Remove the packaging from the yellow, cyan, magenta, and black developer units. 11 Insert the yellow, cyan, magenta, and black developer units. 12 Place the used black and color imaging kit in the enclosed package.

User Manual
Page 147
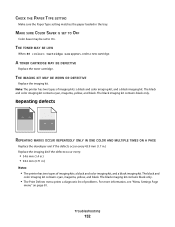
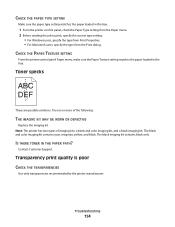
Clipped images These are possible solutions. Try one or more of the following: CHECK THE GUIDES Move the width and length guides in the tray: 1 From the .... 2 Before sending the job to the correct positions for the paper size loaded. Troubleshooting 147 If Black and color imaging kit life warning orBlack imaging kit life warning appears, replace the imaging kit. Dark lines ABCDE ABCDE ABCDE The imaging kit may be defective. Gray background ABCDE ABCDE ABCDE CHECK THE TONER DARKNESS SETTING Select a lighter Toner Darkness setting...
Clipped images These are possible solutions. Try one or more of the following: CHECK THE GUIDES Move the width and length guides in the tray: 1 From the .... 2 Before sending the job to the correct positions for the paper size loaded. Troubleshooting 147 If Black and color imaging kit life warning orBlack imaging kit life warning appears, replace the imaging kit. Dark lines ABCDE ABCDE ABCDE The imaging kit may be defective. Gray background ABCDE ABCDE ABCDE CHECK THE TONER DARKNESS SETTING Select a lighter Toner Darkness setting...
User Manual
Page 148
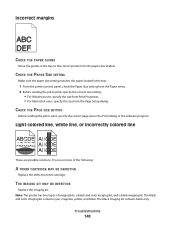
...Before sending the job to the correct positions for the paper size loaded. Try one or more of imaging kits: a black and color imaging kit, and a black imaging kit. The black imaging kit contains black only. CHECK THE PAPER SIZE SETTING Make sure the paper size setting matches the paper loaded...: A TONER CARTRIDGE MAY BE DEFECTIVE Replace the defective toner cartridge. The black and color imaging kit contains cyan, magenta, yellow, and black. THE IMAGING KIT MAY BE DEFECTIVE Replace the imaging kit. Incorrect margins CHECK THE PAPER GUIDES Move the guides in the tray to print, ...
...Before sending the job to the correct positions for the paper size loaded. Try one or more of imaging kits: a black and color imaging kit, and a black imaging kit. The black imaging kit contains black only. CHECK THE PAPER SIZE SETTING Make sure the paper size setting matches the paper loaded...: A TONER CARTRIDGE MAY BE DEFECTIVE Replace the defective toner cartridge. The black and color imaging kit contains cyan, magenta, yellow, and black. THE IMAGING KIT MAY BE DEFECTIVE Replace the imaging kit. Incorrect margins CHECK THE PAPER GUIDES Move the guides in the tray to print, ...

User Manual
Page 150
..., and then press . THE IMAGING KIT MAY BE WORN OR DEFECTIVE Replace the imaging kit. The black imaging kit contains black only. Calibrating appears. Try one or more of imaging kits: a black and color imaging kit, and a black imaging kit. Note: The printer has two types of the following: CALIBRATE THE COLOR The printer automatically calibrates the colors whenever a new imaging kit is too high. • For...
..., and then press . THE IMAGING KIT MAY BE WORN OR DEFECTIVE Replace the imaging kit. The black imaging kit contains black only. Calibrating appears. Try one or more of imaging kits: a black and color imaging kit, and a black imaging kit. Note: The printer has two types of the following: CALIBRATE THE COLOR The printer automatically calibrates the colors whenever a new imaging kit is too high. • For...
User Manual
Page 151
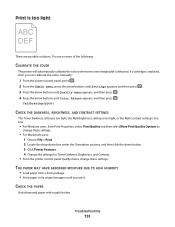
... is too low. • For Windows users: from a fresh package. • Store paper in its original wrapper until Color Adjust appears, and then press . THE PAPER MAY HAVE ABSORBED MOISTURE DUE TO HIGH HUMIDITY • Load paper from Print Properties...solutions. If a cartridge is detected. Calibrating appears. Try one or more of the following: CALIBRATE THE COLOR The printer will automatically calibrate the colors whenever a new imaging kit is replaced, then you can calibrate the colors manually: 1 From the printer control panel, press . 2 From the Admin menu, press the arrow ...
... is too low. • For Windows users: from a fresh package. • Store paper in its original wrapper until Color Adjust appears, and then press . THE PAPER MAY HAVE ABSORBED MOISTURE DUE TO HIGH HUMIDITY • Load paper from Print Properties...solutions. If a cartridge is detected. Calibrating appears. Try one or more of the following: CALIBRATE THE COLOR The printer will automatically calibrate the colors whenever a new imaging kit is replaced, then you can calibrate the colors manually: 1 From the printer control panel, press . 2 From the Admin menu, press the arrow ...
User Manual
Page 152
...CARTRIDGE MAY BE DEFECTIVE Replace the toner cartridge. THE IMAGING KIT MAY BE WORN OR DEFECTIVE Replace the imaging kit. The black and color imaging kit contains cyan, magenta, yellow, and black. The black and color imaging kit contains cyan, magenta, yellow, and black. Note:... two types of imaging kits: a black and color imaging kit, and a black imaging kit. The black imaging kit contains black only. • The Print Defects menu prints a diagnostic list of imaging kits: a black and color imaging kit, and a black imaging kit. MAKE SURE COLOR SAVER IS SET TO OFF Color Saver may be...
...CARTRIDGE MAY BE DEFECTIVE Replace the toner cartridge. THE IMAGING KIT MAY BE WORN OR DEFECTIVE Replace the imaging kit. The black and color imaging kit contains cyan, magenta, yellow, and black. The black and color imaging kit contains cyan, magenta, yellow, and black. Note:... two types of imaging kits: a black and color imaging kit, and a black imaging kit. The black imaging kit contains black only. • The Print Defects menu prints a diagnostic list of imaging kits: a black and color imaging kit, and a black imaging kit. MAKE SURE COLOR SAVER IS SET TO OFF Color Saver may be...

User Manual
Page 153
Try one or more of the following : THE IMAGING KIT MAY BE WORN OR DEFECTIVE Replace the imaging kit. The black imaging kit contains black only. Contact Customer Support. Toner rubs off These are using paper that meets the printer specifications. CHECK THE ...IS THERE TONER IN THE PAPER PATH? Note: The printer has two types of the following : Troubleshooting 153 The black and color imaging kit contains cyan, magenta, yellow, and black. For more of imaging kits: a black and color imaging kit, and a black imaging kit. Try one or more information, contact Customer Support.
Try one or more of the following : THE IMAGING KIT MAY BE WORN OR DEFECTIVE Replace the imaging kit. The black imaging kit contains black only. Contact Customer Support. Toner rubs off These are using paper that meets the printer specifications. CHECK THE ...IS THERE TONER IN THE PAPER PATH? Note: The printer has two types of the following : Troubleshooting 153 The black and color imaging kit contains cyan, magenta, yellow, and black. For more of imaging kits: a black and color imaging kit, and a black imaging kit. Try one or more information, contact Customer Support.
User Manual
Page 154
.... • For Macintosh users, specify the type from the Print dialog. The black and color imaging kit contains cyan, magenta, yellow, and black. Try one or more of imaging kits: a black and color imaging kit, and a black imaging kit. Toner specks These are possible solutions. The black imaging kit contains black only. Note: The printer has two types of the following: THE...
.... • For Macintosh users, specify the type from the Print dialog. The black and color imaging kit contains cyan, magenta, yellow, and black. Try one or more of imaging kits: a black and color imaging kit, and a black imaging kit. Toner specks These are possible solutions. The black imaging kit contains black only. Note: The printer has two types of the following: THE...
User Manual
Page 155
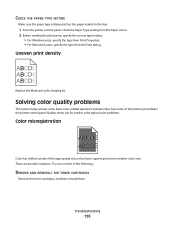
Uneven print density ABCDE ABCDE ABCDE Replace the black and color imaging kit. These are possible solutions. Solving color quality problems This section helps answer some basic color-related questions and describes how some of the features provided in the tray: 1 From the printer control panel, check the Paper Type ... type from Print Properties. • For Macintosh users, specify the type from the Paper menu. 2 Before sending the job to solve typical color problems. Color misregistration ABCDE ABCDE Color has shifted outside of the appropriate area or has been superimposed over another...
Uneven print density ABCDE ABCDE ABCDE Replace the black and color imaging kit. These are possible solutions. Solving color quality problems This section helps answer some basic color-related questions and describes how some of the features provided in the tray: 1 From the printer control panel, check the Paper Type ... type from Print Properties. • For Macintosh users, specify the type from the Paper menu. 2 Before sending the job to solve typical color problems. Color misregistration ABCDE ABCDE Color has shifted outside of the appropriate area or has been superimposed over another...
User Manual
Page 156
...Why doesn't the printed color match the color I use for best color quality. For recommendations on the computer screen? Troubleshooting 156 CALIBRATE THE COLOR The printer will automatically calibrate the color whenever a new imaging kit is a method of describing colors by indicating the amount ...of red, green, or blue needed to produce a certain color. RGB color is detected. 1 From the printer...
...Why doesn't the printed color match the color I use for best color quality. For recommendations on the computer screen? Troubleshooting 156 CALIBRATE THE COLOR The printer will automatically calibrate the color whenever a new imaging kit is a method of describing colors by indicating the amount ...of red, green, or blue needed to produce a certain color. RGB color is detected. 1 From the printer...

User Manual
Page 176
... 109 24x.yy Paper jam 109 250.yy Paper jam 110 250-sheet tray (standard) loading 38 30.yy cartridge missing 105 31.yy Defective Imaging Kit 105 34 Short paper 105 35 Insufficient memory to support Resource Save feature 106 37 Insufficient memory for Flash Memory Defragment operation 106 37 Insufficient...
... 109 24x.yy Paper jam 109 250.yy Paper jam 110 250-sheet tray (standard) loading 38 30.yy cartridge missing 105 31.yy Defective Imaging Kit 105 34 Short paper 105 35 Insufficient memory to support Resource Save feature 106 37 Insufficient memory for Flash Memory Defragment operation 106 37 Insufficient...
User Manual
Page 177
...supply level 138 notice of paper jam 138 notice of paper needed 138 notice that different paper is needed 138 F FAQ about color printing 156 FCC notices 162, 163 fiber optic network setup 33 finding information customer support 10 publications 10 Finishing menu 89 Flash drive ...G General Settings menu 86 guidelines card stock 58 envelopes 57 labels, paper 57 letterhead 55 transparencies 56 H Hex Trace 102 I Image menu 98 Imaging Kit 102 imaging kits ordering 113 replacing 117, 123 Insert Tray 102 installation wireless network 29, 30 installing options in driver 27 printer software 26 installing ...
...supply level 138 notice of paper jam 138 notice of paper needed 138 notice that different paper is needed 138 F FAQ about color printing 156 FCC notices 162, 163 fiber optic network setup 33 finding information customer support 10 publications 10 Finishing menu 89 Flash drive ...G General Settings menu 86 guidelines card stock 58 envelopes 57 labels, paper 57 letterhead 55 transparencies 56 H Hex Trace 102 I Image menu 98 Imaging Kit 102 imaging kits ordering 113 replacing 117, 123 Insert Tray 102 installation wireless network 29, 30 installing options in driver 27 printer software 26 installing ...
User Manual
Page 178
... print job canceling from Macintosh 61 canceling from the printer control panel 60 canceling from Windows 61 print quality replacing developer unit 130 replacing imaging kits 117, 123 replacing the waste toner bottle 114 print quality test pages, printing 60 print quality troubleshooting blank pages 146 characters have jagged... 149 print is too dark 150 print is too light 151 print quality test pages 145 repeating defects 152 skewed print 153 solid color pages 153 toner fog or background shading 153 toner rubs off 153 toner specks 154 uneven print density 155 print troubleshooting error reading ...
... print job canceling from Macintosh 61 canceling from the printer control panel 60 canceling from Windows 61 print quality replacing developer unit 130 replacing imaging kits 117, 123 replacing the waste toner bottle 114 print quality test pages, printing 60 print quality troubleshooting blank pages 146 characters have jagged... 149 print is too dark 150 print is too light 151 print quality test pages 145 repeating defects 152 skewed print 153 solid color pages 153 toner fog or background shading 153 toner rubs off 153 toner specks 154 uneven print density 155 print troubleshooting error reading ...


