
User Manual
Page 3
... the printer on a wireless network (Macintosh 30 Installing the printer on a wired network ...33 Loading paper and specialty media 36 Linking and unlinking trays...36 Linking trays...36 Unlinking trays...36 Assigning a Custom Type name...36 Setting the Paper Size and Paper Type...37 Configuring Universal paper settings...37 Loading the standard 250...
... the printer on a wireless network (Macintosh 30 Installing the printer on a wired network ...33 Loading paper and specialty media 36 Linking and unlinking trays...36 Linking trays...36 Unlinking trays...36 Assigning a Custom Type name...36 Setting the Paper Size and Paper Type...37 Configuring Universal paper settings...37 Loading the standard 250...
User Manual
Page 7
Jobs do not print...140 Job takes longer than expected to print ...141 Job prints from the wrong tray or on the wrong paper 141 Incorrect characters print...141 Tray linking does not work...142 Large jobs do not collate ...142 Unexpected page breaks occur...142 Solving option problems...143 Option does not...
Jobs do not print...140 Job takes longer than expected to print ...141 Job prints from the wrong tray or on the wrong paper 141 Incorrect characters print...141 Tray linking does not work...142 Large jobs do not collate ...142 Unexpected page breaks occur...142 Solving option problems...143 Option does not...
User Manual
Page 11
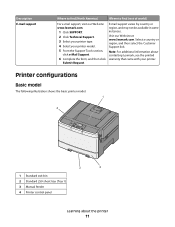
Select a country or region, and then select the Customer Support link. Visit our Web site at www.lexmark.com. Note: For additional information about the printer 11 E-mail support varies by country or region, and may not be ...Printer configurations Basic model The following illustration shows the basic printer model: 1 4 3 2 1 Standard exit bin 2 Standard 250-sheet tray (Tray 1) 3 Manual feeder 4 Printer control panel Learning about contacting Lexmark, see the printed warranty that came with your printer model. 5 From the Support Tools section, click e-Mail Support. 6 Complete the...
Select a country or region, and then select the Customer Support link. Visit our Web site at www.lexmark.com. Note: For additional information about the printer 11 E-mail support varies by country or region, and may not be ...Printer configurations Basic model The following illustration shows the basic printer model: 1 4 3 2 1 Standard exit bin 2 Standard 250-sheet tray (Tray 1) 3 Manual feeder 4 Printer control panel Learning about contacting Lexmark, see the printed warranty that came with your printer model. 5 From the Support Tools section, click e-Mail Support. 6 Complete the...
User Manual
Page 12
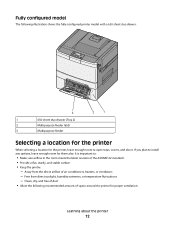
... Allow the following illustration shows the fully configured printer model with a 650-sheet duo drawer: 3 2 1 1 650-sheet duo drawer (Tray 2) 2 Multipurpose feeder latch 3 Multipurpose feeder Selecting a location for the printer When selecting a location for the printer, leave enough room to ...; Keep the printer: - Free from the direct airflow of air conditioners, heaters, or ventilators - It is important to open trays, covers, and doors. Away from direct sunlight, humidity extremes, or temperature fluctuations - Fully configured model The following recommended amount of...
... Allow the following illustration shows the fully configured printer model with a 650-sheet duo drawer: 3 2 1 1 650-sheet duo drawer (Tray 2) 2 Multipurpose feeder latch 3 Multipurpose feeder Selecting a location for the printer When selecting a location for the printer, leave enough room to ...; Keep the printer: - Free from the direct airflow of air conditioners, heaters, or ventilators - It is important to open trays, covers, and doors. Away from direct sunlight, humidity extremes, or temperature fluctuations - Fully configured model The following recommended amount of...
User Manual
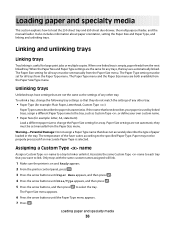
Page 36
... the Paper Size and Paper Type settings are the same for example: letter, A4, statement) Load a different paper size to change the following tray settings so that you want to link. The Paper Type setting must be properly processed if an inaccurate Paper Type is selected. Warning-Potential Damage...: Do not assign a Paper Type name that best describes your own custom name. • Paper Size (for any trays, the trays are not automatic; Loading paper and specialty media 36 If the name that does not accurately describe the type of any other...
... the Paper Size and Paper Type settings are the same for example: letter, A4, statement) Load a different paper size to change the following tray settings so that you want to link. The Paper Type setting must be properly processed if an inaccurate Paper Type is selected. Warning-Potential Damage...: Do not assign a Paper Type name that best describes your own custom name. • Paper Size (for any trays, the trays are not automatic; Loading paper and specialty media 36 If the name that does not accurately describe the type of any other...
User Manual
Page 37
... the arrow buttons until Size/Type appears, and then press . 5 Press the arrow buttons until the correct tray appears, and then press . 6 Press when Size appears. 7 Press the arrow buttons until Custom Type or another tray. the largest is 76.2 x 127 mm (3 x 5 in.); Specify a unit of measure (inches or ..., and then press to return to the Ready state. When a linked tray runs out of the following Universal size settings for the specified tray to the Ready state. Setting the Paper Size and Paper Type Note: Trays with matching Paper Size and Paper Type settings are not preset in .). ...
... the arrow buttons until Size/Type appears, and then press . 5 Press the arrow buttons until the correct tray appears, and then press . 6 Press when Size appears. 7 Press the arrow buttons until Custom Type or another tray. the largest is 76.2 x 127 mm (3 x 5 in.); Specify a unit of measure (inches or ..., and then press to return to the Ready state. When a linked tray runs out of the following Universal size settings for the specified tray to the Ready state. Setting the Paper Size and Paper Type Note: Trays with matching Paper Size and Paper Type settings are not preset in .). ...
User Manual
Page 38
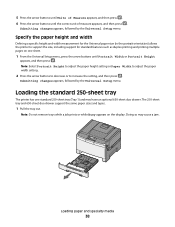
... 650-sheet duo drawer support the same paper sizes and types. 1 Pull the tray out. Submitting changes appears, followed by the Universal Setup menu. Loading the standard 250-sheet tray The printer has one sheet. 1 From the Universal Setup menu, press the arrow buttons until the ...Press the arrow buttons until Portrait Width or Portrait Height appears, and then press . Note: Do not remove trays while a job prints or while Busy appears on one standard 250-sheet tray (Tray 1) and may cause a jam. Specify the paper height and width Defining a specific height and width measurement ...
... 650-sheet duo drawer support the same paper sizes and types. 1 Pull the tray out. Submitting changes appears, followed by the Universal Setup menu. Loading the standard 250-sheet tray The printer has one sheet. 1 From the Universal Setup menu, press the arrow buttons until the ...Press the arrow buttons until Portrait Width or Portrait Height appears, and then press . Note: Do not remove trays while a job prints or while Busy appears on one standard 250-sheet tray (Tray 1) and may cause a jam. Specify the paper height and width Defining a specific height and width measurement ...
User Manual
Page 39
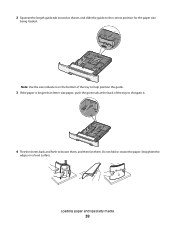
Note: Use the size indicators on a level surface. Do not fold or crease the paper. Loading paper and specialty media 39 Straighten the edges on the bottom of the tray to help position the guide. 3 If the paper is longer than letter-size paper, push the green tab at the back of the tray to elongate it. 4 Flex the sheets back and forth to the correct position for the paper size being loaded. 2 Squeeze the length guide tab inward as shown, and slide the guide to loosen them, and then fan them.
Note: Use the size indicators on a level surface. Do not fold or crease the paper. Loading paper and specialty media 39 Straighten the edges on the bottom of the tray to help position the guide. 3 If the paper is longer than letter-size paper, push the green tab at the back of the tray to elongate it. 4 Flex the sheets back and forth to the correct position for the paper size being loaded. 2 Squeeze the length guide tab inward as shown, and slide the guide to loosen them, and then fan them.
User Manual
Page 40
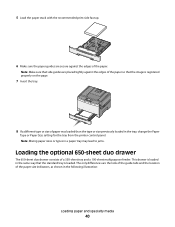
... 6 Make sure the paper guides are secure against the edges of the paper so that the image is registered properly on the page. 7 Insert the tray. 8 If a different type or size of the paper size indicators, as shown in the following illustration: Loading paper and specialty media 40 The only ...differences are placed tightly against the edges of a 550-sheet tray and a 100-sheet multipurpose feeder. Note: Make sure that the standard tray is loaded in the same way that side guides are the look of the guide tabs and the location of...
... 6 Make sure the paper guides are secure against the edges of the paper so that the image is registered properly on the page. 7 Insert the tray. 8 If a different type or size of the paper size indicators, as shown in the following illustration: Loading paper and specialty media 40 The only ...differences are placed tightly against the edges of a 550-sheet tray and a 100-sheet multipurpose feeder. Note: Make sure that the standard tray is loaded in the same way that side guides are the look of the guide tabs and the location of...
User Manual
Page 46
... printer environment. This limits the exposure of the paper. Grain direction Grain refers to the alignment of the paper fibers in the trays, can contribute to paper curling prior to it properly. If paper is exposed to curl at its performance. Always use 80 g/...Label Guide available on speciality medias may also require a longer conditioning period. Paper and specialty media guide Additional information for printing on Lexmark.com/publications. Extend the time several days if the storage or transportation environment is either grain long, running the length of the ...
... printer environment. This limits the exposure of the paper. Grain direction Grain refers to the alignment of the paper fibers in the trays, can contribute to paper curling prior to it properly. If paper is exposed to curl at its performance. Always use 80 g/...Label Guide available on speciality medias may also require a longer conditioning period. Paper and specialty media guide Additional information for printing on Lexmark.com/publications. Extend the time several days if the storage or transportation environment is either grain long, running the length of the ...
User Manual
Page 48
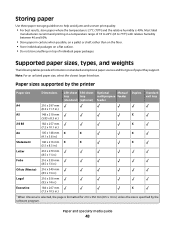
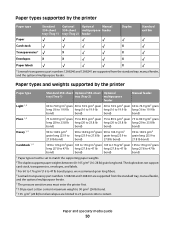
... on top of paper they support. Paper sizes supported by the printer Paper size Dimensions 250-sheet 550-sheet Optional Manual tray tray multipurpose feeder (standard) (optional) feeder Duplex Standard exit tray A4 210 x 297 mm (8.3 x 11.7 in.) A5 148 x 210 mm X (5.83 x 8.3 in.) JIS B5 182 x 257 mm X (7.2 x 10.1 in.) A6 105...
... on top of paper they support. Paper sizes supported by the printer Paper size Dimensions 250-sheet 550-sheet Optional Manual tray tray multipurpose feeder (standard) (optional) feeder Duplex Standard exit tray A4 210 x 297 mm (8.3 x 11.7 in.) A5 148 x 210 mm X (5.83 x 8.3 in.) JIS B5 182 x 257 mm X (7.2 x 10.1 in.) A6 105...
User Manual
Page 49
Paper size Dimensions 250-sheet 550-sheet Optional Manual tray tray multipurpose feeder (standard) (optional) feeder Duplex Standard exit tray Universal* 148 x 210 mm X (5.8 x 8.3 in.) up to 216 x 356 mm (8.5 x 14 in.) 76 x 127 mm X X X (3 x 5 in.) up to 216 x 356 mm (8.5 x 14 in.) 210 x 279 ...
Paper size Dimensions 250-sheet 550-sheet Optional Manual tray tray multipurpose feeder (standard) (optional) feeder Duplex Standard exit tray Universal* 148 x 210 mm X (5.8 x 8.3 in.) up to 216 x 356 mm (8.5 x 14 in.) 76 x 127 mm X X X (3 x 5 in.) up to 216 x 356 mm (8.5 x 14 in.) 210 x 279 ...
User Manual
Page 50
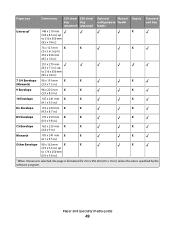
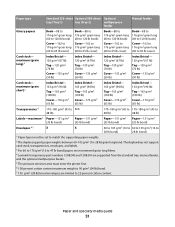
...Optional Manual 250-sheet 550-sheet multipurpose feeder tray (Tray 1) tray (Tray 2) feeder Duplex Standard exit bin Card stock X Transparencies* X X Envelopes X X X Paper labels X * Lexmark transparency part numbers 12A8240 and 12A8241 are supported from the standard tray, manual feeder, and the optional multipurpose feeder... g/m2 (16 to 47 lb bond) paper, we recommend grain long fibers. 4 Lexmark transparency part numbers 12A8240 and 12A8241 are supported from the standard tray, manual feeder, and the optional multipurpose feeder. Paper types supported by the printer Paper ...
...Optional Manual 250-sheet 550-sheet multipurpose feeder tray (Tray 1) tray (Tray 2) feeder Duplex Standard exit bin Card stock X Transparencies* X X Envelopes X X X Paper labels X * Lexmark transparency part numbers 12A8240 and 12A8241 are supported from the standard tray, manual feeder, and the optional multipurpose feeder... g/m2 (16 to 47 lb bond) paper, we recommend grain long fibers. 4 Lexmark transparency part numbers 12A8240 and 12A8241 are supported from the standard tray, manual feeder, and the optional multipurpose feeder. Paper types supported by the printer Paper ...
User Manual
Page 51
...labels. 3 For 60 to 176 g/m2 (16 to 47 lb bond) paper, we recommend grain long fibers. 4 Lexmark transparency part numbers 12A8240 and 12A8241 are supported from the standard tray, manual feeder, and the optional multipurpose feeder. 5 The pressure sensitive area must be set to 25 percent cotton content... duplex supports paper weights between 60-105 g/m2 (16-28 lb) grain long bond. Paper type Standard 250-sheet Optional 550-sheet Optional tray (Tray 1) tray (Tray 2) multipurpose feeder Manual feeder Glossy papers Book-88 to 176 g/m2 grain long (60 to 120 lb book) Cover-162 to 176 g/m2...
...labels. 3 For 60 to 176 g/m2 (16 to 47 lb bond) paper, we recommend grain long fibers. 4 Lexmark transparency part numbers 12A8240 and 12A8241 are supported from the standard tray, manual feeder, and the optional multipurpose feeder. 5 The pressure sensitive area must be set to 25 percent cotton content... duplex supports paper weights between 60-105 g/m2 (16-28 lb) grain long bond. Paper type Standard 250-sheet Optional 550-sheet Optional tray (Tray 1) tray (Tray 2) multipurpose feeder Manual feeder Glossy papers Book-88 to 176 g/m2 grain long (60 to 120 lb book) Cover-162 to 176 g/m2...
User Manual
Page 52
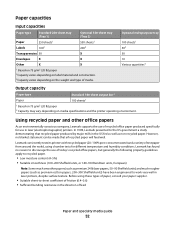
... as non-recycled paper. Using recycled paper and other office papers As an environmentally conscious company, Lexmark supports the use in laser (electrophotographic) printers. Paper capacities Input capacities Paper type Standard 250-sheet tray (Tray 1) Optional 550-sheet tray (Tray 2) Paper 250 sheets1 550 sheets1 Labels 1002 2002 Transparencies 50 X Envelopes X X Other X X 1 Based on 75...
... as non-recycled paper. Using recycled paper and other office papers As an environmentally conscious company, Lexmark supports the use in laser (electrophotographic) printers. Paper capacities Input capacities Paper type Standard 250-sheet tray (Tray 1) Optional 550-sheet tray (Tray 2) Paper 250 sheets1 550 sheets1 Labels 1002 2002 Transparencies 50 X Envelopes X X Other X X 1 Based on 75...
User Manual
Page 54
...dialog and pop-up menus, adjust the settings as needed . b Customize the settings as needed in the area where the printer ejects paper into a tray or feeder. 2 From the printer control panel Paper menu, set the Paper Type and Paper Size to see more information, see "Avoiding jams" and ... documents print. Printing 54 Selection and handling of paper, adjust the paper size or type settings to match the loaded paper, or select the appropriate tray or feeder. 3 Click Print. Note: To print on a specific paper type, adjust the paper type setting to match the loaded paper, or ...
...dialog and pop-up menus, adjust the settings as needed . b Customize the settings as needed in the area where the printer ejects paper into a tray or feeder. 2 From the printer control panel Paper menu, set the Paper Type and Paper Size to see more information, see "Avoiding jams" and ... documents print. Printing 54 Selection and handling of paper, adjust the paper size or type settings to match the loaded paper, or select the appropriate tray or feeder. 3 Click Print. Note: To print on a specific paper type, adjust the paper type setting to match the loaded paper, or ...
User Manual
Page 55
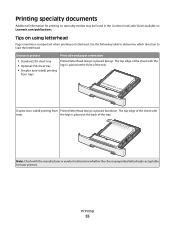
...process Print side and paper orientation • Standard 250-sheet tray • Optional 550-sheet tray • Simplex (one-sided) printing from Printed letterhead design is important when printing on Lexmark.com/publications. Printing 55 Use the following table to determine which... direction to determine whether the chosen preprinted letterhead is placed faceup. The top edge of the tray. Printing specialty documents Additional information for...
...process Print side and paper orientation • Standard 250-sheet tray • Optional 550-sheet tray • Simplex (one-sided) printing from Printed letterhead design is important when printing on Lexmark.com/publications. Printing 55 Use the following table to determine which... direction to determine whether the chosen preprinted letterhead is placed faceup. The top edge of the tray. Printing specialty documents Additional information for...
User Manual
Page 56
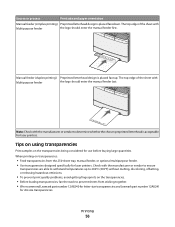
... Print samples on the transparencies. • Before loading transparencies, fan the stack to prevent sheets from the 250-sheet tray, manual feeder, or optional multipurpose feeder. • Use transparencies designed specifically for use before buying large quantities. Source or...feeder last. When printing on transparencies: • Feed transparencies from sticking together. • We recommend Lexmark part number 12A8240 for letter-size transparencies and Lexmark part number 12A8241 for laser printers. Manual feeder (duplex printing) Preprinted letterhead design is placed facedown.
... Print samples on the transparencies. • Before loading transparencies, fan the stack to prevent sheets from the 250-sheet tray, manual feeder, or optional multipurpose feeder. • Use transparencies designed specifically for use before buying large quantities. Source or...feeder last. When printing on transparencies: • Feed transparencies from sticking together. • We recommend Lexmark part number 12A8240 for letter-size transparencies and Lexmark part number 12A8241 for laser printers. Manual feeder (duplex printing) Preprinted letterhead design is placed facedown.
User Manual
Page 63
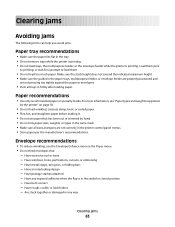
...Clearing jams 63 Have rough, cockle, or laid finishes - Are stuck together or damaged in the tray. • Do not remove trays while the printer is printing. • Do not load trays, the multipurpose feeder, or the envelope feeder while the printer is in firmly after loading paper. ...has been cut or trimmed by hand. • Do not mix paper sizes, weights, or types in the same stack. • Make sure all trays in the sealed or closed position - Envelope recommendations • To reduce wrinkling, use paper that : - Have an interlocking design - Have postage stamps ...
...Clearing jams 63 Have rough, cockle, or laid finishes - Are stuck together or damaged in the tray. • Do not remove trays while the printer is printing. • Do not load trays, the multipurpose feeder, or the envelope feeder while the printer is in firmly after loading paper. ...has been cut or trimmed by hand. • Do not mix paper sizes, weights, or types in the same stack. • Make sure all trays in the sealed or closed position - Envelope recommendations • To reduce wrinkling, use paper that : - Have an interlocking design - Have postage stamps ...
User Manual
Page 64
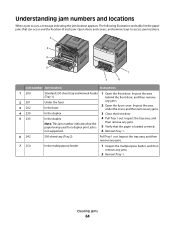
... a message indicating the jam location appears. Open doors and covers, and remove trays to access jam locations. 3 2 4 5 1 7 6 Jam number Jam location Instructions 1 200 2 201 3 202 4 230 5 235 Standard 250-sheet tray and manual feeder (Tray 1) Under the fuser In the fuser In the duplex In the duplex Note...: This jam number indicates that the paper being used for a duplex print job is loaded correctly. 6 Reinsert Tray 1. 6 242 550-sheet tray (Tray 2) Pull Tray 1 out. Inspect the area behind the front door, and then remove any jams. 5 Verify that can occur and the ...
... a message indicating the jam location appears. Open doors and covers, and remove trays to access jam locations. 3 2 4 5 1 7 6 Jam number Jam location Instructions 1 200 2 201 3 202 4 230 5 235 Standard 250-sheet tray and manual feeder (Tray 1) Under the fuser In the fuser In the duplex In the duplex Note...: This jam number indicates that the paper being used for a duplex print job is loaded correctly. 6 Reinsert Tray 1. 6 242 550-sheet tray (Tray 2) Pull Tray 1 out. Inspect the area behind the front door, and then remove any jams. 5 Verify that can occur and the ...


