Wireless Setup Guide
Page 28
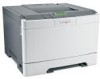
... computer. THERE ARE TOO MANY DEVICES ON THE WIRELESS NETWORK A wireless device will communicate on . • Verify that a new device is configured for the network, manually entering all network information. Try one or more of the following: The printer is not powered on • Turn the printer on the network only...
... computer. THERE ARE TOO MANY DEVICES ON THE WIRELESS NETWORK A wireless device will communicate on . • Verify that a new device is configured for the network, manually entering all network information. Try one or more of the following: The printer is not powered on • Turn the printer on the network only...

Wireless Setup Guide
Page 34
Basic Service Set describes the type of wireless network that you and others can identify it on the network. The address may be assigned manually by you assign to your wireless network by specifying which MAC addresses may communicate on the network A device that shares a single Internet connection with multiple ...
Basic Service Set describes the type of wireless network that you and others can identify it on the network. The address may be assigned manually by you assign to your wireless network by specifying which MAC addresses may communicate on the network A device that shares a single Internet connection with multiple ...
Wireless Setup Guide
Page 35
An IP address assigned manually by the manufacturer. Other possible security settings are WEP and WPA2. Other possible security settings are WPA and WPA2. Also referred to support this. To ...
An IP address assigned manually by the manufacturer. Other possible security settings are WEP and WPA2. Other possible security settings are WPA and WPA2. Also referred to support this. To ...
User's Guide
Page 2
... Universal paper settings...40 Loading the standard 250-sheet tray...41 Loading the 650-sheet duo drawer...43 Using the multipurpose feeder...44 Using the manual feeder...46 Paper and specialty media guidelines 48 Paper guidelines...48 Storing paper...49 Contents 2
... Universal paper settings...40 Loading the standard 250-sheet tray...41 Loading the 650-sheet duo drawer...43 Using the multipurpose feeder...44 Using the manual feeder...46 Paper and specialty media guidelines 48 Paper guidelines...48 Storing paper...49 Contents 2
User's Guide
Page 10
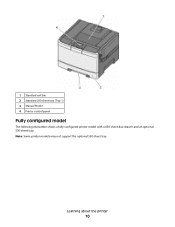
1 Standard exit bin 2 Standard 250-sheet tray (Tray 1) 3 Manual feeder 4 Printer control panel Fully configured model The following illustration shows a fully configured printer model with a 650-sheet duo drawer and an optional 550-sheet tray: Note: Some printer models may not support the optional 550-sheet tray. Learning about the printer 10
1 Standard exit bin 2 Standard 250-sheet tray (Tray 1) 3 Manual feeder 4 Printer control panel Fully configured model The following illustration shows a fully configured printer model with a 650-sheet duo drawer and an optional 550-sheet tray: Note: Some printer models may not support the optional 550-sheet tray. Learning about the printer 10

User's Guide
Page 21
Additional printer setup 21 Note: Once the printer software and any options are installed, it into place. 4 Align the printer with the 650-sheet duo drawer, and then lower the printer into place. 5 Install the dust covers. 3 Align a 650-sheet duo drawer with the optional 550-sheet tray, and then lower it may be necessary to make them available for print jobs. For more information, see "Updating available options in the printer driver to manually add the options in the printer driver" on page 24.
Additional printer setup 21 Note: Once the printer software and any options are installed, it into place. 4 Align the printer with the 650-sheet duo drawer, and then lower the printer into place. 5 Install the dust covers. 3 Align a 650-sheet duo drawer with the optional 550-sheet tray, and then lower it may be necessary to make them available for print jobs. For more information, see "Updating available options in the printer driver to manually add the options in the printer driver" on page 24.
User's Guide
Page 24
... Properties. 4 Click the Install Options tab. 5 Under Available Options, add any options are installed, it may be necessary to manually add the options in the printer driver to the Lexmark Web site at www.lexmark.com. 2 From the Drivers & Downloads menu, click Driver Finder. 3 Select your printer, and then select your operating system...
... Properties. 4 Click the Install Options tab. 5 Under Available Options, add any options are installed, it may be necessary to manually add the options in the printer driver to the Lexmark Web site at www.lexmark.com. 2 From the Drivers & Downloads menu, click Driver Finder. 3 Select your printer, and then select your operating system...
User's Guide
Page 39
... Custom Type ) Paper Type names describe the paper characteristics. The temperature of paper loaded in the tray. The Paper Type setting must be set manually from the next linked tray. To unlink a tray, change the following tray settings so that best describes your own custom name. • Paper...Type. Assigning a custom paper type name to a tray Assign a Custom Type name to a tray to use the 250-sheet tray, the manual feeder, an optional 550-sheet tray and the 650-sheet duo drawer with an integrated multipurpose feeder. Associate the same Custom Type name to ...
... Custom Type ) Paper Type names describe the paper characteristics. The temperature of paper loaded in the tray. The Paper Type setting must be set manually from the next linked tray. To unlink a tray, change the following tray settings so that best describes your own custom name. • Paper...Type. Assigning a custom paper type name to a tray Assign a Custom Type name to a tray to use the 250-sheet tray, the manual feeder, an optional 550-sheet tray and the 650-sheet duo drawer with an integrated multipurpose feeder. Associate the same Custom Type name to ...
User's Guide
Page 41
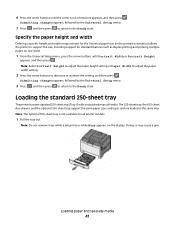
..., and then press . Note: Do not remove trays while a job prints or while Busy appears on one standard 250-sheet tray (Tray 1) with an attached manual feeder. Doing so may cause a jam. The 250-sheet tray, the 650-sheet duo drawer, and the optional 550-sheet tray support the same paper...
..., and then press . Note: Do not remove trays while a job prints or while Busy appears on one standard 250-sheet tray (Tray 1) with an attached manual feeder. Doing so may cause a jam. The 250-sheet tray, the 650-sheet duo drawer, and the optional 550-sheet tray support the same paper...
User's Guide
Page 46
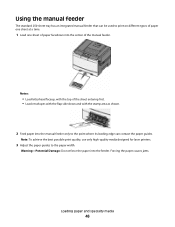
... paper guides to print on different types of paper one sheet at a time. 1 Load one sheet of paper facedown into the feeder. Using the manual feeder The standard 250-sheet tray has an integrated manual feeder that can contact the paper guides. Notes: • Load letterhead faceup, with the top of the... manual feeder. Warning-Potential Damage: Do not force the paper into the center of the sheet entering first. • Load envelopes with the flap side down ...
... paper guides to print on different types of paper one sheet at a time. 1 Load one sheet of paper facedown into the feeder. Using the manual feeder The standard 250-sheet tray has an integrated manual feeder that can contact the paper guides. Notes: • Load letterhead faceup, with the top of the... manual feeder. Warning-Potential Damage: Do not force the paper into the center of the sheet entering first. • Load envelopes with the flap side down ...
User's Guide
Page 50
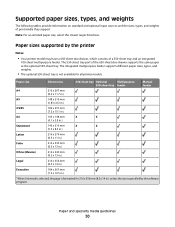
... larger listed size. The 550-sheet tray part of print media they support. Paper size Dimensions 250-sheet tray Optional Multipurpose 550-sheet tray feeder Manual feeder A4 210 x 297 mm (8.3 x 11.7 in.) A5 148 x 210 mm (5.83 x 8.3 in.) JIS B5 182 x 257 mm (7.2 x 10.1 in.) A6 105 x 148 mm X X (4.1 x 5.8 in...
... larger listed size. The 550-sheet tray part of print media they support. Paper size Dimensions 250-sheet tray Optional Multipurpose 550-sheet tray feeder Manual feeder A4 210 x 297 mm (8.3 x 11.7 in.) A5 148 x 210 mm (5.83 x 8.3 in.) JIS B5 182 x 257 mm (7.2 x 10.1 in.) A6 105 x 148 mm X X (4.1 x 5.8 in...
User's Guide
Page 51
... and an integrated 100-sheet multipurpose feeder. Paper and specialty media guidelines 51 Paper size Dimensions 250-sheet tray Optional Multipurpose 550-sheet tray feeder Manual feeder Universal* 148 x 210 mm (5.8 x 8.3 in.) up to 216 x 356 mm (8.5 x 14 in.) 76 x 127 mm (3 x 5 in.) X X up to 216 x 356 mm (8.5 x 14 in.) 7 3/4 Envelope...
... and an integrated 100-sheet multipurpose feeder. Paper and specialty media guidelines 51 Paper size Dimensions 250-sheet tray Optional Multipurpose 550-sheet tray feeder Manual feeder Universal* 148 x 210 mm (5.8 x 8.3 in.) up to 216 x 356 mm (8.5 x 14 in.) 76 x 127 mm (3 x 5 in.) X X up to 216 x 356 mm (8.5 x 14 in.) 7 3/4 Envelope...
User's Guide
Page 52
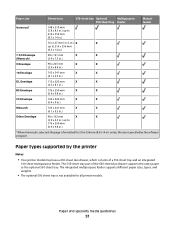
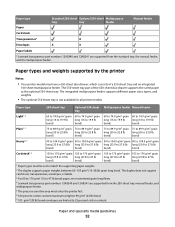
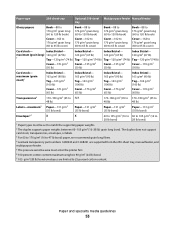
...type Standard 250-sheet Optional 550-sheet Multipurpose tray tray feeder Manual feeder Paper Card stock Transparencies* X Envelopes X X Paper labels * Lexmark transparency part numbers 12A8240 and 12A8241 are supported from the 250-sheet tray, manual feeder, and multipurpose feeder. 5 The pressure sensitive area must..., envelopes, or labels. 3 For 60 to 176 g/m2 (16 to 47 lb bond) paper, we recommend grain long fibers. 4 Lexmark transparency part numbers 12A8240 and 12A8241 are limited to 47 lb bond) bond) bond) bond) 1 Paper types must enter the printer first....
...type Standard 250-sheet Optional 550-sheet Multipurpose tray tray feeder Manual feeder Paper Card stock Transparencies* X Envelopes X X Paper labels * Lexmark transparency part numbers 12A8240 and 12A8241 are supported from the 250-sheet tray, manual feeder, and multipurpose feeder. 5 The pressure sensitive area must..., envelopes, or labels. 3 For 60 to 176 g/m2 (16 to 47 lb bond) paper, we recommend grain long fibers. 4 Lexmark transparency part numbers 12A8240 and 12A8241 are limited to 47 lb bond) bond) bond) bond) 1 Paper types must enter the printer first....
User's Guide
Page 53
... 3 For 60 to 176 g/m2 (16 to 47 lb bond) paper, we recommend grain long fibers. 4 Lexmark transparency part numbers 12A8240 and 12A8241 are supported from the 250-sheet tray, manual feeder, and multipurpose feeder. 5 The pressure sensitive area must be set to 25 percent cotton content. Index Bristol- ...Paper type 250-sheet tray Optional 550-sheet Multipurpose feeder Manual feeder tray Glossy papers Book-88 to 176 g/m2 grain long (60 to 120 lb book) Cover-162 to 176 g/m2 grain long (...
... 3 For 60 to 176 g/m2 (16 to 47 lb bond) paper, we recommend grain long fibers. 4 Lexmark transparency part numbers 12A8240 and 12A8241 are supported from the 250-sheet tray, manual feeder, and multipurpose feeder. 5 The pressure sensitive area must be set to 25 percent cotton content. Index Bristol- ...Paper type 250-sheet tray Optional 550-sheet Multipurpose feeder Manual feeder tray Glossy papers Book-88 to 176 g/m2 grain long (60 to 120 lb book) Cover-162 to 176 g/m2 grain long (...

User's Guide
Page 57
... number 70X7240 for letter-size transparencies and Lexmark part number 12A5010 for laser printers. Note: Transparencies can be printed at a temperature up to prevent sheets from the standard 250-sheet tray or the manual feeder. • Use transparencies designed specifically for ...the stack to 175° C (350° F) without melting, discoloring, offsetting, or releasing hazardous emissions. Source or process Manual feeder (simplex printing) Multipurpose feeder Print side and paper orientation Preprinted letterhead design is placed faceup. Check with the manufacturer or vendor to...
... number 70X7240 for letter-size transparencies and Lexmark part number 12A5010 for laser printers. Note: Transparencies can be printed at a temperature up to prevent sheets from the standard 250-sheet tray or the manual feeder. • Use transparencies designed specifically for ...the stack to 175° C (350° F) without melting, discoloring, offsetting, or releasing hazardous emissions. Source or process Manual feeder (simplex printing) Multipurpose feeder Print side and paper orientation Preprinted letterhead design is placed faceup. Check with the manufacturer or vendor to...
User's Guide
Page 58
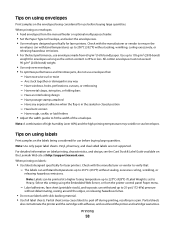
...labels Print samples on the labels being considered for use before buying large quantities. Select this setting using the Embedded Web Server, or from the manual feeder or optional multipurpose feeder. • Set the Paper Type to 200°C (392°F) without delaminating, oozing around the edges, ...or vendor to Heavy. Tips on using envelopes Print samples on the envelopes being considered for use before buying large quantities. When printing on the Lexmark Web site at a higher fusing temperature up to 220°C (428°F) if Label Weight is 25% or less. Check with the...
...labels Print samples on the labels being considered for use before buying large quantities. Select this setting using the Embedded Web Server, or from the manual feeder or optional multipurpose feeder. • Set the Paper Type to 200°C (392°F) without delaminating, oozing around the edges, ...or vendor to Heavy. Tips on using envelopes Print samples on the envelopes being considered for use before buying large quantities. When printing on the Lexmark Web site at a higher fusing temperature up to 220°C (428°F) if Label Weight is 25% or less. Check with the...
User's Guide
Page 65
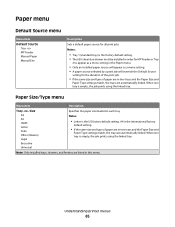
... the Paper Size and Paper Type settings match, the trays are automatically linked. Paper menu Default Source menu Menu item Default Source Tray MP Feeder Manual Paper Manual Env Description Sets a default paper source for all print jobs Notes: • Tray 1 (standard tray) is the factory default setting. • The 650-sheet...
... the Paper Size and Paper Type settings match, the trays are automatically linked. Paper menu Default Source menu Menu item Default Source Tray MP Feeder Manual Paper Manual Env Description Sets a default paper source for all print jobs Notes: • Tray 1 (standard tray) is the factory default setting. • The 650-sheet...
User's Guide
Page 67
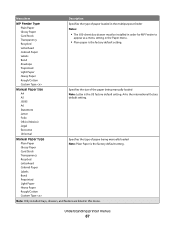
... Preprinted Light Paper Heavy Paper Rough/Cotton Custom Type Specifies the type of the paper being manually loaded Note: Plain Paper is the US factory default setting. A4 is the factory default setting. Manual Paper Size A4 A5 JIS B5 A6 Statement Letter Folio Oficio (Mexico) Legal Executive Universal... Specifies the size of paper being manually loaded Note: Letter is the factory default setting. Note: Only installed trays, drawers, and feeders are listed in the Paper menu. • Plain...
... Preprinted Light Paper Heavy Paper Rough/Cotton Custom Type Specifies the type of the paper being manually loaded Note: Plain Paper is the US factory default setting. A4 is the factory default setting. Manual Paper Size A4 A5 JIS B5 A6 Statement Letter Folio Oficio (Mexico) Legal Executive Universal... Specifies the size of paper being manually loaded Note: Letter is the factory default setting. Note: Only installed trays, drawers, and feeders are listed in the Paper menu. • Plain...
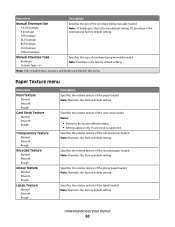
User's Guide
Page 68
... texture of the transparencies loaded Note: Normal is the factory default setting. Understanding printer menus 68 Manual Envelope Type Envelope Custom Type Specifies the type of envelope being manually loaded Note: 10 Envelope is the US factory default setting. Specifies the relative texture of the ... Note: Normal is the factory default setting. DL Envelope is the international factory default setting. Menu item Description Manual Envelope Size 7 3/4 Envelope 9 Envelope 10 Envelope DL Envelope B5 Envelope C5 Envelope Other Envelope Specifies the size of the envelope being...
... texture of the transparencies loaded Note: Normal is the factory default setting. Understanding printer menus 68 Manual Envelope Type Envelope Custom Type Specifies the type of envelope being manually loaded Note: 10 Envelope is the US factory default setting. Specifies the relative texture of the ... Note: Normal is the factory default setting. DL Envelope is the international factory default setting. Menu item Description Manual Envelope Size 7 3/4 Envelope 9 Envelope 10 Envelope DL Envelope B5 Envelope C5 Envelope Other Envelope Specifies the size of the envelope being...
User's Guide
Page 77
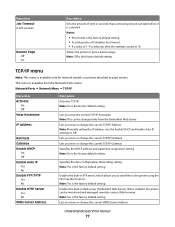
... hostname Note: This can be monitored and managed remotely using the File Transfer Protocol. Lets you view or change the current TCP/IP Address Note: Manually setting the IP address sets the Enable DHCP and Enable Auto IP settings to print servers. Enables the built-in FTP server, which allows you...
... hostname Note: This can be monitored and managed remotely using the File Transfer Protocol. Lets you view or change the current TCP/IP Address Note: Manually setting the IP address sets the Enable DHCP and Enable Auto IP settings to print servers. Enables the built-in FTP server, which allows you...


