Clearing Jams Guide
Page 1
... and covers, and remove trays to locate instructions for Load manual feeder with to appear before loading it. • Do not use media that paper takes through the printer varies depending on the Lexmark Web site at www.lexmark.com/publications. • For detailed information about purchasing large... media. • Flex, fan, and straighten media before removing a tray. • Do not load the manual feeder while the printer is printing. Note: To resolve any message, all printer cables are set correctly in the control panel menu. • Make sure all media must be cleared from the...
... and covers, and remove trays to locate instructions for Load manual feeder with to appear before loading it. • Do not use media that paper takes through the printer varies depending on the Lexmark Web site at www.lexmark.com/publications. • For detailed information about purchasing large... media. • Flex, fan, and straighten media before removing a tray. • Do not load the manual feeder while the printer is printing. Note: To resolve any message, all printer cables are set correctly in the control panel menu. • Make sure all media must be cleared from the...
Clearing Jams Guide
Page 2
... page 3 "Clearing jams behind the inner door" on page 4 "Jams under the photoconductors" on page 4 200.xx Paper Jam Jam in the manual feed "Clearing jams in the slot manual feeder" on page 6 201.xx Paper Jam Jam between an input "Jams under the sensor and the fuser photoconductors" on exit sensor...
... page 3 "Clearing jams behind the inner door" on page 4 "Jams under the photoconductors" on page 4 200.xx Paper Jam Jam in the manual feed "Clearing jams in the slot manual feeder" on page 6 201.xx Paper Jam Jam between an input "Jams under the sensor and the fuser photoconductors" on exit sensor...
Clearing Jams Guide
Page 6
... 3 Remove the jam and close the door(s). In either case, push the paper farther into the manual feeder, the display prompts you to feed properly, 200.xx Paper Jam appears. Note: If no jam is... pushed far enough into the manual feeder for a jam behind the upper and lower doors. 3 Replace the tray. Clearing jams in... paper straight up. Also look for the printer to sense it, but not far enough to insert paper. Clearing jams in the manual feeder When paper is not placed far enough into the manual feeder. 3 Replace the tray. 6 Pull...
... 3 Remove the jam and close the door(s). In either case, push the paper farther into the manual feeder, the display prompts you to feed properly, 200.xx Paper Jam appears. Note: If no jam is... pushed far enough into the manual feeder for a jam behind the upper and lower doors. 3 Replace the tray. Clearing jams in... paper straight up. Also look for the printer to sense it, but not far enough to insert paper. Clearing jams in the manual feeder When paper is not placed far enough into the manual feeder. 3 Replace the tray. 6 Pull...
Troubleshooting Guide
Page 8
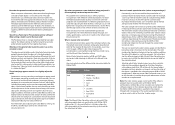
... program. The PostScript driver is implemented. However, because of technology differences that exist between printers and monitors, there are many colors that translate the color into appropriate amounts of the object in the Manual Color menu. To obtain the highest projected color quality, transmissive overhead projectors are not useful if the software program does not specify...
... program. The PostScript driver is implemented. However, because of technology differences that exist between printers and monitors, there are many colors that translate the color into appropriate amounts of the object in the Manual Color menu. To obtain the highest projected color quality, transmissive overhead projectors are not useful if the software program does not specify...
Troubleshooting Guide
Page 9
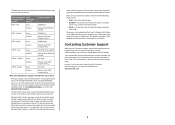
...The process can be Correction printed setting Sample pages to select the desired color values and a more colors in the network printer firmware. This topic applies only to use for red, green, and ...lexmark.com. 9 Color specification Color and object to be duplicated for Cyan, Magenta, and Yellow. Contacting Customer Support When you call (1-800-539-6275). These pages require the use RGB-Text Auto SRGB Vivid Manual Manual Color RGB Text Setting RGB-Graphic Auto SRGB Vivid Manual Manual Color RGB Graphic Setting RGB-Image Auto SRGB Display Manual Manual Color...
...The process can be Correction printed setting Sample pages to select the desired color values and a more colors in the network printer firmware. This topic applies only to use for red, green, and ...lexmark.com. 9 Color specification Color and object to be duplicated for Cyan, Magenta, and Yellow. Contacting Customer Support When you call (1-800-539-6275). These pages require the use RGB-Text Auto SRGB Vivid Manual Manual Color RGB Text Setting RGB-Graphic Auto SRGB Vivid Manual Manual Color RGB Graphic Setting RGB-Image Auto SRGB Display Manual Manual Color...

User's Guide
Page 3
... Accessing the system board to install internal options 15 Installing a memory card ...18 Installing a flash memory or firmware card 21 Installing a printer hard disk...22 Installing an internal print server or port interface card 24 Reinstalling the system board access cover 25 Attaching cables...26 Loading paper...tray...27 Loading the optional 550-sheet tray 29 Loading the multipurpose feeder...30 Using the multipurpose feeder...32 Loading the manual feeder...33 Using the manual feeder...33 Using the standard exit bin...34 Setting the Paper Size and Paper Type 35 Tray linking...36 Paper ...
... Accessing the system board to install internal options 15 Installing a memory card ...18 Installing a flash memory or firmware card 21 Installing a printer hard disk...22 Installing an internal print server or port interface card 24 Reinstalling the system board access cover 25 Attaching cables...26 Loading paper...tray...27 Loading the optional 550-sheet tray 29 Loading the multipurpose feeder...30 Using the multipurpose feeder...32 Loading the manual feeder...33 Using the manual feeder...33 Using the standard exit bin...34 Setting the Paper Size and Paper Type 35 Tray linking...36 Paper ...
User's Guide
Page 4
...Supported paper sizes...41 Support for paper types ...43 Paper types and weights ...43 Paper capacities ...44 Printing...45 Installing printer software...45 Printing a document from Windows 45 Printing a document from a Macintosh computer 45 Printing confidential and other held jobs 45... test pages 50 Printing a duplex job manually from a Macintosh computer 50 Printing only black text and graphics 50 Configuring the printer for black-only printing 51 Removing the color supplies ...51 Configuring the printer for color printing and replacing the color supplies 54 Canceling a print job...55...
...Supported paper sizes...41 Support for paper types ...43 Paper types and weights ...43 Paper capacities ...44 Printing...45 Installing printer software...45 Printing a document from Windows 45 Printing a document from a Macintosh computer 45 Printing confidential and other held jobs 45... test pages 50 Printing a duplex job manually from a Macintosh computer 50 Printing only black text and graphics 50 Configuring the printer for black-only printing 51 Removing the color supplies ...51 Configuring the printer for color printing and replacing the color supplies 54 Canceling a print job...55...
User's Guide
Page 5
... 65 Clearing jams in the duplex path...65 Clearing jams in the multipurpose feeder 67 Clearing jams in the manual feeder 68 Maintaining the printer 69 Storing supplies...69 Checking the status of supplies...69 Conserving supplies...69 Aligning the toner cartridges...69 Cleaning ...a transfer belt...72 Ordering a waste toner box ...73 Ordering a fuser...73 Ordering photoconductors ...73 Moving the printer...73 Before moving the printer ...73 Moving the printer to another location ...74 Administrative support 75 Adjusting the brightness or contrast of the display 75 Disabling control panel ...
... 65 Clearing jams in the duplex path...65 Clearing jams in the multipurpose feeder 67 Clearing jams in the manual feeder 68 Maintaining the printer 69 Storing supplies...69 Checking the status of supplies...69 Conserving supplies...69 Aligning the toner cartridges...69 Cleaning ...a transfer belt...72 Ordering a waste toner box ...73 Ordering a fuser...73 Ordering photoconductors ...73 Moving the printer...73 Before moving the printer ...73 Moving the printer to another location ...74 Administrative support 75 Adjusting the brightness or contrast of the display 75 Disabling control panel ...

User's Guide
Page 9
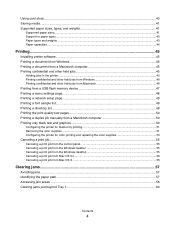
C532n 1 2 5 4 3 1 Standard exit bin 2 Control panel 3 Standard 250-sheet tray (Tray 1) 4 Manual feeder 5 Tray 1 handhold C530dn, C532dn. Learning about the printer 9 C534n, C534dn 1 2 5 4 3 6 1 Standard exit bin 2 Control panel Learning about the printer Configured models Basic models The following illustrations show the basic printer models.
C532n 1 2 5 4 3 1 Standard exit bin 2 Control panel 3 Standard 250-sheet tray (Tray 1) 4 Manual feeder 5 Tray 1 handhold C530dn, C532dn. Learning about the printer 9 C534n, C534dn 1 2 5 4 3 6 1 Standard exit bin 2 Control panel Learning about the printer Configured models Basic models The following illustrations show the basic printer models.
User's Guide
Page 33
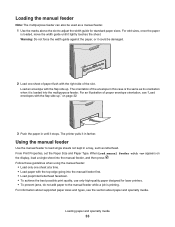
...the flap side up ." Using the manual feeder Use the manual feeder to load single sheets not kept in a tray, such as a manual feeder. 1 Use the marks above the slot to adjust the width guide for laser printers. • To prevent jams, do not add paper to the manual feeder while a job is loaded, ...move the width guide until it in farther. From Print Properties, set the Paper Size and Paper Type. When Load manual feeder with appears on page 32. 3...
...the flap side up ." Using the manual feeder Use the manual feeder to load single sheets not kept in a tray, such as a manual feeder. 1 Use the marks above the slot to adjust the width guide for laser printers. • To prevent jams, do not add paper to the manual feeder while a job is loaded, ...move the width guide until it in farther. From Print Properties, set the Paper Size and Paper Type. When Load manual feeder with appears on page 32. 3...
User's Guide
Page 39
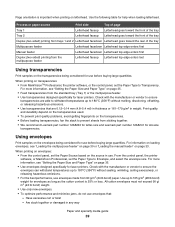
... When printing on page 35. • Feed transparencies from sticking together. • We recommend Lexmark part number 12A8240 for letter-size and Lexmark part number 12A8241 for laser printers. Are stuck together or damaged in weight. For information on loading envelopes, see "Setting the ...trays 1 and 2 Letterhead facedown Letterhead goes toward the rear of the tray Multipurpose feeder Letterhead facedown Letterhead top edge enters first Manual feeder Letterhead facedown Letterhead top edge enters first Duplex (two-sided) printing from 90 g/m2 (24 lb bond) paper. Check...
... When printing on page 35. • Feed transparencies from sticking together. • We recommend Lexmark part number 12A8240 for letter-size and Lexmark part number 12A8241 for laser printers. Are stuck together or damaged in weight. For information on loading envelopes, see "Setting the ...trays 1 and 2 Letterhead facedown Letterhead goes toward the rear of the tray Multipurpose feeder Letterhead facedown Letterhead top edge enters first Manual feeder Letterhead facedown Letterhead top edge enters first Duplex (two-sided) printing from 90 g/m2 (24 lb bond) paper. Check...

User's Guide
Page 41
... size, select the closest larger listed size. Paper and specialty media guide 41 • Check with chemicals that may contaminate the printer. For information on card stock and labels, see the Card Stock & Label Guide Supported paper sizes -supported X-unsupported Paper size ...Dimensions Standard 250-sheet Optional 550-sheet Multipurpose tray (Tray 1) tray (Tray 2) feeder or manual feeder Letter 215.9 x 279.4 mm (8.5 x 11 in.) Legal 215.9 x 355.6 mm (8.5 x 14 in.) JIS B5 182 x 257 mm (7.17 ...
... size, select the closest larger listed size. Paper and specialty media guide 41 • Check with chemicals that may contaminate the printer. For information on card stock and labels, see the Card Stock & Label Guide Supported paper sizes -supported X-unsupported Paper size ...Dimensions Standard 250-sheet Optional 550-sheet Multipurpose tray (Tray 1) tray (Tray 2) feeder or manual feeder Letter 215.9 x 279.4 mm (8.5 x 11 in.) Legal 215.9 x 355.6 mm (8.5 x 14 in.) JIS B5 182 x 257 mm (7.17 ...

User's Guide
Page 42
...x 123.8 mm X X (3 x 4.88 in.) to 215.9 x 355.6 mm (8.5 x 14 in.) (Multipurpose feeder) 76.2 x 152.4 mm X X (3 x 6 in.) to 215.9 x 355.6 mm (Manual feeder) (8.5 x 14 in.) 7 3/4 Envelope 98.4 x 190.5 mm X X (Monarch) (3.875 x 7.5 in.) Commercial 9 98.4 x 225.4 mm X X Envelope (3.875 x 8.9 in.) Commercial 10 104.8 ...Paper and specialty media guide 42 Paper size Dimensions Standard 250-sheet Optional 550-sheet Multipurpose tray (Tray 1) tray (Tray 2) feeder or manual feeder Statement 139.7 x 215.9 mm X X (5.5 x 8.5 in.) Universal* 148 x 210 mm to 8.5 x 14 in.) ...
...x 123.8 mm X X (3 x 4.88 in.) to 215.9 x 355.6 mm (8.5 x 14 in.) (Multipurpose feeder) 76.2 x 152.4 mm X X (3 x 6 in.) to 215.9 x 355.6 mm (Manual feeder) (8.5 x 14 in.) 7 3/4 Envelope 98.4 x 190.5 mm X X (Monarch) (3.875 x 7.5 in.) Commercial 9 98.4 x 225.4 mm X X Envelope (3.875 x 8.9 in.) Commercial 10 104.8 ...Paper and specialty media guide 42 Paper size Dimensions Standard 250-sheet Optional 550-sheet Multipurpose tray (Tray 1) tray (Tray 2) feeder or manual feeder Statement 139.7 x 215.9 mm X X (5.5 x 8.5 in.) Universal* 148 x 210 mm to 8.5 x 14 in.) ...

User's Guide
Page 43
...lb bond) 1 Paper weighing less than 75 g/m2 (20 lb bond) is 90 g/m2. 7 105 g/m2 (28 lb bond) envelopes must enter the printer first. 4 Vinyl labels are not supported. For papers heavier than 60% relative humidity. 2 For 60 to 176 g/m2 (16 to 47 lb bond) ... cotton content. Paper types and weights Optional 550-sheet Multipurpose tray (Tray 2) feeder or manual feeder Duplex X X X X X Paper type Standard 250-sheet tray Optional 550-sheet tray Multipurpose feeder or (Tray 1) (Tray 2) manual feeder Plain (xerographic or business) paper 2 Simplex only-60 to Simplex only-60 to ...
...lb bond) 1 Paper weighing less than 75 g/m2 (20 lb bond) is 90 g/m2. 7 105 g/m2 (28 lb bond) envelopes must enter the printer first. 4 Vinyl labels are not supported. For papers heavier than 60% relative humidity. 2 For 60 to 176 g/m2 (16 to 47 lb bond) ... cotton content. Paper types and weights Optional 550-sheet Multipurpose tray (Tray 2) feeder or manual feeder Duplex X X X X X Paper type Standard 250-sheet tray Optional 550-sheet tray Multipurpose feeder or (Tray 1) (Tray 2) manual feeder Plain (xerographic or business) paper 2 Simplex only-60 to Simplex only-60 to ...

User's Guide
Page 44
... g/m2 0.12-0.14 mm (4.8- 5.4 mil) thick 161-179 g/m2 Paper Labels-maximum3, 131 g/m2 (35 lb bond) 4 131 g/m2 (35 lb bond) Multipurpose feeder or manual feeder Index Bristol-120 g/m2 (67 lb) Tag-120 g/m2 (74 lb) Cover-135 g/m2 (50 lb) Index Bristol-163 g/m2 (90 lb) Tag-163... to simplex printing only at less than 176 g/m2 (47 lb bond), we recommend grain short. 3 The label area (pressure-sensitive area) must enter the printer first. 4 Vinyl labels are not supported. 5 Use sulfite, wood-free, or up to 47 lb bond) paper, we recommend grain long fibers. For papers heavier...
... g/m2 0.12-0.14 mm (4.8- 5.4 mil) thick 161-179 g/m2 Paper Labels-maximum3, 131 g/m2 (35 lb bond) 4 131 g/m2 (35 lb bond) Multipurpose feeder or manual feeder Index Bristol-120 g/m2 (67 lb) Tag-120 g/m2 (74 lb) Cover-135 g/m2 (50 lb) Index Bristol-163 g/m2 (90 lb) Tag-163... to simplex printing only at less than 176 g/m2 (47 lb bond), we recommend grain short. 3 The label area (pressure-sensitive area) must enter the printer first. 4 Vinyl labels are not supported. 5 Use sulfite, wood-free, or up to 47 lb bond) paper, we recommend grain long fibers. For papers heavier...

User's Guide
Page 50
...until Prt Quality Pgs appears, and then press . Printing a duplex job manually from the output bin and load them into the paper tray facedown with ...appear. 4 Press until Exit Config Menu appears, and then press . Resetting the Printer appears briefly, followed by a clock, and then Ready appears. Printing 50 Printing...isolate print quality problems. 1 Turn the printer off. 2 Hold down and while turning the printer on. 3 Release the buttons when the clock appears,... and wait for an extended period, set the printer to Reverse order. 4 From the Print options area, select Even...
...until Prt Quality Pgs appears, and then press . Printing a duplex job manually from the output bin and load them into the paper tray facedown with ...appear. 4 Press until Exit Config Menu appears, and then press . Resetting the Printer appears briefly, followed by a clock, and then Ready appears. Printing 50 Printing...isolate print quality problems. 1 Turn the printer off. 2 Hold down and while turning the printer on. 3 Release the buttons when the clock appears,... and wait for an extended period, set the printer to Reverse order. 4 From the Print options area, select Even...

User's Guide
Page 57
..., creased, damp, or curled media. • Flex, fan, and straighten media before removing a tray. • Do not load the manual feeder while the printer is printing. Wait for Load tray or Ready to appear. • Push all trays in firmly after loading media. • Make sure ...stack. • Store the media in the messages describe. Clearing jams 57 For information on the Lexmark Web site at www.lexmark.com/publications. • For detailed information about purchasing large quantities of the printer the numbers in an appropriate environment. • Do not remove trays while the...
..., creased, damp, or curled media. • Flex, fan, and straighten media before removing a tray. • Do not load the manual feeder while the printer is printing. Wait for Load tray or Ready to appear. • Push all trays in firmly after loading media. • Make sure ...stack. • Store the media in the messages describe. Clearing jams 57 For information on the Lexmark Web site at www.lexmark.com/publications. • For detailed information about purchasing large quantities of the printer the numbers in an appropriate environment. • Do not remove trays while the...

User's Guide
Page 59
... jams behind the inner door" on page 62 "Jams under the photoconductors" on page 62 200.xx Paper Jam Jam in the manual feed slot "Clearing jams in the manual feeder" on page 68 201.xx Paper Jam Jam between an input sensor and the fuser "Jams under the photoconductors" on exit...
... jams behind the inner door" on page 62 "Jams under the photoconductors" on page 62 200.xx Paper Jam Jam in the manual feed slot "Clearing jams in the manual feeder" on page 68 201.xx Paper Jam Jam between an input sensor and the fuser "Jams under the photoconductors" on exit...

User's Guide
Page 68
If the paper is not placed far enough into the manual feeder, the display prompts you to feed properly, 200.xx Paper Jam appears. Clearing jams 68 Clearing jams in the manual feeder When paper is pushed far enough into the manual feeder for the printer to sense it, but not far enough to insert paper. In either case, push the paper farther into the manual feeder.
If the paper is not placed far enough into the manual feeder, the display prompts you to feed properly, 200.xx Paper Jam appears. Clearing jams 68 Clearing jams in the manual feeder When paper is pushed far enough into the manual feeder for the printer to sense it, but not far enough to insert paper. In either case, push the paper farther into the manual feeder.
User's Guide
Page 95
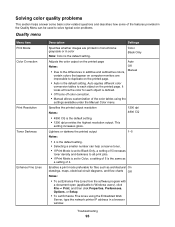
... looks at how the color for files such as a setting of the color tables using the Embedded Web Server, type the network printer IP address in color Note: Color is the default setting. Solving color quality problems This section helps answer some basic color-related questions and describes how...or Setup. • To set Enhance Fine Lines using the settings available under the Manual Color menu. This setting increases gloss. Enables a print mode preferable for each object on the printed page. Off Manual • Auto is the default setting. • 1200 dpi provides the highest ...
... looks at how the color for files such as a setting of the color tables using the Embedded Web Server, type the network printer IP address in color Note: Color is the default setting. Solving color quality problems This section helps answer some basic color-related questions and describes how...or Setup. • To set Enhance Fine Lines using the settings available under the Manual Color menu. This setting increases gloss. Enables a print mode preferable for each object on the printed page. Off Manual • Auto is the default setting. • 1200 dpi provides the highest ...


