
Troubleshooting Guide
Page 4
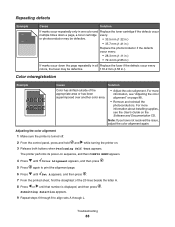
... until all every 116.2 mm colors, the fuser (4.58 in.). The message remains on page 4. • Remove and reinstall the photoconductors. Replace the toner cartridge if the defects occur every: • 33.5 mm (1.32 in.) • 35.7 mm (1.41 in.) Replace the photoconductor if the defects ...occur every: • 28.3 mm (1.11 in.) • 72.4 mm (2.85 in.) If marks occur down a page, a toner cartridge or photoconductor may be defective. Solution • Adjust the color alignment. The printer performs its power-on . Page that jammed does not reprint after...
... until all every 116.2 mm colors, the fuser (4.58 in.). The message remains on page 4. • Remove and reinstall the photoconductors. Replace the toner cartridge if the defects occur every: • 33.5 mm (1.32 in.) • 35.7 mm (1.41 in.) Replace the photoconductor if the defects ...occur every: • 28.3 mm (1.11 in.) • 72.4 mm (2.85 in.) If marks occur down a page, a toner cartridge or photoconductor may be defective. Solution • Adjust the color alignment. The printer performs its power-on . Page that jammed does not reprint after...
Troubleshooting Guide
Page 5
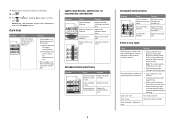
... Contrast setting is not damp. • Make sure the Paper Type and Paper Weight settings match the type of the page: 1 Replace the toner cartridge(s) causing the line. 2 If the problem still occurs, replace the photoconductor unit. • If the problem is On. Turn Color Saver...Note: This solution applies to Windows users only. • Adjust the color quality settings in the trays is incorrect. • Select a different Toner Darkness setting, RGB Brightness setting, or RGB Contrast setting from Print Properties before fusing to the feeding from a new package. • Avoid textured ...
... Contrast setting is not damp. • Make sure the Paper Type and Paper Weight settings match the type of the page: 1 Replace the toner cartridge(s) causing the line. 2 If the problem still occurs, replace the photoconductor unit. • If the problem is On. Turn Color Saver...Note: This solution applies to Windows users only. • Adjust the color quality settings in the trays is incorrect. • Select a different Toner Darkness setting, RGB Brightness setting, or RGB Contrast setting from Print Properties before fusing to the feeding from a new package. • Avoid textured ...
Troubleshooting Guide
Page 6
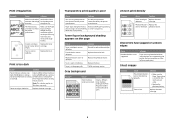
...the job to print. Fuser is poor Cause Solution You are supported by the printer manufacturer. Replace the fuser. Replace the toner cartridge. Transparency print quality is worn or defective. Transfer belt is defective. Replace the fuser. Call for the tray Make... are using . • Replace the photoconductors. empty. Photoconductor is in the Print Properties before sending the job to print. Toner is worn or defective. Replace the photoconductor. Photoconductor is not supported. Characters have jagged or uneven edges Cause Downloaded font is ...
...the job to print. Fuser is poor Cause Solution You are supported by the printer manufacturer. Replace the fuser. Replace the toner cartridge. Transparency print quality is worn or defective. Transfer belt is defective. Replace the fuser. Call for the tray Make... are using . • Replace the photoconductors. empty. Photoconductor is in the Print Properties before sending the job to print. Toner is worn or defective. Replace the photoconductor. Photoconductor is not supported. Characters have jagged or uneven edges Cause Downloaded font is ...
Troubleshooting Guide
Page 7
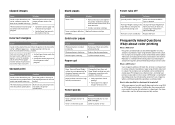
...example, cyan and yellow can be combined to create yellow. loaded. The media being used. or empty. Photoconductor is defective Replace the toner cartridge. Call for customer service. Paper has been stored in a high humidity environment. • Load paper from Normal to the proper ... of cyan, magenta, yellow, and black needed to reproduce a particular color. Paper curl Solution Remove and then reinstall the photoconductor. Toner specks Cause Toner cartridges are Move the guides in the tray to be combined to create green. Change the Paper Weight from a fresh package. &#...
...example, cyan and yellow can be combined to create yellow. loaded. The media being used. or empty. Photoconductor is defective Replace the toner cartridge. Call for customer service. Paper has been stored in a high humidity environment. • Load paper from Normal to the proper ... of cyan, magenta, yellow, and black needed to reproduce a particular color. Paper curl Solution Remove and then reinstall the photoconductor. Toner specks Cause Toner cartridges are Move the guides in the tray to be combined to create green. Change the Paper Weight from a fresh package. &#...
Troubleshooting Guide
Page 8
...no color conversion is manual color correction? Note: The Color Samples pages are recommended. The color conversion tables used , then adjusting the Toner Darkness setting to RGB and CMYK color conversion table mappings as a color in the software program (RGB or CMYK combinations). Can I see... settings in situations where the software program or the computer operating system controls the adjustment of cyan, magenta, yellow, and black toner needed to improve the color? However, because of technology differences that exist between printers and monitors, there are many colors that ...
...no color conversion is manual color correction? Note: The Color Samples pages are recommended. The color conversion tables used , then adjusting the Toner Darkness setting to RGB and CMYK color conversion table mappings as a color in the software program (RGB or CMYK combinations). Can I see... settings in situations where the software program or the computer operating system controls the adjustment of cyan, magenta, yellow, and black toner needed to improve the color? However, because of technology differences that exist between printers and monitors, there are many colors that ...
User's Guide
Page 5
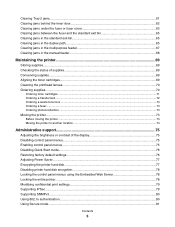
... printer 69 Storing supplies...69 Checking the status of supplies...69 Conserving supplies...69 Aligning the toner cartridges...69 Cleaning the printhead lenses...70 Ordering supplies...70 Ordering toner cartridges...71 Ordering a transfer belt...72 Ordering a waste toner box ...73 Ordering a fuser...73 Ordering photoconductors ...73 Moving the printer...73 Before moving the...
... printer 69 Storing supplies...69 Checking the status of supplies...69 Conserving supplies...69 Aligning the toner cartridges...69 Cleaning the printhead lenses...70 Ordering supplies...70 Ordering toner cartridges...71 Ordering a transfer belt...72 Ordering a waste toner box ...73 Ordering a fuser...73 Ordering photoconductors ...73 Moving the printer...73 Before moving the...

User's Guide
Page 6
... lines ...89 Streaked vertical lines ...90 Print is too light ...90 Print irregularities...91 Print is too dark...91 Transparency print quality is poor ...91 Toner fog or background shading appears on the page 91 Gray background ...92 Uneven print density...92 Characters have jagged or uneven edges 92 Ghost images...
... lines ...89 Streaked vertical lines ...90 Print is too light ...90 Print irregularities...91 Print is too dark...91 Transparency print quality is poor ...91 Toner fog or background shading appears on the page 91 Gray background ...92 Uneven print density...92 Characters have jagged or uneven edges 92 Ghost images...

User's Guide
Page 7
Incorrect margins...93 Skewed print...93 Blank pages...93 Solid color pages ...93 Paper curl ...94 Toner specks ...94 Toner rubs off ...94 Solving color quality problems...95 Quality menu ...95 Frequently Asked Questions (FAQ) about color printing 97 Contacting Customer Support...100 Notices...102 Power consumption...105 Index...108 Contents 7
Incorrect margins...93 Skewed print...93 Blank pages...93 Solid color pages ...93 Paper curl ...94 Toner specks ...94 Toner rubs off ...94 Solving color quality problems...95 Quality menu ...95 Frequently Asked Questions (FAQ) about color printing 97 Contacting Customer Support...100 Notices...102 Power consumption...105 Index...108 Contents 7

User's Guide
Page 11
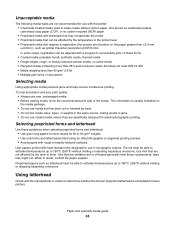
... when the printer detects an error code. These screens are only available when the printer is in the Ready state. Learning about supplies, such as Toner Low. • Show-me screens-Provide instructions for resolving common printer errors. Understanding the control panel 7 BACK MENU 6 STOP X 5 1 2 7 BACK MENU 6 STOP X 5 4 3 4 1 1 23 4 56 7 89...
... when the printer detects an error code. These screens are only available when the printer is in the Ready state. Learning about supplies, such as Toner Low. • Show-me screens-Provide instructions for resolving common printer errors. Understanding the control panel 7 BACK MENU 6 STOP X 5 1 2 7 BACK MENU 6 STOP X 5 4 3 4 1 1 23 4 56 7 89...

User's Guide
Page 37
... trays, can cause media feeding or print quality issues. This content provides the media with a high degree of the printer to it is too rough, toner cannot fuse to feed the media correctly. Curl Curl is exposed to the alignment of the media. however, smoothness between 100 and 300 Sheffield points...
... trays, can cause media feeding or print quality issues. This content provides the media with a high degree of the printer to it is too rough, toner cannot fuse to feed the media correctly. Curl Curl is exposed to the alignment of the media. however, smoothness between 100 and 300 Sheffield points...
User's Guide
Page 38
... less than ±2.3 mm (±0.09 in.), such as optical character recognition (OCR) forms In some cases, registration can be affected by the resin in toner. latex inks might not. Preprinted papers such as letterhead must be able to withstand temperatures up to 180°C (356°F) without melting or releasing...
... less than ±2.3 mm (±0.09 in.), such as optical character recognition (OCR) forms In some cases, registration can be affected by the resin in toner. latex inks might not. Preprinted papers such as letterhead must be able to withstand temperatures up to 180°C (356°F) without melting or releasing...

User's Guide
Page 50
... the top of the page facing you. Printing a duplex job manually from the output bin and load them into the paper tray facedown with black toner only for CONFIG MENU to appear. 4 Press until Exit Config Menu appears, and then press .
... the top of the page facing you. Printing a duplex job manually from the output bin and load them into the paper tray facedown with black toner only for CONFIG MENU to appear. 4 Press until Exit Config Menu appears, and then press .

User's Guide
Page 53
Remove all three color toner cartridges. 8 Place the toner cartridges in a clean, sturdy box. 9 Close the lower door. 6 Close the box to protect the photoconductors from light. 7 Lift the small toner cartridge handles slightly and pull straight out. Printing 53
Remove all three color toner cartridges. 8 Place the toner cartridges in a clean, sturdy box. 9 Close the lower door. 6 Close the box to protect the photoconductors from light. 7 Lift the small toner cartridge handles slightly and pull straight out. Printing 53
User's Guide
Page 69
...press . 5 Press again to use them. Supply status is usually available on . 3 Release both buttons when Performing Self Test appears. Aligning the toner cartridges Sometimes replacing the transfer belt affects the alignment of any browser (ex: 192.264.26.3). If you to : • Direct sunlight •...appears on page 45. For more information, see the Supplies menu, Quality menu, and Finishing menu in the address bar of the toner cartridges. Conserving supplies There are some settings that you can change from the control panel that will help you need to maintain optimum print...
...press . 5 Press again to use them. Supply status is usually available on . 3 Release both buttons when Performing Self Test appears. Aligning the toner cartridges Sometimes replacing the transfer belt affects the alignment of any browser (ex: 192.264.26.3). If you to : • Direct sunlight •...appears on page 45. For more information, see the Supplies menu, Quality menu, and Finishing menu in the address bar of the toner cartridges. Conserving supplies There are some settings that you can change from the control panel that will help you need to maintain optimum print...
User's Guide
Page 70
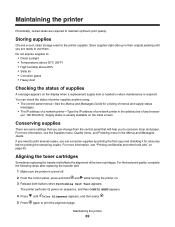
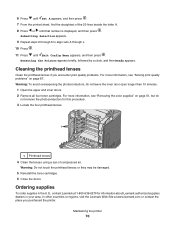
... contact Lexmark at www.lexmark.com or contact the place you encounter print quality problems. For more information, see "Solving print quality problems" on page 51, but do not leave the inner door open longer than 10 minutes. 1 Open the upper and inner doors. 2 Remove all four toner cartridges.... supplies" on page 87. Resetting the Printer appears briefly, followed by a clock, and then Ready appears. In other countries or regions, visit the Lexmark Web Site at 1-800-539-6275 for this procedure. 3 Locate the four printhead lenses. 1 1 Printhead lenses 4 Clean the lenses using a can...
... contact Lexmark at www.lexmark.com or contact the place you encounter print quality problems. For more information, see "Solving print quality problems" on page 51, but do not leave the inner door open longer than 10 minutes. 1 Open the upper and inner doors. 2 Remove all four toner cartridges.... supplies" on page 87. Resetting the Printer appears briefly, followed by a clock, and then Ready appears. In other countries or regions, visit the Lexmark Web Site at 1-800-539-6275 for this procedure. 3 Locate the four printhead lenses. 1 1 Printhead lenses 4 Clean the lenses using a can...
User's Guide
Page 71
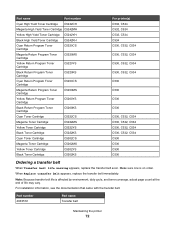
... Yield Return Program Toner Cartridge C5340MX C534 Yellow Extra High Yield Return Program Toner Cartridge C5340YX C534 Cyan Extra High Yield Toner Cartridge C5342CX C534 Magenta Extra High Yield Toner Cartridge C5342MX C534 Yellow Extra High Yield Toner Cartridge C5342YX C534 Cyan High Yield Return Program Toner Cartridge C5240CH C532, C534 Magenta High Yield Return Program C5240MH Toner Cartridge C532, C534 Yellow High Yield...
... Yield Return Program Toner Cartridge C5340MX C534 Yellow Extra High Yield Return Program Toner Cartridge C5340YX C534 Cyan Extra High Yield Toner Cartridge C5342CX C534 Magenta Extra High Yield Toner Cartridge C5342MX C534 Yellow Extra High Yield Toner Cartridge C5342YX C534 Cyan High Yield Return Program Toner Cartridge C5240CH C532, C534 Magenta High Yield Return Program C5240MH Toner Cartridge C532, C534 Yellow High Yield...
User's Guide
Page 72
... Cyan Toner Cartridge C5222CS Magenta Toner Cartridge C5222MS Yellow Toner Cartridge C5222YS Black Toner Cartridge C5222KS Cyan Toner Cartridge C5202CS Magenta Toner Cartridge C5202MS Yellow Toner Cartridge C5202YS Black Toner Cartridge C5202KS For printer(s) C532, C534 C532, C534 C532, C534 C534 C530, C532, C534 C530, C532, C534 C530, C532, C534 C530, C532, C534 C530 C530 C530 C530 C530, C532, C534 C530, C532, C534 C530, C532, C534 C530, C532, C534 C530...
... Cyan Toner Cartridge C5222CS Magenta Toner Cartridge C5222MS Yellow Toner Cartridge C5222YS Black Toner Cartridge C5222KS Cyan Toner Cartridge C5202CS Magenta Toner Cartridge C5202MS Yellow Toner Cartridge C5202YS Black Toner Cartridge C5202KS For printer(s) C532, C534 C532, C534 C532, C534 C534 C530, C532, C534 C530, C532, C534 C530, C532, C534 C530, C532, C534 C530 C530 C530 C530 C530, C532, C534 C530, C532, C534 C530, C532, C534 C530, C532, C534 C530...
User's Guide
Page 73
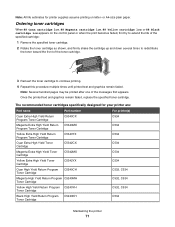
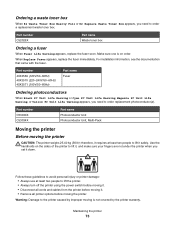
... name Photoconductor Unit Photoconductor Unit, Multi-Pack Moving the printer Before moving the printer. Ordering a waste toner box When 82 Waste Toner Box Nearly Full or 82 Replace Waste Toner Box appears, you need to lift the printer. • Always turn off the printer using the ... on order. therefore, it requires at least two people to order replacement photoconductor(s). Maintaining the printer 73 Part number C52025X Part name Waste toner box Ordering a fuser When Fuser Life Warning appears, replace the fuser soon. Part number 40X3569 (120V/50-60Hz) 40X3570 (220-240V/...
... name Photoconductor Unit Photoconductor Unit, Multi-Pack Moving the printer Before moving the printer. Ordering a waste toner box When 82 Waste Toner Box Nearly Full or 82 Replace Waste Toner Box appears, you need to lift the printer. • Always turn off the printer using the ... on order. therefore, it requires at least two people to order replacement photoconductor(s). Maintaining the printer 73 Part number C52025X Part name Waste toner box Ordering a fuser When Fuser Life Warning appears, replace the fuser soon. Part number 40X3569 (120V/50-60Hz) 40X3570 (220-240V/...
User's Guide
Page 88
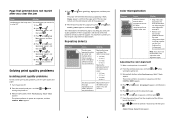
... is displayed, and then press . Repeating defects ) ) Example Cause Solution If marks occur repeatedly only in one color and Replace the toner cartridge if the defects occur multiple times down a page, a toner cartridge every: or photoconductor may be defective. • 33.5 mm (1.32 in.) • 35.7 mm (1.41 in.) Replace the photoconductor...
... is displayed, and then press . Repeating defects ) ) Example Cause Solution If marks occur repeatedly only in one color and Replace the toner cartridge if the defects occur multiple times down a page, a toner cartridge every: or photoconductor may be defective. • 33.5 mm (1.32 in.) • 35.7 mm (1.41 in.) Replace the photoconductor...

User's Guide
Page 89
...is defective. Clean the printhead lenses. Photoconductors may be defective. Solution Replace the toner cartridge. Troubleshooting 89 Photoconductors are dirty. Streaked horizontal lines Example ABCDE ABCDE ABCDE Cause A toner cartridge is on the back of the page, replace the transfer belt. Printhead ...lenses are defective. Solution • If the problem is on the front (print side) of the page: 1 Replace the toner cartridge(s) causing the line. 2 If the problem still occurs, replace the photoconductor unit. • If the problem is defective, empty,...
...is defective. Clean the printhead lenses. Photoconductors may be defective. Solution Replace the toner cartridge. Troubleshooting 89 Photoconductors are dirty. Streaked horizontal lines Example ABCDE ABCDE ABCDE Cause A toner cartridge is on the back of the page, replace the transfer belt. Printhead ...lenses are defective. Solution • If the problem is on the front (print side) of the page: 1 Replace the toner cartridge(s) causing the line. 2 If the problem still occurs, replace the photoconductor unit. • If the problem is defective, empty,...


