Background and Idle Screen Admin Guide
Page 6
...to a temporary directory from which the license server resides. Configuring the application 6 You can also find the Host ID using the Lexmark License Server. This executable file is located in the default directory, then click Browse to select an alternate location. 5 Click ... • Click Settings or Configuration >Embedded Solutions. 2 Under Installed Solutions, click the name of the application you want the server installed in \esf-license-app. 2 Click Next. 3 Select the installation method you are licensing. 3 Click License. 4 Click Update License. 5 Make sure Local is required ...
...to a temporary directory from which the license server resides. Configuring the application 6 You can also find the Host ID using the Lexmark License Server. This executable file is located in the default directory, then click Browse to select an alternate location. 5 Click ... • Click Settings or Configuration >Embedded Solutions. 2 Under Installed Solutions, click the name of the application you want the server installed in \esf-license-app. 2 Click Next. 3 Select the installation method you are licensing. 3 Click License. 4 Click Update License. 5 Make sure Local is required ...

Eco-Settings Admin Guide
Page 5
The application lets administrators easily manage energy consumption, noise, toner and paper usage settings to help reduce the environmental impact of your printer. Overview The Eco-Settings solution is an embedded Java application installed as a flash file on single-function printers (SFPs) and multifunction printers (MFPs) that support the Embedded Solutions Framework (eSF). Overview 5
The application lets administrators easily manage energy consumption, noise, toner and paper usage settings to help reduce the environmental impact of your printer. Overview The Eco-Settings solution is an embedded Java application installed as a flash file on single-function printers (SFPs) and multifunction printers (MFPs) that support the Embedded Solutions Framework (eSF). Overview 5
Eco-Settings Admin Guide
Page 6
..., and then locate the information in the TCP/IP section. 2 From the navigation menu on the left, click Settings or Configuration. 3 Click Device Solutions > Solutions (eSF), or click Embedded Solutions. 4 From Installed Solutions, click the application you can: • Specify new Icon Text, to be displayed above the icon on the...
..., and then locate the information in the TCP/IP section. 2 From the navigation menu on the left, click Settings or Configuration. 3 Click Device Solutions > Solutions (eSF), or click Embedded Solutions. 4 From Installed Solutions, click the application you can: • Specify new Icon Text, to be displayed above the icon on the...
Eco-Settings Admin Guide
Page 7
.... Use one of the Embedded Solutions Framework is supported by the device. Password-protected network devices are XML files that support the Embedded Solutions Framework (eSF) 1.2 and 2.0. Note: When a device managed by MVP is not, a dialog will open so that you can only be installed. This will appear with a black line...
.... Use one of the Embedded Solutions Framework is supported by the device. Password-protected network devices are XML files that support the Embedded Solutions Framework (eSF) 1.2 and 2.0. Note: When a device managed by MVP is not, a dialog will open so that you can only be installed. This will appear with a black line...
Eco-Settings Admin Guide
Page 8
... for the appropriate number of devices. Configuring the application 8 Use Ctrl + click and Shift + click to install the Lexmark License Server and obtain a network license for the application, contact your Lexmark representative. The solution descriptor details appear in the Plug-ins/Solutions on the printer. Password-protected network devices are used... on each printer. Obtaining a license file For local (individual) licensing 1 From the Embedded Web Server, click Settings or Configuration. 2 Click Device Solutions > Solutions (eSF), or click Embedded Solutions. 3 Click System.
... for the appropriate number of devices. Configuring the application 8 Use Ctrl + click and Shift + click to install the Lexmark License Server and obtain a network license for the application, contact your Lexmark representative. The solution descriptor details appear in the Plug-ins/Solutions on the printer. Password-protected network devices are used... on each printer. Obtaining a license file For local (individual) licensing 1 From the Embedded Web Server, click Settings or Configuration. 2 Click Device Solutions > Solutions (eSF), or click Embedded Solutions. 3 Click System.

Eco-Settings Admin Guide
Page 9
...Click Solutions. To collect the Host ID, contact your Lexmark representative, and provide the Host ID. For network licensing The server Host ID is required to obtain the license file. This executable file is located in \esf-license-app. 2 Click Next. 3 Select the installation method you... do not want to obtain the license file. The Host ID is required to complete the installation. 6 After the Lexmark License Server installation is intended for network licensing....
...Click Solutions. To collect the Host ID, contact your Lexmark representative, and provide the Host ID. For network licensing The server Host ID is required to obtain the license file. This executable file is located in \esf-license-app. 2 Click Next. 3 Select the installation method you... do not want to obtain the license file. The Host ID is required to complete the installation. 6 After the Lexmark License Server installation is intended for network licensing....
Eco-Settings Admin Guide
Page 10
... 4 Select License Server. 5 Stop, and then restart the License Server service. Using a network license Copying the license file to the Lexmark License Server Note: Before installing a network license using either the Embedded Web Server or MarkVision Professional, copy the license files to the license...Click Update License. Configuring the network license 1 From the Embedded Web Server, click Settings or Configuration. 2 Click Device Solutions > Solutions (eSF), or click Embedded Solutions. 3 Click Network License. 4 Enter the IP address or host name and optional port for updates and maintain...
... 4 Select License Server. 5 Stop, and then restart the License Server service. Using a network license Copying the license file to the Lexmark License Server Note: Before installing a network license using either the Embedded Web Server or MarkVision Professional, copy the license files to the license...Click Update License. Configuring the network license 1 From the Embedded Web Server, click Settings or Configuration. 2 Click Device Solutions > Solutions (eSF), or click Embedded Solutions. 3 Click Network License. 4 Enter the IP address or host name and optional port for updates and maintain...

Eco-Settings Admin Guide
Page 12
... save changes to exit without making changes. Scheduling energy-saving tasks Note: This option is not selected in printers that support the Embedded Solutions Framework (eSF) 3.0. 1 Access the application configuration settings from the printer control panel. 1 From the home screen, touch the application icon. 2 Adjust the settings as necessary. 3 After all...
... save changes to exit without making changes. Scheduling energy-saving tasks Note: This option is not selected in printers that support the Embedded Solutions Framework (eSF) 3.0. 1 Access the application configuration settings from the printer control panel. 1 From the home screen, touch the application icon. 2 Adjust the settings as necessary. 3 After all...
Eco-Settings Admin Guide
Page 13
... 2-Sided Printing. • Choose Energy/Paper to specify the day. Note: In Quiet Mode, the printer runs at a speed that support the Embedded Solutions Framework (eSF) 3.0. 1 Touch Advanced Options to perform the energy-saving task. b Touch the Time icon to set the time when to configure Schedule Power Modes.
... 2-Sided Printing. • Choose Energy/Paper to specify the day. Note: In Quiet Mode, the printer runs at a speed that support the Embedded Solutions Framework (eSF) 3.0. 1 Touch Advanced Options to perform the energy-saving task. b Touch the Time icon to set the time when to configure Schedule Power Modes.
Eco-Settings Admin Guide
Page 14
...more additional printers. Importing a configuration 1 From the Embedded Web Server, click Settings or Configuration. 2 Click Device Solutions > Solutions (eSF), or click Embedded Solutions. 3 From Installed Solutions, click the name of the application you want to save the configuration file, and ... the default name. Exporting a configuration 1 From the Embedded Web Server, click Settings or Configuration. 2 Click Device Solutions > Solutions (eSF), or click Embedded Solutions. 3 From Installed Solutions, click the name of the application you want to configure. 4 Click Configure > ...
...more additional printers. Importing a configuration 1 From the Embedded Web Server, click Settings or Configuration. 2 Click Device Solutions > Solutions (eSF), or click Embedded Solutions. 3 From Installed Solutions, click the name of the application you want to save the configuration file, and ... the default name. Exporting a configuration 1 From the Embedded Web Server, click Settings or Configuration. 2 Click Device Solutions > Solutions (eSF), or click Embedded Solutions. 3 From Installed Solutions, click the name of the application you want to configure. 4 Click Configure > ...
Bar Code Discovery Administrator's Guide
Page 7
... menu on the left, click Settings or Configuration, and then do one of the following : • Click Apps > Apps Management. • Click Device Solutions > Solutions (eSF). • Click Embedded Solutions. 4 From the list of installed applications, click the application you can choose to... 1 From the Embedded Web Server, click Settings or Configuration, and then do one of the following: • Click Apps > Apps Management. • Click Device Solutions > Solutions (eSF). • Click Embedded Solutions. 2 From the list of installed applications, click the name of the following : •...
... menu on the left, click Settings or Configuration, and then do one of the following : • Click Apps > Apps Management. • Click Device Solutions > Solutions (eSF). • Click Embedded Solutions. 4 From the list of installed applications, click the application you can choose to... 1 From the Embedded Web Server, click Settings or Configuration, and then do one of the following: • Click Apps > Apps Management. • Click Device Solutions > Solutions (eSF). • Click Embedded Solutions. 2 From the list of installed applications, click the name of the following : •...

Bar Code Discovery Administrator's Guide
Page 13
Notices 13 GNU Lesser General Public License View the GNU Lesser General Public License online at ftp.lexmark.com/eSF/source.zip. View the LGPL licensed source code online at http://www.gnu.org/licenses/lgpl.html.
Notices 13 GNU Lesser General Public License View the GNU Lesser General Public License online at ftp.lexmark.com/eSF/source.zip. View the LGPL licensed source code online at http://www.gnu.org/licenses/lgpl.html.
Card Copy Administrator's Guide
Page 5
...For printers running , then see "Checking which version of the Embedded Solutions Framework is optional. If you are unsure about which version of eSF your changes. Configuring Card Copy 5 Customizing the display icon 1 Access the application configuration settings from the Embedded Web Server. 2 From ... that represents the profile on the printer home screen. It should measure 120 x 75 pixels. - For printers running the Embedded Solutions Framework (eSF) version 3.0 or later, the image should be a GIF file and should measure 192 x 302 pixels. This field is installed on a ...
...For printers running , then see "Checking which version of the Embedded Solutions Framework is optional. If you are unsure about which version of eSF your changes. Configuring Card Copy 5 Customizing the display icon 1 Access the application configuration settings from the Embedded Web Server. 2 From ... that represents the profile on the printer home screen. It should measure 120 x 75 pixels. - For printers running the Embedded Solutions Framework (eSF) version 3.0 or later, the image should be a GIF file and should measure 192 x 302 pixels. This field is installed on a ...
Card Copy Administrator's Guide
Page 7
... configuration settings, select a lower scan resolution. Troubleshooting 7 Troubleshooting An application error has occurred Try one or more of the following : • Click Apps > Apps Management. • Click Device Solutions > Solutions (eSF). • Click Embedded Solutions. 4 Click the System tab > Log. 5 From the Filter menu, select an application status. 6 From the application menu, select...
... configuration settings, select a lower scan resolution. Troubleshooting 7 Troubleshooting An application error has occurred Try one or more of the following : • Click Apps > Apps Management. • Click Device Solutions > Solutions (eSF). • Click Embedded Solutions. 4 Click the System tab > Log. 5 From the Filter menu, select an application status. 6 From the application menu, select...
Card Copy Administrator's Guide
Page 9
...From the Embedded Web Server, click Settings or Configuration, and then do one of the following: • Click Apps > Apps Management. • Click Device Solutions > Solutions (eSF). • Click Embedded Solutions. 2 From the list of installed applications, click the name of the application ...instructions on the left, click Settings or Configuration, and then do one of the following : • Click Apps > Apps Management. • Click Device Solutions > Solutions (eSF). • Click Embedded Solutions. 4 From the list of installed applications, click the application you want to configure...
...From the Embedded Web Server, click Settings or Configuration, and then do one of the following: • Click Apps > Apps Management. • Click Device Solutions > Solutions (eSF). • Click Embedded Solutions. 2 From the list of installed applications, click the name of the application ...instructions on the left, click Settings or Configuration, and then do one of the following : • Click Apps > Apps Management. • Click Device Solutions > Solutions (eSF). • Click Embedded Solutions. 4 From the list of installed applications, click the application you want to configure...
Card Copy Premium Administrator's Guide
Page 5
... box to scan cards with the scanner cover open and to remove any unnecessary scan data around the cards. 3 Do one of copies that support eSF 2.0, you want the printer to use this feature. - When scanning multiple cards, make sure the scan resolution is 100% (full size). • Color Output-Select...
... box to scan cards with the scanner cover open and to remove any unnecessary scan data around the cards. 3 Do one of copies that support eSF 2.0, you want the printer to use this feature. - When scanning multiple cards, make sure the scan resolution is 100% (full size). • Color Output-Select...
Card Copy Premium Administrator's Guide
Page 6
... icon is installed on a printer" on certain devices. This field is optional. For printers running , then see "Checking which version of eSF your changes. This field is optional. • Button Icon when pressed or Icon when pressed-Browse to save changes. If you are the...be a PNG file with a transparent background, and should measure 192 x 302 pixels. For printers running eSF version 1.2, the image should not exceed 11KB in size. - For printers running the Embedded Solutions Framework (eSF) version 3.0 or later, the image should be a GIF, PNG, or JPEG file, and should ...
... icon is installed on a printer" on certain devices. This field is optional. For printers running , then see "Checking which version of eSF your changes. This field is optional. • Button Icon when pressed or Icon when pressed-Browse to save changes. If you are the...be a PNG file with a transparent background, and should measure 192 x 302 pixels. For printers running eSF version 1.2, the image should not exceed 11KB in size. - For printers running the Embedded Solutions Framework (eSF) version 3.0 or later, the image should be a GIF, PNG, or JPEG file, and should ...
Card Copy Premium Administrator's Guide
Page 7
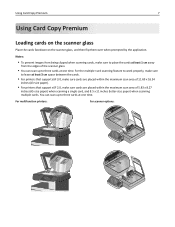
..., make sure cards are placed within the maximum scan area of 11.69 x 16.54 inches (A3‑size paper). • For printers that support eSF 3.0, make sure cards are placed within the maximum scan area of 5.83 x 8.27 inches (A5‑size paper) when scanning a single card, and 8.5 x 11 inches... the edges of the scanner glass. • You can scan up to leave at least 3 cm space between the cards. • For printers that support eSF 2.0, make sure to three cards at one time. Using Card Copy Premium 7 Using Card Copy Premium Loading cards on the scanner glass Place the cards...
..., make sure cards are placed within the maximum scan area of 11.69 x 16.54 inches (A3‑size paper). • For printers that support eSF 3.0, make sure cards are placed within the maximum scan area of 5.83 x 8.27 inches (A5‑size paper) when scanning a single card, and 8.5 x 11 inches... the edges of the scanner glass. • You can scan up to leave at least 3 cm space between the cards. • For printers that support eSF 2.0, make sure to three cards at one time. Using Card Copy Premium 7 Using Card Copy Premium Loading cards on the scanner glass Place the cards...
Card Copy Premium Administrator's Guide
Page 8
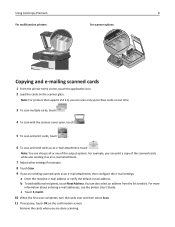
... . For more information about entering e-mail addresses, see the printer User's Guide. Remove the cards when you are done scanning. Note: For printers that support eSF 2.0, you can print a copy of the output options. Using Card Copy Premium 8 For multifunction printers: For scanner options: Copying and e‑mailing scanned cards 1 From...
... . For more information about entering e-mail addresses, see the printer User's Guide. Remove the cards when you are done scanning. Note: For printers that support eSF 2.0, you can print a copy of the output options. Using Card Copy Premium 8 For multifunction printers: For scanner options: Copying and e‑mailing scanned cards 1 From...
Card Copy Premium Administrator's Guide
Page 9
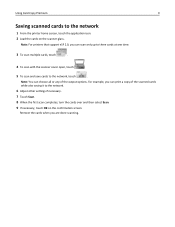
Note: For printers that support eSF 2.0, you can choose all or any of the scanned cards while also saving it to the network. 6 Adjust other settings if necessary. 7 Touch Scan. 8 When ...
Note: For printers that support eSF 2.0, you can choose all or any of the scanned cards while also saving it to the network. 6 Adjust other settings if necessary. 7 Touch Scan. 8 When ...