Clearing Jams Guide
Page 3
... the left access door. 4 Turn the printer off the guides. 3 Pull down the front access door, insert a folded piece of paper as shown to clear the paper sensors under the image transfer unit. c Place the cartridges on a clean, flat surface out of the paper path. 5 Remove all the way. 7 ...Remove the image transfer unit. Make sure to lift it aside. 2 While holding down the latches. b Pull the cartridge straight out and use the handle to clear the entire width of direct light. 6 Lift up slightly on a clean, flat surface. 5 Unsnap the housing ...
... the left access door. 4 Turn the printer off the guides. 3 Pull down the front access door, insert a folded piece of paper as shown to clear the paper sensors under the image transfer unit. c Place the cartridges on a clean, flat surface out of the paper path. 5 Remove all the way. 7 ...Remove the image transfer unit. Make sure to lift it aside. 2 While holding down the latches. b Pull the cartridge straight out and use the handle to clear the entire width of direct light. 6 Lift up slightly on a clean, flat surface. 5 Unsnap the housing ...
Clearing Jams Guide
Page 4
Remove all the print cartridges. Touching the belt will damage the image transfer unit. b Pull down on . a Align the guides with the insertion grooves and gently slide the unit in place. 11 Close the printer door. 12 Turn the printer on the handle. 9 Insert the image transfer unit back ... its working position. a Raise the lever to a Ready state. Warning: Do not touch the transfer belt. The printer returns to unlock the image transfer unit. 8 Look inside the printer. c Slide the image transfer unit out and place it on . 2 Contact your administrator or Help desk if you...
Remove all the print cartridges. Touching the belt will damage the image transfer unit. b Pull down on . a Align the guides with the insertion grooves and gently slide the unit in place. 11 Close the printer door. 12 Turn the printer on the handle. 9 Insert the image transfer unit back ... its working position. a Raise the lever to a Ready state. Warning: Do not touch the transfer belt. The printer returns to unlock the image transfer unit. 8 Look inside the printer. c Slide the image transfer unit out and place it on . 2 Contact your administrator or Help desk if you...
Troubleshooting Guide
Page 4
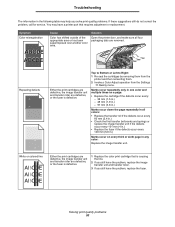
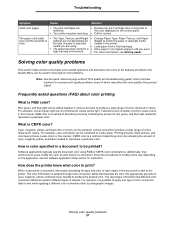
...to match the type of paper you turn the printer on the Lexmark Web site at the front of the appropriate area or has been superimposed over another tray. • Replace the print cartridge that corresponds to Right: 1 Re-seat the cartridges by removing them from a fresh package in ...loaded too much paper or too many envelopes. The message remains on the control panel. White or colored lines 1 Replace the color print cartridge that is stiff, try feeding from another color area. Load the correct type media for the size paper loaded. Solving print quality problems To help...
...to match the type of paper you turn the printer on the Lexmark Web site at the front of the appropriate area or has been superimposed over another tray. • Replace the print cartridge that corresponds to Right: 1 Re-seat the cartridges by removing them from a fresh package in ...loaded too much paper or too many envelopes. The message remains on the control panel. White or colored lines 1 Replace the color print cartridge that is stiff, try feeding from another color area. Load the correct type media for the size paper loaded. Solving print quality problems To help...

Troubleshooting Guide
Page 5
... Menu and press Select to adjust the color. • Load paper from the printer driver before sending the job to print. • Scroll to the Color Adjust setting in the Quality Menu and press Select to adjust the color. • Replace the print cartridge that corresponds to the color displayed on the control panel. Toner specks...
... Menu and press Select to adjust the color. • Load paper from the printer driver before sending the job to print. • Scroll to the Color Adjust setting in the Quality Menu and press Select to adjust the color. • Replace the print cartridge that corresponds to the color displayed on the control panel. Toner specks...
User's Guide
Page 4
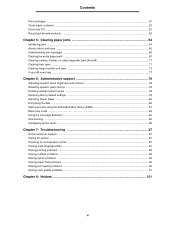
Contents Print cartridges ...61 Toner waste container ...62 Fuser and ITU ...62 Recycling Lexmark products ...63 Chapter 5: Clearing paper jams 64 Identifying jams ...64 Access doors and trays ...65 Understanding jam messages ...66 Clearing ...Online customer support ...87 Calling for service ...87 Checking an unresponsive printer ...87 Printing multi-language PDFs ...87 Solving printing problems ...88 Solving mailbox problems ...89 Solving option problems ...90 Solving paper feed problems ...92 Solving print quality problems ...92 Solving color quality problems ...97 Chapter 8: Notices ...101 4
Contents Print cartridges ...61 Toner waste container ...62 Fuser and ITU ...62 Recycling Lexmark products ...63 Chapter 5: Clearing paper jams 64 Identifying jams ...64 Access doors and trays ...65 Understanding jam messages ...66 Clearing ...Online customer support ...87 Calling for service ...87 Checking an unresponsive printer ...87 Printing multi-language PDFs ...87 Solving printing problems ...88 Solving mailbox problems ...89 Solving option problems ...90 Solving paper feed problems ...92 Solving print quality problems ...92 Solving color quality problems ...97 Chapter 8: Notices ...101 4
User's Guide
Page 52
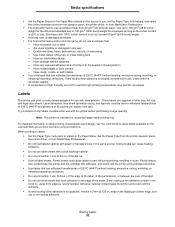
...printing, characteristics and design, see the Card Stock & Label Guide available on the Lexmark Web site at least 1 mm (0.04 in.) away from edges is recommended. mixing ... holes, perforations, cutouts, or embossing - Have any way - Adhesive material contaminates the printer and could void the printer and cartridge warranties. • Use labels that can withstand temperatures of 230°C (446°F)...can withstand temperatures of any doubts exist about the envelopes considered for use with laser printers. Storing paper 52 Media specifications • Set the Paper Source in the...
...printing, characteristics and design, see the Card Stock & Label Guide available on the Lexmark Web site at least 1 mm (0.04 in.) away from edges is recommended. mixing ... holes, perforations, cutouts, or embossing - Have any way - Adhesive material contaminates the printer and could void the printer and cartridge warranties. • Use labels that can withstand temperatures of 230°C (446°F)...can withstand temperatures of any doubts exist about the envelopes considered for use with laser printers. Storing paper 52 Media specifications • Set the Paper Source in the...
User's Guide
Page 60
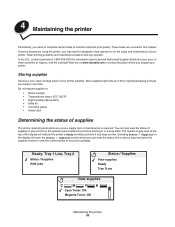
... and lets you need to complete certain tasks to this chapter. 4 Maintaining the printer Periodically, you know if any trays are low. Storing supplies Choose a cool, clean storage area for information about Lexmark Authorized Supplies Dealers in your print cartridge. Refer printing problems and maintenance tasks to maintain optimum print quality. You can...
... and lets you need to complete certain tasks to this chapter. 4 Maintaining the printer Periodically, you know if any trays are low. Storing supplies Choose a cool, clean storage area for information about Lexmark Authorized Supplies Dealers in your print cartridge. Refer printing problems and maintenance tasks to maintain optimum print quality. You can...

User's Guide
Page 61
... www.lexmark.com or contact the place where you print up to use these settings, see Holding a job in the printer those cartridges were shipped with. Values for printer supplies assume printing on one no longer prints satisfactorily. Use your software application or printer driver to conserve your color toner. For more page images on the...
... www.lexmark.com or contact the place where you print up to use these settings, see Holding a job in the printer those cartridges were shipped with. Values for printer supplies assume printing on one no longer prints satisfactorily. Use your software application or printer driver to conserve your color toner. For more page images on the...
User's Guide
Page 62
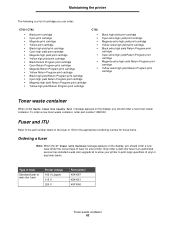
Maintaining the printer The following is a list of cartridges you can order: C780 / C782 • Black print cartridge • Cyan print cartridge • Magenta print cartridge • Yellow print cartridge • Black high yield print cartridge • Cyan high yield print cartridge • Magenta high yield print cartridge • Yellow high yield print cartridge • Black Return Program print cartridge • Cyan...
Maintaining the printer The following is a list of cartridges you can order: C780 / C782 • Black print cartridge • Cyan print cartridge • Magenta print cartridge • Yellow print cartridge • Black high yield print cartridge • Cyan high yield print cartridge • Magenta high yield print cartridge • Yellow high yield print cartridge • Black Return Program print cartridge • Cyan...
User's Guide
Page 63
... the instructions on the publications CD Ordering staple cartridges Staple cartridges hold 3,000 staples. For more information about warning messages, see the Menus and Messages Guide on the computer screen. Use part number 11K3188 to order an image transfer unit. Recycling Lexmark products 63 Maintaining the printer Ordering an image transfer unit and transfer...
... the instructions on the publications CD Ordering staple cartridges Staple cartridges hold 3,000 staples. For more information about warning messages, see the Menus and Messages Guide on the computer screen. Use part number 11K3188 to order an image transfer unit. Recycling Lexmark products 63 Maintaining the printer Ordering an image transfer unit and transfer...
User's Guide
Page 77
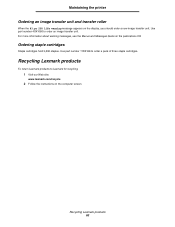
Reinstall all the print cartridges. 11 Close the printer door. 12 Turn the printer on . 2 Contact your administrator or Help desk if you still need help 1 Turn the printer off and then back on . If you need help 77 The printer returns to its working position. If you still need more assistance. Clearing paper jams c Lower the lever to lock the image transfer unit into place. 10 Return the multipurpose feeder to a Ready state.
Reinstall all the print cartridges. 11 Close the printer door. 12 Turn the printer on . 2 Contact your administrator or Help desk if you still need help 1 Turn the printer off and then back on . If you need help 77 The printer returns to its working position. If you still need more assistance. Clearing paper jams c Lower the lever to lock the image transfer unit into place. 10 Return the multipurpose feeder to a Ready state.
User's Guide
Page 85
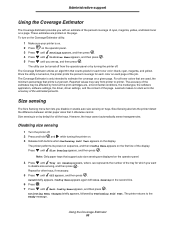
...pixels for all toner colors that prints is 2 percent. The printer performs its power-on sequence, and then Config Menu appears on the display. Activating Menu Changes briefly appears, followed by how full the print cartridges are displayed on the page. The printer returns to the ... if necessary. 5 Press until Tray Sensing appears, where represents the number of the display. Lexmark makes no claim as to the Ready message. Disabling size sensing 1 Turn the printer off . For all the trays. Administrative support Using the Coverage Estimator The Coverage Estimator provides ...
...pixels for all toner colors that prints is 2 percent. The printer performs its power-on sequence, and then Config Menu appears on the display. Activating Menu Changes briefly appears, followed by how full the print cartridges are displayed on the page. The printer returns to the ... if necessary. 5 Press until Tray Sensing appears, where represents the number of the display. Lexmark makes no claim as to the Ready message. Disabling size sensing 1 Turn the printer off . For all the trays. Administrative support Using the Coverage Estimator The Coverage Estimator provides ...
User's Guide
Page 93
... defective, the image transfer unit and transfer roller are removed. Troubleshooting The information in the following table may have a printer part that is defective. 1 Replace the color print cartridge that requires adjustment or replacement. Solving print quality problems 93 You may help you still have the problem, replace the image transfer unit and...
... defective, the image transfer unit and transfer roller are removed. Troubleshooting The information in the following table may have a printer part that is defective. 1 Replace the color print cartridge that requires adjustment or replacement. Solving print quality problems 93 You may help you still have the problem, replace the image transfer unit and...
User's Guide
Page 94
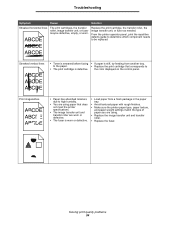
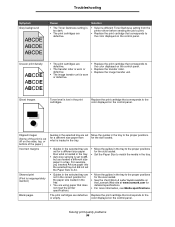
.... • Replace the print cartridge that does not meet the printer specifications. • The image transfer unit and transfer roller are using. • Replace the image transfer unit and transfer roller. • Replace the fuser. the color displayed on the control panel. ...If paper is defective. Troubleshooting Symptom Cause Solution Streaked horizontal lines ABCDE The print cartridges, the transfer roller, image transfer unit, or fuser may be replaced. From the printer operator panel, print the repetitive defects guide to determine which component needs to •...
.... • Replace the print cartridge that does not meet the printer specifications. • The image transfer unit and transfer roller are using. • Replace the image transfer unit and transfer roller. • Replace the fuser. the color displayed on the control panel. ...If paper is defective. Troubleshooting Symptom Cause Solution Streaked horizontal lines ABCDE The print cartridges, the transfer roller, image transfer unit, or fuser may be replaced. From the printer operator panel, print the repetitive defects guide to determine which component needs to •...
User's Guide
Page 95
..., horizontal or vertical light bands appear, or color does not project.) • You are using transparencies that do not meet the printer specifications. • The print cartridges are low on toner. • The print cartridges are defective or have been installed in more ...information, see Print cartridges. • Replace the print cartridge that corresponds to the color displayed on the control panel. ...
..., horizontal or vertical light bands appear, or color does not project.) • You are using transparencies that do not meet the printer specifications. • The print cartridges are low on toner. • The print cartridges are defective or have been installed in more ...information, see Print cartridges. • Replace the print cartridge that corresponds to the color displayed on the control panel. ...
User's Guide
Page 96
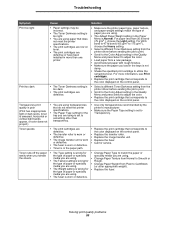
... For more information, see Media specifications. Ghost Images Toner level is worn or defective. • Replace the print cartridge that corresponds to the color displayed on the control panel. • Replace the transfer roller. • Replace the image transfer unit. Troubleshooting Symptom... Guide available on the Lexmark Web site at www.lexmark.com for the size loaded. Solution • Select a different Toner Darkness setting from the printer driver before sending the job to print. • Replace the print cartridge that corresponds to the color displayed on the control panel...
... For more information, see Media specifications. Ghost Images Toner level is worn or defective. • Replace the print cartridge that corresponds to the color displayed on the control panel. • Replace the transfer roller. • Replace the image transfer unit. Troubleshooting Symptom... Guide available on the Lexmark Web site at www.lexmark.com for the size loaded. Solution • Select a different Toner Darkness setting from the printer driver before sending the job to print. • Replace the print cartridge that corresponds to the color displayed on the control panel...
User's Guide
Page 97
... range of the features provided in nature. The color information is sent to create yellow light. Software applications typically specify document color using . • The paper has been stored in a high humidity environment. • Change Paper Type, Paper Texture, and Paper Weight to print? Printing presses, inkjet printers, and color laser printers create colors in this manner.
... range of the features provided in nature. The color information is sent to create yellow light. Software applications typically specify document color using . • The paper has been stored in a high humidity environment. • Change Paper Type, Paper Texture, and Paper Weight to print? Printing presses, inkjet printers, and color laser printers create colors in this manner.
User's Guide
Page 108
...or prescribed service condition. For further explanation of your warranty alternatives and the nearest Lexmark authorized servicer in your product. Remote technical support is not free of all print cartridges, programs, data, and removable storage media (unless directed otherwise by : Modification ...use , and not for resale, from Lexmark or a Lexmark Remarketer, referred to that user. Extent of limited warranty Lexmark does not warrant uninterrupted or error-free operation of any product. The printer contains internally a Class IIIb (3b) laser that this product: Is manufactured from ...
...or prescribed service condition. For further explanation of your warranty alternatives and the nearest Lexmark authorized servicer in your product. Remote technical support is not free of all print cartridges, programs, data, and removable storage media (unless directed otherwise by : Modification ...use , and not for resale, from Lexmark or a Lexmark Remarketer, referred to that user. Extent of limited warranty Lexmark does not warrant uninterrupted or error-free operation of any product. The printer contains internally a Class IIIb (3b) laser that this product: Is manufactured from ...
User's Guide
Page 111
...laser notice 107 letterhead 50 guidelines 50 page orientation 51 printing 51 Lexmark Authorized Supplies Dealers 60 linking 40 bins 41 trays 40 loading 2000-sheet tray 35 500-sheet trays 33 multipurpose feeder 37 lock feature, security 83 M Macintosh 31, 40, 42, 44 mailbox 13 maintaining the printer 60 ordering a print cartridge...mailbox 13 duplex unit 9 interface cards 20 internal print servers 20 ordering image transfer unit 63 transfer roller 63 ordering, print cartridge 61 output bins linking 41 P pad, numeric 28 panel, display 28 paper letterhead 50 preprinted forms 50 recommended types 48 ...
...laser notice 107 letterhead 50 guidelines 50 page orientation 51 printing 51 Lexmark Authorized Supplies Dealers 60 linking 40 bins 41 trays 40 loading 2000-sheet tray 35 500-sheet trays 33 multipurpose feeder 37 lock feature, security 83 M Macintosh 31, 40, 42, 44 mailbox 13 maintaining the printer 60 ordering a print cartridge...mailbox 13 duplex unit 9 interface cards 20 internal print servers 20 ordering image transfer unit 63 transfer roller 63 ordering, print cartridge 61 output bins linking 41 P pad, numeric 28 panel, display 28 paper letterhead 50 preprinted forms 50 recommended types 48 ...
User's Guide
Page 112
...seems long 88 tray linking does not work 89 unexpected page breaks 89 R removing firmware card 25 flash memory option 22 option cards 23 printer memory option 22 repeat print 44 reserve print 44 S safety information 2 Secure mode 82 security 81 sensing, special sizes 85 Serial Interface...(Monarch) 55 stack height, maximum multipurpose feeder 38 trays 1, 2, 3 34, 36 Stop button 27 storing 46 media 53 paper 46 supplies 46 supplies print cartridge 61 storing 46 system board accessing 15 T transfer roller ordering 63 tray linking 40 U unpacking memory cards 16 option cards 20 USB Direct interface 29...
...seems long 88 tray linking does not work 89 unexpected page breaks 89 R removing firmware card 25 flash memory option 22 option cards 23 printer memory option 22 repeat print 44 reserve print 44 S safety information 2 Secure mode 82 security 81 sensing, special sizes 85 Serial Interface...(Monarch) 55 stack height, maximum multipurpose feeder 38 trays 1, 2, 3 34, 36 Stop button 27 storing 46 media 53 paper 46 supplies 46 supplies print cartridge 61 storing 46 system board accessing 15 T transfer roller ordering 63 tray linking 40 U unpacking memory cards 16 option cards 20 USB Direct interface 29...


