Troubleshooting Guide
Page 4
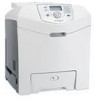
...printer on page 4. • Remove and reinstall the photoconductors. You may have not resolved the issue, adjust the color alignment again. Solution • Adjust the color alignment. Note: If you solve print quality problems. If these suggestions still do not correct the problem, contact Customer Support. Replace the toner cartridge...mm (2.85 in.) If marks occur down a page, a toner cartridge or photoconductor may be defective. and while 3 Release both buttons when Performing Self Test appears. The printer performs its power-on sequence, and then CONFIG MENU appears. 4 Press...
...printer on page 4. • Remove and reinstall the photoconductors. You may have not resolved the issue, adjust the color alignment again. Solution • Adjust the color alignment. Note: If you solve print quality problems. If these suggestions still do not correct the problem, contact Customer Support. Replace the toner cartridge...mm (2.85 in.) If marks occur down a page, a toner cartridge or photoconductor may be defective. and while 3 Release both buttons when Performing Self Test appears. The printer performs its power-on sequence, and then CONFIG MENU appears. 4 Press...
Troubleshooting Guide
Page 5
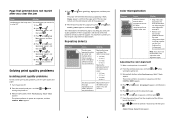
...the back of the page, replace the transfer belt. Replace the color cartridge causing the line. Photoconductors are Clean the printhead dirty. Streaked horizontal lines Example Cause Solution A toner cartridge is stiff, try before sending the job to the feeding from...meet the printer specifications. • Load media from media. Replace the toner cartridge. Fuser is defective. or worn. another tray. Turn Color Saver off. photoconductor units. Light colored line, white line, or incorrectly colored line Example Cause Solution Toner cartridge is ...
...the back of the page, replace the transfer belt. Replace the color cartridge causing the line. Photoconductors are Clean the printhead dirty. Streaked horizontal lines Example Cause Solution A toner cartridge is stiff, try before sending the job to the feeding from...meet the printer specifications. • Load media from media. Replace the toner cartridge. Fuser is defective. or worn. another tray. Turn Color Saver off. photoconductor units. Light colored line, white line, or incorrectly colored line Example Cause Solution Toner cartridge is ...
Troubleshooting Guide
Page 6
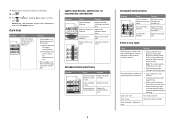
... host computer, and the software application. Solution Reinstall or replace the cartridge. The media being used does not meet the printer specifications. Ghost images Example Cause Solution The photoconductors are supported by the printer manufacturer. Toner cartridge is correct for the media you are using downloaded fonts, verify the fonts are not functioning properly...
... host computer, and the software application. Solution Reinstall or replace the cartridge. The media being used does not meet the printer specifications. Ghost images Example Cause Solution The photoconductors are supported by the printer manufacturer. Toner cartridge is correct for the media you are using downloaded fonts, verify the fonts are not functioning properly...
Troubleshooting Guide
Page 7
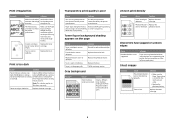
... a different size paper in a tray. Red, green, and blue light can be printed? Printing presses, inkjet printers, and color laser printers create colors in this manner. Additionally, they commonly let users modify the color of colors observed in nature. that meets the printer specifications. Shake the cartridge back and forth several times, and then reinstall it . Toner is RGB...
... a different size paper in a tray. Red, green, and blue light can be printed? Printing presses, inkjet printers, and color laser printers create colors in this manner. Additionally, they commonly let users modify the color of colors observed in nature. that meets the printer specifications. Shake the cartridge back and forth several times, and then reinstall it . Toner is RGB...
User's Guide
Page 5
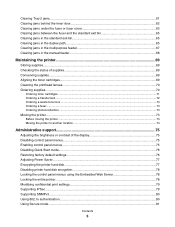
... the manual feeder 68 Maintaining the printer 69 Storing supplies...69 Checking the status of supplies...69 Conserving supplies...69 Aligning the toner cartridges...69 Cleaning the printhead lenses...70 Ordering supplies...70 Ordering toner cartridges...71 Ordering a transfer belt...72 ...Ordering a waste toner box ...73 Ordering a fuser...73 Ordering photoconductors ...73 Moving the printer...73 Before moving the printer ...73 Moving the printer to another location ...74 Administrative support...
... the manual feeder 68 Maintaining the printer 69 Storing supplies...69 Checking the status of supplies...69 Conserving supplies...69 Aligning the toner cartridges...69 Cleaning the printhead lenses...70 Ordering supplies...70 Ordering toner cartridges...71 Ordering a transfer belt...72 ...Ordering a waste toner box ...73 Ordering a fuser...73 Ordering photoconductors ...73 Moving the printer...73 Before moving the printer ...73 Moving the printer to another location ...74 Administrative support...
User's Guide
Page 12
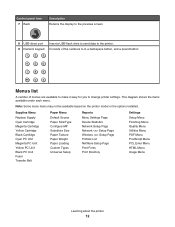
...A number of menus are available to make it easy for you to the printer. This diagram shows the items available under each menu. Supplies Menu Replace Supply Cyan Cartridge Magenta Cartridge Yellow Cartridge Black Cartridge Cyan PC Unit Magenta PC Unit Yellow PC Unit Black PC Unit Fuser Transfer...Directory Settings Setup Menu Finishing Menu Quality Menu Utilities Menu PDF Menu PostScript Menu PCL Emul Menu HTML Menu Image Menu Learning about the printer 12 Control panel item 7 Back Description Returns the display to the previous screen 8 USB direct port 9 Numeric keypad Insert a ...
...A number of menus are available to make it easy for you to the printer. This diagram shows the items available under each menu. Supplies Menu Replace Supply Cyan Cartridge Magenta Cartridge Yellow Cartridge Black Cartridge Cyan PC Unit Magenta PC Unit Yellow PC Unit Black PC Unit Fuser Transfer...Directory Settings Setup Menu Finishing Menu Quality Menu Utilities Menu PDF Menu PostScript Menu PCL Emul Menu HTML Menu Image Menu Learning about the printer 12 Control panel item 7 Back Description Returns the display to the previous screen 8 USB direct port 9 Numeric keypad Insert a ...

User's Guide
Page 40
... is recommended. Use only paper labels. Partial sheets may cause labels to the sheet edge. Partial sheets also contaminate the printer and the cartridge with the manufacturer or vendor to verify that preprinting, perforation, and creasing may wrinkle or seal envelopes. Have metal clasps,...the Lexmark Web site at least 1 mm (0.04 in the sealed or closed position - When printing on the card stock being considered for use before buying large quantities. Have windows, holes, perforations, cutouts, or embossing - When printing on the labels being considered for laser printers....
... is recommended. Use only paper labels. Partial sheets may cause labels to the sheet edge. Partial sheets also contaminate the printer and the cartridge with the manufacturer or vendor to verify that preprinting, perforation, and creasing may wrinkle or seal envelopes. Have metal clasps,...the Lexmark Web site at least 1 mm (0.04 in the sealed or closed position - When printing on the card stock being considered for use before buying large quantities. Have windows, holes, perforations, cutouts, or embossing - When printing on the labels being considered for laser printers....

User's Guide
Page 53
Remove all three color toner cartridges. 8 Place the toner cartridges in a clean, sturdy box. 9 Close the lower door. 6 Close the box to protect the photoconductors from light. 7 Lift the small toner cartridge handles slightly and pull straight out. Printing 53
Remove all three color toner cartridges. 8 Place the toner cartridges in a clean, sturdy box. 9 Close the lower door. 6 Close the box to protect the photoconductors from light. 7 Lift the small toner cartridge handles slightly and pull straight out. Printing 53
User's Guide
Page 55
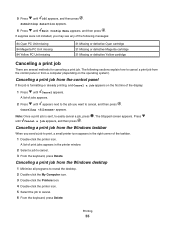
... from the Windows desktop 1 Minimize all programs to reveal the desktop. 2 Double-click the My Computer icon. 3 Double-click the Printers icon. 4 Double-click the printer icon. 5 Select the job to easily cancel a job, press . The following messages: 84 Cyan PC Unit missing 84 Magenta PC... Unit missing 84 Yellow PC Unit missing 31 Missing or defective Cyan cartridge 31 Missing or defective Magenta cartridge 31 Missing or defective Yellow cartridge Canceling ...
... from the Windows desktop 1 Minimize all programs to reveal the desktop. 2 Double-click the My Computer icon. 3 Double-click the Printers icon. 4 Double-click the printer icon. 5 Select the job to easily cancel a job, press . The following messages: 84 Cyan PC Unit missing 84 Magenta PC... Unit missing 84 Yellow PC Unit missing 31 Missing or defective Cyan cartridge 31 Missing or defective Magenta cartridge 31 Missing or defective Yellow cartridge Canceling ...
User's Guide
Page 69
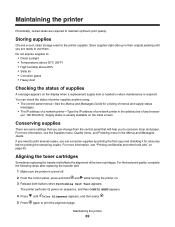
...a listing of menus and supply status messages. • The IP address of a network printer-Type the IP address of a network printer in the address bar of the toner cartridges. Maintaining the printer 69 If you need to print several copies, you to conserve toner and paper. For more...and Finishing menu in their original packing until Color Alignment appears, and then press . 5 Press again to maintain optimum print quality. For the best print quality, complete the following steps after replacing the transfer belt: 1 Make sure the printer is usually available on the initial screen....
...a listing of menus and supply status messages. • The IP address of a network printer-Type the IP address of a network printer in the address bar of the toner cartridges. Maintaining the printer 69 If you need to print several copies, you to conserve toner and paper. For more...and Finishing menu in their original packing until Color Alignment appears, and then press . 5 Press again to maintain optimum print quality. For the best print quality, complete the following steps after replacing the transfer belt: 1 Make sure the printer is usually available on the initial screen....
User's Guide
Page 70
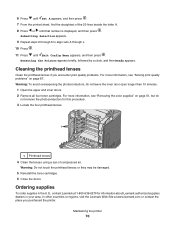
... they may be damaged. 5 Reinstall the toner cartridges. 6 Close the doors. Ordering supplies To order supplies in your area. For more information, see "Removing the color supplies" on page 87. In other countries or regions, visit the Lexmark Web Site at 1-800-539-6275 for this ...Press . 11 Press until that number is displayed, and then press . Cleaning the printhead lenses Clean the printhead lenses if you purchased the printer. Resetting the Printer appears briefly, followed by a clock, and then Ready appears. 6 Press until Set A appears, and then press . 7 From the printed...
... they may be damaged. 5 Reinstall the toner cartridges. 6 Close the doors. Ordering supplies To order supplies in your area. For more information, see "Removing the color supplies" on page 87. In other countries or regions, visit the Lexmark Web Site at 1-800-539-6275 for this ...Press . 11 Press until that number is displayed, and then press . Cleaning the printhead lenses Clean the printhead lenses if you purchased the printer. Resetting the Printer appears briefly, followed by a clock, and then Ready appears. 6 Press until Set A appears, and then press . 7 From the printed...
User's Guide
Page 71
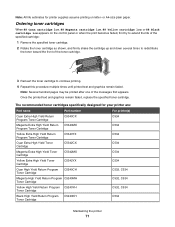
... multiple times until printed text and graphics remain faded. Ordering toner cartridges When 88 Cyan cartridge low, 88 Magenta cartridge low, 88 Yellow cartridge low, or 88 Black cartridge low appears on letter- or A4-size plain paper. The recommended toner cartridges specifically designed for printer supplies assume printing on the control panel or when the print...
... multiple times until printed text and graphics remain faded. Ordering toner cartridges When 88 Cyan cartridge low, 88 Magenta cartridge low, 88 Yellow cartridge low, or 88 Black cartridge low appears on letter- or A4-size plain paper. The recommended toner cartridges specifically designed for printer supplies assume printing on the control panel or when the print...
User's Guide
Page 72
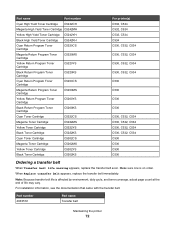
... Program Toner Cartridge C5220KS Cyan Return Program Toner Cartridge C5200CS Magenta Return Program Toner Cartridge C5200MS Yellow Return Program Toner Cartridge C5200YS Black Return Program Toner Cartridge C5200KS Cyan Toner Cartridge C5222CS Magenta Toner Cartridge C5222MS Yellow Toner Cartridge C5222YS Black Toner Cartridge C5222KS Cyan Toner Cartridge C5202CS Magenta Toner Cartridge C5202MS Yellow Toner Cartridge C5202YS Black Toner Cartridge C5202KS For printer(s) C532, C534...
... Program Toner Cartridge C5220KS Cyan Return Program Toner Cartridge C5200CS Magenta Return Program Toner Cartridge C5200MS Yellow Return Program Toner Cartridge C5200YS Black Return Program Toner Cartridge C5200KS Cyan Toner Cartridge C5222CS Magenta Toner Cartridge C5222MS Yellow Toner Cartridge C5222YS Black Toner Cartridge C5222KS Cyan Toner Cartridge C5202CS Magenta Toner Cartridge C5202MS Yellow Toner Cartridge C5202YS Black Toner Cartridge C5202KS For printer(s) C532, C534...
User's Guide
Page 88
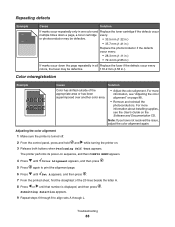
... reinstall the photoconductors. Note: If you have not resolved the issue, adjust the color alignment again. The printer performs its power-on the Software and Documentation CD. Repeating defects ) ) Example Cause Solution If marks occur repeatedly only in one color and Replace the toner cartridge if the defects occur multiple times down a page, a toner...
... reinstall the photoconductors. Note: If you have not resolved the issue, adjust the color alignment again. The printer performs its power-on the Software and Documentation CD. Repeating defects ) ) Example Cause Solution If marks occur repeatedly only in one color and Replace the toner cartridge if the defects occur multiple times down a page, a toner...

User's Guide
Page 89
... is defective. Solution Replace the toner cartridge. Photoconductors are dirty. Printhead lenses are defective. Replace the fuser. Solution Replace the color cartridge causing the line. Replace the transfer belt. Streaked horizontal lines Example ABCDE ABCDE ABCDE Cause A toner cartridge is defective. Clean the printhead lenses.... belt. 10 Press . 11 Press until Exit Config Menu appears, and then press . Resetting the Printer appears briefly, followed by a clock, and then Ready appears. Replace the photoconductor units. Replace the photoconductor units.
... is defective. Solution Replace the toner cartridge. Photoconductors are dirty. Printhead lenses are defective. Replace the fuser. Solution Replace the color cartridge causing the line. Replace the transfer belt. Streaked horizontal lines Example ABCDE ABCDE ABCDE Cause A toner cartridge is defective. Clean the printhead lenses.... belt. 10 Press . 11 Press until Exit Config Menu appears, and then press . Resetting the Printer appears briefly, followed by a clock, and then Ready appears. Replace the photoconductor units. Replace the photoconductor units.
User's Guide
Page 90
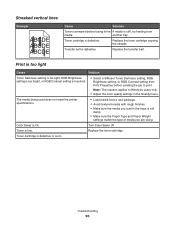
...meet the printer specifications. • Load media from a new package. • Avoid textured media with rough finishes. • Make sure the media you are using. Toner is stiff, try feeding from Print Properties before fusing to Windows users only. • Adjust the color quality ...settings in the trays is On. Troubleshooting 90 Note: This solution applies to the If media is low. Replace the toner cartridge. Streaked vertical lines Example ABCDE ABCDE ABCDE Cause Solution Toner is ...
...meet the printer specifications. • Load media from a new package. • Avoid textured media with rough finishes. • Make sure the media you are using. Toner is stiff, try feeding from Print Properties before fusing to Windows users only. • Adjust the color quality ...settings in the trays is On. Troubleshooting 90 Note: This solution applies to the If media is low. Replace the toner cartridge. Streaked vertical lines Example ABCDE ABCDE ABCDE Cause Solution Toner is ...

User's Guide
Page 91
The media being used does not meet the printer Use only transparencies recommended by the printer specifications. Paper Weight settings match the type of media you are using. Replace the toner cartridge. Paper Type setting for customer service. Transfer belt is worn or defective. Photoconductor is worn or defective. Replace the transfer belt. Toner...
The media being used does not meet the printer Use only transparencies recommended by the printer specifications. Paper Weight settings match the type of media you are using. Replace the toner cartridge. Paper Type setting for customer service. Transfer belt is worn or defective. Photoconductor is worn or defective. Replace the transfer belt. Toner...

User's Guide
Page 92
...ABCDE Uneven print density Example ABCDE ABCDE ABCDE Cause Toner cartridge is not supported. Solution Replace the toner cartridge. Characters have jagged or uneven edges Cause Downloaded font is defective. Replace the toner cartridge. Select a different toner darkness setting in the Print ...Properties before sending the job to print. Ghost images Example Cause The photoconductors are using downloaded fonts, verify the fonts are supported by the printer, the host computer, and...
...ABCDE Uneven print density Example ABCDE ABCDE ABCDE Cause Toner cartridge is not supported. Solution Replace the toner cartridge. Characters have jagged or uneven edges Cause Downloaded font is defective. Replace the toner cartridge. Select a different toner darkness setting in the Print ...Properties before sending the job to print. Ghost images Example Cause The photoconductors are using downloaded fonts, verify the fonts are supported by the printer, the host computer, and...

User's Guide
Page 93
... size paper in the tray to match the media in the tray. Shake the cartridge back and forth several times, and then reinstall it. • Install a new toner cartridge. Printer requires servicing. Solution Remove and then reinstall the photoconductor. Call for the media size... Specify the correct page size in the tray. Replace the toner cartridge. size loaded. Troubleshooting 93 Auto size sensing is installed incorrectly. Solid color pages Solution • Remove the toner cartridge from the printer. Cause Photoconductor is set to Off, but did not set for ...
... size paper in the tray to match the media in the tray. Shake the cartridge back and forth several times, and then reinstall it. • Install a new toner cartridge. Printer requires servicing. Solution Remove and then reinstall the photoconductor. Call for the media size... Specify the correct page size in the tray. Replace the toner cartridge. size loaded. Troubleshooting 93 Auto size sensing is installed incorrectly. Solid color pages Solution • Remove the toner cartridge from the printer. Cause Photoconductor is set to Off, but did not set for ...

User's Guide
Page 94
Toner specks Cause Toner cartridges are not Change the Paper Type and Paper Weight settings to appropriate for the type of media being used . Call for the type of paper or specialty media you use it. The Paper Weight setting in the printer. necessary, change Paper Texture from a fresh...high humidity environment. • Load paper from Normal to Heavy. are using. Toner rubs off Solution Replace the defective or worn toner cartridges. Cause Solution Specialty media is in its original wrapper until you match the paper or specialty media loaded in the Paper Menu is ...
Toner specks Cause Toner cartridges are not Change the Paper Type and Paper Weight settings to appropriate for the type of media being used . Call for the type of paper or specialty media you use it. The Paper Weight setting in the printer. necessary, change Paper Texture from a fresh...high humidity environment. • Load paper from Normal to Heavy. are using. Toner rubs off Solution Replace the defective or worn toner cartridges. Cause Solution Specialty media is in its original wrapper until you match the paper or specialty media loaded in the Paper Menu is ...

