Quick Reference
Page 1
...your job in an optional 530-sheet tray, you see your PIN, asterisks appear on the application) to view the printer driver settings. 3 Click Help and refer to reposition the fuser pressure release levers once you enter your user name, and then press Select. This may not need to print a...access your confidential print job: a Press Menu until you see it . To check the amount of the printer near the fuser is personal or confidential, and you do not want anyone else to the printer.) f Press Menu until you see Confidential Job, and then press Select. c Press Menu until you may...
...your job in an optional 530-sheet tray, you see your PIN, asterisks appear on the application) to view the printer driver settings. 3 Click Help and refer to reposition the fuser pressure release levers once you enter your user name, and then press Select. This may not need to print a...access your confidential print job: a Press Menu until you see it . To check the amount of the printer near the fuser is personal or confidential, and you do not want anyone else to the printer.) f Press Menu until you see Confidential Job, and then press Select. c Press Menu until you may...
Quick Reference
Page 2
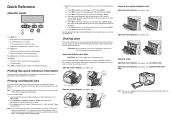
... USB Buffer Job Buffering MAC Binary PS P/N 20K1046 E.C. 2K0125 © 2003 Lexmark International, Inc. Not Ready The printer is waiting for a command or additional data. • Press Go to clear...printer driver. Loading a tray Width guide Load lines Length guide Paper size indicators Load media into the tray with the recommended print side faceup for one- All rights reserved. Operator panel menus Supplies Menu Toner Waste Bottle Photodev Cart Fuser Supplies Life Replace Supplies Color Menu Print Mode Color Correction Toner Darkness Color Saver Color Balance Color...
... USB Buffer Job Buffering MAC Binary PS P/N 20K1046 E.C. 2K0125 © 2003 Lexmark International, Inc. Not Ready The printer is waiting for a command or additional data. • Press Go to clear...printer driver. Loading a tray Width guide Load lines Length guide Paper size indicators Load media into the tray with the recommended print side faceup for one- All rights reserved. Operator panel menus Supplies Menu Toner Waste Bottle Photodev Cart Fuser Supplies Life Replace Supplies Color Menu Print Mode Color Correction Toner Darkness Color Saver Color Balance Color...
User's Reference
Page 3
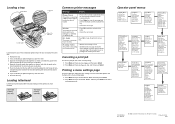
... jams hints ...49 Identifying the media path 50 Accessing jam areas 51 Chapter 5: Maintenance 60 Maintaining your printer 60 Determining the status of supplies 60 Conserving supplies ...61 Ordering supplies and maintenance items 61 Ordering toner cartridges 62 Ordering... a fuser ...62 Ordering a waste toner bottle 62 Ordering a photodeveloper cartridge 62 Maintaining your printer for long term storage 62 Storing supplies ...63 Storing media ...63 Storing the toner cartridges...
... jams hints ...49 Identifying the media path 50 Accessing jam areas 51 Chapter 5: Maintenance 60 Maintaining your printer 60 Determining the status of supplies 60 Conserving supplies ...61 Ordering supplies and maintenance items 61 Ordering toner cartridges 62 Ordering... a fuser ...62 Ordering a waste toner bottle 62 Ordering a photodeveloper cartridge 62 Maintaining your printer for long term storage 62 Storing supplies ...63 Storing media ...63 Storing the toner cartridges...
User's Reference
Page 4
...Lexmark products 68 Replacing the fuser ...69 Replacing the waste toner bottle 72 Replacing the photodeveloper cartridge 73 Setting the operator panel when a supply is replaced 77 Changing the toner cartridge yield 77 Specifying the replaced supply 77 Cleaning the printhead lens 78 Chapter 6: Troubleshooting 81 Solving basic printer... problems 81 Checking an unresponsive printer 81 Solving display problems 82 Solving printing problems 82 Solving print quality problems 84 Solving color quality problems 88 Frequently asked questions (FAQ) about color printing 88...
...Lexmark products 68 Replacing the fuser ...69 Replacing the waste toner bottle 72 Replacing the photodeveloper cartridge 73 Setting the operator panel when a supply is replaced 77 Changing the toner cartridge yield 77 Specifying the replaced supply 77 Cleaning the printhead lens 78 Chapter 6: Troubleshooting 81 Solving basic printer... problems 81 Checking an unresponsive printer 81 Solving display problems 82 Solving printing problems 82 Solving print quality problems 84 Solving color quality problems 88 Frequently asked questions (FAQ) about color printing 88...
User's Reference
Page 28
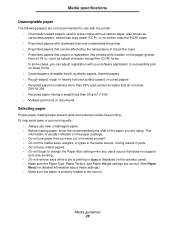
...sizes, weights, or types in the same source; Media specifications Unacceptable paper The following papers are not recommended for use with the printer: • Chemically treated papers used to make copies without carbon paper, also known as carbonless papers, carbonless copy paper (CCP),... or no carbon required (NCR) paper • Preprinted papers with chemicals that may contaminate the printer • Preprinted papers that can be affected by the temperature in the printer fuser • Preprinted papers that require a registration (the precise print location on the page) greater than &#...
...sizes, weights, or types in the same source; Media specifications Unacceptable paper The following papers are not recommended for use with the printer: • Chemically treated papers used to make copies without carbon paper, also known as carbonless papers, carbonless copy paper (CCP),... or no carbon required (NCR) paper • Preprinted papers with chemicals that may contaminate the printer • Preprinted papers that can be affected by the temperature in the printer fuser • Preprinted papers that require a registration (the precise print location on the page) greater than &#...

User's Reference
Page 53
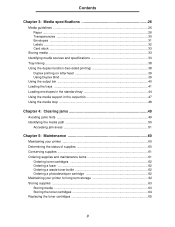
Clearing jams 3 Pull the fuser pressure release levers to the rear of the jammed media. Pull it . 5 Close the rear door. Identifying the media path 53 Fuser pressure release lever Fuser pressure release lever Note: Gently pull the media out so you do not tear it to release tension on the media. 4 Grasp each side of the printer and then out.
Clearing jams 3 Pull the fuser pressure release levers to the rear of the jammed media. Pull it . 5 Close the rear door. Identifying the media path 53 Fuser pressure release lever Fuser pressure release lever Note: Gently pull the media out so you do not tear it to release tension on the media. 4 Grasp each side of the printer and then out.

User's Reference
Page 54
See the illustrations on page 52. 2 Pull the fuser pressure release levers to release tension on the media. 3 Grasp each corner of the jammed media and pull it . 4 Close the rear door. Clearing jams 202 Paper Jam Open Rear Door A 202 Paper Jam message indicates the media is jammed behind the rear door above the fuser. 1 Push the rear door release latch and gently lower the rear door. Identifying the media path 54 Fuser pressure release lever Fuser pressure release lever Note: Gently pull the media out so you do not tear it up and out.
See the illustrations on page 52. 2 Pull the fuser pressure release levers to release tension on the media. 3 Grasp each corner of the jammed media and pull it . 4 Close the rear door. Clearing jams 202 Paper Jam Open Rear Door A 202 Paper Jam message indicates the media is jammed behind the rear door above the fuser. 1 Push the rear door release latch and gently lower the rear door. Identifying the media path 54 Fuser pressure release lever Fuser pressure release lever Note: Gently pull the media out so you do not tear it up and out.
User's Reference
Page 62
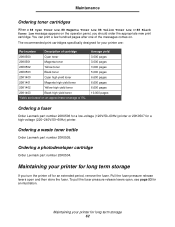
.... Ordering a waste toner bottle Order Lexmark part number 20K0505. To pull the fuser pressure release levers open and then store the fuser. Pull the fuser pressure release levers open , see page 53 for your printer for a high-voltage (220-240V/50-60Hz) printer. Maintenance Ordering toner cartridges When a ...yield 3,000 pages 3,000 pages 3,000 pages 5,000 pages 6,600 pages 6,600 pages 6,600 pages 10,000 pages Ordering a fuser Order Lexmark part number 20K0506 for a low-voltage (120V/50-60Hz) printer or 20K0507 for long term storage 62 Ordering a photodeveloper cartridge Order...
.... Ordering a waste toner bottle Order Lexmark part number 20K0505. To pull the fuser pressure release levers open and then store the fuser. Pull the fuser pressure release levers open , see page 53 for your printer for a high-voltage (220-240V/50-60Hz) printer. Maintenance Ordering toner cartridges When a ...yield 3,000 pages 3,000 pages 3,000 pages 5,000 pages 6,600 pages 6,600 pages 6,600 pages 10,000 pages Ordering a fuser Order Lexmark part number 20K0506 for a low-voltage (120V/50-60Hz) printer or 20K0507 for long term storage 62 Ordering a photodeveloper cartridge Order...

User's Reference
Page 69
Make sure you need to cool before replacing the fuser. 1 Turn the printer off. 2 Push the rear door release latch. 3 Gently lower the rear door. Replacing the fuser 69 Maintenance Replacing the fuser When 87 Fuser Life Warning appears on the operator panel, you must replace the fuser immediately. When 87 Fuser Exhausted appears on the operator panel, you have ordered one. CAUTION: The fuser and the inside of the printer near the fuser may be hot. Wait for more information. See Ordering a fuser for it to replace the fuser soon.
Make sure you need to cool before replacing the fuser. 1 Turn the printer off. 2 Push the rear door release latch. 3 Gently lower the rear door. Replacing the fuser 69 Maintenance Replacing the fuser When 87 Fuser Life Warning appears on the operator panel, you must replace the fuser immediately. When 87 Fuser Exhausted appears on the operator panel, you have ordered one. CAUTION: The fuser and the inside of the printer near the fuser may be hot. Wait for more information. See Ordering a fuser for it to replace the fuser soon.

User's Reference
Page 70
Handle Handle 6 Unpack the new fuser. Replacing the fuser 70 Dispose of the used fuser by the handles and align it with its opening. 8 Gently lower it straight up. Maintenance 4 Turn the two green fuser release levers as shown. 5 Grasp the used fuser. Remove any packaging material or tape. 7 Grasp the new fuser by the handles and lift it into place.
Handle Handle 6 Unpack the new fuser. Replacing the fuser 70 Dispose of the used fuser by the handles and align it with its opening. 8 Gently lower it straight up. Maintenance 4 Turn the two green fuser release levers as shown. 5 Grasp the used fuser. Remove any packaging material or tape. 7 Grasp the new fuser by the handles and lift it into place.

User's Reference
Page 71
If you have installed the fuser improperly, 87 Fuser Missing appears on . 13 Continue with Setting the operator panel when a supply is replaced. If this message appears, remove the fuser, and try to lock the new fuser into place. 10 Push the other two green release levers down. 11 Close the rear door. 12 Turn the printer on the operator panel. Replacing the fuser 71 Maintenance 9 Turn the two green levers as shown to reinstall it correctly.
If you have installed the fuser improperly, 87 Fuser Missing appears on . 13 Continue with Setting the operator panel when a supply is replaced. If this message appears, remove the fuser, and try to lock the new fuser into place. 10 Push the other two green release levers down. 11 Close the rear door. 12 Turn the printer on the operator panel. Replacing the fuser 71 Maintenance 9 Turn the two green levers as shown to reinstall it correctly.

User's Reference
Page 77
...and then press Select. Specifying the replaced supply Note: If you replace the fuser or photodeveloper cartridge once the printer issues the 87 Fuser Life Warning or 83 Photodev Cart Life Warning messages, respectively, the printer issues message prompts on and the Ready message appears. 2 Press and release... setting takes effect once you exit the Config Menu. 7 Install the toner cartridge. When you replace a supply item, you see the color name of the counter in showing the remaining toner. See Specifying the replaced supply for instructions. 8 Specify the item you replaced. The...
...and then press Select. Specifying the replaced supply Note: If you replace the fuser or photodeveloper cartridge once the printer issues the 87 Fuser Life Warning or 83 Photodev Cart Life Warning messages, respectively, the printer issues message prompts on and the Ready message appears. 2 Press and release... setting takes effect once you exit the Config Menu. 7 Install the toner cartridge. When you replace a supply item, you see the color name of the counter in showing the remaining toner. See Specifying the replaced supply for instructions. 8 Specify the item you replaced. The...
User's Reference
Page 78
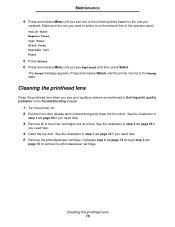
...illustration in step 1 on page 74 if you see print quality problems as mentioned in Solving print quality problems in the Troubleshooting chapter. 1 Turn the printer off. 2 Pull the front door release latch forward and gently lower the front door. Complete step 2 on page 74 through step 3 on page ... replaced. Press and release Return until you need help. 4 Open the top door. Yellow Toner Magenta Toner Cyan Toner Black Toner Photodev Cart Fuser 5 Press Select. 6 Press and release Menu until the printer returns to remove the photodeveloper cartridge. Make sure the one at a time.
...illustration in step 1 on page 74 if you see print quality problems as mentioned in Solving print quality problems in the Troubleshooting chapter. 1 Turn the printer off. 2 Pull the front door release latch forward and gently lower the front door. Complete step 2 on page 74 through step 3 on page ... replaced. Press and release Return until you need help. 4 Open the top door. Yellow Toner Magenta Toner Cyan Toner Black Toner Photodev Cart Fuser 5 Press Select. 6 Press and release Menu until the printer returns to remove the photodeveloper cartridge. Make sure the one at a time.

User's Reference
Page 84
... the toner cartridges You may want to print the Print Quality Test Pages to look for information about a printer consumable. The job has timed out. Marks occur down the page repeatedly in all colors: Replace the item if the defects occur every: 35 mm (1.38 in.) or 95 mm (3.74 in.) for... Solution Collate is too complex. Set Collation to print quality problems. Symptom Repeating defects Cause Solution Either the toner cartridges, the photodeveloper cartridge, or the fuser are defective. Set Print Timeout to On. Check the operator panel for more information.
... the toner cartridges You may want to print the Print Quality Test Pages to look for information about a printer consumable. The job has timed out. Marks occur down the page repeatedly in all colors: Replace the item if the defects occur every: 35 mm (1.38 in.) or 95 mm (3.74 in.) for... Solution Collate is too complex. Set Collation to print quality problems. Symptom Repeating defects Cause Solution Either the toner cartridges, the photodeveloper cartridge, or the fuser are defective. Set Print Timeout to On. Check the operator panel for more information.

User's Reference
Page 85
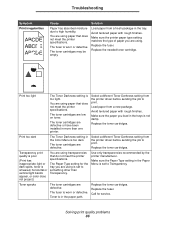
... cartridges are defective, or toner has accumulated in the printer housing near the printhead using a soft, clean lint-free cloth. Replace the toner cartridges or fuser as needed. Streaked vertical lines ABCDE ABCDE ABCDE Toner is stiff, try feeding from another color area. Replace the color toner cartridge causing the line. Clean any spilled...
... cartridges are defective, or toner has accumulated in the printer housing near the printhead using a soft, clean lint-free cloth. Replace the toner cartridges or fuser as needed. Streaked vertical lines ABCDE ABCDE ABCDE Toner is stiff, try feeding from another color area. Replace the color toner cartridge causing the line. Clean any spilled...
User's Reference
Page 86
...path. Make sure the Paper Type setting in the Paper Menu is in the Color Menu is worn or defective. Replace the fuser. Replace the toner cartridges. Toner is set to something other than one printer. Replace the toner cartridges. Call for the tray you are low on toner....job to Transparency. Load paper from a fresh package in the trays is set to print. Use only transparencies recommended by the printer manufacturer. The fuser is too light. Print too light The Toner Darkness setting is worn or defective. The toner cartridges are using paper that ...
...path. Make sure the Paper Type setting in the Paper Menu is in the Color Menu is worn or defective. Replace the fuser. Replace the toner cartridges. Toner is set to something other than one printer. Replace the toner cartridges. Call for the tray you are low on toner....job to Transparency. Load paper from a fresh package in the trays is set to print. Use only transparencies recommended by the printer manufacturer. The fuser is too light. Print too light The Toner Darkness setting is worn or defective. The toner cartridges are using paper that ...

User's Reference
Page 87
...or specialty media you are using . Select a different Toner Darkness setting from Plain Weight to print. Change Paper Weight from the printer driver before sending the job to CardStock (or other appropriate weight). Gray background ABCDE The Toner Darkness setting is correct for the... in the Paper Menu is not functioning properly. Replace the photodeveloper cartridge. than what is worn or defective. Replace the fuser. The fuser is loaded in the tray. Ghost images The photodeveloper cartridge is wrong for service. The toner cartridges are defective. Call ...
...or specialty media you are using . Select a different Toner Darkness setting from Plain Weight to print. Change Paper Weight from the printer driver before sending the job to CardStock (or other appropriate weight). Gray background ABCDE The Toner Darkness setting is correct for the... in the Paper Menu is not functioning properly. Replace the photodeveloper cartridge. than what is worn or defective. Replace the fuser. The fuser is loaded in the tray. Ghost images The photodeveloper cartridge is wrong for service. The toner cartridges are defective. Call ...

User's Reference
Page 93
...size paper loaded. The paper has absorbed Load paper from occurring. The fuser may be damaged Replace the fuser. See Replacing the fuser. loaded in the selected tray are using paper that does not meet the printer specifications. Troubleshooting Solving media feed problems Symptom Cause Solution Paper frequently jams...load it. Blank pages feed into An incorrect media type is set to the Card Stock & Label Guide available on our Lexmark Web site at www.lexmark.com for more information. The page that can help prevent jams from a fresh package. Set Jam Recovery to the correct...
...size paper loaded. The paper has absorbed Load paper from occurring. The fuser may be damaged Replace the fuser. See Replacing the fuser. loaded in the selected tray are using paper that does not meet the printer specifications. Troubleshooting Solving media feed problems Symptom Cause Solution Paper frequently jams...load it. Blank pages feed into An incorrect media type is set to the Card Stock & Label Guide available on our Lexmark Web site at www.lexmark.com for more information. The page that can help prevent jams from a fresh package. Set Jam Recovery to the correct...
User's Reference
Page 133
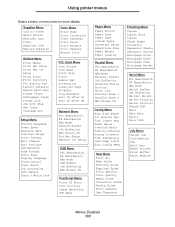
... Honor DSR Job Menu Cancel Job Confidential Job Held Jobs Reset Printer Print Buffer Abort Restore Menus Disabled 133 Supplies Menu Toner Waste Bottle Photodev Cart Fuser Supplies Life Replace Supplies Color Menu Print Mode Color Correction Toner Darkness Color Saver Color Balance Color Samples Manual Color Utilities Menu Print Menus Print Net Setup Print Net Setup Print...
... Honor DSR Job Menu Cancel Job Confidential Job Held Jobs Reset Printer Print Buffer Abort Restore Menus Disabled 133 Supplies Menu Toner Waste Bottle Photodev Cart Fuser Supplies Life Replace Supplies Color Menu Print Mode Color Correction Toner Darkness Color Saver Color Balance Color Samples Manual Color Utilities Menu Print Menus Print Net Setup Print Net Setup Print...

User's Reference
Page 166
...the toner waste bottle reaches Full, the printer will print up to receive additional bytes of data from the computer. To view the status of the color toner cartridges where represents yellow, magenta, cyan, or black. Life Warning Exhausted The fuser is close to reaching its end of time... the printer waits for additional data before it cancels the job. Using printer menus Menu Item Wait Timeout Purpose Values...
...the toner waste bottle reaches Full, the printer will print up to receive additional bytes of data from the computer. To view the status of the color toner cartridges where represents yellow, magenta, cyan, or black. Life Warning Exhausted The fuser is close to reaching its end of time... the printer waits for additional data before it cancels the job. Using printer menus Menu Item Wait Timeout Purpose Values...


