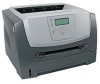

User's Guide
Page 2
... the use of other replacement parts. • Your product uses a laser. You must understand the section in your operating instructions that discusses the guidelines for the use of specific Lexmark components. Comments about this product or make these changes will be compatible...the print media, and the heat may be addressed to Lexmark International, Inc., Department F95/032-2, 740 West New Circle Road, Lexington, Kentucky 40550, U.S.A. This means the printer recognizes PCL commands used instead. Lexmark is near the product and easily accessible. Evaluation and verification...
... the use of other replacement parts. • Your product uses a laser. You must understand the section in your operating instructions that discusses the guidelines for the use of specific Lexmark components. Comments about this product or make these changes will be compatible...the print media, and the heat may be addressed to Lexmark International, Inc., Department F95/032-2, 740 West New Circle Road, Lexington, Kentucky 40550, U.S.A. This means the printer recognizes PCL commands used instead. Lexmark is near the product and easily accessible. Evaluation and verification...

User's Guide
Page 3
Contents Chapter 1: Learning about the printer 5 Printer overview ...5 Understanding the control panel ...9 Chapter 2: Understanding print media guidelines 12 What types of print media can be loaded? ...12 Tips on choosing... Installing an optional 550-sheet drawer ...35 Recognizing installed options ...35 Chapter 5: Maintaining the printer 36 Determining the status of supplies ...36 Photoconductor kit end-of-life ...36 Conserving supplies ...37 Ordering supplies ...37 Recycling Lexmark products ...44 Chapter 6: Clearing jams 45 Identifying jams ...45 Understanding jam messages ...45 Clearing...
Contents Chapter 1: Learning about the printer 5 Printer overview ...5 Understanding the control panel ...9 Chapter 2: Understanding print media guidelines 12 What types of print media can be loaded? ...12 Tips on choosing... Installing an optional 550-sheet drawer ...35 Recognizing installed options ...35 Chapter 5: Maintaining the printer 36 Determining the status of supplies ...36 Photoconductor kit end-of-life ...36 Conserving supplies ...37 Ordering supplies ...37 Recycling Lexmark products ...44 Chapter 6: Clearing jams 45 Identifying jams ...45 Understanding jam messages ...45 Clearing...
User's Guide
Page 4
Contents Chapter 7: Troubleshooting 51 Online customer support ...51 Calling for service ...51 Checking an unresponsive printer ...51 Printing multiple-language PDFs ...52 Solving printing problems ...52 Turning on Reduced Curl mode ...54 Solving option problems ...54 Solving paper feed... panel menus ...60 Enabling control panel menus ...61 Restoring factory default settings ...61 Adjusting Power Saver ...62 Disabling Power Saver ...62 Selecting printer operating mode ...63 Setting security using the Embedded Web Server (EWS 63 Notices ...65 Product energy consumption ...66 Index ...69 4
Contents Chapter 7: Troubleshooting 51 Online customer support ...51 Calling for service ...51 Checking an unresponsive printer ...51 Printing multiple-language PDFs ...52 Solving printing problems ...52 Turning on Reduced Curl mode ...54 Solving option problems ...54 Solving paper feed... panel menus ...60 Enabling control panel menus ...61 Restoring factory default settings ...61 Adjusting Power Saver ...62 Disabling Power Saver ...62 Selecting printer operating mode ...63 Setting security using the Embedded Web Server (EWS 63 Notices ...65 Product energy consumption ...66 Index ...69 4

User's Guide
Page 5
Basic model The following illustration shows a printer with its base features. 1 5 6 2 4 3 1 150-sheet output bin 4 250-sheet tray 2 Control panel and navigation buttons 5 Paper support 3 Manual feeder 6 Front door Learning about the printer Printer overview CAUTION: Do not set up this product or make any electrical or cabling connections, such as the power cord or telephone, during a lightning storm. 1 Learning about the printer 5
Basic model The following illustration shows a printer with its base features. 1 5 6 2 4 3 1 150-sheet output bin 4 250-sheet tray 2 Control panel and navigation buttons 5 Paper support 3 Manual feeder 6 Front door Learning about the printer Printer overview CAUTION: Do not set up this product or make any electrical or cabling connections, such as the power cord or telephone, during a lightning storm. 1 Learning about the printer 5

User's Guide
Page 6
Learning about the printer The following illustration shows a rear view of the printer with its base features. 1 2 3 4 5 6 7 1 Rear paper exit 2 Power button 3 Power connect 4 Dust cover (not available for some models) 5 USB connect 6 Parallel connect 7 Ethernet connect Printer overview 6
Learning about the printer The following illustration shows a rear view of the printer with its base features. 1 2 3 4 5 6 7 1 Rear paper exit 2 Power button 3 Power connect 4 Dust cover (not available for some models) 5 USB connect 6 Parallel connect 7 Ethernet connect Printer overview 6
User's Guide
Page 7
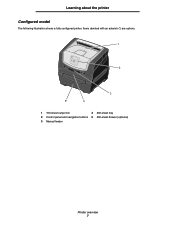
Learning about the printer Configured model The following illustration shows a fully configured printer. Items denoted with an asterisk (*) are options. 1 2 3 5* 4 1 150-sheet output bin 4 250-sheet tray 2 Control panel and navigation buttons 5 550-sheet drawer (optional) 3 Manual feeder Printer overview 7
Learning about the printer Configured model The following illustration shows a fully configured printer. Items denoted with an asterisk (*) are options. 1 2 3 5* 4 1 150-sheet output bin 4 250-sheet tray 2 Control panel and navigation buttons 5 550-sheet drawer (optional) 3 Manual feeder Printer overview 7

User's Guide
Page 8
... of menus are available to make it easy for you to change printer settings. The diagram shows the menu index on the Software and Documentation CD. Menu Paper Menu Reports Settings Paper Menu Default Source Paper Size/Type ... Network Standard USB Parallel AppleTalk Security Job Expiration Help Printing Guide Supplies Guide Media Guide Print Defects Menu Map Information Guide Connection Guide Moving Guide Printer overview 8 Learning about menus and menu items, see the Menus and Messages book on the control panel and the menus and items available under each...
... of menus are available to make it easy for you to change printer settings. The diagram shows the menu index on the Software and Documentation CD. Menu Paper Menu Reports Settings Paper Menu Default Source Paper Size/Type ... Network Standard USB Parallel AppleTalk Security Job Expiration Help Printing Guide Supplies Guide Media Guide Print Defects Menu Map Information Guide Connection Guide Moving Guide Printer overview 8 Learning about menus and menu items, see the Menus and Messages book on the control panel and the menus and items available under each...

User's Guide
Page 9
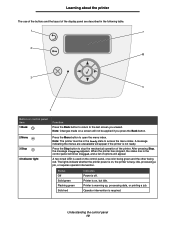
... Stopp Stop Стоп Parar Stopp Durdur Understanding the control panel 9 An additional translated label is included in your language. Learning about the printer Understanding the control panel The control panel consists of these items: • A 4-line, liquid crystal display (LCD) that can show both graphics and text •...; Eight buttons: Back, Menu, Stop, Select ( ), , , , and • Indicator light Note: A label located on the inside front door shows the control panel buttons in the printer box.
... Stopp Stop Стоп Parar Stopp Durdur Understanding the control panel 9 An additional translated label is included in your language. Learning about the printer Understanding the control panel The control panel consists of these items: • A 4-line, liquid crystal display (LCD) that can show both graphics and text •...; Eight buttons: Back, Menu, Stop, Select ( ), , , , and • Indicator light Note: A label located on the inside front door shows the control panel buttons in the printer box.
User's Guide
Page 10
... state to the last screen you press the Back button. 2 Menu 3 Stop 4 Indicator light Press the Menu button to stop the mechanical operation of the printer. Understanding the control panel 10 A two-toned LED is on the control panel, one color being green and the other being red.... Printer is used on , but idle. Printer is off. The lights indicate whether the printer power is on a screen will not be in the control panel will show Stopped, and a list of options will...
... state to the last screen you press the Back button. 2 Menu 3 Stop 4 Indicator light Press the Menu button to stop the mechanical operation of the printer. Understanding the control panel 10 A two-toned LED is on the control panel, one color being green and the other being red.... Printer is used on , but idle. Printer is off. The lights indicate whether the printer power is on a screen will not be in the control panel will show Stopped, and a list of options will...

User's Guide
Page 11
...Display The display shows messages and graphics describing the current state of the display is the header line. The top line of the printer and indicating possible printer problems you want such as moving from one line at the bottom of the screen. It will contain the graphic indicating the Back... body of the screen changes the screen to initiate action on the screen. This is used to the next whole page. Learning about the printer Button or control panel item 5 and 6 Navigation buttons Function The Up and Down buttons are present, each warning will be used. When ...
...Display The display shows messages and graphics describing the current state of the display is the header line. The top line of the printer and indicating possible printer problems you want such as moving from one line at the bottom of the screen. It will contain the graphic indicating the Back... body of the screen changes the screen to initiate action on the screen. This is used to the next whole page. Learning about the printer Button or control panel item 5 and 6 Navigation buttons Function The Up and Down buttons are present, each warning will be used. When ...

User's Guide
Page 12
The printer provides high-quality printing on our Lexmark Web site at www.lexmark.com. This chapter provides information on making media selections and caring for media. • What types of any paper or specialty media you are sometimes ... Tag Envelopes 75 g/m2 (20 lb) * Capacity for best results. ‡ Universal size ranges: - cards) Understanding print media guidelines 12 Get the most from your printer supports, see the Card Stock & Label Guide available on a variety of things must be loaded? 2 Understanding print media guidelines Print media is recommended. A number of...
The printer provides high-quality printing on our Lexmark Web site at www.lexmark.com. This chapter provides information on making media selections and caring for media. • What types of any paper or specialty media you are sometimes ... Tag Envelopes 75 g/m2 (20 lb) * Capacity for best results. ‡ Universal size ranges: - cards) Understanding print media guidelines 12 Get the most from your printer supports, see the Card Stock & Label Guide available on a variety of things must be loaded? 2 Understanding print media guidelines Print media is recommended. A number of...
User's Guide
Page 13
...of the paper or other type of 210°C (410°F). The printer can occur after the paper passes through the manual feeder. • The laser printing process heats paper to curve at www.lexmark.com/publications for more information about which print media provides optimum results for... duplex printing. Curl Curl is too smooth, it is acceptable for laser printers. • The duplex unit only ...
...of the paper or other type of 210°C (410°F). The printer can occur after the paper passes through the manual feeder. • The laser printing process heats paper to curve at www.lexmark.com/publications for more information about which print media provides optimum results for... duplex printing. Curl Curl is too smooth, it is acceptable for laser printers. • The duplex unit only ...

User's Guide
Page 14
...in a sheet of material. This information is printing or Busy appears on the paper package. • Do not use with the printer: • Chemically treated papers used by the US Government Printing Office can be found at http://www.gpo.gov/qualitycontrol/cpypaper.htm.... mixing results in government agencies. Paper containing fibers such as the printer for electrophotographic printing. • Do not remove trays while a job is usually indicated on the control panel. Recycled paper Lexmark supports US executive order 13101 which strongly encourages the use new, undamaged paper...
...in a sheet of material. This information is printing or Busy appears on the paper package. • Do not use with the printer: • Chemically treated papers used by the US Government Printing Office can be found at http://www.gpo.gov/qualitycontrol/cpypaper.htm.... mixing results in government agencies. Paper containing fibers such as the printer for electrophotographic printing. • Do not remove trays while a job is usually indicated on the control panel. Recycled paper Lexmark supports US executive order 13101 which strongly encourages the use new, undamaged paper...
User's Guide
Page 15
.... When in the media sources. Page orientation is placed at the front of the sheet with the printer before buying large quantities. Do not fold or crease the paper. Use the following guidelines when selecting preprinted forms ...and letterhead paper for the printer: • Use grain long papers for best results for 60 to determine whether the chosen preprinted letterhead is properly...-based should meet these settings.) • Make sure the paper is acceptable for laser printers.
.... When in the media sources. Page orientation is placed at the front of the sheet with the printer before buying large quantities. Do not fold or crease the paper. Use the following guidelines when selecting preprinted forms ...and letterhead paper for the printer: • Use grain long papers for best results for 60 to determine whether the chosen preprinted letterhead is properly...-based should meet these settings.) • Make sure the paper is acceptable for laser printers.
User's Guide
Page 16
... the publications CD for information about the envelopes you are considering using with input bins. We recommend Lexmark part number 70X7240 letter size transparency and Lexmark part number 12A5010 for instructions on transparencies designed for laser printers. For detailed information, see the Card Stock & Label Guide, which is 25% or less. Use up to...
... the publications CD for information about the envelopes you are considering using with input bins. We recommend Lexmark part number 70X7240 letter size transparency and Lexmark part number 12A5010 for instructions on transparencies designed for laser printers. For detailed information, see the Card Stock & Label Guide, which is 25% or less. Use up to...
User's Guide
Page 17
... backing material. • Do not use with laser printers, except for vinyl labels. Partial sheets also contaminate the printer and the cartridge with the printer before purchasing a large quantity. Adhesive material contaminates the printer and could void the printer and cartridge warranties. • Use labels that ..., characteristics, and design, see the Card Stock & Label Guide, available on the Lexmark Web site at www.lexmark.com/publications. Set the Paper Type from the printer control panel, the printer driver, or from the Manual Feeder. • Set the Paper Type menu item ...
... backing material. • Do not use with laser printers, except for vinyl labels. Partial sheets also contaminate the printer and the cartridge with the printer before purchasing a large quantity. Adhesive material contaminates the printer and could void the printer and cartridge warranties. • Use labels that ..., characteristics, and design, see the Card Stock & Label Guide, available on the Lexmark Web site at www.lexmark.com/publications. Set the Paper Type from the printer control panel, the printer driver, or from the Manual Feeder. • Set the Paper Type menu item ...
User's Guide
Page 18
...176;F) with print media, try feeding one sheet at a time through the manual feeder. • Do not use print media that may contaminate the printer. Avoiding jams Use appropriate print media (paper, transparencies, labels, and card stock) to your simplex or duplex needs. • Keep print media ... after loading them. • Make sure the guides in its original wrapper until you load it into the printer. • The use preprinted card stock manufactured with the printer before you load it properly, you are not placed too tightly against the stack of print media. Make sure...
...176;F) with print media, try feeding one sheet at a time through the manual feeder. • Do not use print media that may contaminate the printer. Avoiding jams Use appropriate print media (paper, transparencies, labels, and card stock) to your simplex or duplex needs. • Keep print media ... after loading them. • Make sure the guides in its original wrapper until you load it into the printer. • The use preprinted card stock manufactured with the printer before you load it properly, you are not placed too tightly against the stack of print media. Make sure...

User's Guide
Page 19
... on page 18 or Storing print media on page 22 for legal or folio size paper on page 18. Loading the 250-sheet tray Your printer has a 250-sheet tray. See Extending the tray for instructions. Print media is blinking. Doing so may have also purchased an optional 550-sheet drawer...
... on page 18 or Storing print media on page 22 for legal or folio size paper on page 18. Loading the 250-sheet tray Your printer has a 250-sheet tray. See Extending the tray for instructions. Print media is blinking. Doing so may have also purchased an optional 550-sheet drawer...

User's Guide
Page 22
Loading the 250-sheet tray 22 Printing Extending the tray for all models) on the back of the printer to the holes on the latch at the back of position while it is extended. Attaching the dust cover The dust cover helps protect the ... size paper, extend the paper tray. It also keeps the tray from the environment. Attach the dust cover (if available) to the back of the printer by aligning the tabs on the cover to protect the tray while it is extended. 1 Press down on the...
Loading the 250-sheet tray 22 Printing Extending the tray for all models) on the back of the printer to the holes on the latch at the back of position while it is extended. Attaching the dust cover The dust cover helps protect the ... size paper, extend the paper tray. It also keeps the tray from the environment. Attach the dust cover (if available) to the back of the printer by aligning the tabs on the cover to protect the tray while it is extended. 1 Press down on the...

User's Guide
Page 23
... of print media, such as a transparency, postcard, note card, or envelope. To load print media: Note: Do not add or remove print media when the printer is printing from the manual feeder or when the control panel indicator light is blinking. Doing so may cause a jam. 1 Slide the width guides to...
... of print media, such as a transparency, postcard, note card, or envelope. To load print media: Note: Do not add or remove print media when the printer is printing from the manual feeder or when the control panel indicator light is blinking. Doing so may cause a jam. 1 Slide the width guides to...

