
User's Guide for Windows
Page 1
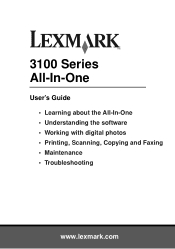
3100 Series All-In-One User's Guide • Learning about the All-In-One • Understanding the software • Working with digital photos • Printing, Scanning, Copying and Faxing • Maintenance • Troubleshooting www.lexmark.com
3100 Series All-In-One User's Guide • Learning about the All-In-One • Understanding the software • Working with digital photos • Printing, Scanning, Copying and Faxing • Maintenance • Troubleshooting www.lexmark.com

User's Guide for Windows
Page 2
... or the programs described may be made to you. Other trademarks are the user's responsibility. UNITED STATES GOVERNMENT RIGHTS This software and any time. Refer service or repairs, other countries, contact your point of express or implied warranties in conjunction with... manufacturer intends to make any obligation to you are commercial computer software and documentation developed exclusively at any accompanying documentation provided under this product by the manufacturer, are the property of Lexmark International, Inc., registered in any way it operates. Copyright advisory...
... or the programs described may be made to you. Other trademarks are the user's responsibility. UNITED STATES GOVERNMENT RIGHTS This software and any time. Refer service or repairs, other countries, contact your point of express or implied warranties in conjunction with... manufacturer intends to make any obligation to you are commercial computer software and documentation developed exclusively at any accompanying documentation provided under this product by the manufacturer, are the property of Lexmark International, Inc., registered in any way it operates. Copyright advisory...
User's Guide for Windows
Page 3
... the scanner glass 11 Inserting the digital camera memory card 11 Understanding the software 13 Using the Lexmark All-In-One Center 13 Using Print Properties 17 Using the Lexmark Solution Center 19 Using the Lexmark Photo Editor 21 Accessing the Memory Card Manager 22 Working with digital photos... 23 Using the Lexmark Memory Card Manager 23 Finding your photos 24 Printing digital photos 26 Printing ...
... the scanner glass 11 Inserting the digital camera memory card 11 Understanding the software 13 Using the Lexmark All-In-One Center 13 Using Print Properties 17 Using the Lexmark Solution Center 19 Using the Lexmark Photo Editor 21 Accessing the Memory Card Manager 22 Working with digital photos... 23 Using the Lexmark Memory Card Manager 23 Finding your photos 24 Printing digital photos 26 Printing ...
User's Guide for Windows
Page 4
... cartridges 40 Cleaning the print cartridge nozzles 41 Wiping the print cartridge nozzles and contacts 41 Preserving the print cartridges 43 Ordering supplies 43 Recycling Lexmark products 43 Troubleshooting 44 Troubleshooting checklist 44 Setup troubleshooting 46 Printing troubleshooting 48 Scanning, copying, and faxing troubleshooting 50 Photo card is not recognized by...
... cartridges 40 Cleaning the print cartridge nozzles 41 Wiping the print cartridge nozzles and contacts 41 Preserving the print cartridges 43 Ordering supplies 43 Recycling Lexmark products 43 Troubleshooting 44 Troubleshooting checklist 44 Setup troubleshooting 46 Printing troubleshooting 48 Scanning, copying, and faxing troubleshooting 50 Photo card is not recognized by...
User's Guide for Windows
Page 6
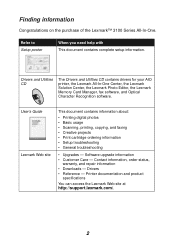
.... Drivers and Utilities CD The Drivers and Utilities CD contains drivers for your AIO printer, the Lexmark All-In-One Center, the Lexmark Solution Center, the Lexmark Photo Editor, the Lexmark Memory Card Manager, fax software, and Optical Character Recognition software. Contact information, order status, warranty, and repair information • Downloads - Printer documentation and product specifications...
.... Drivers and Utilities CD The Drivers and Utilities CD contains drivers for your AIO printer, the Lexmark All-In-One Center, the Lexmark Solution Center, the Lexmark Photo Editor, the Lexmark Memory Card Manager, fax software, and Optical Character Recognition software. Contact information, order status, warranty, and repair information • Downloads - Printer documentation and product specifications...
User's Guide for Windows
Page 9
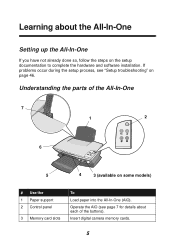
If problems occur during the setup process, see page 7 for details about the All-In-One Setting up the All-In-One If you have not already done so, follow the steps on the setup documentation to complete the hardware and software installation. Operate the AIO (see "Setup troubleshooting" on page 46. Learning about each of the All-In-One 7 1 2 6 5 4 3 (available on some models) # Use the 1 Paper support 2 Control panel 3 Memory card slots To Load paper into the All-In-One (AIO). Insert digital camera memory cards. 5 Understanding the parts of the buttons).
If problems occur during the setup process, see page 7 for details about the All-In-One Setting up the All-In-One If you have not already done so, follow the steps on the setup documentation to complete the hardware and software installation. Operate the AIO (see "Setup troubleshooting" on page 46. Learning about each of the All-In-One 7 1 2 6 5 4 3 (available on some models) # Use the 1 Paper support 2 Control panel 3 Memory card slots To Load paper into the All-In-One (AIO). Insert digital camera memory cards. 5 Understanding the parts of the buttons).
User's Guide for Windows
Page 17
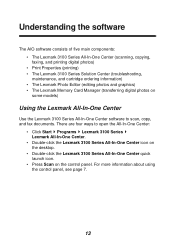
...-In-One Center icon on the desktop. • Double-click the Lexmark 3100 Series All-In-One Center quick launch icon. • Press Scan on some models) Using the Lexmark All-In-One Center Use the Lexmark 3100 Series All-In-One Center software to scan, copy, and fax documents. For more information about...
...-In-One Center icon on the desktop. • Double-click the Lexmark 3100 Series All-In-One Center quick launch icon. • Press Scan on some models) Using the Lexmark All-In-One Center Use the Lexmark 3100 Series All-In-One Center software to scan, copy, and fax documents. For more information about...
User's Guide for Windows
Page 20
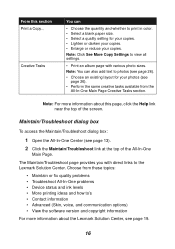
Note: You can • Choose the quantity and whether to print in color. • Select a blank paper size. • Select a quality setting for your copies. The Maintain/Troubleshoot page provides you with various photo sizes. Maintain/... settings. • Print an album page with direct links to 's • Contact information • Advanced (Skin, voice, and communication options) • View the software version and copyright information For more information about the Lexmark Solution Center, see page 13). 2 Click the Maintain/Troubleshoot link at the top of the screen.
Note: You can • Choose the quantity and whether to print in color. • Select a blank paper size. • Select a quality setting for your copies. The Maintain/Troubleshoot page provides you with various photo sizes. Maintain/... settings. • Print an album page with direct links to 's • Contact information • Advanced (Skin, voice, and communication options) • View the software version and copyright information For more information about the Lexmark Solution Center, see page 13). 2 Click the Maintain/Troubleshoot link at the top of the screen.
User's Guide for Windows
Page 21
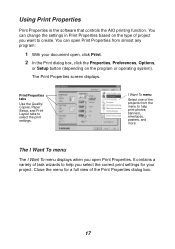
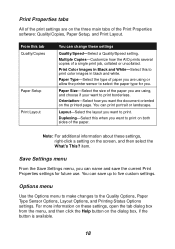
Using Print Properties Print Properties is the software that controls the AIO printing function. Print Properties tabs Use the Quality/ Copies, Paper Setup, and Print Layout tabs to create. The Print Properties screen ...
Using Print Properties Print Properties is the software that controls the AIO printing function. Print Properties tabs Use the Quality/ Copies, Paper Setup, and Print Layout tabs to create. The Print Properties screen ...
User's Guide for Windows
Page 22
...settings Quality/Speed-Select a Quality/Speed setting. Duplexing-Select this when you want to print on the three main tabs of the Print Properties software: Quality/Copies, Paper Setup, and Print Layout. You can print portrait or landscape. Multiple Copies-Customize how the AIO prints several copies ...of a single print job, collated or uncollated. Print Color Images in Black and White-Select this tab Quality/Copies Paper Setup Print Layout You can name and save up to five custom settings....
...settings Quality/Speed-Select a Quality/Speed setting. Duplexing-Select this when you want to print on the three main tabs of the Print Properties software: Quality/Copies, Paper Setup, and Print Layout. You can print portrait or landscape. Multiple Copies-Customize how the AIO prints several copies ...of a single print job, collated or uncollated. Print Color Images in Black and White-Select this tab Quality/Copies Paper Setup Print Layout You can name and save up to five custom settings....
User's Guide for Windows
Page 23
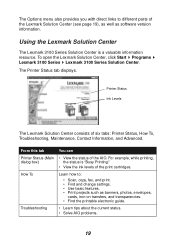
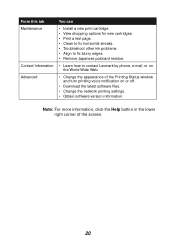
...while printing, dialog box) the status is a valuable information resource. How To Learn how to different parts of the Lexmark Solution Center (see page 19), as well as banners, photos, envelopes, cards, iron-on transfers, and transparencies.... • Find the printable electronic guide. Printer Status Ink Levels The Lexmark Solution Center consists of the AIO. From this tab You can Printer Status (Main • View the status... and change settings. • Use basic features. • Print projects such as software version information.
...while printing, dialog box) the status is a valuable information resource. How To Learn how to different parts of the Lexmark Solution Center (see page 19), as well as banners, photos, envelopes, cards, iron-on transfers, and transparencies.... • Find the printable electronic guide. Printer Status Ink Levels The Lexmark Solution Center consists of the AIO. From this tab You can Printer Status (Main • View the status... and change settings. • Use basic features. • Print projects such as software version information.
User's Guide for Windows
Page 24
...; Align to fix blurry edges. • Remove Japanese postcard residue. • Learn how to contact Lexmark by phone, e-mail, or on or off. • Download the latest software files. • Change the network printing settings. • Obtain software version information. Note: For more information, click the Help button in the lower right corner...
...; Align to fix blurry edges. • Remove Japanese postcard residue. • Learn how to contact Lexmark by phone, e-mail, or on or off. • Download the latest software files. • Change the network printing settings. • Obtain software version information. Note: For more information, click the Help button in the lower right corner...
User's Guide for Windows
Page 25
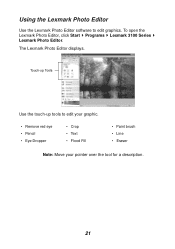
The Lexmark Photo Editor displays. To open the Lexmark Photo Editor, click Start Programs Lexmark 3100 Series Lexmark Photo Editor. Using the Lexmark Photo Editor Use the Lexmark Photo Editor software to edit your graphic. • Remove red eye • Pencil • Eye Dropper • Crop • Text • Flood Fill • Paint brush • Line • Eraser Note: Move your pointer over the tool for a description. 21 Touch-up Tools Use the touch-up tools to edit graphics.
The Lexmark Photo Editor displays. To open the Lexmark Photo Editor, click Start Programs Lexmark 3100 Series Lexmark Photo Editor. Using the Lexmark Photo Editor Use the Lexmark Photo Editor software to edit your graphic. • Remove red eye • Pencil • Eye Dropper • Crop • Text • Flood Fill • Paint brush • Line • Eraser Note: Move your pointer over the tool for a description. 21 Touch-up Tools Use the touch-up tools to edit graphics.

User's Guide for Windows
Page 27
... : • Automatically save them to store photos. Using the Lexmark Memory Card Manager The Lexmark Memory Card Manager (available on some models) gives you several options for transferring photos from your computer using the software. Insert the digital camera memory card into your AIO to your ...photos. For help accessing the Lexmark Memory Card Manager, see page 21. You can now print your computer's hard disk...
... : • Automatically save them to store photos. Using the Lexmark Memory Card Manager The Lexmark Memory Card Manager (available on some models) gives you several options for transferring photos from your computer using the software. Insert the digital camera memory card into your AIO to your ...photos. For help accessing the Lexmark Memory Card Manager, see page 21. You can now print your computer's hard disk...
User's Guide for Windows
Page 39
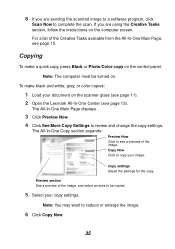
...scan. Copy settings Adjust the settings for the copy. 8 If you are sending the scanned image to a software program, click Scan Now to see a preview of the image. If you are using the Creative Tasks ... or enlarge the image. 6 Click Copy Now. 35 To make a quick copy, press Black or Photo/Color copy on the computer screen. Note: You may want to copy your image. For a list of the ...available from the All-In-One Main Page, see page 13). Copying To make black and white, gray, or color copies: 1 Load your copy settings. The All-In-One Main Page displays. 3 Click Preview Now. 4 ...
...scan. Copy settings Adjust the settings for the copy. 8 If you are sending the scanned image to a software program, click Scan Now to see a preview of the image. If you are using the Creative Tasks ... or enlarge the image. 6 Click Copy Now. 35 To make a quick copy, press Black or Photo/Color copy on the computer screen. Note: You may want to copy your image. For a list of the ...available from the All-In-One Main Page, see page 13). Copying To make black and white, gray, or color copies: 1 Load your copy settings. The All-In-One Main Page displays. 3 Click Preview Now. 4 ...
User's Guide for Windows
Page 44
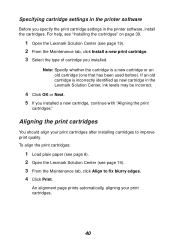
... whether the cartridge is incorrectly identified as new cartridge in the Lexmark Solution Center, ink levels may be incorrect. 4 Click OK or Next. 5 If you specify the print cartridge settings in the printer software Before you installed a new cartridge, continue with "Aligning the print... cartridges." To align the print cartridges: 1 Load plain paper (see page 8). 2 Open the Lexmark Solution Center (see page 19). 2 From the Maintenance tab, ...
... whether the cartridge is incorrectly identified as new cartridge in the Lexmark Solution Center, ink levels may be incorrect. 4 Click OK or Next. 5 If you specify the print cartridge settings in the printer software Before you installed a new cartridge, continue with "Aligning the print... cartridges." To align the print cartridges: 1 Load plain paper (see page 8). 2 Open the Lexmark Solution Center (see page 19). 2 From the Maintenance tab, ...
User's Guide for Windows
Page 48
... computer and the AIO? Additional troubleshooting information is available in the Lexmark Solution Center. Is your operating system supported? For help accessing the Lexmark Solution Center, see page 54)? Is the USB cable securely attached to install the software on ? Is the Lexmark 3100 Series set as the default printer (see page 19. Troubleshooting...
... computer and the AIO? Additional troubleshooting information is available in the Lexmark Solution Center. Is your operating system supported? For help accessing the Lexmark Solution Center, see page 54)? Is the USB cable securely attached to install the software on ? Is the Lexmark 3100 Series set as the default printer (see page 19. Troubleshooting...
User's Guide for Windows
Page 49
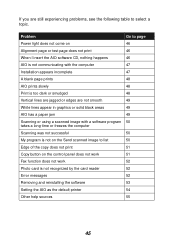
... page Power light does not come on 46 Alignment page or test page does not print 46 When I insert the AIO software CD, nothing happens 46 AIO is not communicating with a software program 50 takes a long time or freezes the computer Scanning was not successful 50 My program is not on the... work 51 Fax function does not work 52 Photo card is not recognized by the card reader 52 Error messages 52 Removing and reinstalling the software 53 Setting the AIO as the default printer 54 Other help sources 55 45
... page Power light does not come on 46 Alignment page or test page does not print 46 When I insert the AIO software CD, nothing happens 46 AIO is not communicating with a software program 50 takes a long time or freezes the computer Scanning was not successful 50 My program is not on the... work 51 Fax function does not work 52 Photo card is not recognized by the card reader 52 Error messages 52 Removing and reinstalling the software 53 Setting the AIO as the default printer 54 Other help sources 55 45

User's Guide for Windows
Page 50
... auto launch is set as the default printer (see page 6). 2 Check the power supply connections. 3 Press Power on the control panel. When I insert the AIO software CD, nothing happens From the desktop, double-click the My Computer icon, and then double-click the CD-ROM drive icon. For help installing print... have during setup. Power light does not come on 1 Make sure the power supply is correctly inserted into the AIO (see page 8). 4 Make sure the Lexmark 3100 Series is turned off, double-click setup.exe. 46
... auto launch is set as the default printer (see page 6). 2 Check the power supply connections. 3 Press Power on the control panel. When I insert the AIO software CD, nothing happens From the desktop, double-click the My Computer icon, and then double-click the CD-ROM drive icon. For help installing print... have during setup. Power light does not come on 1 Make sure the power supply is correctly inserted into the AIO (see page 8). 4 Make sure the Lexmark 3100 Series is turned off, double-click setup.exe. 46
User's Guide for Windows
Page 51
If the problem continues, remove and then reinstall the software (see page 53). Note: The Other Devices category displays only when unknown devices are any Lexmark items unless they are using Windows 98 or Windows Me, click the Device Manager tab. If you are using Windows 2000 ... then reconnect the power supply. Printers and 3 If you are present under the Other Devices category. 5 Insert the CD, and install the software again. Do not restart the computer. AIO is not communicating with the computer 1 Disconnect and reconnect both ends of the USB cable. Installation ...
If the problem continues, remove and then reinstall the software (see page 53). Note: The Other Devices category displays only when unknown devices are any Lexmark items unless they are using Windows 98 or Windows Me, click the Device Manager tab. If you are using Windows 2000 ... then reconnect the power supply. Printers and 3 If you are present under the Other Devices category. 5 Insert the CD, and install the software again. Do not restart the computer. AIO is not communicating with the computer 1 Disconnect and reconnect both ends of the USB cable. Installation ...


