
Setup Sheet
Page 1
All rights reserved. 3100 Series All-In-One 1 4 5 www.lexmark.com 2 3 3 2 1 6 P/N 16T0272 EC 6T0009 © 2003 Lexmark International, Inc.
All rights reserved. 3100 Series All-In-One 1 4 5 www.lexmark.com 2 3 3 2 1 6 P/N 16T0272 EC 6T0009 © 2003 Lexmark International, Inc.
User's Guide for Windows
Page 1
3100 Series All-In-One User's Guide • Learning about the All-In-One • Understanding the software • Working with digital photos • Printing, Scanning, Copying and Faxing • Maintenance • Troubleshooting www.lexmark.com
3100 Series All-In-One User's Guide • Learning about the All-In-One • Understanding the software • Working with digital photos • Printing, Scanning, Copying and Faxing • Maintenance • Troubleshooting www.lexmark.com

User's Guide for Windows
Page 5
Getting started Use this guide for the Lexmark 3100 Series. 1
Getting started Use this guide for the Lexmark 3100 Series. 1
User's Guide for Windows
Page 6
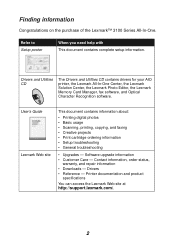
... with This document contains complete setup information. Contact information, order status, warranty, and repair information • Downloads - Finding information Congratulations on the purchase of the Lexmark™ 3100 Series All-In-One. Drivers and Utilities CD The Drivers and Utilities CD contains drivers for your AIO printer, the...
... with This document contains complete setup information. Contact information, order status, warranty, and repair information • Downloads - Finding information Congratulations on the purchase of the Lexmark™ 3100 Series All-In-One. Drivers and Utilities CD The Drivers and Utilities CD contains drivers for your AIO printer, the...
User's Guide for Windows
Page 8
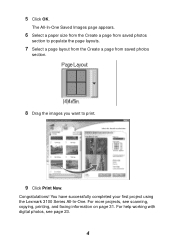
For help working with digital photos, see scanning, copying, printing, and faxing information on page 31. For more projects, see page 23. 4 You have successfully completed your first project using the Lexmark 3100 Series All-In-One. Congratulations! The All-In-One Saved Images page appears. 6 Select a paper size from the Create a page from saved photos section to populate the page layouts. 7 Select a page layout from the Create a page from saved photos section. 8 Drag the images you want to print. 9 Click Print Now. 5 Click OK.
For help working with digital photos, see scanning, copying, printing, and faxing information on page 31. For more projects, see page 23. 4 You have successfully completed your first project using the Lexmark 3100 Series All-In-One. Congratulations! The All-In-One Saved Images page appears. 6 Select a paper size from the Create a page from saved photos section to populate the page layouts. 7 Select a page layout from the Create a page from saved photos section. 8 Drag the images you want to print. 9 Click Print Now. 5 Click OK.
User's Guide for Windows
Page 15
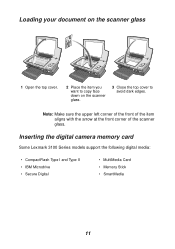
Loading your document on the scanner glass 1 Open the top cover. 2 Place the item you want to copy face down on the scanner glass. 3 Close the top cover to avoid dark edges. Note: Make sure the upper left corner of the front of the item aligns with the arrow at the front corner of the scanner glass. Inserting the digital camera memory card Some Lexmark 3100 Series models support the following digital media: • CompactFlash Type I and Type II • IBM Microdrive • Secure Digital • MultiMedia Card • Memory Stick • SmartMedia 11
Loading your document on the scanner glass 1 Open the top cover. 2 Place the item you want to copy face down on the scanner glass. 3 Close the top cover to avoid dark edges. Note: Make sure the upper left corner of the front of the item aligns with the arrow at the front corner of the scanner glass. Inserting the digital camera memory card Some Lexmark 3100 Series models support the following digital media: • CompactFlash Type I and Type II • IBM Microdrive • Secure Digital • MultiMedia Card • Memory Stick • SmartMedia 11
User's Guide for Windows
Page 17
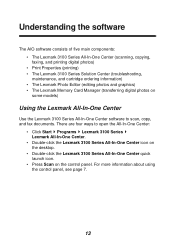
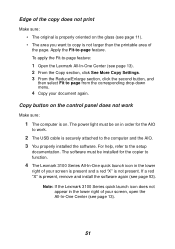
There are four ways to open the All-In-One Center: • Click Start Programs Lexmark 3100 Series Lexmark All-In-One Center. • Double-click the Lexmark 3100 Series All-In-One Center icon on the desktop. • Double-click the Lexmark 3100 Series All-In-One Center quick launch icon. • Press Scan on some models...
There are four ways to open the All-In-One Center: • Click Start Programs Lexmark 3100 Series Lexmark All-In-One Center. • Double-click the Lexmark 3100 Series All-In-One Center icon on the desktop. • Double-click the Lexmark 3100 Series All-In-One Center quick launch icon. • Press Scan on some models...
User's Guide for Windows
Page 23
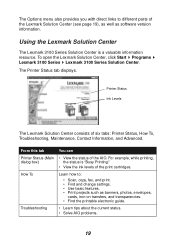
... print. • Find and change settings. • Use basic features. • Print projects such as software version information. To open the Lexmark Solution Center, click Start Programs Lexmark 3100 Series Lexmark 3100 Series Solution Center. The Printer Status tab displays. Troubleshooting • Learn tips about the current status. • Solve AIO problems. 19 Printer Status...
... print. • Find and change settings. • Use basic features. • Print projects such as software version information. To open the Lexmark Solution Center, click Start Programs Lexmark 3100 Series Lexmark 3100 Series Solution Center. The Printer Status tab displays. Troubleshooting • Learn tips about the current status. • Solve AIO problems. 19 Printer Status...
User's Guide for Windows
Page 25
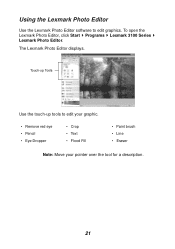
Touch-up Tools Use the touch-up tools to edit graphics. To open the Lexmark Photo Editor, click Start Programs Lexmark 3100 Series Lexmark Photo Editor. Using the Lexmark Photo Editor Use the Lexmark Photo Editor software to edit your graphic. • Remove red eye • Pencil • Eye Dropper • Crop • Text • Flood Fill • Paint brush • Line • Eraser Note: Move your pointer over the tool for a description. 21 The Lexmark Photo Editor displays.
Touch-up Tools Use the touch-up tools to edit graphics. To open the Lexmark Photo Editor, click Start Programs Lexmark 3100 Series Lexmark Photo Editor. Using the Lexmark Photo Editor Use the Lexmark Photo Editor software to edit your graphic. • Remove red eye • Pencil • Eye Dropper • Crop • Text • Flood Fill • Paint brush • Line • Eraser Note: Move your pointer over the tool for a description. 21 The Lexmark Photo Editor displays.

User's Guide for Windows
Page 26
There are three ways to access the Lexmark Memory Card Manager: • Insert a digital camera memory card. • Right-click the Lexmark 3100 Series All-In-One quick launch icon on some models) gives you several options for transferring photos from your digital camera memory card to your... screen, and select Launch Memory Card Manager. • Click Start Programs Lexmark 3100 Series Memory Card Manager. For more information about the Memory Card Manager (see page 23). 22 Accessing the Memory Card Manager The...
There are three ways to access the Lexmark Memory Card Manager: • Insert a digital camera memory card. • Right-click the Lexmark 3100 Series All-In-One quick launch icon on some models) gives you several options for transferring photos from your digital camera memory card to your... screen, and select Launch Memory Card Manager. • Click Start Programs Lexmark 3100 Series Memory Card Manager. For more information about the Memory Card Manager (see page 23). 22 Accessing the Memory Card Manager The...
User's Guide for Windows
Page 42
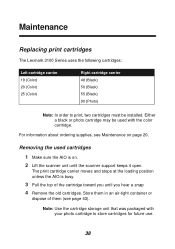
... the scanner support keeps it open. Note: Use the cartridge storage unit that was packaged with the color cartridge. Maintenance Replacing print cartridges The Lexmark 3100 Series uses the following cartridges: Left cartridge carrier 19 (Color) 20 (Color) 25 (Color) Right cartridge carrier 48 (Black) 50 (Black) 55 (Black) 90 (Photo) Note: In order to store...
... the scanner support keeps it open. Note: Use the cartridge storage unit that was packaged with the color cartridge. Maintenance Replacing print cartridges The Lexmark 3100 Series uses the following cartridges: Left cartridge carrier 19 (Color) 20 (Color) 25 (Color) Right cartridge carrier 48 (Black) 50 (Black) 55 (Black) 90 (Photo) Note: In order to store...
User's Guide for Windows
Page 48
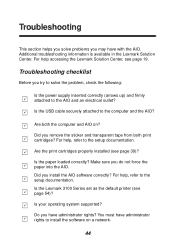
... attached to the setup documentation. Did you do not force the paper into the AIO. Is the Lexmark 3100 Series set as the default printer (see page 39)? Additional troubleshooting information is available in the Lexmark Solution Center. For help, refer to the computer and the AIO? Is your operating system supported? Are... (see page 54)? Make sure you remove the sticker and transparent tape from both the computer and AIO on a network. 44 For help accessing the Lexmark Solution Center, see page 19.
... attached to the setup documentation. Did you do not force the paper into the AIO. Is the Lexmark 3100 Series set as the default printer (see page 39)? Additional troubleshooting information is available in the Lexmark Solution Center. For help, refer to the computer and the AIO? Is your operating system supported? Are... (see page 54)? Make sure you remove the sticker and transparent tape from both the computer and AIO on a network. 44 For help accessing the Lexmark Solution Center, see page 19.
User's Guide for Windows
Page 50
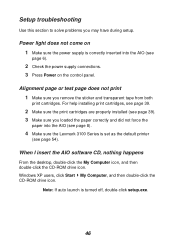
..., and then double-click the CD-ROM drive icon. Note: If auto launch is set as the default printer (see page 8). 4 Make sure the Lexmark 3100 Series is turned off, double-click setup.exe. 46 Setup troubleshooting Use this section to solve problems you remove the sticker and transparent tape from both...
..., and then double-click the CD-ROM drive icon. Note: If auto launch is set as the default printer (see page 8). 4 Make sure the Lexmark 3100 Series is turned off, double-click setup.exe. 46 Setup troubleshooting Use this section to solve problems you remove the sticker and transparent tape from both...
User's Guide for Windows
Page 52
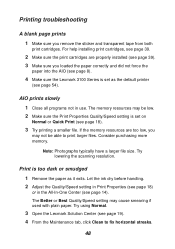
...see page 39). 3 Make sure you loaded the paper correctly and did not force the paper into the AIO (see page 8). 4 Make sure the Lexmark 3100 Series is set on Normal or Quick Print (see page 54). The Better or Best Quality/Speed setting may not be low. 2 Make sure the Print...a larger file size. Try lowering the scanning resolution. The memory resources may be able to fix horizontal streaks. 48 Try using Normal. 3 Open the Lexmark Solution Center (see page 14). For help installing print cartridges, see page 39. 2 Make sure the print cartridges are too low, you remove the sticker...
...see page 39). 3 Make sure you loaded the paper correctly and did not force the paper into the AIO (see page 8). 4 Make sure the Lexmark 3100 Series is set on Normal or Quick Print (see page 54). The Better or Best Quality/Speed setting may not be low. 2 Make sure the Print...a larger file size. Try lowering the scanning resolution. The memory resources may be able to fix horizontal streaks. 48 Try using Normal. 3 Open the Lexmark Solution Center (see page 14). For help installing print cartridges, see page 39. 2 Make sure the print cartridges are too low, you remove the sticker...
User's Guide for Windows
Page 55
... software must be installed for the AIO to work Make sure: 1 The computer is on. For help, refer to -page feature. Note: If the Lexmark 3100 Series quick launch icon does not appear in the lower right of your screen, open the All-In-One Center (see page 11). • The area.... Edge of the copy does not print Make sure: • The original is properly oriented on in order for the copier to function. 4 The Lexmark 3100 Series All-In-One quick launch icon in the lower right of the page. If a red "X" is securely attached to the computer and the AIO. 3 You...
... software must be installed for the AIO to work Make sure: 1 The computer is on. For help, refer to -page feature. Note: If the Lexmark 3100 Series quick launch icon does not appear in the lower right of your screen, open the All-In-One Center (see page 11). • The area.... Edge of the copy does not print Make sure: • The original is properly oriented on in order for the copier to function. 4 The Lexmark 3100 Series All-In-One quick launch icon in the lower right of the page. If a red "X" is securely attached to the computer and the AIO. 3 You...
User's Guide for Windows
Page 57
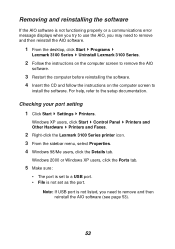
Windows XP users, click Start Control Panel Printers and Other Hardware Printers and Faxes. 2 Right-click the Lexmark 3100 Series printer icon. 3 From the sidebar menu, select Properties. 4 Windows 98/Me users, click the Details tab. Note: If USB port is not listed,... when you try to use the AIO, you need to remove and then reinstall the AIO software. 1 From the desktop, click Start Programs Lexmark 3100 Series Uninstall Lexmark 3100 Series. 2 Follow the instructions on the computer screen to remove the AIO software. 3 Restart the computer before reinstalling the software. 4 Insert the ...
Windows XP users, click Start Control Panel Printers and Other Hardware Printers and Faxes. 2 Right-click the Lexmark 3100 Series printer icon. 3 From the sidebar menu, select Properties. 4 Windows 98/Me users, click the Details tab. Note: If USB port is not listed,... when you try to use the AIO, you need to remove and then reinstall the AIO software. 1 From the desktop, click Start Programs Lexmark 3100 Series Uninstall Lexmark 3100 Series. 2 Follow the instructions on the computer screen to remove the AIO software. 3 Restart the computer before reinstalling the software. 4 Insert the ...
User's Guide for Windows
Page 58
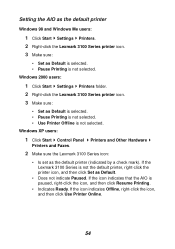
...a check mark). Setting the AIO as the default printer Windows 98 and Windows Me users: 1 Click Start Settings Printers. 2 Right-click the Lexmark 3100 Series printer icon. 3 Make sure: • Set as Default is selected. • Pause Printing is not selected. • Use Printer Offline is... not selected. Windows 2000 users: 1 Click Start Settings Printers folder. 2 Right-click the Lexmark 3100 Series printer icon. 3 Make sure: • Set as Default is selected. • Pause Printing is paused, right-click the icon, and then click...
...a check mark). Setting the AIO as the default printer Windows 98 and Windows Me users: 1 Click Start Settings Printers. 2 Right-click the Lexmark 3100 Series printer icon. 3 Make sure: • Set as Default is selected. • Pause Printing is not selected. • Use Printer Offline is... not selected. Windows 2000 users: 1 Click Start Settings Printers folder. 2 Right-click the Lexmark 3100 Series printer icon. 3 Make sure: • Set as Default is selected. • Pause Printing is paused, right-click the icon, and then click...

User's Guide for Windows
Page 59
Other help sources If the preceding solutions do not solve the problem with your All-In-One: • Refer to the Lexmark Solution Center software for more troubleshooting information: 1 Click Start Programs Lexmark 3100 Series Lexmark 3100 Series Solution Center. 2 Click the Troubleshooting tab on the left side of the screen. • Visit our Web site at http://support.lexmark.com/ for help. 55
Other help sources If the preceding solutions do not solve the problem with your All-In-One: • Refer to the Lexmark Solution Center software for more troubleshooting information: 1 Click Start Programs Lexmark 3100 Series Lexmark 3100 Series Solution Center. 2 Click the Troubleshooting tab on the left side of the screen. • Visit our Web site at http://support.lexmark.com/ for help. 55
User's Guide for Windows
Page 60
... information statement The Lexmark 3100 Series 4477-001/4478-001 has been tested and found to comply with the limits for a Class B digital device, pursuant to Part 15 of electrical equipment designed for use a properly shielded and grounded cable such as Lexmark part number 1329605 ... may cause undesired operation. The FCC Class B limits are designed to this equipment does cause harmful interference to : Director of Lexmark Technology & Services Lexmark International, Inc. 740 West New Circle Road Lexington, KY 40550 (859) 232-3000 Industry Canada compliance statement This Class B digital...
... information statement The Lexmark 3100 Series 4477-001/4478-001 has been tested and found to comply with the limits for a Class B digital device, pursuant to Part 15 of electrical equipment designed for use a properly shielded and grounded cable such as Lexmark part number 1329605 ... may cause undesired operation. The FCC Class B limits are designed to this equipment does cause harmful interference to : Director of Lexmark Technology & Services Lexmark International, Inc. 740 West New Circle Road Lexington, KY 40550 (859) 232-3000 Industry Canada compliance statement This Class B digital...


