User's Guide
Page 2
... hardware options...17 Installing a 250- or 550-sheet drawer...17 Attaching cables...18 Installing printer software...19 Interpreting the printer control panel lights 21 Understanding the printer control panel light sequences 21 Understanding the primary light sequences...21 Understanding the secondary error light...printer settings configuration sheet ...38 Loading paper and specialty media 40 Setting the paper size and paper type...40 Configuring Universal paper settings...40 Loading the standard 250-sheet tray...41 Loading the optional 250- or 550-sheet tray...45 Using the manual...
... hardware options...17 Installing a 250- or 550-sheet drawer...17 Attaching cables...18 Installing printer software...19 Interpreting the printer control panel lights 21 Understanding the printer control panel light sequences 21 Understanding the primary light sequences...21 Understanding the secondary error light...printer settings configuration sheet ...38 Loading paper and specialty media 40 Setting the paper size and paper type...40 Configuring Universal paper settings...40 Loading the standard 250-sheet tray...41 Loading the optional 250- or 550-sheet tray...45 Using the manual...
User's Guide
Page 3
... paper sizes, types, and weights...54 Paper types and weights supported by the printer ...54 Paper sizes supported by the printer ...55 Printing 57 Printing a document...57 Printing on both sides of the paper...58 Printer models and printing on both sides of the paper 58 Printing on both sides ...of the paper automatically...58 Printing on both sides of the paper manually...59 Printing specialty documents...60 Tips on using letterhead...60 Tips ...
... paper sizes, types, and weights...54 Paper types and weights supported by the printer ...54 Paper sizes supported by the printer ...55 Printing 57 Printing a document...57 Printing on both sides of the paper...58 Printer models and printing on both sides of the paper 58 Printing on both sides ...of the paper automatically...58 Printing on both sides of the paper manually...59 Printing specialty documents...60 Tips on using letterhead...60 Tips ...
User's Guide
Page 5
... standard exit bin...120 Clearing jams from Tray 1...120 Clearing jams from Tray 2...122 Clearing jams in the manual feeder...123 Clearing jams behind the rear door...124 Troubleshooting 126 Solving basic printer problems...126 Solving printing problems...126 Jobs do not print...126 Multiple-language PDFs do not print...127 Job...
... standard exit bin...120 Clearing jams from Tray 1...120 Clearing jams from Tray 2...122 Clearing jams in the manual feeder...123 Clearing jams behind the rear door...124 Troubleshooting 126 Solving basic printer problems...126 Solving printing problems...126 Jobs do not print...126 Multiple-language PDFs do not print...127 Job...
User's Guide
Page 9
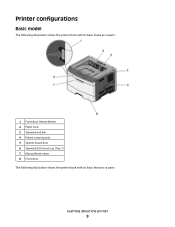
Printer configurations Basic model The following illustration shows the printer front with its basic features or parts: 1 Front door release button 2 Paper stop 3 Standard exit bin 4 Printer control panel 5 System board door 6 Standard 250-sheet tray (Tray 1) 7 Manual feeder door 8 Front door The following illustration shows the printer back with its basic features or parts: Learning about the printer 9
Printer configurations Basic model The following illustration shows the printer front with its basic features or parts: 1 Front door release button 2 Paper stop 3 Standard exit bin 4 Printer control panel 5 System board door 6 Standard 250-sheet tray (Tray 1) 7 Manual feeder door 8 Front door The following illustration shows the printer back with its basic features or parts: Learning about the printer 9

User's Guide
Page 11
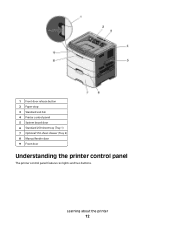
1 Front door release button 2 Paper stop 3 Standard exit bin 4 Printer control panel 5 System board door 6 Standard 250-sheet tray (Tray 1) 7 Optional 250-sheet drawer (Tray 2) 8 Manual feeder door 9 Front door The following illustration shows the printer configured with an optional 550-sheet drawer: Learning about the printer 11
1 Front door release button 2 Paper stop 3 Standard exit bin 4 Printer control panel 5 System board door 6 Standard 250-sheet tray (Tray 1) 7 Optional 250-sheet drawer (Tray 2) 8 Manual feeder door 9 Front door The following illustration shows the printer configured with an optional 550-sheet drawer: Learning about the printer 11
User's Guide
Page 12
1 Front door release button 2 Paper stop 3 Standard exit bin 4 Printer control panel 5 System board door 6 Standard 250-sheet tray (Tray 1) 7 Optional 550-sheet drawer (Tray 2) 8 Manual feeder door 9 Front door Understanding the printer control panel The printer control panel features six lights and two buttons. Learning about the printer 12
1 Front door release button 2 Paper stop 3 Standard exit bin 4 Printer control panel 5 System board door 6 Standard 250-sheet tray (Tray 1) 7 Optional 550-sheet drawer (Tray 2) 8 Manual feeder door 9 Front door Understanding the printer control panel The printer control panel features six lights and two buttons. Learning about the printer 12
User's Guide
Page 26
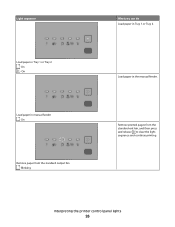
Blinking What you can do Load paper in Tray 1 or Tray 2 - Light sequence Load paper in Tray 1 or Tray 2. On Remove paper from the standard exit bin, and then press and release to clear the light sequence and continue printing. Interpreting the printer control panel lights 26 Load paper in manual feeder - Remove printed pages from the standard output bin - On Load paper in the manual feeder. On -
Blinking What you can do Load paper in Tray 1 or Tray 2 - Light sequence Load paper in Tray 1 or Tray 2. On Remove paper from the standard exit bin, and then press and release to clear the light sequence and continue printing. Interpreting the printer control panel lights 26 Load paper in manual feeder - Remove printed pages from the standard output bin - On Load paper in the manual feeder. On -
User's Guide
Page 38
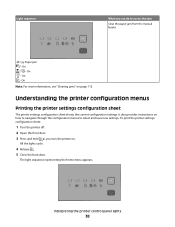
...paper jam from the manual feeder. 251.yy Paper jam - On Note: For more information, see "Clearing jams" on page 113. On - Interpreting the printer control panel lights 38 On - Understanding the printer configuration menus Printing the printer settings configuration sheet The printer settings configuration sheet ...appears. All the lights cycle. 4 Release . 5 Close the front door. Light sequence What you turn the printer on. To print the printer settings configuration sheet: 1 Turn the printer off. 2 Open the front door. 3 Press and hold as you can do to select and save new ...
...paper jam from the manual feeder. 251.yy Paper jam - On Note: For more information, see "Clearing jams" on page 113. On - Interpreting the printer control panel lights 38 On - Understanding the printer configuration menus Printing the printer settings configuration sheet The printer settings configuration sheet ...appears. All the lights cycle. 4 Release . 5 Close the front door. Light sequence What you turn the printer on. To print the printer settings configuration sheet: 1 Turn the printer off. 2 Open the front door. 3 Press and hold as you can do to select and save new ...
User's Guide
Page 40
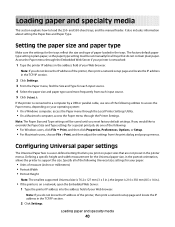
...Macintosh computer, access the Paper menu through the Embedded Web Server if your printer is networked: 1 Type the printer IP address in the address field of your Web browser. Note: The Paper Size and Type settings will be set manually for the trays reflect the size and type of your Web browser. ... From the Paper menu, find the Size and Type for your paper: • Units of the printer, then print a network setup page and locate the IP address in .); and 550-sheet trays, and the manual feeder. It also includes information about setting the Paper Size and Paper Type. If you would like...
...Macintosh computer, access the Paper menu through the Embedded Web Server if your printer is networked: 1 Type the printer IP address in the address field of your Web browser. Note: The Paper Size and Type settings will be set manually for the trays reflect the size and type of your Web browser. ... From the Paper menu, find the Size and Type for your paper: • Units of the printer, then print a network setup page and locate the IP address in .); and 550-sheet trays, and the manual feeder. It also includes information about setting the Paper Size and Paper Type. If you would like...

User's Guide
Page 46
Loading paper and specialty media 46 You can use the manual feeder to quickly print on paper types or sizes that are not currently loaded in the tray. 1 Open the manual feeder door. 2 When the light is located inside the manual feeder door of the printer and can feed only one sheet of paper at a time. Using the manual feeder The manual feeder is lit, load the paper faceup into the center of the manual feeder. Notes: • Load letterhead faceup, with the top of the sheet entering first. • Load envelopes with the flap side down and with the stamp area as shown.
Loading paper and specialty media 46 You can use the manual feeder to quickly print on paper types or sizes that are not currently loaded in the tray. 1 Open the manual feeder door. 2 When the light is located inside the manual feeder door of the printer and can feed only one sheet of paper at a time. Using the manual feeder The manual feeder is lit, load the paper faceup into the center of the manual feeder. Notes: • Load letterhead faceup, with the top of the sheet entering first. • Load envelopes with the flap side down and with the stamp area as shown.
User's Guide
Page 47
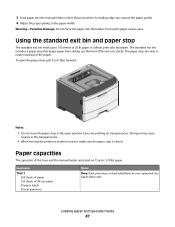
... stop also aids in neater stacking of 20 lb paper. Notes: • Do not leave the paper stop in the transparencies. • When moving the printer to another location, make sure the paper stop The standard exit bin holds up to the paper width. Doing so may cause creases in the... its leading edge can contact the paper guides. 4 Adjust the paper guides to Tray 1 250 sheets of paper 150 sheets of the trays and the manual feeder are based on transparencies. 3 Feed paper into the feeder. Paper capacities The capacities of A6-size paper 50 paper labels 50 transparencies Notes Note...
... stop also aids in neater stacking of 20 lb paper. Notes: • Do not leave the paper stop in the transparencies. • When moving the printer to another location, make sure the paper stop The standard exit bin holds up to the paper width. Doing so may cause creases in the... its leading edge can contact the paper guides. 4 Adjust the paper guides to Tray 1 250 sheets of paper 150 sheets of the trays and the manual feeder are based on transparencies. 3 Feed paper into the feeder. Paper capacities The capacities of A6-size paper 50 paper labels 50 transparencies Notes Note...
User's Guide
Page 48
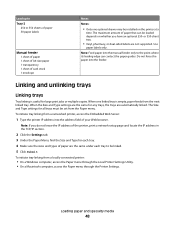
... address field of your Web browser. Note: If you have an optional 250- Note: Feed paper into the manual feeder only to the point where its leading edge can be loaded depends on the printer at a time. Linking and unlinking trays Linking trays Tray linking is empty, paper feeds from a networked... supported. The maximum amount of paper that can contact the paper guides. Load up to Tray 2 250 or 550 sheets of paper 50 paper labels Manual feeder 1 sheet of paper 1 sheet of A6-size paper 1 transparency 1 sheet of card stock 1 envelope Notes Notes: • Only one linked tray is ...
... address field of your Web browser. Note: If you have an optional 250- Note: Feed paper into the manual feeder only to the point where its leading edge can be loaded depends on the printer at a time. Linking and unlinking trays Linking trays Tray linking is empty, paper feeds from a networked... supported. The maximum amount of paper that can contact the paper guides. Load up to Tray 2 250 or 550 sheets of paper 50 paper labels Manual feeder 1 sheet of paper 1 sheet of A6-size paper 1 transparency 1 sheet of card stock 1 envelope Notes Notes: • Only one linked tray is ...
User's Guide
Page 49
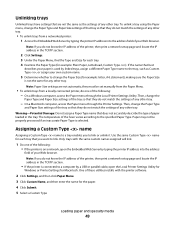
... a different Paper Type name to the tray, such as the settings of the printer, then print a network setup page and locate the IP address in the TCP/IP section. • If the printer is selected. Paper may not be set manually from the Paper Menu. • To unlink trays from a networked... printer: 1 Access the Embedded Web Server by typing the printer IP address into the address field of any other tray. Assigning a ...
... a different Paper Type name to the tray, such as the settings of the printer, then print a network setup page and locate the IP address in the TCP/IP section. • If the printer is selected. Paper may not be set manually from the Paper Menu. • To unlink trays from a networked... printer: 1 Access the Embedded Web Server by typing the printer IP address into the address field of any other tray. Assigning a ...

User's Guide
Page 51
...Sheffield points produces the best print quality. Paper lighter than 182 x 257 mm (7.2 x 10.1 in the same environment as the printer for paper to moisture changes that can cause feeding problems. Smoothness Paper smoothness directly affects print quality. If paper is recommended. For ... guidelines Paper characteristics The following paper characteristics affect print quality and reliability. Consider these characteristics when evaluating new paper stock. The manual feeder can automatically feed paper weights up to it is supported only for 60-90 g/m2 (16-24 lb bond) paper...
...Sheffield points produces the best print quality. Paper lighter than 182 x 257 mm (7.2 x 10.1 in the same environment as the printer for paper to moisture changes that can cause feeding problems. Smoothness Paper smoothness directly affects print quality. If paper is recommended. For ... guidelines Paper characteristics The following paper characteristics affect print quality and reliability. Consider these characteristics when evaluating new paper stock. The manual feeder can automatically feed paper weights up to it is supported only for 60-90 g/m2 (16-24 lb bond) paper...
User's Guide
Page 54
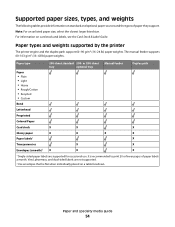
...the printer The printer engine and the duplex path support 60-90 g/m2 (16-24 lb) paper weights. It is recommended to print 20 or fewer pages of paper they support. Supported paper sizes, types, and weights The following tables provide information on a table facedown. or 550-sheet Manual ... an unlisted paper size, select the closest larger listed size. For information on card stock and labels, see the Card Stock & Label Guide. The manual feeder supports 60-163 g/m2 (16-43 lb) paper weights. Paper and specialty media guide 54 Paper type Paper • Plain • Light ...
...the printer The printer engine and the duplex path support 60-90 g/m2 (16-24 lb) paper weights. It is recommended to print 20 or fewer pages of paper they support. Supported paper sizes, types, and weights The following tables provide information on a table facedown. or 550-sheet Manual ... an unlisted paper size, select the closest larger listed size. For information on card stock and labels, see the Card Stock & Label Guide. The manual feeder supports 60-163 g/m2 (16-43 lb) paper weights. Paper and specialty media guide 54 Paper type Paper • Plain • Light ...

User's Guide
Page 55
Paper sizes supported by the printer Paper size Dimensions Standard Optional 250- 250-sheet tray or 550-sheet tray Manual feeder Duplex path A4 210 x 297 mm (8.3 x 11.7 in.) A5 148 x 210 mm X (5.8 x 8.3 in.) A61 105 x 148 mm X X (4.1 x 5.8 in.) Executive 184 x 267 mm X (7.3 x 10.5 in.) ...
Paper sizes supported by the printer Paper size Dimensions Standard Optional 250- 250-sheet tray or 550-sheet tray Manual feeder Duplex path A4 210 x 297 mm (8.3 x 11.7 in.) A5 148 x 210 mm X (5.8 x 8.3 in.) A61 105 x 148 mm X X (4.1 x 5.8 in.) Executive 184 x 267 mm X (7.3 x 10.5 in.) ...
User's Guide
Page 58
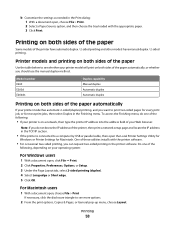
Model number E260 E260d E260dn Duplex capability Manual duplex Automatic duplex Automatic duplex Printing on both sides of the paper automatically, or whether you do one of these utilities installs with the appropriate paper. 3 Click Print. Printer models and printing on both sides of the ..., do not know the IP address of the printer have automatic duplex / 2-sided printing and other models have manual duplex / 2-sided printing. Note: If you should use the manual duplex method. Printing on a network, then type the printer IP address into the address field of the paper...
Model number E260 E260d E260dn Duplex capability Manual duplex Automatic duplex Automatic duplex Printing on both sides of the paper automatically, or whether you do one of these utilities installs with the appropriate paper. 3 Click Print. Printer models and printing on both sides of the ..., do not know the IP address of the printer have automatic duplex / 2-sided printing and other models have manual duplex / 2-sided printing. Note: If you should use the manual duplex method. Printing on a network, then type the printer IP address into the address field of the paper...
User's Guide
Page 59
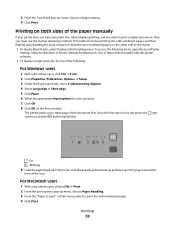
... menu, choose Paper Handling. 3 From the "Pages to print" or Print menu, select to print a duplex document, then you must use the manual duplexing method. Printing on , and the l button light blinks. - This method involves printing the odd-numbered pages, and then flipping and reloading the...• To duplex a single print job, do one of the following: For Windows users 1 With a document open the Local Printer Settings Utility for Windows or Printer Settings for your printer does not have automatic two-sided (duplex) printing, and you want to print the odd-numbered pages. 4 Click Print. 3...
... menu, choose Paper Handling. 3 From the "Pages to print" or Print menu, select to print a duplex document, then you must use the manual duplexing method. Printing on , and the l button light blinks. - This method involves printing the odd-numbered pages, and then flipping and reloading the...• To duplex a single print job, do one of the following: For Windows users 1 With a document open the Local Printer Settings Utility for Windows or Printer Settings for your printer does not have automatic two-sided (duplex) printing, and you want to print the odd-numbered pages. 4 Click Print. 3...
User's Guide
Page 61
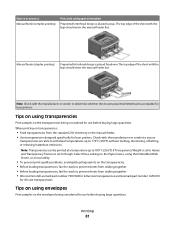
...: • Feed transparencies from sticking together. • We recommend Lexmark part number 70X7240 for letter-size transparencies and Lexmark part number 12A5010 for laser printers. Note: Transparencies can be printed at a temperature up to prevent ...sheets from the standard 250-sheet tray or the manual feeder. • Use transparencies designed specifically for A4-size transparencies. When printing on the transparencies being considered for laser printers...
...: • Feed transparencies from sticking together. • We recommend Lexmark part number 70X7240 for letter-size transparencies and Lexmark part number 12A5010 for laser printers. Note: Transparencies can be printed at a temperature up to prevent ...sheets from the standard 250-sheet tray or the manual feeder. • Use transparencies designed specifically for A4-size transparencies. When printing on the transparencies being considered for laser printers...
User's Guide
Page 71
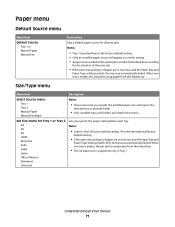
...Menu item Description Select Source menu Tray 1 Tray 2 Manual Paper Manual Envelope Notes: • These menus let you specify the paper size loaded in each tray Notes: • Letter is the US factory default setting. Understanding printer menus 71 Paper menu Default Source menu Menu item ...Default Source Tray Manual Paper Manual Env Description Sets a default paper source for all print jobs Notes: • Tray 1 (standard ...
...Menu item Description Select Source menu Tray 1 Tray 2 Manual Paper Manual Envelope Notes: • These menus let you specify the paper size loaded in each tray Notes: • Letter is the US factory default setting. Understanding printer menus 71 Paper menu Default Source menu Menu item ...Default Source Tray Manual Paper Manual Env Description Sets a default paper source for all print jobs Notes: • Tray 1 (standard ...


