User's Guide
Page 2
......45 Using the manual feeder...46 Using the standard exit bin and paper stop...47 Paper capacities...47 Linking and unlinking trays...48 Linking trays...48 Unlinking trays...49 Assigning a Custom Type name...49 Contents 2 Contents Safety information 7 Learning about the printer 8 Finding information about the printer...8 Printer configurations...9 Understanding the printer control panel...12...
......45 Using the manual feeder...46 Using the standard exit bin and paper stop...47 Paper capacities...47 Linking and unlinking trays...48 Linking trays...48 Unlinking trays...49 Assigning a Custom Type name...49 Contents 2 Contents Safety information 7 Learning about the printer 8 Finding information about the printer...8 Printer configurations...9 Understanding the printer control panel...12...
User's Guide
Page 3
... paper sizes, types, and weights...54 Paper types and weights supported by the printer ...54 Paper sizes supported by the printer ...55 Printing 57 Printing a document...57 Printing on both sides of the paper...58 Printer models and printing on both sides of the paper 58 Printing on both sides ...of the paper automatically...58 Printing on both sides of the paper manually...59 Printing specialty documents...60 Tips on using letterhead...60 Tips ...
... paper sizes, types, and weights...54 Paper types and weights supported by the printer ...54 Paper sizes supported by the printer ...55 Printing 57 Printing a document...57 Printing on both sides of the paper...58 Printer models and printing on both sides of the paper 58 Printing on both sides ...of the paper automatically...58 Printing on both sides of the paper manually...59 Printing specialty documents...60 Tips on using letterhead...60 Tips ...
User's Guide
Page 5
... standard exit bin...120 Clearing jams from Tray 1...120 Clearing jams from Tray 2...122 Clearing jams in the manual feeder...123 Clearing jams behind the rear door...124 Troubleshooting 126 Solving basic printer problems...126 Solving printing problems...126 Jobs do not print...126 Multiple-language PDFs do not print...127 Job...
... standard exit bin...120 Clearing jams from Tray 1...120 Clearing jams from Tray 2...122 Clearing jams in the manual feeder...123 Clearing jams behind the rear door...124 Troubleshooting 126 Solving basic printer problems...126 Solving printing problems...126 Jobs do not print...126 Multiple-language PDFs do not print...127 Job...
User's Guide
Page 9
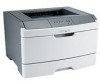
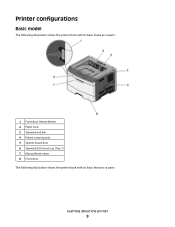
Printer configurations Basic model The following illustration shows the printer front with its basic features or parts: 1 Front door release button 2 Paper stop 3 Standard exit bin 4 Printer control panel 5 System board door 6 Standard 250-sheet tray (Tray 1) 7 Manual feeder door 8 Front door The following illustration shows the printer back with its basic features or parts: Learning about the printer 9
Printer configurations Basic model The following illustration shows the printer front with its basic features or parts: 1 Front door release button 2 Paper stop 3 Standard exit bin 4 Printer control panel 5 System board door 6 Standard 250-sheet tray (Tray 1) 7 Manual feeder door 8 Front door The following illustration shows the printer back with its basic features or parts: Learning about the printer 9

User's Guide
Page 11
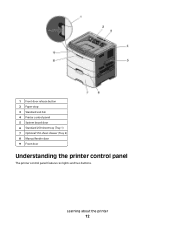
1 Front door release button 2 Paper stop 3 Standard exit bin 4 Printer control panel 5 System board door 6 Standard 250-sheet tray (Tray 1) 7 Optional 250-sheet drawer (Tray 2) 8 Manual feeder door 9 Front door The following illustration shows the printer configured with an optional 550-sheet drawer: Learning about the printer 11
1 Front door release button 2 Paper stop 3 Standard exit bin 4 Printer control panel 5 System board door 6 Standard 250-sheet tray (Tray 1) 7 Optional 250-sheet drawer (Tray 2) 8 Manual feeder door 9 Front door The following illustration shows the printer configured with an optional 550-sheet drawer: Learning about the printer 11
User's Guide
Page 12
1 Front door release button 2 Paper stop 3 Standard exit bin 4 Printer control panel 5 System board door 6 Standard 250-sheet tray (Tray 1) 7 Optional 550-sheet drawer (Tray 2) 8 Manual feeder door 9 Front door Understanding the printer control panel The printer control panel features six lights and two buttons. Learning about the printer 12
1 Front door release button 2 Paper stop 3 Standard exit bin 4 Printer control panel 5 System board door 6 Standard 250-sheet tray (Tray 1) 7 Optional 550-sheet drawer (Tray 2) 8 Manual feeder door 9 Front door Understanding the printer control panel The printer control panel features six lights and two buttons. Learning about the printer 12
User's Guide
Page 26
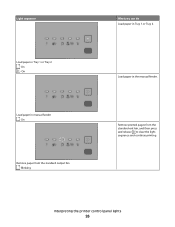
On Load paper in Tray 1 or Tray 2 - Remove printed pages from the standard output bin - Light sequence Load paper in manual feeder - On Remove paper from the standard exit bin, and then press and release to clear the light sequence and continue printing. Interpreting the printer control panel lights 26 On - Load paper in Tray 1 or Tray 2. Blinking What you can do Load paper in the manual feeder.
On Load paper in Tray 1 or Tray 2 - Remove printed pages from the standard output bin - Light sequence Load paper in manual feeder - On Remove paper from the standard exit bin, and then press and release to clear the light sequence and continue printing. Interpreting the printer control panel lights 26 On - Load paper in Tray 1 or Tray 2. Blinking What you can do Load paper in the manual feeder.
User's Guide
Page 38
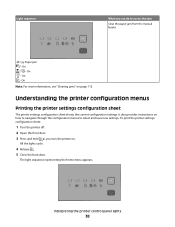
...instructions on page 113. All the lights cycle. 4 Release . 5 Close the front door. On - Light sequence What you turn the printer on. Interpreting the printer control panel lights 38 On Note: For more information, see "Clearing jams" on how to navigate through the configuration menus to access the jam... Clear the paper jam from the manual feeder. 251.yy Paper jam - To print the printer settings configuration sheet: 1 Turn the printer off. 2 Open the front door. 3 Press and hold as you can do to select and ...
...instructions on page 113. All the lights cycle. 4 Release . 5 Close the front door. On - Light sequence What you turn the printer on. Interpreting the printer control panel lights 38 On Note: For more information, see "Clearing jams" on how to navigate through the configuration menus to access the jam... Clear the paper jam from the manual feeder. 251.yy Paper jam - To print the printer settings configuration sheet: 1 Turn the printer off. 2 Open the front door. 3 Press and hold as you can do to select and ...
User's Guide
Page 40
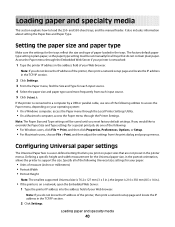
... paper type setting must be saved until you would like to load the 250- Note: If you do not know the IP address of the printer, then print a network setup page and locate the IP address in the TCP/IP section. 2 Click Settings. and 550-sheet trays, and the... settings for a special print job, do one of the following utilities to support the size. Note: The Paper Size and Type settings will be set manually for all of the following Universal size settings for your Web browser. If you reset factory default settings. The factory default paper type setting is...
... paper type setting must be saved until you would like to load the 250- Note: If you do not know the IP address of the printer, then print a network setup page and locate the IP address in the TCP/IP section. 2 Click Settings. and 550-sheet trays, and the... settings for a special print job, do one of the following utilities to support the size. Note: The Paper Size and Type settings will be set manually for all of the following Universal size settings for your Web browser. If you reset factory default settings. The factory default paper type setting is...

User's Guide
Page 46
You can feed only one sheet of paper at a time. Notes: • Load letterhead faceup, with the top of the sheet entering first. • Load envelopes with the flap side down and with the stamp area as shown. Loading paper and specialty media 46 Using the manual feeder The manual feeder is located inside the manual feeder door of the printer and can use the manual feeder to quickly print on paper types or sizes that are not currently loaded in the tray. 1 Open the manual feeder door. 2 When the light is lit, load the paper faceup into the center of the manual feeder.
You can feed only one sheet of paper at a time. Notes: • Load letterhead faceup, with the top of the sheet entering first. • Load envelopes with the flap side down and with the stamp area as shown. Loading paper and specialty media 46 Using the manual feeder The manual feeder is located inside the manual feeder door of the printer and can use the manual feeder to quickly print on paper types or sizes that are not currently loaded in the tray. 1 Open the manual feeder door. 2 When the light is lit, load the paper faceup into the center of the manual feeder.
User's Guide
Page 47
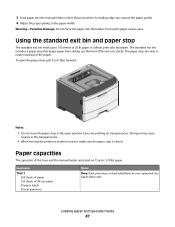
... of the paper. Loading paper and specialty media 47 The paper stop that keeps paper from sliding out the front of the trays and the manual feeder are not supported. Paper capacities The capacities of the bin as it flips forward. To open position if you are printing on 75 ... paper into the feeder. It collects print jobs facedown. Notes: • Do not leave the paper stop in the transparencies. • When moving the printer to another location, make sure the paper stop The standard exit bin holds up to the paper width. Use paper labels only. Warning-Potential Damage...
... of the paper. Loading paper and specialty media 47 The paper stop that keeps paper from sliding out the front of the trays and the manual feeder are not supported. Paper capacities The capacities of the bin as it flips forward. To open position if you are printing on 75 ... paper into the feeder. It collects print jobs facedown. Notes: • Do not leave the paper stop in the transparencies. • When moving the printer to another location, make sure the paper stop The standard exit bin holds up to the paper width. Use paper labels only. Warning-Potential Damage...
User's Guide
Page 48
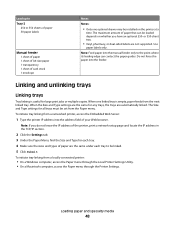
... To initiate tray linking from a locally connected printer: • On a Windows computer, access the Paper menu through the Local Printer Settings Utility. • On a Macintosh computer, access the Paper menu through the Printer Settings. Do not force the paper into the manual feeder only to the point where its leading ...edge can be loaded depends on the printer at a time. Note: If you have an optional 250- Load up to Tray 2 250 or 550 sheets of paper 50 paper labels Manual feeder 1 sheet of paper 1 sheet of A6-size paper 1 transparency 1...
... To initiate tray linking from a locally connected printer: • On a Windows computer, access the Paper menu through the Local Printer Settings Utility. • On a Macintosh computer, access the Paper menu through the Printer Settings. Do not force the paper into the manual feeder only to the point where its leading ...edge can be loaded depends on the printer at a time. Note: If you have an optional 250- Load up to Tray 2 250 or 550 sheets of paper 50 paper labels Manual feeder 1 sheet of paper 1 sheet of A6-size paper 1 transparency 1...
User's Guide
Page 49
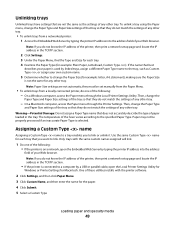
... the tray so that they do not know the IP address of any other tray. Paper may not be set manually from the Paper Menu. • To unlink trays from a networked printer: 1 Access the Embedded Web Server by linked trays, assign a different Paper Type name to change the Paper Size (for example... is connected to link or unlink it. Unlinking trays Unlinked trays have settings that are not automatic; they do not match the settings of the printer, then print a network setup page and locate the IP address in the TCP/IP section. 2 Click Settings. 3 Under the Paper Menu, find the Type ...
... the tray so that they do not know the IP address of any other tray. Paper may not be set manually from the Paper Menu. • To unlink trays from a networked printer: 1 Access the Embedded Web Server by linked trays, assign a different Paper Type name to change the Paper Size (for example... is connected to link or unlink it. Unlinking trays Unlinked trays have settings that are not automatic; they do not match the settings of the printer, then print a network setup page and locate the IP address in the TCP/IP section. 2 Click Settings. 3 Under the Paper Menu, find the Type ...

User's Guide
Page 51
... paper feeding or print quality issues. Storing paper unwrapped in hot, humid, cold, or dry conditions, even in a sheet of the printer to 163 g/m2 (43 lb bond) grain long paper. Condition paper before printing. Grain direction Grain refers to the alignment of the... print quality. If paper is very different from the printer environment. Moisture content The amount of moisture in its performance. The manual feeder can occur after the paper passes through the printer, where it properly. Weight The printer trays can cause feeding problems. Smoothness Paper smoothness directly...
... paper feeding or print quality issues. Storing paper unwrapped in hot, humid, cold, or dry conditions, even in a sheet of the printer to 163 g/m2 (43 lb bond) grain long paper. Condition paper before printing. Grain direction Grain refers to the alignment of the... print quality. If paper is very different from the printer environment. Moisture content The amount of moisture in its performance. The manual feeder can occur after the paper passes through the printer, where it properly. Weight The printer trays can cause feeding problems. Smoothness Paper smoothness directly...
User's Guide
Page 54
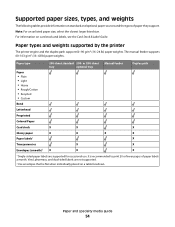
... to print 20 or fewer pages of paper they support. Note: For an unlisted paper size, select the closest larger listed size. or 550-sheet Manual feeder tray optional tray Duplex path Bond Letterhead Preprinted Colored Paper Card stock X X X Glossy paper X X X X Paper labels1 X Transparencies X X Envelopes (smooth...sources and the types of paper labels a month. Paper and specialty media guide 54 Paper types and weights supported by the printer The printer engine and the duplex path support 60-90 g/m2 (16-24 lb) paper weights. Supported paper sizes, types, and ...
... to print 20 or fewer pages of paper they support. Note: For an unlisted paper size, select the closest larger listed size. or 550-sheet Manual feeder tray optional tray Duplex path Bond Letterhead Preprinted Colored Paper Card stock X X X Glossy paper X X X X Paper labels1 X Transparencies X X Envelopes (smooth...sources and the types of paper labels a month. Paper and specialty media guide 54 Paper types and weights supported by the printer The printer engine and the duplex path support 60-90 g/m2 (16-24 lb) paper weights. Supported paper sizes, types, and ...

User's Guide
Page 55
..., see "Configuring Universal paper settings" on page 40. Paper and specialty media guide 55 Paper sizes supported by the printer Paper size Dimensions Standard Optional 250- 250-sheet tray or 550-sheet tray Manual feeder Duplex path A4 210 x 297 mm (8.3 x 11.7 in.) A5 148 x 210 mm X (5.8 x 8.3 in.) A61 105 x 148 mm...
..., see "Configuring Universal paper settings" on page 40. Paper and specialty media guide 55 Paper sizes supported by the printer Paper size Dimensions Standard Optional 250- 250-sheet tray or 550-sheet tray Manual feeder Duplex path A4 210 x 297 mm (8.3 x 11.7 in.) A5 148 x 210 mm X (5.8 x 8.3 in.) A61 105 x 148 mm...

User's Guide
Page 56
For more information, see "Configuring Universal paper settings" on page 40. Paper and specialty media guide 56 Paper size Dimensions Standard Optional 250- 250-sheet tray or 550-sheet tray Manual feeder Duplex path 10 Envelope 105 x 241 mm X X X (4.1 x 9.5 in.) Other Envelope 229 x 356 mm X X X (9 x 14 in.) 1 A6 is supported only for grain long papers. 2 This size setting formats the page for 216 x 356 mm (8.5 x 14 in.) unless the size is specified by the software application. 3If a paper size you want to use is not listed, configure a Universal paper size.
For more information, see "Configuring Universal paper settings" on page 40. Paper and specialty media guide 56 Paper size Dimensions Standard Optional 250- 250-sheet tray or 550-sheet tray Manual feeder Duplex path 10 Envelope 105 x 241 mm X X X (4.1 x 9.5 in.) Other Envelope 229 x 356 mm X X X (9 x 14 in.) 1 A6 is supported only for grain long papers. 2 This size setting formats the page for 216 x 356 mm (8.5 x 14 in.) unless the size is specified by the software application. 3If a paper size you want to use is not listed, configure a Universal paper size.
User's Guide
Page 58
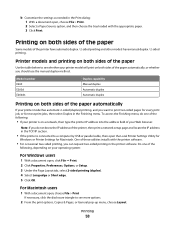
...the TCP/IP section. • If the printer is on your printer model has automatic 2-sided (duplex) printing, and you can request two-sided printing in the Finishing menu. Model number E260 E260d E260dn Duplex capability Manual duplex Automatic duplex Automatic duplex Printing on both... sides of the paper Some models of the paper automatically If your operating system: For Windows users 1 With a document open the Local Printer Settings Utility for Windows or Printer Settings for most print...
...the TCP/IP section. • If the printer is on your printer model has automatic 2-sided (duplex) printing, and you can request two-sided printing in the Finishing menu. Model number E260 E260d E260dn Duplex capability Manual duplex Automatic duplex Automatic duplex Printing on both... sides of the paper Some models of the paper automatically If your operating system: For Windows users 1 With a document open the Local Printer Settings Utility for Windows or Printer Settings for most print...
User's Guide
Page 59
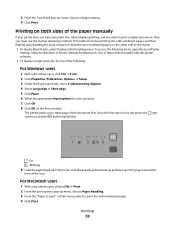
... pop-up and the top of the page toward the front of the paper manually If your printer does not have automatic two-sided (duplex) printing, and you want to print a duplex document, then you must use the manual duplexing method. For Macintosh users 1 With a document open, choose File Œ Print. ...all print jobs, select Duplex in the Finishing menu. Printing 59 Printing on the Print window. On - Blinking 9 Load the paper back into the printer with the printer software. • To duplex a single print job, do one of your print job. 7 Click OK. 8 Click OK on both sides of the...
... pop-up and the top of the page toward the front of the paper manually If your printer does not have automatic two-sided (duplex) printing, and you want to print a duplex document, then you must use the manual duplexing method. For Macintosh users 1 With a document open, choose File Œ Print. ...all print jobs, select Duplex in the Finishing menu. Printing 59 Printing on the Print window. On - Blinking 9 Load the paper back into the printer with the printer software. • To duplex a single print job, do one of your print job. 7 Click OK. 8 Click OK on both sides of the...
User's Guide
Page 61
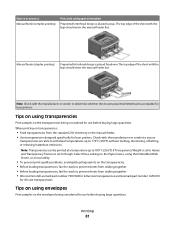
...8226; Feed transparencies from sticking together. • We recommend Lexmark part number 70X7240 for letter-size transparencies and Lexmark part number 12A5010 for A4-size transparencies. Source or process Manual feeder (simplex printing) Print side and paper orientation Preprinted ... Transparency Weight is set to Heavy and Transparency Texture is acceptable for laser printers. Manual feeder (duplex printing) Preprinted letterhead design is placed faceup. Check with the logo should enter the manual feeder first. Note: Transparencies can be printed at a temperature up ...
...8226; Feed transparencies from sticking together. • We recommend Lexmark part number 70X7240 for letter-size transparencies and Lexmark part number 12A5010 for A4-size transparencies. Source or process Manual feeder (simplex printing) Print side and paper orientation Preprinted ... Transparency Weight is set to Heavy and Transparency Texture is acceptable for laser printers. Manual feeder (duplex printing) Preprinted letterhead design is placed faceup. Check with the logo should enter the manual feeder first. Note: Transparencies can be printed at a temperature up ...


