Clearing Jams Guide
Page 1
CAUTION: The inside of the printer may be hot. 3 Lift and pull the print cartridge out of print media. Lexmark™ T64x Clearing Jams Guide Avoiding jams The following hints...remove the print cartridge, and remove the jam. 202 Paper Jam Open the rear door on the printer, Open Rear and remove the jam. Clearing jams Understanding jam messages Message What to resume 200 and... the jam, press printing. Make sure the guides are not placed too tightly against the stack of the printer. to do occur with print media, try feeding one sheet at a time through the multipurpose feeder. &#...
CAUTION: The inside of the printer may be hot. 3 Lift and pull the print cartridge out of print media. Lexmark™ T64x Clearing Jams Guide Avoiding jams The following hints...remove the print cartridge, and remove the jam. 202 Paper Jam Open the rear door on the printer, Open Rear and remove the jam. Clearing jams Understanding jam messages Message What to resume 200 and... the jam, press printing. Make sure the guides are not placed too tightly against the stack of the printer. to do occur with print media, try feeding one sheet at a time through the multipurpose feeder. &#...
Clearing Jams Guide
Page 2
... the media straight out, and press . Make sure it snaps into place. 4 Press . Otherwise, continue with step 2. 2 Open the printer rear door. 23x Paper Jam Open Duplex Rear Door 1 Open the duplex rear door. 6 Align and reinstall the print cartridge. 7 Close the top front cover. 8 ... feeder. 9 Press . 2 Remove the jammed media. Remove the jammed media. 3 Close the rear door. 4 Press . 3 Close the duplex rear door. CAUTION: The inside of the printer may be hot.
... the media straight out, and press . Make sure it snaps into place. 4 Press . Otherwise, continue with step 2. 2 Open the printer rear door. 23x Paper Jam Open Duplex Rear Door 1 Open the duplex rear door. 6 Align and reinstall the print cartridge. 7 Close the top front cover. 8 ... feeder. 9 Press . 2 Remove the jammed media. Remove the jammed media. 3 Close the rear door. 4 Press . 3 Close the duplex rear door. CAUTION: The inside of the printer may be hot.
Clearing Jams Guide
Page 3
... feeder. 3 Load the print media. 2 Open the duplex tray. a Lift the envelope feeder up . 4 Slide the side guide toward the inside of the printer, and then set it aside. Pull the print media either up or down. Make sure it lightly rests against the edge of print media is... the jam, and make sure the stack of the media. 1 Lift the envelope weight. 2 Remove all envelopes. 1 2 If the jammed envelope has entered the printer and cannot be pulled out, remove the envelope feeder. b Remove the envelope from the multipurpose feeder. 2 Flex, fan, and restack the media, and place it...
... feeder. 3 Load the print media. 2 Open the duplex tray. a Lift the envelope feeder up . 4 Slide the side guide toward the inside of the printer, and then set it aside. Pull the print media either up or down. Make sure it lightly rests against the edge of print media is... the jam, and make sure the stack of the media. 1 Lift the envelope weight. 2 Remove all envelopes. 1 2 If the jammed envelope has entered the printer and cannot be pulled out, remove the envelope feeder. b Remove the envelope from the multipurpose feeder. 2 Flex, fan, and restack the media, and place it...
Troubleshooting Guide
Page 1
... . Solving printing problems The operator panel display is not connected properly Verify that you have sent to the Ready state. Press to return the printer to the printer. Lexmark™ T64x Troubleshooting Guide Online technical support Technical support is empty Load paper in the tray. The message USB device unsupported appears when using...
... . Solving printing problems The operator panel display is not connected properly Verify that you have sent to the Ready state. Press to return the printer to the printer. Lexmark™ T64x Troubleshooting Guide Online technical support Technical support is empty Load paper in the tray. The message USB device unsupported appears when using...

Troubleshooting Guide
Page 2
... sure the connection between drawers (250-sheet drawer, 500-sheet drawer, or 2000-sheet drawer), or the connection between the envelope feeder and the printer is secure. • Make sure the Paper Size setting is loaded correctly. Envelop e feeder • Make sure the connection between a drawer ... it may not be properly installed. Note: Setting Collation to Off in the driver overrides the setting in Hex Trace mode. We recommend Lexmark part number 1329605 (10 ft) or 1427498 (20 ft) for related problems. If the suggested corrective actions for the standard parallel port...
... sure the connection between drawers (250-sheet drawer, 500-sheet drawer, or 2000-sheet drawer), or the connection between the envelope feeder and the printer is secure. • Make sure the Paper Size setting is loaded correctly. Envelop e feeder • Make sure the connection between a drawer ... it may not be properly installed. Note: Setting Collation to Off in the driver overrides the setting in Hex Trace mode. We recommend Lexmark part number 1329605 (10 ft) or 1427498 (20 ft) for related problems. If the suggested corrective actions for the standard parallel port...
Troubleshooting Guide
Page 3
...at the front of paper you load does not exceed the maximum stack height indicated at www.lexmark.com for detailed specifications. Load paper from occurring, see if the printer is correctly set to the appropriate position for more details. Internal print server • Make sure... the following : • Drawer is properly installed. • Print media is loaded correctly. • Print media is loaded. Printer Make sure printer memory is securely connected to remove the top and bottom sheets of each output expander. The elevator tray lowers unexpectedly Check to high humidity...
...at the front of paper you load does not exceed the maximum stack height indicated at www.lexmark.com for detailed specifications. Load paper from occurring, see if the printer is correctly set to the appropriate position for more details. Internal print server • Make sure... the following : • Drawer is properly installed. • Print media is loaded correctly. • Print media is loaded. Printer Make sure printer memory is securely connected to remove the top and bottom sheets of each output expander. The elevator tray lowers unexpectedly Check to high humidity...

Troubleshooting Guide
Page 4
... the jammed paper. Note: A (check mark) appears to indicate that is smaller than the page size of the printed page Toner is within the printer specifications. If another type of an item to the left of print quality problem exists, see the Troubleshooting chapter in the User's Guide on an...change the Paper Weight and Paper Texture settings in the Paper menu. • Verify the print media is on the transfer roll. You may have a printer part that jammed does not reprint after you solve print quality problems. If these suggestions still do not load print media that it is Class...
... the jammed paper. Note: A (check mark) appears to indicate that is smaller than the page size of the printed page Toner is within the printer specifications. If another type of an item to the left of print quality problem exists, see the Troubleshooting chapter in the User's Guide on an...change the Paper Weight and Paper Texture settings in the Paper menu. • Verify the print media is on the transfer roll. You may have a printer part that jammed does not reprint after you solve print quality problems. If these suggestions still do not load print media that it is Class...
Troubleshooting Guide
Page 5
...procedure multiple times until the print remains faded. When the print remains faded replace the print cartridge. • If you are using the correct printer drivers. • Verify the environment is white • The toner may be too dark. To utilize the remaining toner, remove the cartridge... cartridge to redistribute the toner. Part or all of 230°C (446°F). To utilize the remaining toner, remove the cartridge by the printer, the host computer, and the software application. • Verify the print media type and print tray type settings match. • Verify you...
...procedure multiple times until the print remains faded. When the print remains faded replace the print cartridge. • If you are using the correct printer drivers. • Verify the environment is white • The toner may be too dark. To utilize the remaining toner, remove the cartridge... cartridge to redistribute the toner. Part or all of 230°C (446°F). To utilize the remaining toner, remove the cartridge by the printer, the host computer, and the software application. • Verify the print media type and print tray type settings match. • Verify you...

Troubleshooting Guide
Page 6
... the charge rolls. • Replace the print cartridge. • Replace the photoconductor kit. Transparency print quality is poor. • Use only transparencies recommended by the printer manufacturer. • Make sure the Paper Type setting in your software application. The job prints, but the top and side margins are set to Transparency...
... the charge rolls. • Replace the print cartridge. • Replace the photoconductor kit. Transparency print quality is poor. • Use only transparencies recommended by the printer manufacturer. • Make sure the Paper Type setting in your software application. The job prints, but the top and side margins are set to Transparency...
User's Guide
Page 3
...Windows ...11 Macintosh ...15 UNIX/Linux ...16 Chapter 3: Installing drivers for network printing 17 Printing a network setup page ...17 Assigning a printer IP address ...17 Verifying the IP settings ...18 Windows ...18 Macintosh ...22 UNIX/Linux ...24 NetWare ...24 Chapter 4: Installing and ...removing options 25 Installing input options ...25 Installing a duplex unit ...27 Installing memory or option cards ...28 Accessing the printer system board ...28 Installing or removing a memory card ...30 Installing or removing a flash memory or firmware card 32 Installing an option...
...Windows ...11 Macintosh ...15 UNIX/Linux ...16 Chapter 3: Installing drivers for network printing 17 Printing a network setup page ...17 Assigning a printer IP address ...17 Verifying the IP settings ...18 Windows ...18 Macintosh ...22 UNIX/Linux ...24 NetWare ...24 Chapter 4: Installing and ...removing options 25 Installing input options ...25 Installing a duplex unit ...27 Installing memory or option cards ...28 Accessing the printer system board ...28 Installing or removing a memory card ...30 Installing or removing a flash memory or firmware card 32 Installing an option...
User's Guide
Page 4
... Storing print media ...72 Avoiding jams ...73 Chapter 7: Maintaining the printer 74 Determining the status of supplies ...75 Conserving supplies ...75 Ordering supplies ...76 Recycling Lexmark products ...78 Moving the printer ...79 Chapter 8: Clearing jams 80 Identifying jams ...80 Access doors and... trays ...81 Understanding jam messages ...82 Clearing printer jams ...82 Clearing staple jams ...93 Chapter 9: ...
... Storing print media ...72 Avoiding jams ...73 Chapter 7: Maintaining the printer 74 Determining the status of supplies ...75 Conserving supplies ...75 Ordering supplies ...76 Recycling Lexmark products ...78 Moving the printer ...79 Chapter 8: Clearing jams 80 Identifying jams ...80 Access doors and... trays ...81 Understanding jam messages ...82 Clearing printer jams ...82 Clearing staple jams ...93 Chapter 9: ...
User's Guide
Page 6
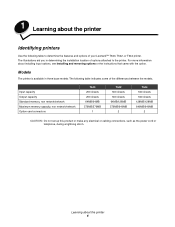
1 Learning about the printer Identifying printers Use the following table indicates some of the differences between the models. Input capacity Output capacity Standard memory, non network/network Maximum memory capacity,... The following table to determine the features and options of options attached to the printer. For more information about the printer 6 Models The printer is available in determining the installation location of your Lexmark™ T640, T642, or T644 printer. Learning about installing input options, see Installing and removing options or the instructions ...
1 Learning about the printer Identifying printers Use the following table indicates some of the differences between the models. Input capacity Output capacity Standard memory, non network/network Maximum memory capacity,... The following table to determine the features and options of options attached to the printer. For more information about the printer 6 Models The printer is available in determining the installation location of your Lexmark™ T640, T642, or T644 printer. Learning about installing input options, see Installing and removing options or the instructions ...

User's Guide
Page 7
... standard tray) The standard tray holds 250 sheets for the T640 and 500 sheets for more information. You must use either a printer stand or printer base if you are options. See www.lexmark.com/multifunctionprinters for the T642 and T644. Duplex unit* Tray 2* (250 or 500 sheets) Tray 3* (250 or 500 sheets) Tray...
... standard tray) The standard tray holds 250 sheets for the T640 and 500 sheets for more information. You must use either a printer stand or printer base if you are options. See www.lexmark.com/multifunctionprinters for the T642 and T644. Duplex unit* Tray 2* (250 or 500 sheets) Tray 3* (250 or 500 sheets) Tray...

User's Guide
Page 8
... Invalid PIN Job Expiration Help Print All Print Quality Printing Guide Supplies Guide Media Guide Menu Map Information Guide Connection Guide Moving Guide Identifying printers 8 Learning about menus and menu items, see the Menus and Messages book on the operator panel and the menus and items available under... each menu. For more information about the printer A number of menus are available to make it easy for you to change printer settings. The diagram shows the menu index on the publications CD.
... Invalid PIN Job Expiration Help Print All Print Quality Printing Guide Supplies Guide Media Guide Menu Map Information Guide Connection Guide Moving Guide Identifying printers 8 Learning about menus and menu items, see the Menus and Messages book on the operator panel and the menus and items available under... each menu. For more information about the printer A number of menus are available to make it easy for you to change printer settings. The diagram shows the menu index on the publications CD.
User's Guide
Page 9
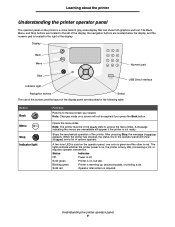
... Stop buttons are located to the right of the display panel are described in the following table. Opens the menu index. Solid green Printer is not ready. A message indicating the menus are located below the display, and the numeric pad is located to the left of ...a job, or requires operator intervention. Status Indicates Off Power is warming up, processing data, or printing a job. Understanding the printer operator panel 9 When the printer has stopped, the status line in the Ready state to the last screen you press the Back button. Solid red Operator intervention ...
... Stop buttons are located to the right of the display panel are described in the following table. Opens the menu index. Solid green Printer is not ready. A message indicating the menus are located below the display, and the numeric pad is located to the left of ...a job, or requires operator intervention. Status Indicates Off Power is warming up, processing data, or printing a job. Understanding the printer operator panel 9 When the printer has stopped, the status line in the Ready state to the last screen you press the Back button. Solid red Operator intervention ...

User's Guide
Page 10
...item to another. They are used to move within a screen such as following a link, submitting a configuration item, or when you view printer status, supplies messages, show-me screens, and make selections. If multiple warnings are used to connect a PC or other three lines of ...the display are used to plug in a USB flash memory device and print PDF files. Learning about the printer Button Navigation buttons USB Direct interface Numeric pad 1 2 3 4 5 6 789 0 # Display panel Status / Supplies Ready Tray 1 low View Supplies Tell...
...item to another. They are used to move within a screen such as following a link, submitting a configuration item, or when you view printer status, supplies messages, show-me screens, and make selections. If multiple warnings are used to connect a PC or other three lines of ...the display are used to plug in a USB flash memory device and print PDF files. Learning about the printer Button Navigation buttons USB Direct interface Numeric pad 1 2 3 4 5 6 789 0 # Display panel Status / Supplies Ready Tray 1 low View Supplies Tell...

User's Guide
Page 11
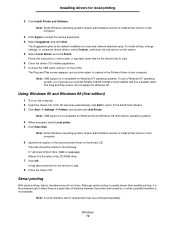
...of the CD-ROM drive). Note: Installing a custom driver will be used . Drivers are also available in the Printers folder. The local printer is intended to be created and appear in downloadable software packages on the computer before connecting the USB cable. 1 Insert... to find driver installation instructions for the particular operating system. A separate printer object will not replace the system driver. 2 Installing drivers for local printing A local printer is attached. If attaching a local printer, you must install the printer driver on the Lexmark Web site at www...
...of the CD-ROM drive). Note: Installing a custom driver will be used . Drivers are also available in the Printers folder. The local printer is intended to be created and appear in downloadable software packages on the computer before connecting the USB cable. 1 Insert... to find driver installation instructions for the particular operating system. A separate printer object will not replace the system driver. 2 Installing drivers for local printing A local printer is attached. If attaching a local printer, you must install the printer driver on the Lexmark Web site at www...
User's Guide
Page 12
...select Custom, and follow the instructions on the screen. The Plug and Play screen will not appear for local printing 2 Click Install Printer and Software. Note: Some Windows operating systems require administrative access to accept the license agreement. 4 Select Suggested, and click Next. ...Drivers\Print\Win_9xMe\ Where D is not available for Windows 95 and Windows 98 (first edition) operating systems. 4 When prompted, select Local printer. 5 Click Have Disk. Although serial printing is usually slower than parallel printing, it is the preferred option when there is a great ...
...select Custom, and follow the instructions on the screen. The Plug and Play screen will not appear for local printing 2 Click Install Printer and Software. Note: Some Windows operating systems require administrative access to accept the license agreement. 4 Select Suggested, and click Next. ...Drivers\Print\Win_9xMe\ Where D is not available for Windows 95 and Windows 98 (first edition) operating systems. 4 When prompted, select Local printer. 5 Click Have Disk. Although serial printing is usually slower than parallel printing, it is the preferred option when there is a great ...

User's Guide
Page 13
...press . b Press until press . Installing drivers for later use. appears (where is the parameter required for a change), and then press . The printer returns to find the serial parameters. Note the following restrictions: • Maximum baud rate supported is 115,200. • Data Bits must be set... to 7 or 8. • Parity must be set to Even, Odd, or None. • Stop Bits must establish communication between the printer and computer. Setting parameters in the COM port. Windows 13 d Look under the Standard Serial (or Serial Option X if a serial interface card is...
...press . b Press until press . Installing drivers for later use. appears (where is the parameter required for a change), and then press . The printer returns to find the serial parameters. Note the following restrictions: • Maximum baud rate supported is 115,200. • Data Bits must be set... to 7 or 8. • Parity must be set to Even, Odd, or None. • Stop Bits must establish communication between the printer and computer. Setting parameters in the COM port. Windows 13 d Look under the Standard Serial (or Serial Option X if a serial interface card is...
User's Guide
Page 14
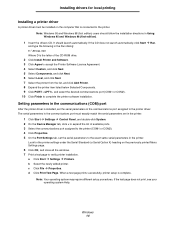
... of available ports. 3 Select the communications port assigned to the printer (COM1 or COM2). 4 Click Properties. 5 On the Port Settings tab, set in the printer. Look for local printing Installing a printer driver A printer driver must exactly match the serial parameters set the serial parameters to...click System. 2 On the Device Manager tab, click + to expand the list of the CD-ROM drive. 2 Click Install Printer and Software. 3 Click Agree to accept the Printer Software License Agreement. 4 Select Custom, and click Next. 5 Select Components, and click Next. 6 Select Local, and click ...
... of available ports. 3 Select the communications port assigned to the printer (COM1 or COM2). 4 Click Properties. 5 On the Port Settings tab, set in the printer. Look for local printing Installing a printer driver A printer driver must exactly match the serial parameters set the serial parameters to...click System. 2 On the Device Manager tab, click + to expand the list of the CD-ROM drive. 2 Click Install Printer and Software. 3 Click Agree to accept the Printer Software License Agreement. 4 Select Custom, and click Next. 5 Select Components, and click Next. 6 Select Local, and click ...

