
OptraImage 242/232 Setup Guide (2.5 MB)
Page 2
... software and documentation are trademarks of Lexmark International, Inc., registered in the United States and/or other countries, contact your point of the Rights in subparagraph (c)(1)(ii) of purchase. This publication could include technical inaccuracies or typographical errors. PostScript Level 2 or PostScript 3 is not intended to you . Changes are the user's responsibility. Any reference to a product, program, or service...
... software and documentation are trademarks of Lexmark International, Inc., registered in the United States and/or other countries, contact your point of the Rights in subparagraph (c)(1)(ii) of purchase. This publication could include technical inaccuracies or typographical errors. PostScript Level 2 or PostScript 3 is not intended to you . Changes are the user's responsibility. Any reference to a product, program, or service...

OptraImage 242/232 Setup Guide (2.5 MB)
Page 3
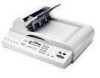
OptraImage Setup Guide OptraImage Setup Guide English For use with OptraImage 242/232 Safety information 4 Set up your printer 5 Install the MarkNet print server 6 Unlock the scan unit 7 Install paper feed tray and paper stop- - - - - 8 Attach cables and power cords 9 Turn on scan unit and printer 12 Assign a network address 13 Set default copy settings 15 Set up to send and receive faxes 17 Set up network scanning 21 Verify the setup 24 Distribute OptraImage user instructions - - - 25 Solve setup problems 26 Maintain your scanner 27 Notices 30 3
OptraImage Setup Guide OptraImage Setup Guide English For use with OptraImage 242/232 Safety information 4 Set up your printer 5 Install the MarkNet print server 6 Unlock the scan unit 7 Install paper feed tray and paper stop- - - - - 8 Attach cables and power cords 9 Turn on scan unit and printer 12 Assign a network address 13 Set default copy settings 15 Set up to send and receive faxes 17 Set up network scanning 21 Verify the setup 24 Distribute OptraImage user instructions - - - 25 Solve setup problems 26 Maintain your scanner 27 Notices 30 3
OptraImage 242/232 Setup Guide (2.5 MB)
Page 4
... to meet strict global safety standards with the use of other than those described in wet locations. • Before attempting to access the printer compartment where the option card is installed, you must be connected to a properly grounded electrical outlet. • The power cord must remove the fax phone line cable first from the wall outlet, and then from the fax modem port of the MarkNet print server. 4 OptraImage Setup Guide
... to meet strict global safety standards with the use of other than those described in wet locations. • Before attempting to access the printer compartment where the option card is installed, you must be connected to a properly grounded electrical outlet. • The power cord must remove the fax phone line cable first from the wall outlet, and then from the fax modem port of the MarkNet print server. 4 OptraImage Setup Guide
OptraImage 242/232 Setup Guide (2.5 MB)
Page 5
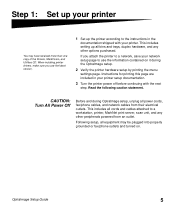
When installing printer drivers, make sure you attach the printer to a network, save your network setup page to use the latest version. 1 Set up the printer according to the instructions in your printer setup documentation. 3 Turn the printer power off before continuing with your printer You may be plugged into properly grounded or fax/phone outlets and turned on it during OptraImage setup, unplug all cords and cables attached to a workstation, printer, MarkNet print server, scan unit, and any other peripherals powered from their...
When installing printer drivers, make sure you attach the printer to a network, save your network setup page to use the latest version. 1 Set up the printer according to the instructions in your printer setup documentation. 3 Turn the printer power off before continuing with your printer You may be plugged into properly grounded or fax/phone outlets and turned on it during OptraImage setup, unplug all cords and cables attached to a workstation, printer, MarkNet print server, scan unit, and any other peripherals powered from their...

OptraImage 242/232 Setup Guide (2.5 MB)
Page 6
... printer. (MarkNet internal print servers are sometimes called printer option cards.) For detailed instructions about installing your print server, refer to your printer shipped with the MarkNet N2501e or N2401e print server already installed, skip to the next step. Install the MarkNet N2501e or N2401e print server in your printer is not plugged into the card or the wall outlet. Make sure your printer, make sure the fax/phone cable is unplugged. MarkNet N2501e print server ports SCSI port (OptraImage scan unit...
... printer. (MarkNet internal print servers are sometimes called printer option cards.) For detailed instructions about installing your print server, refer to your printer shipped with the MarkNet N2501e or N2401e print server already installed, skip to the next step. Install the MarkNet N2501e or N2401e print server in your printer is not plugged into the card or the wall outlet. Make sure your printer, make sure the fax/phone cable is unplugged. MarkNet N2501e print server ports SCSI port (OptraImage scan unit...

OptraImage 242/232 Setup Guide (2.5 MB)
Page 8
Top cover Paper stop to the automatic document feeder. 3 Attach the paper stop Paper extension Paper feed tray Automatic document feeder 8 OptraImage Setup Guide Step 4: Install paper feed tray and paper stop 1 Connect the paper extension to the paper feed tray. 2 Attach the paper feed tray to the top cover.
Top cover Paper stop to the automatic document feeder. 3 Attach the paper stop Paper extension Paper feed tray Automatic document feeder 8 OptraImage Setup Guide Step 4: Install paper feed tray and paper stop 1 Connect the paper extension to the paper feed tray. 2 Attach the paper feed tray to the top cover.

OptraImage 242/232 Setup Guide (2.5 MB)
Page 12
.... OptraImage panel: Please Set Date/Time Please Wait . . . When you may see the message on the second line of at least 24MB is completed, the Please wait message disappears. displays on the first line of memory required for OptraImage to your printer, you restart OptraImage, a Please wait message displays on the left. THE SCAN UNIT AUTOMATICALLY TURNS ON. 4 Plug the printer power cord into the phone line outlet. 2 If you need to configure OptraImage. 12 OptraImage Setup Guide Printer panel Printer panel...
.... OptraImage panel: Please Set Date/Time Please Wait . . . When you may see the message on the second line of at least 24MB is completed, the Please wait message disappears. displays on the first line of memory required for OptraImage to your printer, you restart OptraImage, a Please wait message displays on the left. THE SCAN UNIT AUTOMATICALLY TURNS ON. 4 Plug the printer power cord into the phone line outlet. 2 If you need to configure OptraImage. 12 OptraImage Setup Guide Printer panel Printer panel...

OptraImage 242/232 Setup Guide (2.5 MB)
Page 13
... address information "X" designates which option card slot in option slot 2, the printer operator panel displays: Network Option 2. Once you must manually assign an IP address. For example, if you think it is generally performed by one. Pressing Menu> increases the number by a network administrator and can affect other network devices to find the OptraImage, you find the address, go to the MarkNet print server. Do not attempt to change the address. For instructions about other devices...
... address information "X" designates which option card slot in option slot 2, the printer operator panel displays: Network Option 2. Once you must manually assign an IP address. For example, if you think it is generally performed by one. Pressing Menu> increases the number by a network administrator and can affect other network devices to find the OptraImage, you find the address, go to the MarkNet print server. Do not attempt to change the address. For instructions about other devices...

OptraImage 242/232 Setup Guide (2.5 MB)
Page 14
... your screen. 14 OptraImage Setup Guide To install the utility: 1 Launch the Drivers, MarkVision, and Utilities CD that shipped with your OptraImage hardware. 2 Do a custom install to add network support. 3 In the list of the print server to use this simple utility to know the 12-digit physical address (UAA) of installable components, select Print Server TCP/IP Setup Utility. 4 Follow the instructions on page 13. You can find information about installing, using, and troubleshooting...
... your screen. 14 OptraImage Setup Guide To install the utility: 1 Launch the Drivers, MarkVision, and Utilities CD that shipped with your OptraImage hardware. 2 Do a custom install to add network support. 3 In the list of the print server to use this simple utility to know the 12-digit physical address (UAA) of installable components, select Print Server TCP/IP Setup Utility. 4 Follow the instructions on page 13. You can find information about installing, using, and troubleshooting...

OptraImage 242/232 Setup Guide (2.5 MB)
Page 17
... page 30 and "Telecommunications Notices" on the OptraImage CD. After the IP address is set (using any method), use the OptraImage control panel to set your primary system support person for a password during the following information in the URL field of your browser (for example, http://192.168.236.24), and then press Enter. 2 Click Configuration. 3 Under the OptraImage heading, click FAX Setup. 4 Click Configuration. Step 9: Set up to send faxes Configuration...
... page 30 and "Telecommunications Notices" on the OptraImage CD. After the IP address is set (using any method), use the OptraImage control panel to set your primary system support person for a password during the following information in the URL field of your browser (for example, http://192.168.236.24), and then press Enter. 2 Click Configuration. 3 Under the OptraImage heading, click FAX Setup. 4 Click Configuration. Step 9: Set up to send faxes Configuration...

OptraImage 242/232 Setup Guide (2.5 MB)
Page 18
... the MarkNet print server is configured to use Network Time Protocol (NTP) time, the current date and time are provided by what your printer supports, refer to Answer, and so on. 6 When you have finished, click Submit. 18 OptraImage Setup Guide MarkVision is a printer management utility on the screen, and then save your settings before you finish entering the information, click Submit. To set the fax receive options: 1 Type the IP address of the OptraImage in...
... the MarkNet print server is configured to use Network Time Protocol (NTP) time, the current date and time are provided by what your printer supports, refer to Answer, and so on. 6 When you have finished, click Submit. 18 OptraImage Setup Guide MarkVision is a printer management utility on the screen, and then save your settings before you finish entering the information, click Submit. To set the fax receive options: 1 Type the IP address of the OptraImage in...

OptraImage 242/232 Setup Guide (2.5 MB)
Page 19
... printing the transmission logs and output bins. 6 When you are prompted to the online documentation on the OptraImage control panel. Assigning a shortcut lets you send or receive a fax, an entry of your options for supported paper sizes, paper types, and output bins. Instead of entering the phone numbers of your browser, and then press Enter. 2 Click Configuration. 3 Under the OptraImage heading, click FAX Setup. 4 Click Configuration. 5 Set your browser, and then press Enter. OptraImage Setup Guide 19 To set the fax transmission log options: 1 Type...
... printing the transmission logs and output bins. 6 When you are prompted to the online documentation on the OptraImage control panel. Assigning a shortcut lets you send or receive a fax, an entry of your options for supported paper sizes, paper types, and output bins. Instead of entering the phone numbers of your browser, and then press Enter. 2 Click Configuration. 3 Under the OptraImage heading, click FAX Setup. 4 Click Configuration. 5 Set your browser, and then press Enter. OptraImage Setup Guide 19 To set the fax transmission log options: 1 Type...

OptraImage 242/232 Setup Guide (2.5 MB)
Page 20
... Fax Server is sent to send outgoing faxes, the phone number is incorporated into the e-mail address of your browser (for example, http://192.168.236.24), and then press Enter. 2 Click Configuration. 3 Click Fax Setup under the OptraImage menu. 4 Select Fax Server and click Submit. 5 Enter the settings for Fax server. 20 OptraImage Setup Guide When this mode is enabled, instead of using the modem to the fax server with the fax image as an attachment. 1 Type the IP address...
... Fax Server is sent to send outgoing faxes, the phone number is incorporated into the e-mail address of your browser (for example, http://192.168.236.24), and then press Enter. 2 Click Configuration. 3 Click Fax Setup under the OptraImage menu. 4 Select Fax Server and click Submit. 5 Enter the settings for Fax server. 20 OptraImage Setup Guide When this mode is enabled, instead of using the modem to the fax server with the fax image as an attachment. 1 Type the IP address...

OptraImage 242/232 Setup Guide (2.5 MB)
Page 21
... example, http://192.168.236.24), and then press Enter. 2 Click Configuration. 3 Under the OptraImage heading, click Scan to Network General Setup. 4 Set your default network scan settings. Configure default scan job settings You can be scanning. However, these scan to designated destinations on the OptraImage control panel just before you begin scanning. 5 Click Submit. In addition to making copies and sending faxes, OptraImage lets you scan documents and send them to the IP address of the OptraImage and using the MarkNet resident web pages.
... example, http://192.168.236.24), and then press Enter. 2 Click Configuration. 3 Under the OptraImage heading, click Scan to Network General Setup. 4 Set your default network scan settings. Configure default scan job settings You can be scanning. However, these scan to designated destinations on the OptraImage control panel just before you begin scanning. 5 Click Submit. In addition to making copies and sending faxes, OptraImage lets you scan documents and send them to the IP address of the OptraImage and using the MarkNet resident web pages.

OptraImage 242/232 Setup Guide (2.5 MB)
Page 22
... General Setup. 4 Specify the SMTP gateway of your network or internet service provider, plus your e-mail address for use the network administrator's address as a Web Link. 8 Select scan type and resolution. 9 If you create a destination, check the list at the bottom of the Web page. When an e-mail cannot be sent, notification is now available for the destination. 6 Enter the destination e-mail address. 7 Specify to use on the OptraImage control panel. You...
... General Setup. 4 Specify the SMTP gateway of your network or internet service provider, plus your e-mail address for use the network administrator's address as a Web Link. 8 Select scan type and resolution. 9 If you create a destination, check the list at the bottom of the Web page. When an e-mail cannot be sent, notification is now available for the destination. 6 Enter the destination e-mail address. 7 Specify to use on the OptraImage control panel. You...

OptraImage 242/232 Setup Guide (2.5 MB)
Page 24
... scan unit. 3 Press Go/Send to send a copy to someone and ask for feedback. 1 Press Fax/Scan Mode once. Otherwise, SCAN → EMAIL does not appear as a scan to permanent destinations. For example, to test Scan to e-mail, you configured during setup. Send a test fax If Send/Fax is displayed. 2 Place your printer. Send a one permanent e-mail destination. Enter Phone # displays on the OptraImage control panel. 2 Use the numeric keypad on the control panel and enter the phone number of the control panel. 1 Make sure the Ready status message is disabled...
... scan unit. 3 Press Go/Send to send a copy to someone and ask for feedback. 1 Press Fax/Scan Mode once. Otherwise, SCAN → EMAIL does not appear as a scan to permanent destinations. For example, to test Scan to e-mail, you configured during setup. Send a test fax If Send/Fax is displayed. 2 Place your printer. Send a one permanent e-mail destination. Enter Phone # displays on the OptraImage control panel. 2 Use the numeric keypad on the control panel and enter the phone number of the control panel. 1 Make sure the Ready status message is disabled...

OptraImage 242/232 Setup Guide (2.5 MB)
Page 25
... information on your network or Intranet. The PDFs are several ways to distribute OptraImage information: • Print copies of each set of user instructions stored on the OptraImage CD, and manually deliver them to unlock the control panel. Detailed instructions can be found on the OptraImage CD. • Browse to the Lexmark web site (www.lexmark.com) and access the information there. Click View Documentation, Use OptraImage, and then More OptraImage Configuration. OptraImage Setup Guide 25
... information on your network or Intranet. The PDFs are several ways to distribute OptraImage information: • Print copies of each set of user instructions stored on the OptraImage CD, and manually deliver them to unlock the control panel. Detailed instructions can be found on the OptraImage CD. • Browse to the Lexmark web site (www.lexmark.com) and access the information there. Click View Documentation, Use OptraImage, and then More OptraImage Configuration. OptraImage Setup Guide 25

OptraImage 242/232 Setup Guide (2.5 MB)
Page 26
... power. 2 Make sure all cables and line cords are not talking to each other, or the printer may be configured in order to send or receive faxes. Solve setup problems Problem Ready status message not displayed Control panel buttons not responding Scan unit isn't working Test document did not print Unable to show up network scanning" on page 7. 2 Turn printer off . Network scanning modes (SCAN → PROFILE, SCAN → EMAIL, and/or SCAN → FTP) don't appear in the OptraImage control panel. See "Unlock the scan unit" on page 21 for a complete list of phone numbers...
... power. 2 Make sure all cables and line cords are not talking to each other, or the printer may be configured in order to send or receive faxes. Solve setup problems Problem Ready status message not displayed Control panel buttons not responding Scan unit isn't working Test document did not print Unable to show up network scanning" on page 7. 2 Turn printer off . Network scanning modes (SCAN → PROFILE, SCAN → EMAIL, and/or SCAN → FTP) don't appear in the OptraImage control panel. See "Unlock the scan unit" on page 21 for a complete list of phone numbers...

OptraImage 242/232 Setup Guide (2.5 MB)
Page 27
The scan unit parts may be contaminated with ink, toner particles or paper coatings. 1 Wet a clean, lint-free cloth or cotton swab with isopropyl alcohol (95%). 2 Open the ADF unit and wipe the upper feeding roller by moving the swab from side to side. 3 Rotate the roller forward with your scanner Clearing a paper jam in the ADF 1 Turn off and disconnect the power to the scan unit. 2 Open the Automatic Document Feeder (ADF) to its full position. 3 Carefully...
The scan unit parts may be contaminated with ink, toner particles or paper coatings. 1 Wet a clean, lint-free cloth or cotton swab with isopropyl alcohol (95%). 2 Open the ADF unit and wipe the upper feeding roller by moving the swab from side to side. 3 Rotate the roller forward with your scanner Clearing a paper jam in the ADF 1 Turn off and disconnect the power to the scan unit. 2 Open the Automatic Document Feeder (ADF) to its full position. 3 Carefully...

OptraImage 242/232 Setup Guide (2.5 MB)
Page 31
... any message via a telephone fax option unless such message clearly contains the following Universal Service Order Code (USOC) jack: RJ-11C. The Telephone Consumer Protection Act of the transmission: • the date and time it is located on the first page of 1991 makes it is causing harm to the telephone network, the telephone company may be advised of devices that the customer install an...
... any message via a telephone fax option unless such message clearly contains the following Universal Service Order Code (USOC) jack: RJ-11C. The Telephone Consumer Protection Act of the transmission: • the date and time it is located on the first page of 1991 makes it is causing harm to the telephone network, the telephone company may be advised of devices that the customer install an...

