
User's Guide (3.6 MB)
Page 3
... the warranty period, contact a Remarketer or Lexmark for which perform like new parts, • Is free from defects in material and workmanship, • Conforms to the country-specific warranty information that came with your Lexmark Z82 printer. If you may not be required to ...the United States and Canada. and Canada, refer to Lexmark's official published specifications, and • Is in good working order. If this ...
... the warranty period, contact a Remarketer or Lexmark for which perform like new parts, • Is free from defects in material and workmanship, • Conforms to the country-specific warranty information that came with your Lexmark Z82 printer. If you may not be required to ...the United States and Canada. and Canada, refer to Lexmark's official published specifications, and • Is in good working order. If this ...

User's Guide (3.6 MB)
Page 5
... Warranty, you may recover actual damages up to the limit set forth in a residential installation. Lexmark is an intended beneficiary of this limitation. Electronic Emission Notices Federal Communications Commission (FCC) Compliance Information Statement The Lexmark Z82 Scanner, Printer and Copier has been tested and found to comply with the instructions, may cause harmful interference...
... Warranty, you may recover actual damages up to the limit set forth in a residential installation. Lexmark is an intended beneficiary of this limitation. Electronic Emission Notices Federal Communications Commission (FCC) Compliance Information Statement The Lexmark Z82 Scanner, Printer and Copier has been tested and found to comply with the instructions, may cause harmful interference...

User's Guide (3.6 MB)
Page 8
1 Chapter Introduction Overview 1-1 About This Guide 1-2 Main Features 1-3 Printer Components 1-4 2 Chapter Setting up Your Printer Overview 2-1 Unpacking Your Printer 2-2 Connecting the Printer Cable 2-4 Connecting the Power Cord 2-7 Loading Paper into the Input Tray 2-8 Installing the Print Cartridges 2-10 Testing the Printer 2-16 Installing the Printer Software 2-17 Uninstalling the Lexmark Software 2-25 vi Introduction vi
1 Chapter Introduction Overview 1-1 About This Guide 1-2 Main Features 1-3 Printer Components 1-4 2 Chapter Setting up Your Printer Overview 2-1 Unpacking Your Printer 2-2 Connecting the Printer Cable 2-4 Connecting the Power Cord 2-7 Loading Paper into the Input Tray 2-8 Installing the Print Cartridges 2-10 Testing the Printer 2-16 Installing the Printer Software 2-17 Uninstalling the Lexmark Software 2-25 vi Introduction vi
User's Guide (3.6 MB)
Page 9
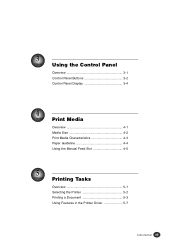
3 Chapter Using the Control Panel Overview 3-1 Control Panel Buttons 3-2 Control Panel Display 3-4 4 Chapter Print Media Overview 4-1 Media Size 4-2 Print Media Characteristics 4-3 Paper Guideline 4-4 Using the Manual Feed Slot 4-5 5 Chapter Printing Tasks Overview 5-1 Selecting the Printer 5-2 Printing a Document 5-3 Using Features in the Printer Driver 5-7 vii Introduction vii
3 Chapter Using the Control Panel Overview 3-1 Control Panel Buttons 3-2 Control Panel Display 3-4 4 Chapter Print Media Overview 4-1 Media Size 4-2 Print Media Characteristics 4-3 Paper Guideline 4-4 Using the Manual Feed Slot 4-5 5 Chapter Printing Tasks Overview 5-1 Selecting the Printer 5-2 Printing a Document 5-3 Using Features in the Printer Driver 5-7 vii Introduction vii
User's Guide (3.6 MB)
Page 10
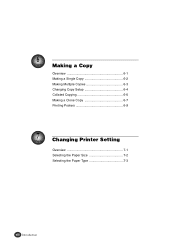
6 Chapter Making a Copy Overview 6-1 Making a Single Copy 6-2 Making Multiple Copies 6-3 Changing Copy Setup 6-4 Collated Copying 6-6 Making a Clone Copy 6-7 Printing Posters 6-9 7 Chapter Changing Printer Setting Overview 7-1 Selecting the Paper Size 7-2 Selecting the Paper Type 7-3 viii Introduction viii
6 Chapter Making a Copy Overview 6-1 Making a Single Copy 6-2 Making Multiple Copies 6-3 Changing Copy Setup 6-4 Collated Copying 6-6 Making a Clone Copy 6-7 Printing Posters 6-9 7 Chapter Changing Printer Setting Overview 7-1 Selecting the Paper Size 7-2 Selecting the Paper Type 7-3 viii Introduction viii
User's Guide (3.6 MB)
Page 11
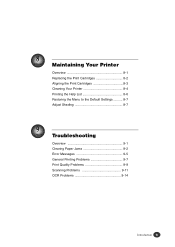
8 Chapter Maintaining Your Printer Overview 8-1 Replacing the Print Cartridges 8-2 Aligning the Print Cartridges 8-3 Cleaning Your Printer 8-4 Printing the Help List 8-6 Restoring the Menu to the Default Settings .......... 8-7 Adjust Shading 8-7 9 Chapter Troubleshooting Overview 9-1 Clearing Paper Jams 9-2 Error Messages 9-5 General Printing Problems 9-7 Print Quality Problems 9-9 Scanning Problems 9-11 OCR Problems 9-14 ix Introduction ix
8 Chapter Maintaining Your Printer Overview 8-1 Replacing the Print Cartridges 8-2 Aligning the Print Cartridges 8-3 Cleaning Your Printer 8-4 Printing the Help List 8-6 Restoring the Menu to the Default Settings .......... 8-7 Adjust Shading 8-7 9 Chapter Troubleshooting Overview 9-1 Clearing Paper Jams 9-2 Error Messages 9-5 General Printing Problems 9-7 Print Quality Problems 9-9 Scanning Problems 9-11 OCR Problems 9-14 ix Introduction ix

User's Guide (3.6 MB)
Page 13
This chapter provides the following information: About This Guide Main Features Printer Components Introduction 1-1 1 Chapter Introduction Overview Congratulations on the purchase of your Lexmark Z82 Scan/Print/Copy!
This chapter provides the following information: About This Guide Main Features Printer Components Introduction 1-1 1 Chapter Introduction Overview Congratulations on the purchase of your Lexmark Z82 Scan/Print/Copy!

User's Guide (3.6 MB)
Page 14
... like, which, if not correctly performed or adhered to, could result in this guide, the following specific conventions are representative of the product or your printer. Chapter 1 About This Guide This guide will show you how to or destruction of part or all of actual screen captures. 1-2 Introduction
... like, which, if not correctly performed or adhered to, could result in this guide, the following specific conventions are representative of the product or your printer. Chapter 1 About This Guide This guide will show you how to or destruction of part or all of actual screen captures. 1-2 Introduction

User's Guide (3.6 MB)
Page 15
...Lexmark Z82 Scan/Print/Copy supports the following features: You can use SmarThru to quickly transmit scanned documents by fax or electronic mail, or to print a copy on your computer, and maintain them as your scanner You can easily copy, or scan documents and photographs into your printer. You can also use this printer... as electronic documents. With SmarThru 2, you can easily scan documents and photographs. You can print with excellent quality High-quality printing at a maximum resolution of 1200 dpi. Your printer is a ...
...Lexmark Z82 Scan/Print/Copy supports the following features: You can use SmarThru to quickly transmit scanned documents by fax or electronic mail, or to print a copy on your computer, and maintain them as your scanner You can easily copy, or scan documents and photographs into your printer. You can also use this printer... as electronic documents. With SmarThru 2, you can easily scan documents and photographs. You can print with excellent quality High-quality printing at a maximum resolution of 1200 dpi. Your printer is a ...
User's Guide (3.6 MB)
Page 16
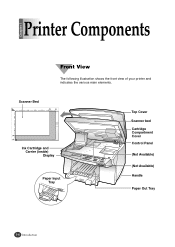
Scanner Bed Ink Cartridge and Carrier (inside) Display Paper Input Tray Top Cover Scanner bed Cartridge Compartment Cover Control Panel (Not Available) (Not Available) Handle Paper Out Tray 1-4 Introduction Chapter 1 Printer Components Front View The following illustration shows the front view of your printer and indicates the various main elements.
Scanner Bed Ink Cartridge and Carrier (inside) Display Paper Input Tray Top Cover Scanner bed Cartridge Compartment Cover Control Panel (Not Available) (Not Available) Handle Paper Out Tray 1-4 Introduction Chapter 1 Printer Components Front View The following illustration shows the front view of your printer and indicates the various main elements.

User's Guide (3.6 MB)
Page 17
Chapter 1 Rear View The following illustration shows the rear view of your printer and indicates the various main elements. Power Connector Rear Cover Parallel Interface Connector Universal Serial Bus (USB) Port Manual Feeder Introduction 1-5
Chapter 1 Rear View The following illustration shows the rear view of your printer and indicates the various main elements. Power Connector Rear Cover Parallel Interface Connector Universal Serial Bus (USB) Port Manual Feeder Introduction 1-5

User's Guide (3.6 MB)
Page 19
Unpacking Your Printer Connecting the Printer Cable Connecting the Power Cord Loading Paper into the Input Tray Installing the Print Cartridge Testing the Printer Installing the Printer Software Setting Up Your Printer 2-1 2 Chapter Setting Up Your Printer Overview This chapter provides step-by-step information on setting up your printer.
Unpacking Your Printer Connecting the Printer Cable Connecting the Power Cord Loading Paper into the Input Tray Installing the Print Cartridge Testing the Printer Installing the Printer Software Setting Up Your Printer 2-1 2 Chapter Setting Up Your Printer Overview This chapter provides step-by-step information on setting up your printer.
User's Guide (3.6 MB)
Page 20
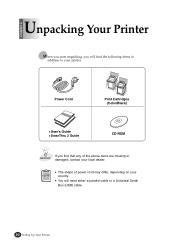
G You will find that any of power cord may differ, depending on your country. G The shape of the above items are missing or damaged, contact your local dealer. Power Cord Print Cartridges (Color/Black) G User's Guide G SmarThru 2 Guide CD-ROM If you will need either a parallel cable or a Universal Serial Bus (USB) cable. 2-2 Setting Up Your Printer Chapter 2 Unpacking Your Printer When you start unpacking, you find the following items in addition to your printer.
G You will find that any of power cord may differ, depending on your country. G The shape of the above items are missing or damaged, contact your local dealer. Power Cord Print Cartridges (Color/Black) G User's Guide G SmarThru 2 Guide CD-ROM If you will need either a parallel cable or a Universal Serial Bus (USB) cable. 2-2 Setting Up Your Printer Chapter 2 Unpacking Your Printer When you start unpacking, you find the following items in addition to your printer.

User's Guide (3.6 MB)
Page 21
Chapter 2 During the storage and transport of your printer, adhesive tape is used to protect some of the elements that may move or open unexpectedly and consequently be damaged. 1 Remove all the adhesive tapes, as illustrated below. 2 Slide the Input Tray out of the printer. Setting Up Your Printer 2-3 Remove the packaging material from the tray.
Chapter 2 During the storage and transport of your printer, adhesive tape is used to protect some of the elements that may move or open unexpectedly and consequently be damaged. 1 Remove all the adhesive tapes, as illustrated below. 2 Slide the Input Tray out of the printer. Setting Up Your Printer 2-3 Remove the packaging material from the tray.

User's Guide (3.6 MB)
Page 22
...-compliant parallel cable with a USB port, see page 2-6 for wide connectivity; Chapter 2 Connecting the Printer Cable The Lexmark Z82 printer has two interfaces for connection. Parallel cable connection To prevent malfunction, it is equipped with the printer. 1 Check that both the printer and the computer are running Windows 98 or higher and your computer is strongly...
...-compliant parallel cable with a USB port, see page 2-6 for wide connectivity; Chapter 2 Connecting the Printer Cable The Lexmark Z82 printer has two interfaces for connection. Parallel cable connection To prevent malfunction, it is equipped with the printer. 1 Check that both the printer and the computer are running Windows 98 or higher and your computer is strongly...

User's Guide (3.6 MB)
Page 23
Setting Up Your Printer 2-5 Chapter 2 3 Push the metal clips down to fit inside the notches on the cable plug. 4 Plug the other end of the cable into the appropriate parallel connector on your computer and fasten it tight.
Setting Up Your Printer 2-5 Chapter 2 3 Push the metal clips down to fit inside the notches on the cable plug. 4 Plug the other end of the cable into the appropriate parallel connector on your computer and fasten it tight.

User's Guide (3.6 MB)
Page 24
USB cable connection The USB and parallel printer cables cannot be running Windows 98 or higher and have a USB port. You should be connected simultaneously. Continued Connecting the Printer Cable To use and the best connection to fit your computer should decide which connection to use a USB cable for printing, your requirement. 1 Make sure that both the printer and computer are turned off. 2 Plug one end of the certified USB cable into the USB port on the printer. 3 Plug the other end into the USB port on the computer. 2-6 Setting Up Your Printer
USB cable connection The USB and parallel printer cables cannot be running Windows 98 or higher and have a USB port. You should be connected simultaneously. Continued Connecting the Printer Cable To use and the best connection to fit your computer should decide which connection to use a USB cable for printing, your requirement. 1 Make sure that both the printer and computer are turned off. 2 Plug one end of the certified USB cable into the USB port on the printer. 3 Plug the other end into the USB port on the computer. 2-6 Setting Up Your Printer
User's Guide (3.6 MB)
Page 25
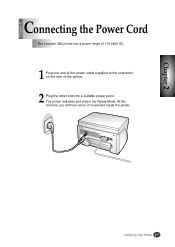
Setting Up Your Printer 2-7 Chapter 2 Chapter 2 Connecting the Power Cord The Lexmark Z82 printer has a power range of 110-240V AC. 1 Plug one end of the power cable supplied to the connector on the rear of movement inside the printer. The printer indicates and enters the Ready Mode. At this moment, you will hear some of the printer. 2 Plug the other end into a suitable power point.
Setting Up Your Printer 2-7 Chapter 2 Chapter 2 Connecting the Power Cord The Lexmark Z82 printer has a power range of 110-240V AC. 1 Plug one end of the power cable supplied to the connector on the rear of movement inside the printer. The printer indicates and enters the Ready Mode. At this moment, you will hear some of the printer. 2 Plug the other end into a suitable power point.

User's Guide (3.6 MB)
Page 26
Chapter 2 Loading Paper into the Input Tray Your printer has the Input Tray that can hold up to 150 sheets of paper. 1 Pull the tray completely out of the printer. 2 Slide the paper width and length guides to loosen them, then fan them. Do not fold or crease the paper. 2-8 Setting Up Your Printer If necessary, flex the sheets back and forth to their outermost positions. 3 Place the paper against the back edge and the right side of the tray with the recommended print side face down.
Chapter 2 Loading Paper into the Input Tray Your printer has the Input Tray that can hold up to 150 sheets of paper. 1 Pull the tray completely out of the printer. 2 Slide the paper width and length guides to loosen them, then fan them. Do not fold or crease the paper. 2-8 Setting Up Your Printer If necessary, flex the sheets back and forth to their outermost positions. 3 Place the paper against the back edge and the right side of the tray with the recommended print side face down.

User's Guide (3.6 MB)
Page 27
Setting Up Your Printer 2-9 Chapter 2 4 Squeeze the Width Guide and slide it to fit the edge of the paper. 5 Slide the Length Guide in to fit the bottom edge of the paper. 6 Push the input tray back towards the printer until it stops.
Setting Up Your Printer 2-9 Chapter 2 4 Squeeze the Width Guide and slide it to fit the edge of the paper. 5 Slide the Length Guide in to fit the bottom edge of the paper. 6 Push the input tray back towards the printer until it stops.


