

Setup Guide
Page 4
... operating instructions that the printer emulates the functions corresponding to Lexmark International, Inc., Department F95/032-2, 740 West New Circle Road, Lexington, Kentucky 40550, U.S.A. CAUTION: Do not set of some parts may be incorporated in the areas near the product and easily accessible. CAUTION: Use of controls or adjustments or performance of their respective owners. © 2003 Lexmark International, Inc. You must be addressed...
... operating instructions that the printer emulates the functions corresponding to Lexmark International, Inc., Department F95/032-2, 740 West New Circle Road, Lexington, Kentucky 40550, U.S.A. CAUTION: Do not set of some parts may be incorporated in the areas near the product and easily accessible. CAUTION: Use of controls or adjustments or performance of their respective owners. © 2003 Lexmark International, Inc. You must be addressed...

Setup Guide
Page 6
... a memory card 32 Installing a firmware card 33 Installing a hard disk 34 Installing an option card 35 Reinstalling the system board access cover 37 Load paper 38 Loading the paper trays 40 Loading the multipurpose feeder 45 Loading the high capacity feeder 48 Attach cables 51 Attaching a local cable 51 Attaching a network cable 52 Turning on the printer 53 Install drivers for local printing 54 Windows 55 Macintosh 59 UNIX/Linux 60 Serial connections 61 Verify printer setup 64 Printing a menu settings page 64 Printing a network setup page...
... a memory card 32 Installing a firmware card 33 Installing a hard disk 34 Installing an option card 35 Reinstalling the system board access cover 37 Load paper 38 Loading the paper trays 40 Loading the multipurpose feeder 45 Loading the high capacity feeder 48 Attach cables 51 Attaching a local cable 51 Attaching a network cable 52 Turning on the printer 53 Install drivers for local printing 54 Windows 55 Macintosh 59 UNIX/Linux 60 Serial connections 61 Verify printer setup 64 Printing a menu settings page 64 Printing a network setup page...
Setup Guide
Page 9
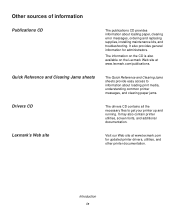
... fonts, and additional documentation. It also provides general information for updated printer drivers, utilities, and other printer documentation. Introduction ix The information on the CD is also available on the Lexmark Web site at www.lexmark.com for administrators. Quick Reference and Clearing Jams sheets The Quick Reference and Clearing Jams sheets provide easy access to information about loading paper, clearing error messages, ordering and replacing supplies, installing maintenance kits, and troubleshooting. Lexmark's Web site Visit our Web site at www...
... fonts, and additional documentation. It also provides general information for updated printer drivers, utilities, and other printer documentation. Introduction ix The information on the CD is also available on the Lexmark Web site at www.lexmark.com for administrators. Quick Reference and Clearing Jams sheets The Quick Reference and Clearing Jams sheets provide easy access to information about loading paper, clearing error messages, ordering and replacing supplies, installing maintenance kits, and troubleshooting. Lexmark's Web site Visit our Web site at www...
Setup Guide
Page 44
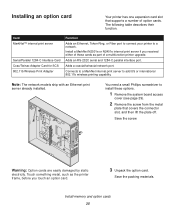
... screw. Adds an RS-232C serial and 1284-C parallel interface port. Touch something metal, such as part of option cards. Connects to a MarkNet internal print server to a network. You need a small Phillips screwdriver to install these cards as the printer frame, before you received either of these options. 1 Remove the system board access cover (see page 29). 2 Remove the screw from the metal plate that supports a number of a multifunction printer upgrade. The...
... screw. Adds an RS-232C serial and 1284-C parallel interface port. Touch something metal, such as part of option cards. Connects to a MarkNet internal print server to a network. You need a small Phillips screwdriver to install these cards as the printer frame, before you received either of these options. 1 Remove the system board access cover (see page 29). 2 Remove the screw from the metal plate that supports a number of a multifunction printer upgrade. The...

Setup Guide
Page 47
... paper 48 4 Universal setting lets you select the following table lists page numbers where you can find loading instructions for the standard and optional trays, as well as for your printer to avoid printing problems. For detailed information about media characteristics, refer to the Card Stock & Label Guide located on custom Windows 9x PCL and Windows NT 4.0 system printer drivers. Paper 3000 sheets of banner paper 7¾, 9, 10, DL, C4, C5, B5 Envelopes...
... paper 48 4 Universal setting lets you select the following table lists page numbers where you can find loading instructions for the standard and optional trays, as well as for your printer to avoid printing problems. For detailed information about media characteristics, refer to the Card Stock & Label Guide located on custom Windows 9x PCL and Windows NT 4.0 system printer drivers. Paper 3000 sheets of banner paper 7¾, 9, 10, DL, C4, C5, B5 Envelopes...

Setup Guide
Page 53
... print media in the tray. Load paper 44 You must set the operator panel to the publications CD. When the heavy media tray is specially designed for "Loading the paper trays" on installing the heavy media tray, refer to place your publications CD. Set the paper size and type 1 Follow the instructions for use with lighter weight paper such as 16-26 lb plain paper may cause jams. Note: For more information about using the operator panel and changing menu settings...
... print media in the tray. Load paper 44 You must set the operator panel to the publications CD. When the heavy media tray is specially designed for "Loading the paper trays" on installing the heavy media tray, refer to place your publications CD. Set the paper size and type 1 Follow the instructions for use with lighter weight paper such as 16-26 lb plain paper may cause jams. Note: For more information about using the operator panel and changing menu settings...
Setup Guide
Page 60
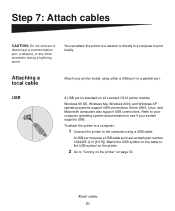
... your printer locally using a USB cable. You can attach the printer to a network or directly to a computer to the computer using either a USB port or a parallel port. Some UNIX, Linux, and Macintosh computers also support USB connections. Refer to your computer operating system documentation to "Turning on the printer" on all Lexmark C912 printer models. A USB port requires a USB cable such as Lexmark part number 12A2405 (2 m [6.5 ft]). To attach the printer to a computer: 1 Connect the printer to print locally. A USB port is standard on page...
... your printer locally using a USB cable. You can attach the printer to a network or directly to a computer to the computer using either a USB port or a parallel port. Some UNIX, Linux, and Macintosh computers also support USB connections. Refer to your computer operating system documentation to "Turning on the printer" on all Lexmark C912 printer models. A USB port requires a USB cable such as Lexmark part number 12A2405 (2 m [6.5 ft]). To attach the printer to a computer: 1 Connect the printer to print locally. A USB port is standard on page...
Setup Guide
Page 63
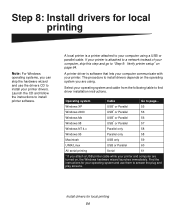
... operating system you are turned on page 64. Select your printer. Install drivers for your operating system and use the drivers CD to install your printer and computer are using a USB or parallel cable. A local printer is attached to a network instead of your computer using . Find the instructions for local printing 54 If your printer is a printer attached to your computer, skip this step and go to "Step 9: Verify printer setup" on , the Windows...
... operating system you are turned on page 64. Select your printer. Install drivers for your operating system and use the drivers CD to install your printer and computer are using a USB or parallel cable. A local printer is attached to a network instead of your computer using . Find the instructions for local printing 54 If your printer is a printer attached to your computer, skip this step and go to "Step 9: Verify printer setup" on , the Windows...

Setup Guide
Page 64
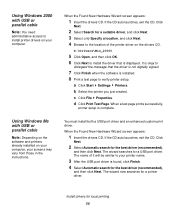
Some versions of Windows software may already have administrative access to install printer drivers on your Windows software. Using Windows XP with USB or parallel cable Note: Business versions of the printer driver on Lexmark's Web site at www.lexmark.com. When the Found New Hardware Wizard screen appears: 1 Insert the drivers CD. b Select the printer you have a system printer driver for local printing 55 Installation may need to verify printer setup. D:\drivers\win_2000\ 3 Disregard the next two messages and click...
Some versions of Windows software may already have administrative access to install printer drivers on your Windows software. Using Windows XP with USB or parallel cable Note: Business versions of the printer driver on Lexmark's Web site at www.lexmark.com. When the Found New Hardware Wizard screen appears: 1 Insert the drivers CD. b Select the printer you have a system printer driver for local printing 55 Installation may need to verify printer setup. D:\drivers\win_2000\ 3 Disregard the next two messages and click...
Setup Guide
Page 65
... printer name. 3 After the USB port driver is displayed. b Select the printer you just created. When a test page prints successfully, printer setup is installed. 8 Print a test page to verify printer setup. Using Windows Me with USB or parallel cable Note: You need administrative access to install printer drivers on your screens may vary from those in the instructions. D:\Drivers\Win_2000\ 5 Click Open, and then click OK. 6 Click Next to install the driver that the driver is not digitally signed. 7 Click Finish when the software...
... printer name. 3 After the USB port driver is displayed. b Select the printer you just created. When a test page prints successfully, printer setup is installed. 8 Print a test page to verify printer setup. Using Windows Me with USB or parallel cable Note: You need administrative access to install printer drivers on your screens may vary from those in the instructions. D:\Drivers\Win_2000\ 5 Click Open, and then click OK. 6 Click Next to install the driver that the driver is not digitally signed. 7 Click Finish when the software...
Setup Guide
Page 66
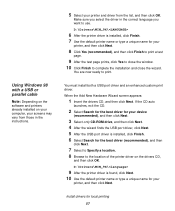
... must install both a USB port driver and an enhanced custom print driver. When the Add New Hardware Wizard screen appears: 1 Insert the drivers CD, and then click Next. D:\Drivers\WIN_9X\ 6 After the printer driver is found, click Next. 10 Use the default printer name or type a unique name for your printer, and then click Next. Using Windows 98 with a USB or parallel cable Note: Depending on the software and printers already installed on the drivers...
... must install both a USB port driver and an enhanced custom print driver. When the Add New Hardware Wizard screen appears: 1 Insert the drivers CD, and then click Next. D:\Drivers\WIN_9X\ 6 After the printer driver is found, click Next. 10 Use the default printer name or type a unique name for your printer, and then click Next. Using Windows 98 with a USB or parallel cable Note: Depending on the software and printers already installed on the drivers...
Setup Guide
Page 67
... necessary files are now ready to print. You are installed on your computer. The Add Printer Wizard screen appears. 4 Use the default printer name or type a unique name for Windows NT operating systems. Note: You need administrative access to install printer drivers on your printer, and then click Next. 5 Click Yes to print a test page. 6 Click Finish. When the Update Device Driver Wizard screen appears: 1 Insert the drivers CD. Using Windows NT with a parallel cable Note: USB support is...
... necessary files are now ready to print. You are installed on your computer. The Add Printer Wizard screen appears. 4 Use the default printer name or type a unique name for Windows NT operating systems. Note: You need administrative access to install printer drivers on your printer, and then click Next. 5 Click Yes to print a test page. 6 Click Finish. When the Update Device Driver Wizard screen appears: 1 Insert the drivers CD. Using Windows NT with a parallel cable Note: USB support is...
Setup Guide
Page 70
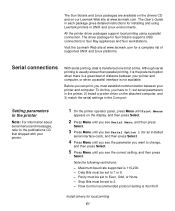
... instructions for installing and using a parallel connection. Maximum baud rate supported is transferred one bit at a time. Data Bits must be set serial parameters in the printer, 2) install a printer driver on the attached computer, and 3) match the serial settings in the Com port. All the printer driver packages support local printing using Lexmark printers in the printer Note: For information about serial menus and messages, refer to the publications CD that shipped with your printer. 1 On the printer operator panel, press Menu...
... instructions for installing and using a parallel connection. Maximum baud rate supported is transferred one bit at a time. Data Bits must be set serial parameters in the printer, 2) install a printer driver on the attached computer, and 3) match the serial settings in the Com port. All the printer driver packages support local printing using Lexmark printers in the printer Note: For information about serial menus and messages, refer to the publications CD that shipped with your printer. 1 On the printer operator panel, press Menu...

Setup Guide
Page 71
... to the serial parameters you set the serial parameters in the printer. 1 Click Start Settings Control Panel, and then double-click System. 2 On the Device Manager tab, click + to expand the list of available ports. Setting parameters in the communications (COM) port After the printer driver is connected to the printer. 1 Insert the drivers CD. Install drivers for later use . 6 Click Finish to complete the printer software installation. b Press Menu until you see Print Menus...
... to the serial parameters you set the serial parameters in the printer. 1 Click Start Settings Control Panel, and then double-click System. 2 On the Device Manager tab, click + to expand the list of available ports. Setting parameters in the communications (COM) port After the printer driver is connected to the printer. 1 Insert the drivers CD. Install drivers for later use . 6 Click Finish to complete the printer software installation. b Press Menu until you see Print Menus...

Setup Guide
Page 72
... the Port Settings tab, set up to print to a local printer. d Click Print Test Page. We recommend that you just created. Task After you have installed the printer driver on the Menu Settings page you are set the serial parameters to verify printer installation. Go to page... 64 Install drivers for the printer settings under the Serial Standard (or Serial Option X) heading on your computer, you printed earlier. 6 Click OK, and then close all the windows. 7 Print a test page to the...
... the Port Settings tab, set up to print to a local printer. d Click Print Test Page. We recommend that you just created. Task After you have installed the printer driver on the Menu Settings page you are set the serial parameters to verify printer installation. Go to page... 64 Install drivers for the printer settings under the Serial Standard (or Serial Option X) heading on your computer, you printed earlier. 6 Click OK, and then close all the windows. 7 Print a test page to the...

Setup Guide
Page 73
.... Printing a network setup page Note: If an optional MarkNet print server is installed, you see Print Menus, and then press Select to verify that printer options are installed correctly. 1 Make sure the printer is on the display. 4 Verify that helps you configure for the sizes and types of memory installed is correctly listed under "Printer Information." 6 Verify that the paper trays are correctly listed under "Installed Features." Verify printer setup 64 UTILITIES MENU 1 Menu 2 Select 3 Return 4 Go 5 Stop 6 Print a menu settings page to review the default printer settings...
.... Printing a network setup page Note: If an optional MarkNet print server is installed, you see Print Menus, and then press Select to verify that printer options are installed correctly. 1 Make sure the printer is on the display. 4 Verify that helps you configure for the sizes and types of memory installed is correctly listed under "Printer Information." 6 Verify that the paper trays are correctly listed under "Installed Features." Verify printer setup 64 UTILITIES MENU 1 Menu 2 Select 3 Return 4 Go 5 Stop 6 Print a menu settings page to review the default printer settings...
Setup Guide
Page 75
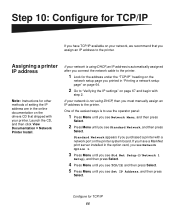
.../IP" heading on the network setup page you printed in the option card, you see Network Option 1. 3 Press Menu until you see Std Net Setup (or Network 1 Setup), and then press Select. 4 Press Menu until you must manually assign an IP address to "Verifying the IP settings" on page 67 and begin with step 2. Step 10: Configure for TCP/IP If you have a MarkNet print server installed in "Printing a network setup page" on page 64...
.../IP" heading on the network setup page you printed in the option card, you see Network Option 1. 3 Press Menu until you see Std Net Setup (or Network 1 Setup), and then press Select. 4 Press Menu until you must manually assign an IP address to "Verifying the IP settings" on page 67 and begin with step 2. Step 10: Configure for TCP/IP If you have a MarkNet print server installed in "Printing a network setup page" on page 64...
Setup Guide
Page 77
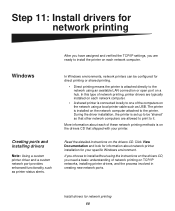
... your specific Windows environment. More information about network printer installation for network printing After you have assigned and verified the TCP/IP settings, you need a basic understanding of network printing, printer drivers are typically installed on each network computer. Read the detailed instructions on the drivers CD that other network computers are ready to the printer. Install drivers for direct printing or shared printing. • Direct printing means the printer is attached directly to the network using a local printer cable such as printer status...
... your specific Windows environment. More information about network printer installation for network printing After you have assigned and verified the TCP/IP settings, you need a basic understanding of network printing, printer drivers are typically installed on each network computer. Read the detailed instructions on the drivers CD that other network computers are ready to the printer. Install drivers for direct printing or shared printing. • Direct printing means the printer is attached directly to the network using a local printer cable such as printer status...

Setup Guide
Page 81
... that came with the product. Warranty Lexmark warrants that user. To obtain warranty service you present for exchange is available to the country-specific warranty information that user for warranty service, remove all programs, data, and removable storage media. Replacement is not available to you if the product you may be free of a repair not included in need of any legal obligation or restrictions...
... that came with the product. Warranty Lexmark warrants that user. To obtain warranty service you present for exchange is available to the country-specific warranty information that user for warranty service, remove all programs, data, and removable storage media. Replacement is not available to you if the product you may be free of a repair not included in need of any legal obligation or restrictions...

Setup Guide
Page 82
...may also have installed a maintenance kit as specified (if applicable) • Use of printing media outside of Lexmark specifications • Use of other than Lexmark product or ...set forth in this Statement of limited warranty 73 Free remote technical support is legally liable. Warranty service does not include repair of failures caused by: • Modification or attachments • Accidents or misuse • Unsuitable physical or operating environment • Maintenance by a Lexmark warranty, technical support may recover actual damages up to Lexmark. Lexmark...
...may also have installed a maintenance kit as specified (if applicable) • Use of printing media outside of Lexmark specifications • Use of other than Lexmark product or ...set forth in this Statement of limited warranty 73 Free remote technical support is legally liable. Warranty service does not include repair of failures caused by: • Modification or attachments • Accidents or misuse • Unsuitable physical or operating environment • Maintenance by a Lexmark warranty, technical support may recover actual damages up to Lexmark. Lexmark...


