Service Manual
Page 9
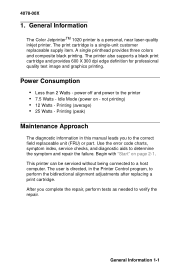
...(average) • 25 Watts - General Information The Color JetprinterTM 1020 printer is directed, in this manual leads you complete the repair, perform tests as needed to a host computer. A single printhead provides three colors and composite black printing. power off and power to ...After you to perform the bidirectional alignment adjustments after replacing a print cartridge. 4078-00X 1. The print cartridge is a single-unit customer replaceable supply item. The printer also supports a black print cartridge and provides 600 X 300 dpi edge definition for professional quality text ...
...(average) • 25 Watts - General Information The Color JetprinterTM 1020 printer is directed, in this manual leads you complete the repair, perform tests as needed to a host computer. A single printhead provides three colors and composite black printing. power off and power to ...After you to perform the bidirectional alignment adjustments after replacing a print cartridge. 4078-00X 1. The print cartridge is a single-unit customer replaceable supply item. The printer also supports a black print cartridge and provides 600 X 300 dpi edge definition for professional quality text ...

Service Manual
Page 14
... • Fails to clean the printhead Operator Panel Action Go to the "Parallel Port Service Check" on page 2-8. Symptom Paper Feed and / or Install print cartridge buttons do not operate Busy light does not come on page 2-6. Replace the system board 2-4 Symptom Printer not communicating with host computer. Carrier Transport Problems...
... • Fails to clean the printhead Operator Panel Action Go to the "Parallel Port Service Check" on page 2-8. Symptom Paper Feed and / or Install print cartridge buttons do not operate Busy light does not come on page 2-6. Replace the system board 2-4 Symptom Printer not communicating with host computer. Carrier Transport Problems...
Service Manual
Page 23
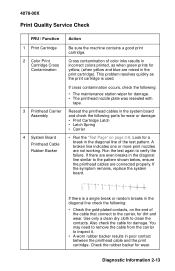
...the following : • The maintenance station wiper for wear. If there is a single break or random breaks in incorrect colors printed, as the print cartridge is used. If cross contamination occurs, check the following : • Check the gold-plated contacts, on page 3-8. If... there are not working. Diagnostic Information 2-13 4078-00X Print Quality Service Check FRU / Function 1 Print Cartridge 2 Color Print Cartridge Cross Contamination 3 Printhead Carrier Assembly 4 System Board Printhead Cable Rubber Backer Action Be sure the machine contains a good print...
...the following : • The maintenance station wiper for wear. If there is a single break or random breaks in incorrect colors printed, as the print cartridge is used. If cross contamination occurs, check the following : • Check the gold-plated contacts, on page 3-8. If... there are not working. Diagnostic Information 2-13 4078-00X Print Quality Service Check FRU / Function 1 Print Cartridge 2 Color Print Cartridge Cross Contamination 3 Printhead Carrier Assembly 4 System Board Printhead Cable Rubber Backer Action Be sure the machine contains a good print...

Service Manual
Page 24
... looseness. Check the following : • Correct type of paper is directed, through the Printer Control program, to perform the bidirectional printing alignment, when replacing a print cartridge. 2-14 The user is being used. Check the following : • Carrier transport belt for wear. • Carrier guide rod for wear or dirt. • Carrier...
... looseness. Check the following : • Correct type of paper is directed, through the Printer Control program, to perform the bidirectional printing alignment, when replacing a print cartridge. 2-14 The user is being used. Check the following : • Carrier transport belt for wear. • Carrier guide rod for wear or dirt. • Carrier...

Service Manual
Page 27
4078-00X EOF and Home Position Sensors Test This test allows the servicer to begin the test. Install Print Cartridge After five seconds, release the buttons to test the function of the End-of the sensor, press and hold the following buttons while turning the ...
4078-00X EOF and Home Position Sensors Test This test allows the servicer to begin the test. Install Print Cartridge After five seconds, release the buttons to test the function of the End-of the sensor, press and hold the following buttons while turning the ...
Service Manual
Page 28
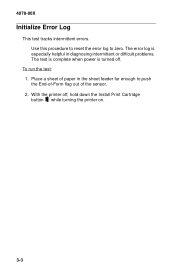
To run the test: 1. With the printer off . 4078-00X Initialize Error Log This test tracks intermittent errors. The error log is turned off , hold down the Install Print Cartridge button while turning the printer on. 3-3 Place a sheet of paper in diagnosing intermittent or difficult problems. The test is complete when power is especially helpful in the sheet feeder far enough to zero. Use this procedure to reset the error log to push the End-of-Form flag out of the sensor. 2.
To run the test: 1. With the printer off . 4078-00X Initialize Error Log This test tracks intermittent errors. The error log is turned off , hold down the Install Print Cartridge button while turning the printer on. 3-3 Place a sheet of paper in diagnosing intermittent or difficult problems. The test is complete when power is especially helpful in the sheet feeder far enough to zero. Use this procedure to reset the error log to push the End-of-Form flag out of the sensor. 2.

Service Manual
Page 30
Load paper into the sheet feeder. 4. After five seconds, release the button to push the End-of-Form flag out of NVRAM, which can be used for diagnostic purposes. Place a sheet of paper in the sheet feeder far enough to begin the test. 3-5 To run the test: 1. 4078-00X Print NVRAM Contents This test prints the contents of the sensor. 3. Install a black print cartridge. 2. With the printer off, press and hold the Paper Feed button and turn the printer on.
Load paper into the sheet feeder. 4. After five seconds, release the button to push the End-of-Form flag out of NVRAM, which can be used for diagnostic purposes. Place a sheet of paper in the sheet feeder far enough to begin the test. 3-5 To run the test: 1. 4078-00X Print NVRAM Contents This test prints the contents of the sensor. 3. Install a black print cartridge. 2. With the printer off, press and hold the Paper Feed button and turn the printer on.
Service Manual
Page 31
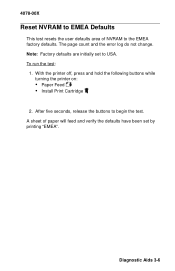
With the printer off, press and hold the following buttons while turning the printer on: • Paper Feed • Install Print Cartridge 2. A sheet of NVRAM to begin the test. 4078-00X Reset NVRAM to EMEA Defaults This test resets the user defaults area of paper will feed and verify the defaults have been set to USA. After five seconds, release the buttons to the EMEA factory defaults. Note: Factory defaults are initially set by printing "EMEA". Diagnostic Aids 3-6 To run the test: 1. The page count and the error log do not change.
With the printer off, press and hold the following buttons while turning the printer on: • Paper Feed • Install Print Cartridge 2. A sheet of NVRAM to begin the test. 4078-00X Reset NVRAM to EMEA Defaults This test resets the user defaults area of paper will feed and verify the defaults have been set to USA. After five seconds, release the buttons to the EMEA factory defaults. Note: Factory defaults are initially set by printing "EMEA". Diagnostic Aids 3-6 To run the test: 1. The page count and the error log do not change.
Service Manual
Page 32
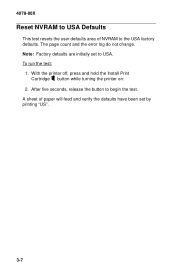
4078-00X Reset NVRAM to USA Defaults This test resets the user defaults area of paper will feed and verify the defaults have been set to USA. A sheet of NVRAM to begin the test. After five seconds, release the button to the USA factory defaults. With the printer off, press and hold the Install Print Cartridge button while turning the printer on: 2. The page count and the error log do not change. To run the test: 1. Note: Factory defaults are initially set by printing "US". 3-7
4078-00X Reset NVRAM to USA Defaults This test resets the user defaults area of paper will feed and verify the defaults have been set to USA. A sheet of NVRAM to begin the test. After five seconds, release the button to the USA factory defaults. With the printer off, press and hold the Install Print Cartridge button while turning the printer on: 2. The page count and the error log do not change. To run the test: 1. Note: Factory defaults are initially set by printing "US". 3-7
Service Manual
Page 33
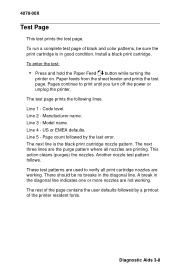
...pattern. Pages continue to verify all nozzles are used to print until you turn off the power or unplug the printer. Line 3 - Install a black print cartridge. The test page prints the following lines. Manufacturer name. Line 5 - These test patterns are printing. The rest of the page contains the user defaults .... A break in the diagonal line. Another nozzle test pattern follows. This action cleans (purges) the nozzles. Page count followed by a printout of black and color patterns, be no breaks in the diagonal line indicates one or more nozzles are working .
...pattern. Pages continue to verify all nozzles are used to print until you turn off the power or unplug the printer. Line 3 - Install a black print cartridge. The test page prints the following lines. Manufacturer name. Line 5 - These test patterns are printing. The rest of the page contains the user defaults .... A break in the diagonal line. Another nozzle test pattern follows. This action cleans (purges) the nozzles. Page count followed by a printout of black and color patterns, be no breaks in the diagonal line indicates one or more nozzles are working .
Service Manual
Page 35
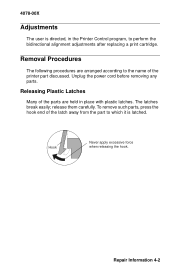
... hook. To remove such parts, press the hook end of the latch away from the part to perform the bidirectional alignment adjustments after replacing a print cartridge. Repair Information 4-2 Releasing Plastic Latches Many of the printer part discussed. Removal Procedures The following procedures are arranged according to the name of the parts...
... hook. To remove such parts, press the hook end of the latch away from the part to perform the bidirectional alignment adjustments after replacing a print cartridge. Repair Information 4-2 Releasing Plastic Latches Many of the printer part discussed. Removal Procedures The following procedures are arranged according to the name of the parts...

Service Manual
Page 48
4078-00X Connector CN1 CN2 CN4 CN5 CN6 CN7 CN8 SW1 SW2 SW3 LED1 LED2 Connector Names Printhead Cable 1 Printhead Cable 2 Carrier Transport Motor Home Position Sensor Paper Feed Motor Power Supply Parallel Port Power Switch Paper Feed Switch Install Print Cartridge Switch Busy Light Power on Light 5-2
4078-00X Connector CN1 CN2 CN4 CN5 CN6 CN7 CN8 SW1 SW2 SW3 LED1 LED2 Connector Names Printhead Cable 1 Printhead Cable 2 Carrier Transport Motor Home Position Sensor Paper Feed Motor Power Supply Parallel Port Power Switch Paper Feed Switch Install Print Cartridge Switch Busy Light Power on Light 5-2


