Service Manual
Page 3
... Self Test (POST) Sequence 2-2 POST Symptom Table 2-3 Symptom Tables 2-4 Service Checks 2-6 Carrier Transport Service Check 2-6 Envelope Feed Service Check 2-7 Maintenance Station Service Check 2-8 Paper Feed Service Check 2-9 Paper Path Service Check 2-11 Parallel Port Service Check 2-12 Power Service Check 2-12 Print Quality Service Check 2-13 Print Quality Notice 2-15 Diagnostic Aids 3-1 EOF and Home Position Sensors Test 3-2 Initialize Error Log 3-3 Parallel Port Test 3-4 Print NVRAM Contents 3-5 Reset NVRAM to EMEA Defaults 3-6 Reset NVRAM to USA Defaults 3-7 Test Page...
... Self Test (POST) Sequence 2-2 POST Symptom Table 2-3 Symptom Tables 2-4 Service Checks 2-6 Carrier Transport Service Check 2-6 Envelope Feed Service Check 2-7 Maintenance Station Service Check 2-8 Paper Feed Service Check 2-9 Paper Path Service Check 2-11 Parallel Port Service Check 2-12 Power Service Check 2-12 Print Quality Service Check 2-13 Print Quality Notice 2-15 Diagnostic Aids 3-1 EOF and Home Position Sensors Test 3-2 Initialize Error Log 3-3 Parallel Port Test 3-4 Print NVRAM Contents 3-5 Reset NVRAM to EMEA Defaults 3-6 Reset NVRAM to USA Defaults 3-7 Test Page...
Service Manual
Page 4
... Parts 4-1 Adjustments 4-2 Removal Procedures 4-2 Releasing Plastic Latches 4-2 Access Cover Removal 4-3 Base Assembly Removal 4-3 Carrier Belt Removal 4-3 Carrier Frame Assembly Removal 4-4 Carrier Home Sensor Removal 4-4 Carrier Transport Motor Removal 4-5 Drive Train Assembly Removal 4-5 Front Cover Removal 4-6 Gutter Pad Removal 4-6 Large Feed Roll Removal 4-7 Maintenance Station Assembly Removal 4-7 Maintenance Wiper and Cap Removal 4-7 Mid Frame Assembly Removal 4-8 Paper Feed Motor Removal 4-8 Power Supply Removal 4-8 Printhead Carrier Assembly Removal 4-9 Rear Cover...
... Parts 4-1 Adjustments 4-2 Removal Procedures 4-2 Releasing Plastic Latches 4-2 Access Cover Removal 4-3 Base Assembly Removal 4-3 Carrier Belt Removal 4-3 Carrier Frame Assembly Removal 4-4 Carrier Home Sensor Removal 4-4 Carrier Transport Motor Removal 4-5 Drive Train Assembly Removal 4-5 Front Cover Removal 4-6 Gutter Pad Removal 4-6 Large Feed Roll Removal 4-7 Maintenance Station Assembly Removal 4-7 Maintenance Wiper and Cap Removal 4-7 Mid Frame Assembly Removal 4-8 Paper Feed Motor Removal 4-8 Power Supply Removal 4-8 Printhead Carrier Assembly Removal 4-9 Rear Cover...

Service Manual
Page 5
... problems. 7. Parts Catalog contains illustrations and part numbers for making printer adjustments and removing and installing FRUs. 5. Safety Information • The maintenance information for this chapter, as well as the original parts. Connector Locations uses illustrations to be obvious. Therefore, replacement parts must have the identical or equivalent characteristics as general environmental and safety instructions. 2. Preface v Diagnostic Information contains error indicator table, symptom table, and service checks used to repair...
... problems. 7. Parts Catalog contains illustrations and part numbers for making printer adjustments and removing and installing FRUs. 5. Safety Information • The maintenance information for this chapter, as well as the original parts. Connector Locations uses illustrations to be obvious. Therefore, replacement parts must have the identical or equivalent characteristics as general environmental and safety instructions. 2. Preface v Diagnostic Information contains error indicator table, symptom table, and service checks used to repair...
Service Manual
Page 9
... than 2 Watts - Use the error code charts, symptom index, service checks, and diagnostic aids to the correct field replaceable unit (FRU) or part. The print cartridge is directed, in this manual leads you complete the repair, perform tests as needed to perform the bidirectional alignment adjustments after replacing a print cartridge. After you to determine the symptom and repair the failure. The user is a single-unit customer replaceable supply item. Idle Mode (power on page 2-1. Printing (average) • 25...
... than 2 Watts - Use the error code charts, symptom index, service checks, and diagnostic aids to the correct field replaceable unit (FRU) or part. The print cartridge is directed, in this manual leads you complete the repair, perform tests as needed to perform the bidirectional alignment adjustments after replacing a print cartridge. After you to determine the symptom and repair the failure. The user is a single-unit customer replaceable supply item. Idle Mode (power on page 2-1. Printing (average) • 25...

Service Manual
Page 11
... page 3-3 to clear the error (the error may have an intermittent error, or the error indicator lights have an error indicated, go to print on page 2-2. Run the "Test Page" on page 3-4. Diagnostic Information Use the error indicator table, symptom tables, service checks, and diagnostic aids in the "Error Indicator Table" on page 2-2. If your machine has an error indication, locate the series of the Power On light. Start Service error indications show as a series of flashes of flashes...
... page 3-3 to clear the error (the error may have an intermittent error, or the error indicator lights have an error indicated, go to print on page 2-2. Run the "Test Page" on page 3-4. Diagnostic Information Use the error indicator table, symptom tables, service checks, and diagnostic aids in the "Error Indicator Table" on page 2-2. If your machine has an error indication, locate the series of the Power On light. Start Service error indications show as a series of flashes of flashes...

Service Manual
Page 14
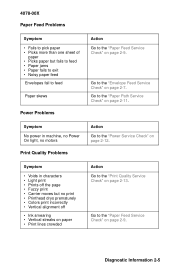
...; Fails to cap the printhead • Fails to clean the printhead Operator Panel Action Go to the "Carrier Transport Service Check" on Action Replace the system board. Carrier Transport Problems Symptom • No carrier movement • Slow carrier movement • Carrier stops • Carrier slams side frame Communications Problems Action Go to the "Maintenance Station Service Check" on page 2-12. Replace the system board 2-4 Symptom Paper Feed and / or Install print cartridge buttons...
...; Fails to cap the printhead • Fails to clean the printhead Operator Panel Action Go to the "Carrier Transport Service Check" on Action Replace the system board. Carrier Transport Problems Symptom • No carrier movement • Slow carrier movement • Carrier stops • Carrier slams side frame Communications Problems Action Go to the "Maintenance Station Service Check" on page 2-12. Replace the system board 2-4 Symptom Paper Feed and / or Install print cartridge buttons...
Service Manual
Page 15
... one sheet of paper • Picks paper but no motors Print Quality Problems Action Go to the "Power Service Check" on page 2-13. Symptom • Voids in machine, no Power On light, no print • Printhead drys prematurely • Colors print incorrectly • Vertical alignment off the page • Fuzzy print • Carrier moves but fails to feed • Paper jams • Paper fails to exit • Noisy paper feed Envelopes fail to feed Paper skews Power Problems Action Go to the "Paper Feed Service Check" on page...
... one sheet of paper • Picks paper but no motors Print Quality Problems Action Go to the "Power Service Check" on page 2-13. Symptom • Voids in machine, no Power On light, no print • Printhead drys prematurely • Colors print incorrectly • Vertical alignment off the page • Fuzzy print • Carrier moves but fails to feed • Paper jams • Paper fails to exit • Noisy paper feed Envelopes fail to feed Paper skews Power Problems Action Go to the "Paper Feed Service Check" on page...

Service Manual
Page 17
... right margin. Turn the printer on page 2-8. If the voltage is not present, replace the system board. Be sure the envelope guide is against the envelopes. Diagnostic Information 2-7 Go to the envelope load position. If the test fails, turn the printer off and disconnect CN5 from the system board. A problem with the maintenance station can cause carrier movement problems at the system board. Perform the "Paper Feed Service Check" on page 3-2, to check...
... right margin. Turn the printer on page 2-8. If the voltage is not present, replace the system board. Be sure the envelope guide is against the envelopes. Diagnostic Information 2-7 Go to the envelope load position. If the test fails, turn the printer off and disconnect CN5 from the system board. A problem with the maintenance station can cause carrier movement problems at the system board. Perform the "Paper Feed Service Check" on page 3-2, to check...

Service Manual
Page 19
... machine does not have paper jam problems, continue with the service check. Turn the printer on and check for motor pins shorted to the motor housing. If you begin the service check: • Check the entire paper path for obstructions. • Be sure there is not too much paper in the sheet feeder. • Be sure the correct type of paper is not present, check for a pulse of...
... machine does not have paper jam problems, continue with the service check. Turn the printer on and check for motor pins shorted to the motor housing. If you begin the service check: • Check the entire paper path for obstructions. • Be sure there is not too much paper in the sheet feeder. • Be sure the correct type of paper is not present, check for a pulse of...

Service Manual
Page 21
... FRU 7 End of Forms Sensor Action Check the sensor for binds or damage. FRU Action 1 Large and Small Feed Rollers Check for wear and binds. 2 Small Feed Roller Check for obstructions. • Be sure the correct type of paper is being used. • Be sure the printer is installed on the system board. If the test fails, replace the system board. Paper Path Service Check Examine the machine for...
... FRU 7 End of Forms Sensor Action Check the sensor for binds or damage. FRU Action 1 Large and Small Feed Rollers Check for wear and binds. 2 Small Feed Roller Check for obstructions. • Be sure the correct type of paper is being used. • Be sure the printer is installed on the system board. If the test fails, replace the system board. Paper Path Service Check Examine the machine for...
Service Manual
Page 23
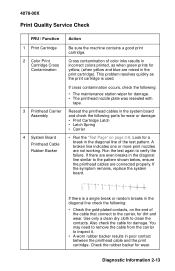
Reseat the printhead cables in incorrect colors printed, as the print cartridge is a single break or random breaks in the diagonal line check the following: • Check the gold-plated contacts, on page 3-8. If there is used. You may need to remove the cable from the carrier to clean the contacts. This problem resolves quickly as when green prints for yellow, (when yellow and blue are even breaks in...
Reseat the printhead cables in incorrect colors printed, as the print cartridge is a single break or random breaks in the diagonal line check the following: • Check the gold-plated contacts, on page 3-8. If there is used. You may need to remove the cable from the carrier to clean the contacts. This problem resolves quickly as when green prints for yellow, (when yellow and blue are even breaks in...

Service Manual
Page 24
...; Carrier guide rod for wear or dirt. • Carrier to perform the bidirectional printing alignment, when replacing a print cartridge. 2-14 Blurred print and voids can be caused by paper problems or problems in the carrier transport area. Check the following : • Correct type of paper is directed, through the Printer Control program, to carrier frame engagement should be lubricated with grease P/N 1329301. Perform the "Maintenance Station Service Check" on page...
...; Carrier guide rod for wear or dirt. • Carrier to perform the bidirectional printing alignment, when replacing a print cartridge. 2-14 Blurred print and voids can be caused by paper problems or problems in the carrier transport area. Check the following : • Correct type of paper is directed, through the Printer Control program, to carrier frame engagement should be lubricated with grease P/N 1329301. Perform the "Maintenance Station Service Check" on page...
Service Manual
Page 28
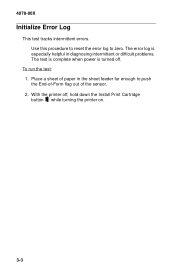
To run the test: 1. With the printer off . The error log is especially helpful in the sheet feeder far enough to zero. Place a sheet of paper in diagnosing intermittent or difficult problems. The test is complete when power is turned off , hold down the Install Print Cartridge button while turning the printer on. 3-3 4078-00X Initialize Error Log This test tracks intermittent errors. Use this procedure to reset the error log to push the End-of-Form flag out of the sensor. 2.
To run the test: 1. With the printer off . The error log is especially helpful in the sheet feeder far enough to zero. Place a sheet of paper in diagnosing intermittent or difficult problems. The test is complete when power is turned off , hold down the Install Print Cartridge button while turning the printer on. 3-3 4078-00X Initialize Error Log This test tracks intermittent errors. Use this procedure to reset the error log to push the End-of-Form flag out of the sensor. 2.

Service Manual
Page 30
With the printer off, press and hold the Paper Feed button and turn the printer on. After five seconds, release the button to push the End-of-Form flag out of the sensor. 3. Load paper into the sheet feeder. 4. 4078-00X Print NVRAM Contents This test prints the contents of paper in the sheet feeder far enough to begin the test. 3-5 Place a sheet of NVRAM, which can be used for diagnostic purposes. To run the test: 1. Install a black print cartridge. 2.
With the printer off, press and hold the Paper Feed button and turn the printer on. After five seconds, release the button to push the End-of-Form flag out of the sensor. 3. Load paper into the sheet feeder. 4. 4078-00X Print NVRAM Contents This test prints the contents of paper in the sheet feeder far enough to begin the test. 3-5 Place a sheet of NVRAM, which can be used for diagnostic purposes. To run the test: 1. Install a black print cartridge. 2.
Service Manual
Page 31
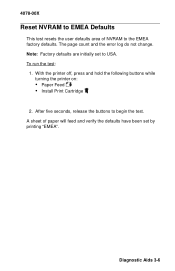
4078-00X Reset NVRAM to EMEA Defaults This test resets the user defaults area of paper will feed and verify the defaults have been set to USA. Note: Factory defaults are initially set by printing "EMEA". A sheet of NVRAM to begin the test. With the printer off, press and hold the following buttons while turning the printer on: • Paper Feed • Install Print Cartridge 2. Diagnostic Aids 3-6 After five seconds, release the buttons to the EMEA factory defaults. To run the test: 1. The page count and the error log do not change.
4078-00X Reset NVRAM to EMEA Defaults This test resets the user defaults area of paper will feed and verify the defaults have been set to USA. Note: Factory defaults are initially set by printing "EMEA". A sheet of NVRAM to begin the test. With the printer off, press and hold the following buttons while turning the printer on: • Paper Feed • Install Print Cartridge 2. Diagnostic Aids 3-6 After five seconds, release the buttons to the EMEA factory defaults. To run the test: 1. The page count and the error log do not change.
Service Manual
Page 32
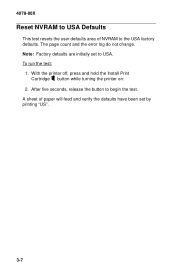
To run the test: 1. With the printer off, press and hold the Install Print Cartridge button while turning the printer on: 2. A sheet of NVRAM to the USA factory defaults. After five seconds, release the button to begin the test. 4078-00X Reset NVRAM to USA Defaults This test resets the user defaults area of paper will feed and verify the defaults have been set to USA. The page count and the error log do not change. Note: Factory defaults are initially set by printing "US". 3-7
To run the test: 1. With the printer off, press and hold the Install Print Cartridge button while turning the printer on: 2. A sheet of NVRAM to the USA factory defaults. After five seconds, release the button to begin the test. 4078-00X Reset NVRAM to USA Defaults This test resets the user defaults area of paper will feed and verify the defaults have been set to USA. The page count and the error log do not change. Note: Factory defaults are initially set by printing "US". 3-7
Service Manual
Page 33
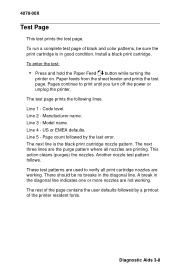
... pattern where all print cartridge nozzles are working . Another nozzle test pattern follows. Code level. Page count followed by a printout of the page contains the user defaults followed by the last error. Paper feeds from the sheet feeder and prints the test page. The test page prints the following lines. Line 2 - Manufacturer name. Model name. A break in the diagonal line indicates one or more nozzles are printing. Diagnostic Aids 3-8 To enter the test: • Press and hold the Paper Feed button while turning the printer on. Line...
... pattern where all print cartridge nozzles are working . Another nozzle test pattern follows. Code level. Page count followed by a printout of the page contains the user defaults followed by the last error. Paper feeds from the sheet feeder and prints the test page. The test page prints the following lines. Line 2 - Manufacturer name. Model name. A break in the diagonal line indicates one or more nozzles are printing. Diagnostic Aids 3-8 To enter the test: • Press and hold the Paper Feed button while turning the printer on. Line...
Service Manual
Page 35
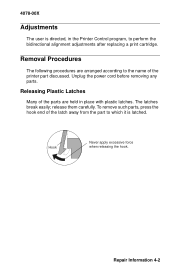
... parts. release them carefully. 4078-00X Adjustments The user is directed, in place with plastic latches. Removal Procedures The following procedures are held in the Printer Control program, to which it is latched. Releasing Plastic Latches Many of the parts are arranged according to the name of the latch away from the part to perform the bidirectional alignment adjustments after replacing a print cartridge. Repair...
... parts. release them carefully. 4078-00X Adjustments The user is directed, in place with plastic latches. Removal Procedures The following procedures are held in the Printer Control program, to which it is latched. Releasing Plastic Latches Many of the parts are arranged according to the name of the latch away from the part to perform the bidirectional alignment adjustments after replacing a print cartridge. Repair...

Service Manual
Page 48
4078-00X Connector CN1 CN2 CN4 CN5 CN6 CN7 CN8 SW1 SW2 SW3 LED1 LED2 Connector Names Printhead Cable 1 Printhead Cable 2 Carrier Transport Motor Home Position Sensor Paper Feed Motor Power Supply Parallel Port Power Switch Paper Feed Switch Install Print Cartridge Switch Busy Light Power on Light 5-2
4078-00X Connector CN1 CN2 CN4 CN5 CN6 CN7 CN8 SW1 SW2 SW3 LED1 LED2 Connector Names Printhead Cable 1 Printhead Cable 2 Carrier Transport Motor Home Position Sensor Paper Feed Motor Power Supply Parallel Port Power Switch Paper Feed Switch Install Print Cartridge Switch Busy Light Power on Light 5-2
Service Manual
Page 63
...2-4 Paper Feed 2-5 Power 2-5 Print Quality 2-5 R Removals Access Cover 4-3 Base Assembly 4-3 Carrier Belt 4-3 Carrier Frame 4-4 Carrier Transport Motor 4-5 Drive Train Assembly 4-5 Front Cover 4-6 Gutter Pad 4-6 Large Feed Roll 4-7 Maintenance Station 4-7 Mid Frame Assembly 4-8 Paper Feed Motor 4-8 Power Supply 4-8 Printhead Carrier 4-9 Rear Cover 4-10 Sheet Feeder 4-11 Small Feed Roll Assembly 4-11 Small Feed Roll Bracket 4-12 System Board 4-13 Wiper & Cap 4-7 Repair Information 4-1 S Safety Information v Service Checks Envelope Feed 2-7 First Print Line 2-8 Maintenance Station 2-8 Paper Feed...
...2-4 Paper Feed 2-5 Power 2-5 Print Quality 2-5 R Removals Access Cover 4-3 Base Assembly 4-3 Carrier Belt 4-3 Carrier Frame 4-4 Carrier Transport Motor 4-5 Drive Train Assembly 4-5 Front Cover 4-6 Gutter Pad 4-6 Large Feed Roll 4-7 Maintenance Station 4-7 Mid Frame Assembly 4-8 Paper Feed Motor 4-8 Power Supply 4-8 Printhead Carrier 4-9 Rear Cover 4-10 Sheet Feeder 4-11 Small Feed Roll Assembly 4-11 Small Feed Roll Bracket 4-12 System Board 4-13 Wiper & Cap 4-7 Repair Information 4-1 S Safety Information v Service Checks Envelope Feed 2-7 First Print Line 2-8 Maintenance Station 2-8 Paper Feed...


