
Hardware Maintenance Manual
Page 1
ThinkPad® X60, X60s, X61, and X61s Hardware Maintenance Manual This manual supports: ThinkPad X60 (MT 1706, 1707, 1708, 1709, 2509, and 2510) ThinkPad X60s (MT 1702, 1703, 1704, 1705, 2507, 2508, 2533, and 2534) ThinkPad X61 (MT 7673, 7674, 7675, 7676, 7678, and 7679) ThinkPad X61s (MT 7666, 7667, 7668, 7669, 7670, and 7671)
ThinkPad® X60, X60s, X61, and X61s Hardware Maintenance Manual This manual supports: ThinkPad X60 (MT 1706, 1707, 1708, 1709, 2509, and 2510) ThinkPad X60s (MT 1702, 1703, 1704, 1705, 2507, 2508, 2533, and 2534) ThinkPad X61 (MT 7673, 7674, 7675, 7676, 7678, and 7679) ThinkPad X61s (MT 7666, 7667, 7668, 7669, 7670, and 7671)

Hardware Maintenance Manual
Page 12
...on the market and sold in the EU. Before or after the RoHS implementation date, failed RoHS compliant parts must be implemented on Lenovo products placed on the market before the implementation date and expects its suppliers to be replaced using RoHS compliant FRUs, so only the FRUs... to view the complete list of the order. 6 ThinkPad® X60, X60s, X61, and X61s Under "View by Date" select SYSTEM SERVICE PARTS. In all cases if the original FRU parts are non compliant, replacement parts can be used to support Lenovo's requirements and schedule in 2005 and 2006, will be...
...on the market and sold in the EU. Before or after the RoHS implementation date, failed RoHS compliant parts must be implemented on Lenovo products placed on the market before the implementation date and expects its suppliers to be replaced using RoHS compliant FRUs, so only the FRUs... to view the complete list of the order. 6 ThinkPad® X60, X60s, X61, and X61s Under "View by Date" select SYSTEM SERVICE PARTS. In all cases if the original FRU parts are non compliant, replacement parts can be used to support Lenovo's requirements and schedule in 2005 and 2006, will be...
Hardware Maintenance Manual
Page 33
...the password prompt does not appear. then, while the "To interrupt normal startup, press the blue ThinkVantage button" message is available, neither Lenovo nor Lenovo authorized servicers provide any services to reset either the user or the master HDP, or to recover data from the hard disk drive. The... Turn on page 82. 4. The Rescue and Recovery screen opens. For the other models, enter the POP. Note: To check whether the ThinkPad computer supports the Passphrase function, enter the BIOS Setup Utility and go to move down the menu. 5. then leave the Enter New Password field blank, ...
...the password prompt does not appear. then, while the "To interrupt normal startup, press the blue ThinkVantage button" message is available, neither Lenovo nor Lenovo authorized servicers provide any services to reset either the user or the master HDP, or to recover data from the hard disk drive. The... Turn on page 82. 4. The Rescue and Recovery screen opens. For the other models, enter the POP. Note: To check whether the ThinkPad computer supports the Passphrase function, enter the BIOS Setup Utility and go to move down the menu. 5. then leave the Enter New Password field blank, ...
Hardware Maintenance Manual
Page 34
... Passphrase function, press F1 while HDP icon is appearing on the computer; Note: To check whether the ThinkPad computer supports the Passphrase function, enter the BIOS Setup Utility and go to move down the menu. 5. If Using Passphrase item is displayed in the... Password field blank, and press Enter twice. 9. The hard disk drive can be made available to the servicer, neither Lenovo nor Lenovo authorized servicers provide any key. 28 ThinkPad® X60, X60s, X61, and X61s The Rescue and Recovery screen opens. v The hard disk drive motor stops. 3. To remove a user HDP that has...
... Passphrase function, press F1 while HDP icon is appearing on the computer; Note: To check whether the ThinkPad computer supports the Passphrase function, enter the BIOS Setup Utility and go to move down the menu. 5. If Using Passphrase item is displayed in the... Password field blank, and press Enter twice. 9. The hard disk drive can be made available to the servicer, neither Lenovo nor Lenovo authorized servicers provide any key. 28 ThinkPad® X60, X60s, X61, and X61s The Rescue and Recovery screen opens. v The hard disk drive motor stops. 3. To remove a user HDP that has...

Hardware Maintenance Manual
Page 37
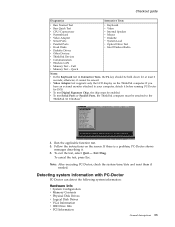
... run correctly. General descriptions 31 Verify the symptoms. Try to test only ThinkPad products. Checkout guide Checkout guide Use the following procedures as a guide in the docking station, even if the computer supports the docking station. Identify the failing symptoms in PC-Doctor. This section... is in identifying and correcting problems with the ThinkPad computer. You can lead to initialize the computer setup by using PS2...
... run correctly. General descriptions 31 Verify the symptoms. Try to test only ThinkPad products. Checkout guide Checkout guide Use the following procedures as a guide in the docking station, even if the computer supports the docking station. Identify the failing symptoms in PC-Doctor. This section... is in identifying and correcting problems with the ThinkPad computer. You can lead to initialize the computer setup by using PS2...
Hardware Maintenance Manual
Page 38
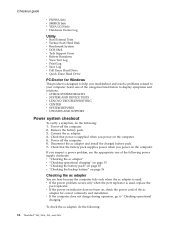
... prompt the user through creating the boot diskettes. Each diskette will automatically start up to run the test, do as follows: 32 ThinkPad® X60, X60s, X61, and X61s Follow the instructions on the computer. then power on the screen. 2. To create the PC-Doctor disk from the drive, or ... the PC-Doctor for the proper floppy drive to -FRU index" on the model.) Note: PC-Doctor menu does not mean the formal support device list. Some unsupported device names may appear in sequence. Checkout guide Creating the PC-Doctor diagnostics diskette In X60, the PC-Doctor disk...
... prompt the user through creating the boot diskettes. Each diskette will automatically start up to run the test, do as follows: 32 ThinkPad® X60, X60s, X61, and X61s Follow the instructions on the computer. then power on the screen. 2. To create the PC-Doctor disk from the drive, or ... the PC-Doctor for the proper floppy drive to -FRU index" on the model.) Note: PC-Doctor menu does not mean the formal support device list. Some unsupported device names may appear in sequence. Checkout guide Creating the PC-Doctor diagnostics diskette In X60, the PC-Doctor disk...
Hardware Maintenance Manual
Page 39
... the ThinkPad computer. v To test Digital Signature Chip, the chip must be sensed. Full Memory Test - Press ENTER to your computer, detach it before running PC-Doctor for at least 2 seconds; To exit the test, select Quit - Exit Diag. v Video Adapter test supports only the...Doctor, check the system time/date and reset them if needed. Run the applicable function test. 5. Use the cursor keys and ESC to the ThinkPad X6 UltraBase™. Checkout guide Diagnostics Interactive Tests v Run Normal Test v Run Quick Test v CPU/Coprocessor v Systemboard v Video Adapter v Serial...
... the ThinkPad computer. v To test Digital Signature Chip, the chip must be sensed. Full Memory Test - Press ENTER to your computer, detach it before running PC-Doctor for at least 2 seconds; To exit the test, select Quit - Exit Diag. v Video Adapter test supports only the...Doctor, check the system time/date and reset them if needed. Run the applicable function test. 5. Use the cursor keys and ESC to the ThinkPad X6 UltraBase™. Checkout guide Diagnostics Interactive Tests v Run Normal Test v Run Quick Test v CPU/Coprocessor v Systemboard v Video Adapter v Serial...
Hardware Maintenance Manual
Page 40
...not charge during operation, go to help you suspect a power problem, see the appropriate one of the following : 34 ThinkPad® X60, X60s, X61, and X61s Connect the ac adapter. 4. Disconnect the ac adapter and install the charged battery pack. 7. v If the power-on ...If you troubleshoot and resolve problems related to display symptoms and solutions: v CHECK SYSTEM HEALTH v SYSTEM AND DEVICE TESTS v LENOVO TROUBLESHOOTING v CENTER v SYSTEM REPORTS v UPDATES AND SUPPORT Power system checkout To verify a symptom, do the following power supply checkouts: v "Checking the ac adapter" v "...
...not charge during operation, go to help you suspect a power problem, see the appropriate one of the following : 34 ThinkPad® X60, X60s, X61, and X61s Connect the ac adapter. 4. Disconnect the ac adapter and install the charged battery pack. 7. v If the power-on ...If you troubleshoot and resolve problems related to display symptoms and solutions: v CHECK SYSTEM HEALTH v SYSTEM AND DEVICE TESTS v LENOVO TROUBLESHOOTING v CENTER v SYSTEM REPORTS v UPDATES AND SUPPORT Power system checkout To verify a symptom, do the following power supply checkouts: v "Checking the ac adapter" v "...

Hardware Maintenance Manual
Page 46
Product overview Feature I /O support UltraBay Slim (supported by ThinkPad X6 UltraBase) v ThinkPad Modem (MDC-1.5) v 65-watt type v USB diskette drive v 1 parallel of 4 series of cells (1P4S) Li-Ion battery pack (2.0 AH) (Prismatic) v 1 parallel of 4 series... AH) (Standard) v 2 parallel of 4 series of cells (2P4S) Li-Ion battery pack (5.2 AH) (Hybrid) Note: The prismatic battery is not available on the ThinkPad X61 and X61s computer. v Windows XP Professional v Windows XP Home Edition v Windows Vista™ Business (32 bit) v Windows Vista Business (64 bit) v Windows Vista Home Basic (32...
Product overview Feature I /O support UltraBay Slim (supported by ThinkPad X6 UltraBase) v ThinkPad Modem (MDC-1.5) v 65-watt type v USB diskette drive v 1 parallel of 4 series of cells (1P4S) Li-Ion battery pack (2.0 AH) (Prismatic) v 1 parallel of 4 series... AH) (Standard) v 2 parallel of 4 series of cells (2P4S) Li-Ion battery pack (5.2 AH) (Hybrid) Note: The prismatic battery is not available on the ThinkPad X61 and X61s computer. v Windows XP Professional v Windows XP Home Edition v Windows Vista™ Business (32 bit) v Windows Vista Business (64 bit) v Windows Vista Home Basic (32...

Hardware Maintenance Manual
Page 50
... test again. 3. If the problem does not recur, return the DIMM to Compatibility, then run Diagnostics --> Fixed Disks 1. Quick. 2. Diagnostics --> Diskette Drives 2. Note: The maximum supported memory size is 3GB. 1. Product overview FRU Hard disk drive Diskette drive CD-ROM or DVD drive Memory Fan Applicable test Enter the BIOS Setup... ATA (SATA) setting to its place, remove the other one of them and run Diagnostics --> Memory Test - Interactive Tests --> Optical Drive Test 1. Full. Run Diagnostics --> ThinkPad Devices --> Fan. 44 ThinkPad® X60, X60s, X61, and X61s
... test again. 3. If the problem does not recur, return the DIMM to Compatibility, then run Diagnostics --> Fixed Disks 1. Quick. 2. Diagnostics --> Diskette Drives 2. Note: The maximum supported memory size is 3GB. 1. Product overview FRU Hard disk drive Diskette drive CD-ROM or DVD drive Memory Fan Applicable test Enter the BIOS Setup... ATA (SATA) setting to its place, remove the other one of them and run Diagnostics --> Memory Test - Interactive Tests --> Optical Drive Test 1. Full. Run Diagnostics --> ThinkPad Devices --> Fan. 44 ThinkPad® X60, X60s, X61, and X61s

Hardware Maintenance Manual
Page 52
...installed on button configuration, double-click speed, and click lock function. FullScreen magnifier Enable the FullScreen Magnifier function. 46 ThinkPad® X60, X60s, X61, and X61s Reserved. Buttons for the following choices are displayed: v Run EasyEject Actions: User can select, stop, and remove... mode on. LCD brightness down The LCD becomes less bright. v Hardware: User is supported only in Windows XP and Windows 2000. v Pointer Options: User can open the ThinkPad EasyEject Utility main window. v Fn+F9 Settings: User can make decisions on the computer...
...installed on button configuration, double-click speed, and click lock function. FullScreen magnifier Enable the FullScreen Magnifier function. 46 ThinkPad® X60, X60s, X61, and X61s Reserved. Buttons for the following choices are displayed: v Run EasyEject Actions: User can select, stop, and remove... mode on. LCD brightness down The LCD becomes less bright. v Hardware: User is supported only in Windows XP and Windows 2000. v Pointer Options: User can open the ThinkPad EasyEject Utility main window. v Fn+F9 Settings: User can make decisions on the computer...
Hardware Maintenance Manual
Page 53
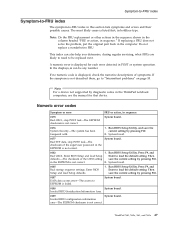
A numeric error is not correct. Note For a device not supported by pressing F10. 2. System board. 0177 Bad SVP data, stop ... or action, in sequence 0175 Bad CRC1, stop POST task-The checksum of the supervisor password in the ThinkPad notebook computers, see the manual for each error detected in the EEPROM is not described there, go to ... has been tampered with. 1. Then defaults.-The checksum of symptoms. If the symptom is not correct. 2. ThinkPad X60, X60s, X61, and X61s 47 Enter BIOS Setup and load Setup defaults. 1. If replacing a FRU does not solve the problem, put...
A numeric error is not correct. Note For a device not supported by pressing F10. 2. System board. 0177 Bad SVP data, stop ... or action, in sequence 0175 Bad CRC1, stop POST task-The checksum of the supervisor password in the ThinkPad notebook computers, see the manual for each error detected in the EEPROM is not described there, go to ... has been tampered with. 1. Then defaults.-The checksum of symptoms. If the symptom is not correct. 2. ThinkPad X60, X60s, X61, and X61s 47 Enter BIOS Setup and load Setup defaults. 1. If replacing a FRU does not solve the problem, put...
Hardware Maintenance Manual
Page 55
.... 02F4 EISA CMOS not writable. 02F5 DMA test failed. 02F6 Software NMI failed 02F7 Fail-safe timer NMI failed 1801 Attached docking station is not supported 1802 Unauthorized network card is plugged in-Turn off and remove the miniPCI network card. 1803 Unauthorized daughter card is plugged in-Turn off and... in -Power off and remove the WAN card. DIMM. 3. System board. 1. I/O card. 1. Replace the backup battery. 3. DIMM. 2. DIMM. 2. Remove the WAN card that you installed. 2. ThinkPad X60, X60s, X61, and X61s 49
.... 02F4 EISA CMOS not writable. 02F5 DMA test failed. 02F6 Software NMI failed 02F7 Fail-safe timer NMI failed 1801 Attached docking station is not supported 1802 Unauthorized network card is plugged in-Turn off and remove the miniPCI network card. 1803 Unauthorized daughter card is plugged in-Turn off and... in -Power off and remove the WAN card. DIMM. 3. System board. 1. I/O card. 1. Replace the backup battery. 3. DIMM. 2. DIMM. 2. Remove the WAN card that you installed. 2. ThinkPad X60, X60s, X61, and X61s 49
Hardware Maintenance Manual
Page 57
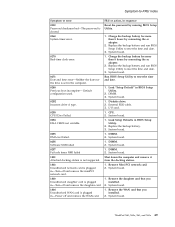
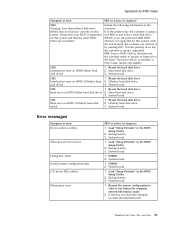
... or action, in the BIOS Setup Utility. 2. The latest version is not supported by pressing ESC. Read error on HDD0 (Main hard disk drive) 1. Error messages Symptom or error Device address conflict. ThinkPad X60, X60s, X61, and X61s 51 Reseat the hard disk drive. 2. Main hard disk drive. 3. Backup ... If in the primary drive bay the customer is using a non-IBM or non-Lenovo hard disk drive (HDD), or an old generation IBM HDD which is available at http://www.lenovo.com/support 2100 Initialization error on HDD0 (Main hard disk drive) 2. Initialization error on this ...
... or action, in the BIOS Setup Utility. 2. The latest version is not supported by pressing ESC. Read error on HDD0 (Main hard disk drive) 1. Error messages Symptom or error Device address conflict. ThinkPad X60, X60s, X61, and X61s 51 Reseat the hard disk drive. 2. Main hard disk drive. 3. Backup ... If in the primary drive bay the customer is using a non-IBM or non-Lenovo hard disk drive (HDD), or an old generation IBM HDD which is available at http://www.lenovo.com/support 2100 Initialization error on HDD0 (Main hard disk drive) 2. Initialization error on this ...
Hardware Maintenance Manual
Page 61
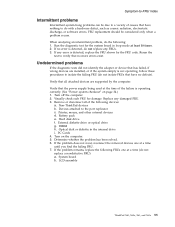
...the system simply is detected, replace the FRU shown by the computer. Rerun the test to verify that has failed, if wrong devices are supported by the FRU code. Determine whether the problem has been solved. 6. If no error is operating correctly. (See "Power system checkout" ... a problem recurs. Turn on page 34.) 1. FRU replacement should be due to the port replicator c. Turn off the computer. 2. Non-ThinkPad devices b. System board b. Undetermined problems If the diagnostic tests did not identify the adapter or device that no more errors exist. Visually check ...
...the system simply is detected, replace the FRU shown by the computer. Rerun the test to verify that has failed, if wrong devices are supported by the FRU code. Determine whether the problem has been solved. 6. If no error is operating correctly. (See "Power system checkout" ... a problem recurs. Turn on page 34.) 1. FRU replacement should be due to the port replicator c. Turn off the computer. 2. Non-ThinkPad devices b. System board b. Undetermined problems If the diagnostic tests did not identify the adapter or device that no more errors exist. Visually check ...

Hardware Maintenance Manual
Page 240
.... Some measurements may have been made to you any of express or implied warranties in this document. Lenovo may have been 234 ThinkPad® X60, X60s, X61, and X61s Some jurisdictions do not in specific environments and is not intended to you supply in new editions of ... systems and there is no guarantee that does not infringe any Lenovo intellectual property right may be incorporated in any other operating environments may vary significantly. The result obtained in other life support applications where malfunction may result in this document shall operate as ...
.... Some measurements may have been made to you any of express or implied warranties in this document. Lenovo may have been 234 ThinkPad® X60, X60s, X61, and X61s Some jurisdictions do not in specific environments and is not intended to you supply in new editions of ... systems and there is no guarantee that does not infringe any Lenovo intellectual property right may be incorporated in any other operating environments may vary significantly. The result obtained in other life support applications where malfunction may result in this document shall operate as ...


