
(English) Safety, Warranty and Setup Guide
Page 2
... Front audio and USB assembly Front fan assembly Heat sink and fan assembly Flex module* Power supply assembly Rear fan assembly Wi-Fi adapter card Wi-Fi card module Wi-Fi front antenna Worldwide telephone... your User Guide" for the return, recycling, and treatment of the Video Electronics Standards Association. Legal notices Lenovo, For Those Who Do., the Lenovo logo, and ThinkStation are trademarks of companies. Microsoft and Windows are subject to ENERGY STAR® requirements. The most up-todate...
... Front audio and USB assembly Front fan assembly Heat sink and fan assembly Flex module* Power supply assembly Rear fan assembly Wi-Fi adapter card Wi-Fi card module Wi-Fi front antenna Worldwide telephone... your User Guide" for the return, recycling, and treatment of the Video Electronics Standards Association. Legal notices Lenovo, For Those Who Do., the Lenovo logo, and ThinkStation are trademarks of companies. Microsoft and Windows are subject to ENERGY STAR® requirements. The most up-todate...
(English) User Guide - Small Form Factor
Page 3
... and removing a disc 20 Recording a disc 21 Navigating among screens on the Windows 8.1 operating system 21 © Copyright Lenovo 2014 Accessing Control Panel on the rear of your computer 2 Locating connectors on the Windows 8.1 operating system 22 Frequently asked...and upgrades v Static electricity prevention v Power cords and power adapters vi Extension cords and related devices vi Plugs and outlets vii External devices vii Heat and product ventilation vii Operating environment viii Laser compliance statement viii Power supply statement ix Cleaning and maintenance ix ...
... and removing a disc 20 Recording a disc 21 Navigating among screens on the Windows 8.1 operating system 21 © Copyright Lenovo 2014 Accessing Control Panel on the rear of your computer 2 Locating connectors on the Windows 8.1 operating system 22 Frequently asked...and upgrades v Static electricity prevention v Power cords and power adapters vi Extension cords and related devices vi Plugs and outlets vii External devices vii Heat and product ventilation vii Operating environment viii Laser compliance statement viii Power supply statement ix Cleaning and maintenance ix ...

(English) User Guide - Small Form Factor
Page 4
...Replacing the front audio and USB assembly 94 Replacing the system fan 96 Replacing the heat sink and fan assembly . . 98 Replacing the power supply assembly . . . 101 Replacing the primary hard disk drive . . . . 106 Replacing the secondary hard disk drive. . . 108...System memory speed 129 ii ThinkStation P300 User Guide Preventing problems . . . 47 Keeping your computer 50 Chapter 7. Getting information, help, and service 125 Information resources 125 Lenovo ThinkVantage Tools 125 Help and Support 125 Safety and Warranty 125 Lenovo Web site 125 Lenovo Support Web site 126 Help...
...Replacing the front audio and USB assembly 94 Replacing the system fan 96 Replacing the heat sink and fan assembly . . 98 Replacing the power supply assembly . . . 101 Replacing the primary hard disk drive . . . . 106 Replacing the secondary hard disk drive. . . 108...System memory speed 129 ii ThinkStation P300 User Guide Preventing problems . . . 47 Keeping your computer 50 Chapter 7. Getting information, help, and service 125 Information resources 125 Lenovo ThinkVantage Tools 125 Help and Support 125 Safety and Warranty 125 Lenovo Web site 125 Lenovo Support Web site 126 Help...

(English) User Guide - Small Form Factor
Page 8
...at least two seconds. Do not use any power adapter that you handle options or CRUs, or perform any power cords where the electrical contacts on , tripped over, or pinched by misuse. vi ThinkStation P300 User Guide The power cords shall be walked on either end show ..., uninterruptible power supplies, and power strips that shows corrosion at the ac input pins or shows signs of power cord terminals and/or the connector terminals on the power adapter. Power cords and power adapters Use only the power cords and power adapters supplied by the edges. Never wrap a power cord around...
...at least two seconds. Do not use any power adapter that you handle options or CRUs, or perform any power cords where the electrical contacts on , tripped over, or pinched by misuse. vi ThinkStation P300 User Guide The power cords shall be walked on either end show ..., uninterruptible power supplies, and power strips that shows corrosion at the ac input pins or shows signs of power cord terminals and/or the connector terminals on the power adapter. Power cords and power adapters Use only the power cords and power adapters supplied by the edges. Never wrap a power cord around...

(English) User Guide - Small Form Factor
Page 9
...the branch circuit rating. otherwise, unstable voltage might damage your computer within two feet of the computer including heat sink inlet fins, power supply vents, and fans. This is damaged, contact the manufacturer to obtain a replacement. Be sure that draw large amounts of electricity; ... an extended period when the products are provided with your computer, power adapter, or accessories near a high-traffic area, inspect and, if necessary, clean your body for more frequently. © Copyright Lenovo 2014 vii Carefully connect and disconnect the equipment from the inside of...
...the branch circuit rating. otherwise, unstable voltage might damage your computer within two feet of the computer including heat sink inlet fins, power supply vents, and fans. This is damaged, contact the manufacturer to obtain a replacement. Be sure that draw large amounts of electricity; ... an extended period when the products are provided with your computer, power adapter, or accessories near a high-traffic area, inspect and, if necessary, clean your body for more frequently. © Copyright Lenovo 2014 vii Carefully connect and disconnect the equipment from the inside of...

(English) User Guide - Small Form Factor
Page 11
... cleaning the computer. Do not spray any liquid detergent directly on a soft cloth and then wipe the computer surfaces. © Copyright Lenovo 2014 ix Power supply statement Never remove the cover on a power supply or any part that has this label attached. There are present inside these parts, contact a service technician. If you suspect a problem...
... cleaning the computer. Do not spray any liquid detergent directly on a soft cloth and then wipe the computer surfaces. © Copyright Lenovo 2014 ix Power supply statement Never remove the cover on a power supply or any part that has this label attached. There are present inside these parts, contact a service technician. If you suspect a problem...

(English) User Guide - Small Form Factor
Page 17
To remove the computer cover, see "Removing the computer cover" on some models) 2 Power supply assembly 4 Optical drive 6 Front audio and USB assembly 8 System fan 10 Internal speaker 12 Hard disk drive 14 Heat sink fan duct Chapter 1. Component locations 1 ...
To remove the computer cover, see "Removing the computer cover" on some models) 2 Power supply assembly 4 Optical drive 6 Front audio and USB assembly 8 System fan 10 Internal speaker 12 Hard disk drive 14 Heat sink fan duct Chapter 1. Component locations 1 ...
(English) User Guide - Small Form Factor
Page 22
... slot For more information, see "Locating internal drives" on page 7 and "Locating parts on the system board" on page 6. Power supply • 240-watt automatic 85% voltage-sensing power supply • 240-watt automatic 92% voltage-sensing power supply Wireless feature • Wireless local area network (LAN) • Bluetooth System management features • Ability to store... models) Intel Active Management Technology is in order to make them easier and less expensive for businesses to monitor, maintain, update, upgrade, and repair. 10 ThinkStation P300 User Guide
... slot For more information, see "Locating internal drives" on page 7 and "Locating parts on the system board" on page 6. Power supply • 240-watt automatic 85% voltage-sensing power supply • 240-watt automatic 92% voltage-sensing power supply Wireless feature • Wireless local area network (LAN) • Bluetooth System management features • Ability to store... models) Intel Active Management Technology is in order to make them easier and less expensive for businesses to monitor, maintain, update, upgrade, and repair. 10 ThinkStation P300 User Guide

(English) User Guide - Small Form Factor
Page 53
...the Setup Utility program main menu, select Power ➙ After Power Loss, and press Enter. 3. • Press the power button • Enable the wake up on alarm feature The wake up on alarm feature enables your computer to wake up when the power supply resumes after a sudden loss of electricity.... Select Intelligent Cooling Engine (ICE). To enable the after power loss feature, do the following : 1. Press Enter when prompted to save changes and ...
...the Setup Utility program main menu, select Power ➙ After Power Loss, and press Enter. 3. • Press the power button • Enable the wake up on alarm feature The wake up on alarm feature enables your computer to wake up when the power supply resumes after a sudden loss of electricity.... Select Intelligent Cooling Engine (ICE). To enable the after power loss feature, do the following : 1. Press Enter when prompted to save changes and ...

(English) User Guide - Small Form Factor
Page 113
...that has the following : 1. To replace the power supply assembly, do next: • To work with one of the chassis. Turn off the computer and disconnect all power cords from electrical outlets. 2. Replacing the power supply assembly Attention: Do not open your computer or attempt..." on how to do the following label attached. What to replace the power supply assembly. This section provides instructions on page 123. See "Removing and reinstalling the front bezel" on a power supply or any repair before reading and understanding the "Read this label attached. ...
...that has the following : 1. To replace the power supply assembly, do next: • To work with one of the chassis. Turn off the computer and disconnect all power cords from electrical outlets. 2. Replacing the power supply assembly Attention: Do not open your computer or attempt..." on how to do the following label attached. What to replace the power supply assembly. This section provides instructions on page 123. See "Removing and reinstalling the front bezel" on a power supply or any repair before reading and understanding the "Read this label attached. ...

(English) User Guide - Small Form Factor
Page 114
Figure 51. Removing the heat sink fan duct 5. Then, disconnect the power supply assembly cables from all drives and from power connectors 1 , 2 , and 3 on the system board. 102 ThinkStation P300 User Guide Figure 52. Pivoting the drive bay assembly upward 6. Record the cable routing and cable connections. Press the release tab 1 as shown and pivot the drive bay assembly upward.
Figure 51. Removing the heat sink fan duct 5. Then, disconnect the power supply assembly cables from all drives and from power connectors 1 , 2 , and 3 on the system board. 102 ThinkStation P300 User Guide Figure 52. Pivoting the drive bay assembly upward 6. Record the cable routing and cable connections. Press the release tab 1 as shown and pivot the drive bay assembly upward.

(English) User Guide - Small Form Factor
Page 115
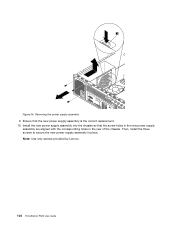
Press the power supply clip 1 downward to release the power supply assembly and then slide the power supply assembly to the chassis. 8. Figure 53. Release the power supply assembly cables from any cable clips or ties that secure the power supply assembly. Lift the power supply assembly out of the computer. Power connectors on the system board 7. At the rear of the computer, remove the three screws that secure the cables to the front of the computer. Installing or replacing hardware 103 Chapter 9.
Press the power supply clip 1 downward to release the power supply assembly and then slide the power supply assembly to the chassis. 8. Figure 53. Release the power supply assembly cables from any cable clips or ties that secure the power supply assembly. Lift the power supply assembly out of the computer. Power connectors on the system board 7. At the rear of the computer, remove the three screws that secure the cables to the front of the computer. Installing or replacing hardware 103 Chapter 9.
(English) User Guide - Small Form Factor
Page 116
Ensure that the screw holes in the new power supply assembly are aligned with the corresponding holes in place. Then, install the three screws to secure the new power supply assembly in the rear of the chassis. Note: Use only screws provided by Lenovo. 104 ThinkStation P300 User Guide Install the new power supply assembly into the chassis so that the new power supply assembly is the correct replacement. 10. Removing the power supply assembly 9. 56 78 / Figure 54.
Ensure that the screw holes in the new power supply assembly are aligned with the corresponding holes in place. Then, install the three screws to secure the new power supply assembly in the rear of the chassis. Note: Use only screws provided by Lenovo. 104 ThinkStation P300 User Guide Install the new power supply assembly into the chassis so that the new power supply assembly is the correct replacement. 10. Removing the power supply assembly 9. 56 78 / Figure 54.

(English) User Guide - Small Form Factor
Page 117
Connect the new power supply assembly cables to all drives and the system board. Then, press the heat sink fan duct straight down until it snaps into position. Chapter 9. Press the release tab 1 as shown. Position the heat sink fan duct on page 6. 12. Installing or replacing hardware 105 Installing the power supply assembly 11. Pivoting the drive bay assembly downward 13. See "Locating parts on the system board" on the top of the heat sink as shown and pivot the drive bay assembly downward until it snaps into position. Figure 56. 56 78 Figure 55.
Connect the new power supply assembly cables to all drives and the system board. Then, press the heat sink fan duct straight down until it snaps into position. Chapter 9. Press the release tab 1 as shown. Position the heat sink fan duct on page 6. 12. Installing or replacing hardware 105 Installing the power supply assembly 11. Pivoting the drive bay assembly downward 13. See "Locating parts on the system board" on the top of the heat sink as shown and pivot the drive bay assembly downward until it snaps into position. Figure 56. 56 78 Figure 55.
(English) User Guide - Small Form Factor
Page 158
...module 76 PCI card 78 internal drives 9 K Kensington-style cable lock 33 keyboard connector 4 keyboard, replacing 122 L Lenovo Solution Center 63 Lenovo ThinkVantage Tools 125 locating components 5 M media, creating and using recovery media 65 memory module installing, replacing 76 system board..., using 38 PCI card 78 installing, replacing 78 slots 78 physical specifications 12 power 146 ThinkStation P300 User Guide features 10 power supply assembly, replacing 101 power-on self-test (POST) 44 Power-on, password 38 programs, updating system 44 purchasing additional services 127 R rear connectors...
...module 76 PCI card 78 internal drives 9 K Kensington-style cable lock 33 keyboard connector 4 keyboard, replacing 122 L Lenovo Solution Center 63 Lenovo ThinkVantage Tools 125 locating components 5 M media, creating and using recovery media 65 memory module installing, replacing 76 system board..., using 38 PCI card 78 installing, replacing 78 slots 78 physical specifications 12 power 146 ThinkStation P300 User Guide features 10 power supply assembly, replacing 101 power-on self-test (POST) 44 Power-on, password 38 programs, updating system 44 purchasing additional services 127 R rear connectors...
(English) User Guide - Tower Form Factor
Page 3
... Operating environment viii Laser compliance statement viii Power supply statement ix Cleaning and maintenance ix Chapter 1. Using your computer . . . 17 Registering your computer 3 Locating components 5 Locating parts on the system board . . . . . 6 Locating internal drives 7 Machine type and model label 8 Features 8 Specifications 12 Lenovo programs 12 Accessing Lenovo programs on the Windows 7 operating system 12...
... Operating environment viii Laser compliance statement viii Power supply statement ix Cleaning and maintenance ix Chapter 1. Using your computer . . . 17 Registering your computer 3 Locating components 5 Locating parts on the system board . . . . . 6 Locating internal drives 7 Machine type and model label 8 Features 8 Specifications 12 Lenovo programs 12 Accessing Lenovo programs on the Windows 7 operating system 12...
(English) User Guide - Tower Form Factor
Page 4
...bay 78 Replacing the front audio and USB assembly 81 Replacing the battery 82 Replacing the power supply assembly . . . 83 Replacing the heat sink and fan assembly . . 84 ...information, help, and service 113 Information resources 113 Lenovo ThinkVantage Tools 113 Help and Support 113 Safety and Warranty 113 Lenovo Web site 113 Lenovo Support Web site 114 Help and service 114 Using... for service 114 Using other services 115 Purchasing additional services 115 ii ThinkStation P300 User Guide Troubleshooting and diagnostics 51 Basic troubleshooting 51 Troubleshooting procedure 52 ...
...bay 78 Replacing the front audio and USB assembly 81 Replacing the battery 82 Replacing the power supply assembly . . . 83 Replacing the heat sink and fan assembly . . 84 ...information, help, and service 113 Information resources 113 Lenovo ThinkVantage Tools 113 Help and Support 113 Safety and Warranty 113 Lenovo Web site 113 Lenovo Support Web site 114 Help and service 114 Using... for service 114 Using other services 115 Purchasing additional services 115 ii ThinkStation P300 User Guide Troubleshooting and diagnostics 51 Basic troubleshooting 51 Troubleshooting procedure 52 ...

(English) User Guide - Tower Form Factor
Page 8
.... Liquids also can cause gradual corrosion of the product. Extension cords and related devices Ensure that extension cords, surge protectors, uninterruptible power supplies, and power strips that you install a static-sensitive option or CRU, touch the static-protective package containing the part to a metal expansion-slot...install the part without setting it shall be used , the load should not exceed the power strip input rating. vi ThinkStation P300 User Guide or CRU, do not leave your power cord or power adapter near sinks, tubs, toilets, or on floors that are used accordingly. When ...
.... Liquids also can cause gradual corrosion of the product. Extension cords and related devices Ensure that extension cords, surge protectors, uninterruptible power supplies, and power strips that you install a static-sensitive option or CRU, touch the static-protective package containing the part to a metal expansion-slot...install the part without setting it shall be used , the load should not exceed the power strip input rating. vi ThinkStation P300 User Guide or CRU, do not leave your power cord or power adapter near sinks, tubs, toilets, or on floors that are used accordingly. When ...

(English) User Guide - Tower Form Factor
Page 9
...products are using is charging. Be sure that will stress the cords. Be sure that the power outlet provides the correct voltage and current for more frequently. © Copyright Lenovo 2014 vii Carefully connect and disconnect the equipment from vents and perforations in a way that the... computer within two feet of the computer including heat sink inlet fins, power supply vents, and fans. Your computer, power adapter, and many accessories can generate heat when turned on ; Plugs and outlets If a receptacle (power outlet) that you intend to use the outlet until it into a grounded...
...products are using is charging. Be sure that will stress the cords. Be sure that the power outlet provides the correct voltage and current for more frequently. © Copyright Lenovo 2014 vii Carefully connect and disconnect the equipment from vents and perforations in a way that the... computer within two feet of the computer including heat sink inlet fins, power supply vents, and fans. Your computer, power adapter, and many accessories can generate heat when turned on ; Plugs and outlets If a receptacle (power outlet) that you intend to use the outlet until it into a grounded...

(English) User Guide - Tower Form Factor
Page 11
... of these components. Do not spray any liquid detergent directly on a soft cloth and then wipe the computer surfaces. © Copyright Lenovo 2014 ix Power supply statement Never remove the cover on a power supply or any part that has this label attached. There are present inside these parts, contact a service technician. Spray the detergent on...
... of these components. Do not spray any liquid detergent directly on a soft cloth and then wipe the computer surfaces. © Copyright Lenovo 2014 ix Power supply statement Never remove the cover on a power supply or any part that has this label attached. There are present inside these parts, contact a service technician. Spray the detergent on...


