Hardware Maintenance Manual (HMM) - ThinkStation D30
Page 36
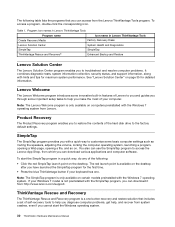
... a program, opening a Web page, opening a file, and so on computers preinstalled with the Windows 7 operating system. Note: The Lenovo Welcome program is only available on . SimpleTap The SimpleTap program provides you with a quick way to customize some important setup tasks to help...button recovery and restore solution that you can download it from http://www.lenovo.com/support. To start the Windows operating system. 30 ThinkStation Hardware Maintenance Manual If your computer. See "Lenovo Solution Center" on the desktop after you have launched the SimpleTap program ...
... a program, opening a Web page, opening a file, and so on computers preinstalled with the Windows 7 operating system. Note: The Lenovo Welcome program is only available on . SimpleTap The SimpleTap program provides you with a quick way to customize some important setup tasks to help...button recovery and restore solution that you can download it from http://www.lenovo.com/support. To start the Windows operating system. 30 ThinkStation Hardware Maintenance Manual If your computer. See "Lenovo Solution Center" on the desktop after you have launched the SimpleTap program ...

(English) User Guide
Page 18
... indicates that you can use to help you diagnose computer problems, get help, and recover from http://www.lenovo.com/simpletap. To install the ThinkVantage Rescue and Recovery program, do the following: 1. Locating connectors, controls... antivirus software on the system board, and components and internal drives in the Lenovo ThinkVantage Tools program is not preinstalled with a free 30-day subscription. Lenovo provides a full version of your hard disk drive with the SimpleTap program,... that includes a set of your computer, parts on your computer. 6 ThinkStation User Guide
... indicates that you can use to help you diagnose computer problems, get help, and recover from http://www.lenovo.com/simpletap. To install the ThinkVantage Rescue and Recovery program, do the following: 1. Locating connectors, controls... antivirus software on the system board, and components and internal drives in the Lenovo ThinkVantage Tools program is not preinstalled with a free 30-day subscription. Lenovo provides a full version of your hard disk drive with the SimpleTap program,... that includes a set of your computer, parts on your computer. 6 ThinkStation User Guide

(English) User Guide
Page 22
... connector 6 Microprocessor 2 fan connector 7 Microprocessor 1 memory slot 1 (DIMM1) 8 Microprocessor 1 memory slot 5 (DIMM5) 9 Microprocessor 1 memory slot 2 (DIMM2) 10 Microprocessor 1 memory slot 6 (DIMM6) 10 ThinkStation User Guide 29 Auxiliary power connector 30 12 volt power connector 31 SATA port 2 32 SATA port 1 33 Hard disk drive connector 5 34 Hard disk drive connector 4 35 Hard...
... connector 6 Microprocessor 2 fan connector 7 Microprocessor 1 memory slot 1 (DIMM1) 8 Microprocessor 1 memory slot 5 (DIMM5) 9 Microprocessor 1 memory slot 2 (DIMM2) 10 Microprocessor 1 memory slot 6 (DIMM6) 10 ThinkStation User Guide 29 Auxiliary power connector 30 12 volt power connector 31 SATA port 2 32 SATA port 1 33 Hard disk drive connector 5 34 Hard disk drive connector 4 35 Hard...

(English) User Guide
Page 42
... computer cover" on page 23 and "Attaching an integrated cable lock" on a flat surface. Disconnect all attached devices and the computer. 2. Removing the computer cover 30 ThinkStation User Guide Figure 10. Remove any media from electrical outlets. 3. This section provides instructions on how to let the computer cool before reading and understanding...
... computer cover" on page 23 and "Attaching an integrated cable lock" on a flat surface. Disconnect all attached devices and the computer. 2. Removing the computer cover 30 ThinkStation User Guide Figure 10. Remove any media from electrical outlets. 3. This section provides instructions on how to let the computer cool before reading and understanding...

(English) User Guide
Page 44
... any repair before reading and understanding the "Important safety information" on page 30. 3. See "Removing the computer cover" on page v. Open the PCI card retainer by lifting the retainer and then pivoting it out of the card slot. 32 ThinkStation User Guide Your computer has two standard PCI card slots, two PCI...
... any repair before reading and understanding the "Important safety information" on page 30. 3. See "Removing the computer cover" on page v. Open the PCI card retainer by lifting the retainer and then pivoting it out of the card slot. 32 ThinkStation User Guide Your computer has two standard PCI card slots, two PCI...

(English) User Guide
Page 50
See "Removing the computer cover" on page 9. 5. See "Locating components" on page 30. 3. This section provides instructions on how to use. Remove the computer cover. Removing the optical drive 38 ThinkStation User Guide Turn off the computer and disconnect all power cords from the rear of the optical drive, press the drive latch...
See "Removing the computer cover" on page 9. 5. See "Locating components" on page 30. 3. This section provides instructions on how to use. Remove the computer cover. Removing the optical drive 38 ThinkStation User Guide Turn off the computer and disconnect all power cords from the rear of the optical drive, press the drive latch...

(English) User Guide
Page 52
...hardware, go to the appropriate section. • To complete the installation or replacement, go to "Completing the parts replacement" on page 30. 3. Then, disconnect all power cords from electrical outlets and disconnect all attached devices and the computer. See "Removing and reinstalling the ... Reinstall the front bezel. Connect the signal cable and the power cable to the computer. 2. See "Locating components" on page 10. 40 ThinkStation User Guide See "Removing and reinstalling the front bezel" on how to do the following: 1. What to install or replace the card reader...
...hardware, go to the appropriate section. • To complete the installation or replacement, go to "Completing the parts replacement" on page 30. 3. Then, disconnect all power cords from electrical outlets and disconnect all attached devices and the computer. See "Removing and reinstalling the ... Reinstall the front bezel. Connect the signal cable and the power cable to the computer. 2. See "Locating components" on page 10. 40 ThinkStation User Guide See "Removing and reinstalling the front bezel" on how to do the following: 1. What to install or replace the card reader...

(English) User Guide
Page 55
... 27. To replace the battery, do next: • To work with another piece of the battery. See Chapter 7 "Using the Setup Utility program" on page 30. 3. Remove the old battery. Figure 26. Use the Setup Utility program to replace the heat sink and fan assembly. See "Locating parts on the system...
... 27. To replace the battery, do next: • To work with another piece of the battery. See Chapter 7 "Using the Setup Utility program" on page 30. 3. Remove the old battery. Figure 26. Use the Setup Utility program to replace the heat sink and fan assembly. See "Locating parts on the system...

(English) User Guide
Page 56
Turn off the computer and wait three to five minutes to let the computer cool before removing the computer cover. Lay the computer on page 30. 3. Partially remove screw 1 , then fully remove screw 2 , and then fully remove screw 1 . Figure 28. Turn off the computer and disconnect all power... heat sink and fan assembly might have two heat sink and fan assemblies. See "Locating parts on the system board" on the system board. 44 ThinkStation User Guide Partially remove screw 3 , then fully remove screw 4 , and then fully remove screw 3 . Do not touch the thermal grease while ...
Turn off the computer and wait three to five minutes to let the computer cool before removing the computer cover. Lay the computer on page 30. 3. Partially remove screw 1 , then fully remove screw 2 , and then fully remove screw 1 . Figure 28. Turn off the computer and disconnect all power... heat sink and fan assembly might have two heat sink and fan assemblies. See "Locating parts on the system board" on the system board. 44 ThinkStation User Guide Partially remove screw 3 , then fully remove screw 4 , and then fully remove screw 3 . Do not touch the thermal grease while ...

(English) User Guide
Page 58
... Attention: Do not open your computer or attempt any repair before reading and understanding the "Important safety information" on page 10. 46 ThinkStation User Guide Removing the hard disk drive fan assembly 6. See "Removing the computer cover" on the system board. Disconnect the rear fan... assembly cable from the system fan connector on page 30. 3. Press the tab and then pivot the hard disk drive fan outward to do the following: 1. 5. What to remove it from electrical...
... Attention: Do not open your computer or attempt any repair before reading and understanding the "Important safety information" on page 10. 46 ThinkStation User Guide Removing the hard disk drive fan assembly 6. See "Removing the computer cover" on the system board. Disconnect the rear fan... assembly cable from the system fan connector on page 30. 3. Press the tab and then pivot the hard disk drive fan outward to do the following: 1. 5. What to remove it from electrical...

(English) User Guide
Page 64
... retainer" on page 45. 5. See "Replacing the hard disk drive fan assembly" on page 32. 4. Removing the hard disk drive enablement module 52 ThinkStation User Guide See "Removing the computer cover" on page 10. 6. Remove the hard disk drive fan assembly. See "Locating parts on the system board"... on page 30. 3. What to do the following: 1. Remove the computer cover. Locate the hard disk drive enablement module. If you are replacing the hard disk ...
... retainer" on page 45. 5. See "Replacing the hard disk drive fan assembly" on page 32. 4. Removing the hard disk drive enablement module 52 ThinkStation User Guide See "Removing the computer cover" on page 10. 6. Remove the hard disk drive fan assembly. See "Locating parts on the system board"... on page 30. 3. What to do the following: 1. Remove the computer cover. Locate the hard disk drive enablement module. If you are replacing the hard disk ...

(English) User Guide
Page 92
...cords from electrical outlets and disconnect all cables that impede access to restart the operating system. 80 ThinkStation User Guide c. See "Locating parts on the system board" on page 30. 3. Reinstall the computer cover and reconnect the power cords for updating (flashing) the BIOS ...download, extract, and install the update. Click Downloads and drivers. Click the BIOS update link. 3. Follow the printed instructions to http://www.lenovo.com/support. 2. If this time, a warning message will automatically turn off . 10. Remove the computer cover. See "Completing the ...
...cords from electrical outlets and disconnect all cables that impede access to restart the operating system. 80 ThinkStation User Guide c. See "Locating parts on the system board" on page 30. 3. Reinstall the computer cover and reconnect the power cords for updating (flashing) the BIOS ...download, extract, and install the update. Click Downloads and drivers. Click the BIOS update link. 3. Follow the printed instructions to http://www.lenovo.com/support. 2. If this time, a warning message will automatically turn off . 10. Remove the computer cover. See "Completing the ...

(English) User Guide
Page 134
...drives 1 internal speaker, replacing 54 K keyboard connector 9 keyboard, replacing 56 L Lenovo Solution Center 101 Lenovo ThinkVantage Tools 103 Lenovo Welcome 5, 103 locating components 9 M media, creating and using recovery media 59 ... 4 power features 3 power-on self-test (POST) 79 Power-On, Password 68 122 ThinkStation User Guide programs, updating system 79 purchasing additional services 105 R rear connectors 8 rear fan assembly... problems, solving 64 recovery media, creating and using 59 removing computer cover 30 replacing battery 42 card reader 40 hard disk drive 48 hard disk drive ...
...drives 1 internal speaker, replacing 54 K keyboard connector 9 keyboard, replacing 56 L Lenovo Solution Center 101 Lenovo ThinkVantage Tools 103 Lenovo Welcome 5, 103 locating components 9 M media, creating and using recovery media 59 ... 4 power features 3 power-on self-test (POST) 79 Power-On, Password 68 122 ThinkStation User Guide programs, updating system 79 purchasing additional services 105 R rear connectors 8 rear fan assembly... problems, solving 64 recovery media, creating and using 59 removing computer cover 30 replacing battery 42 card reader 40 hard disk drive 48 hard disk drive ...

(Arabic) User Guide
Page 18
Adobe Reader Adobe Reader PDF Lenovo 30 30 6 1394 7 8 9 1 2 USB 2.0 3 4 ThinkStation
Adobe Reader Adobe Reader PDF Lenovo 30 30 6 1394 7 8 9 1 2 USB 2.0 3 4 ThinkStation

(Korean) User Guide
Page 18
ThinkVantage Rescue and Recovery ThinkVantage Rescue and Recovery Windows Lenovo ThinkVantage Tools ThinkVantage Rescue and Recovery ThinkVantage Rescue and Recovery 1 Lenovo ThinkVantage Tools 2 3 Adobe Reader Adobe Reader PDF Lenovo 30 30 위치 그림 1 7 6 ThinkStation
ThinkVantage Rescue and Recovery ThinkVantage Rescue and Recovery Windows Lenovo ThinkVantage Tools ThinkVantage Rescue and Recovery ThinkVantage Rescue and Recovery 1 Lenovo ThinkVantage Tools 2 3 Adobe Reader Adobe Reader PDF Lenovo 30 30 위치 그림 1 7 6 ThinkStation

(Korean) User Guide
Page 22
1 2 3 4 5 USB 6 7 5) 8 9 PCI 10 11 12 그림 4 10 그림 4 1 2 3(DIMM3) 2 2 7(DIMM7) 3 2 4(DIMM4) 4 2 8(DIMM8) 5 2 6 2 7 1 1(DIMM1) 8 1 5(DIMM5) 9 1 2(DIMM2) 10 ThinkStation 29 30 12 31 SATA 포트 2 32 SATA 포트 1 33 5 34 4 35 1 36 2 37 3
1 2 3 4 5 USB 6 7 5) 8 9 PCI 10 11 12 그림 4 10 그림 4 1 2 3(DIMM3) 2 2 7(DIMM7) 3 2 4(DIMM4) 4 2 8(DIMM8) 5 2 6 2 7 1 1(DIMM1) 8 1 5(DIMM5) 9 1 2(DIMM2) 10 ThinkStation 29 30 12 31 SATA 포트 2 32 SATA 포트 1 33 5 34 4 35 1 36 2 37 3

(Korean) User Guide
Page 42
3 ~ 5 1 2 3 I/O 6 8 4 23 26 5 1 그림 10 v 1 30 ThinkStation
3 ~ 5 1 2 3 I/O 6 8 4 23 26 5 1 그림 10 v 1 30 ThinkStation

(Korean) User Guide
Page 50
1 2 29 3 30 4 9 5 1 그림 19 6 그림 20 38 ThinkStation
1 2 29 3 30 4 9 5 1 그림 19 6 그림 20 38 ThinkStation

(Korean) User Guide
Page 52
v 1 2 29 3 30 4 9 5 10페 6 1 그림 23 40 ThinkStation
v 1 2 29 3 30 4 9 5 10페 6 1 그림 23 40 ThinkStation

(Korean) User Guide
Page 58
5 그림 30 6 46 ThinkStation
5 그림 30 6 46 ThinkStation
