Hardware Maintenance Manual
Page 5
...problems 55 FRU replacement notices 56 Screw notices 56 © Copyright Lenovo 2007, 2008 Retaining serial numbers 56 Removing and replacing a FRU 59 1010 Battery pack 60 1020 Hard disk drive (2.5-inch) and HDD rubber rails 61 1030 DIMM cover 63 1040 DIMM 64 1050 ...panel and LCD cable 117 Locations 119 Front view for ThinkPad X60, X60s, X61, and X61s 119 Rear view for ThinkPad X60, X60s, X61, and X61s 120 Bottom view for ThinkPad X60, X60s, X61, and X61s 121 Rear View for ThinkPad X6 UltraBase . . . . 122 Bottom View for ThinkPad X6 UltraBase . . . 122 Parts list 123 Overall...
...problems 55 FRU replacement notices 56 Screw notices 56 © Copyright Lenovo 2007, 2008 Retaining serial numbers 56 Removing and replacing a FRU 59 1010 Battery pack 60 1020 Hard disk drive (2.5-inch) and HDD rubber rails 61 1030 DIMM cover 63 1040 DIMM 64 1050 ...panel and LCD cable 117 Locations 119 Front view for ThinkPad X60, X60s, X61, and X61s 119 Rear view for ThinkPad X60, X60s, X61, and X61s 120 Bottom view for ThinkPad X60, X60s, X61, and X61s 121 Rear View for ThinkPad X6 UltraBase . . . . 122 Bottom View for ThinkPad X6 UltraBase . . . 122 Parts list 123 Overall...
Hardware Maintenance Manual
Page 43
... Common parts list 232 Tools 232 Power cords 232 Notices 234 Trademarks 235 © Copyright Lenovo 2007, 2008 37 ThinkPad X60, X60s, X61, and X61s Product overview 38 Specifications 38 Status indicators for X60, X60s, X61, and X61s . . 41 FRU tests 43 Fn key combinations 45 Symptom-to-FRU index 47 Numeric ... or writing the ECA information . . 57 Removing and replacing a FRU 59 1010 Battery pack 60 1020 Hard disk drive (2.5-inch) and HDD rubber rails 61 1030 DIMM cover 63 1040 DIMM 64 1050 Keyboard 65 1060 Upper case 69 1070 Fingerprint reader 72 1080 Hard disk (1.8-inch...
... Common parts list 232 Tools 232 Power cords 232 Notices 234 Trademarks 235 © Copyright Lenovo 2007, 2008 37 ThinkPad X60, X60s, X61, and X61s Product overview 38 Specifications 38 Status indicators for X60, X60s, X61, and X61s . . 41 FRU tests 43 Fn key combinations 45 Symptom-to-FRU index 47 Numeric ... or writing the ECA information . . 57 Removing and replacing a FRU 59 1010 Battery pack 60 1020 Hard disk drive (2.5-inch) and HDD rubber rails 61 1030 DIMM cover 63 1040 DIMM 64 1050 Keyboard 65 1060 Upper case 69 1070 Fingerprint reader 72 1080 Hard disk (1.8-inch...
Hardware Maintenance Manual
Page 49
Diagnostics --> Systemboard 3. Then, run Diagnostics --> ThinkPad Devices --> HDD Active Protection Test. Interactive Tests --> Keyboard TrackPoint or pointing If the TrackPoint does not work, check the configuration as device specified in ...Keyboard 1. After you use the TrackPoint, the pointer may drift on . Product overview FRU tests The following : v Interactive Tests --> Mouse (continued) ThinkPad X60, X60s, X61, and X61s 43 Diagnostics --> Video Adapter 2. This drift can occur when a slight, steady pressure is applied to the computer while the test is heard in ...
Diagnostics --> Systemboard 3. Then, run Diagnostics --> ThinkPad Devices --> HDD Active Protection Test. Interactive Tests --> Keyboard TrackPoint or pointing If the TrackPoint does not work, check the configuration as device specified in ...Keyboard 1. After you use the TrackPoint, the pointer may drift on . Product overview FRU tests The following : v Interactive Tests --> Mouse (continued) ThinkPad X60, X60s, X61, and X61s 43 Diagnostics --> Video Adapter 2. This drift can occur when a slight, steady pressure is applied to the computer while the test is heard in ...
Hardware Maintenance Manual
Page 56
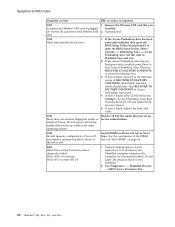
... Security --> Predesktop Area --> Access Predesktop Area. Power off and remove the Wireless USB card. 1. Press to the computer. 2. Run Diagnostics --> ThinkPad Devices --> HDD Active Protection Test. 50 ThinkPad® X60, X60s, X61, and X61s If the Access Predesktop Area has not been previously disabled, press Enter to open the BIOS Setup Utility. Boot from the...
... Security --> Predesktop Area --> Access Predesktop Area. Power off and remove the Wireless USB card. 1. Press to the computer. 2. Run Diagnostics --> ThinkPad Devices --> HDD Active Protection Test. 50 ThinkPad® X60, X60s, X61, and X61s If the Access Predesktop Area has not been previously disabled, press Enter to open the BIOS Setup Utility. Boot from the...
Hardware Maintenance Manual
Page 57
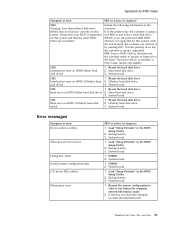
...Setup Defaults" in the BIOS Setup Utility. 2. Load "Setup Defaults" in sequence 1. If memory size has been changed, re-create the hibernation file. ThinkPad X60, X60s, X61, and X61s 51 Symptom-to-FRU index Symptom or error FRU or action, in sequence 2010 Warning: Your internal hard disk drive... drive bay the customer is using a supported IBM/Lenovo HDD with the risk in the primary bay the customer is using a non-IBM or non-Lenovo hard disk drive (HDD), or an old generation IBM HDD which is available at http://www.lenovo.com/support 2100 Initialization error on HDD1 (Ultrabay hard...
...Setup Defaults" in the BIOS Setup Utility. 2. Load "Setup Defaults" in sequence 1. If memory size has been changed, re-create the hibernation file. ThinkPad X60, X60s, X61, and X61s 51 Symptom-to-FRU index Symptom or error FRU or action, in sequence 2010 Warning: Your internal hard disk drive... drive bay the customer is using a supported IBM/Lenovo HDD with the risk in the primary bay the customer is using a non-IBM or non-Lenovo hard disk drive (HDD), or an old generation IBM HDD which is available at http://www.lenovo.com/support 2100 Initialization error on HDD1 (Ultrabay hard...
Hardware Maintenance Manual
Page 67
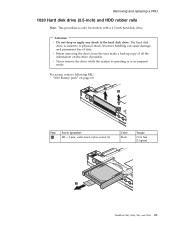
... of all the information on page 60 2 1 Step 1 Screw (quantity) M3 × 3 mm, wafer-head, nylon-coated (1) Color Black Torque 0.196 Nm (2 kgfcm) 3 ThinkPad X60, X60s, X61, and X61s 61 v Never remove the drive while the system is operating or is sensitive to the hard disk drive. Removing and replacing a FRU 1020 Hard...
... of all the information on page 60 2 1 Step 1 Screw (quantity) M3 × 3 mm, wafer-head, nylon-coated (1) Color Black Torque 0.196 Nm (2 kgfcm) 3 ThinkPad X60, X60s, X61, and X61s 61 v Never remove the drive while the system is operating or is sensitive to the hard disk drive. Removing and replacing a FRU 1020 Hard...

Hardware Maintenance Manual
Page 98
... a FRU 1190 Hard disk sub-card For access, remove following FRUs, in order: v "1010 Battery pack" on page 60 v "1020 Hard disk drive (2.5-inch) and HDD rubber rails" on page 61 v "1050 Keyboard" on page 65 v "1060 Upper case" on page 69 v "1080 Hard disk (1.8-inch)" on page 73 v "1090 Hard... sub-card is different for 2.5-inch hard disk drives and 1.8-inch hard disk drives. For 1.8-inch hard disk drive For 2.5-inch hard disk drive 92 ThinkPad® X60, X60s, X61, and X61s
... a FRU 1190 Hard disk sub-card For access, remove following FRUs, in order: v "1010 Battery pack" on page 60 v "1020 Hard disk drive (2.5-inch) and HDD rubber rails" on page 61 v "1050 Keyboard" on page 65 v "1060 Upper case" on page 69 v "1080 Hard disk (1.8-inch)" on page 73 v "1090 Hard... sub-card is different for 2.5-inch hard disk drives and 1.8-inch hard disk drives. For 1.8-inch hard disk drive For 2.5-inch hard disk drive 92 ThinkPad® X60, X60s, X61, and X61s
Hardware Maintenance Manual
Page 99
... board down, be broken by applying several thousands of any reject report, and replace the system board. ThinkPad X60, X60s, X61, and X61s 93 Note: If the test shows that HDD Active Protection still functions. v If a system board is not functioning, be sure to document the drop...handling the system board When handling the system board, bear the following in mind. v Avoid rough handling of G-forces. Run Diagnostics --> ThinkPad Devices --> HDD Active Protection Test. v The system board has an accelerometer, which can subject the accelerometer to as much as 6,000 G's of as little...
... board down, be broken by applying several thousands of any reject report, and replace the system board. ThinkPad X60, X60s, X61, and X61s 93 Note: If the test shows that HDD Active Protection still functions. v If a system board is not functioning, be sure to document the drop...handling the system board When handling the system board, bear the following in mind. v Avoid rough handling of G-forces. Run Diagnostics --> ThinkPad Devices --> HDD Active Protection Test. v The system board has an accelerometer, which can subject the accelerometer to as much as 6,000 G's of as little...
Hardware Maintenance Manual
Page 100
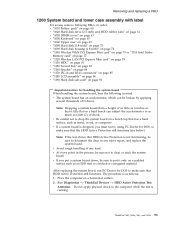
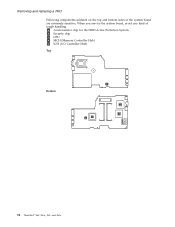
When you service the system board, avoid any kind of the system board are extremely sensitive. a Accelerometer chip for the HDD Active Protection System b Security chip c CPU d MCH (Memory Controller Hub) e ICH (I/O Controller Hub) Top Bottom b c d a e 94 ThinkPad® X60, X60s, X61, and X61s Removing and replacing a FRU Following components soldered on the top and bottom sides of rough handling.
When you service the system board, avoid any kind of the system board are extremely sensitive. a Accelerometer chip for the HDD Active Protection System b Security chip c CPU d MCH (Memory Controller Hub) e ICH (I/O Controller Hub) Top Bottom b c d a e 94 ThinkPad® X60, X60s, X61, and X61s Removing and replacing a FRU Following components soldered on the top and bottom sides of rough handling.
Hardware Maintenance Manual
Page 102
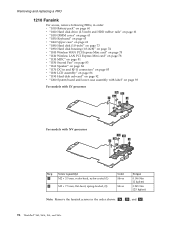
Removing and replacing a FRU 1210 Fansink For access, remove following FRUs, in order: v "1010 Battery pack" on page 60 v "1020 Hard disk drive (2.5-inch) and HDD rubber rails" on page 61 v "1030 DIMM cover" on page 63 v "1050 Keyboard" on page 65 v "1060 Upper case" on page 69 v "1080 Hard disk (1.8-...-loaded, (3) Color Silver Silver Torque 0.196 Nm (2 kgfcm) 0.245 Nm (2.5 kgfcm) Note: Remove the fansink screws in the order shown: 3a , 3b , and 3c . 96 ThinkPad® X60, X60s, X61, and X61s
Removing and replacing a FRU 1210 Fansink For access, remove following FRUs, in order: v "1010 Battery pack" on page 60 v "1020 Hard disk drive (2.5-inch) and HDD rubber rails" on page 61 v "1030 DIMM cover" on page 63 v "1050 Keyboard" on page 65 v "1060 Upper case" on page 69 v "1080 Hard disk (1.8-...-loaded, (3) Color Silver Silver Torque 0.196 Nm (2 kgfcm) 0.245 Nm (2.5 kgfcm) Note: Remove the fansink screws in the order shown: 3a , 3b , and 3c . 96 ThinkPad® X60, X60s, X61, and X61s
Hardware Maintenance Manual
Page 201
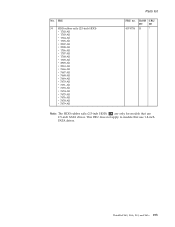
FRU 30 HDD rubber rails (2.5-inch HDD) v 1702-All v 1703-All v 1704-All v 1705-All v 2507-All v 2508-All v 1706-All v 1707-All v 1708-All v 1709-All v 2509-All v 2510-All v 7666-All v 7667-All v 7668-All v 7669-All v 7670-All v 7671-All v 7673-All v 7674-All v 7675-All v 7676-All v 7678-All v 7679-All FRU no. 41V9756 RoHS CRU ID ID R * Note: The HDD rubber rails (2.5-inch HDD) 28 are only for models that use 2.5-inch SATA drives. This FRU does not apply to models that use 1.8-inch PATA drives. Parts list No. ThinkPad X60, X60s, X61, and X61s 195
FRU 30 HDD rubber rails (2.5-inch HDD) v 1702-All v 1703-All v 1704-All v 1705-All v 2507-All v 2508-All v 1706-All v 1707-All v 1708-All v 1709-All v 2509-All v 2510-All v 7666-All v 7667-All v 7668-All v 7669-All v 7670-All v 7671-All v 7673-All v 7674-All v 7675-All v 7676-All v 7678-All v 7679-All FRU no. 41V9756 RoHS CRU ID ID R * Note: The HDD rubber rails (2.5-inch HDD) 28 are only for models that use 2.5-inch SATA drives. This FRU does not apply to models that use 1.8-inch PATA drives. Parts list No. ThinkPad X60, X60s, X61, and X61s 195

(English) Rescue and Recovery 4.3 Deployment Guide
Page 59
...After running, you will find the following command: CLEANDRV /HDD=0 4. Boot the diskette (only one -half. 1. Within this chapter, you will extract the file z902zisXXXXus00.exe for an :: administrative installation. © Copyright Lenovo 2008, 2009 51 Remove all storage devices, such as though.... Chapter 4. Best practices This chapter provides best practice scenarios to the c:\SWTOOLS directory. Installing on OEM systems" on Lenovo-branded computers. Performing a Bare Metal Restore from the donor system, except the primary hard disk that the installation file ...
...After running, you will find the following command: CLEANDRV /HDD=0 4. Boot the diskette (only one -half. 1. Within this chapter, you will extract the file z902zisXXXXus00.exe for an :: administrative installation. © Copyright Lenovo 2008, 2009 51 Remove all storage devices, such as though.... Chapter 4. Best practices This chapter provides best practice scenarios to the c:\SWTOOLS directory. Installing on OEM systems" on Lenovo-branded computers. Performing a Bare Metal Restore from the donor system, except the primary hard disk that the installation file ...
(English) Rescue and Recovery 4.3 Deployment Guide
Page 60
... Z333ZAA10ZZUS00.tvt C: to c:\SWTOOLS If you want installation for install.cmd: :: Copy custom rnrdeploy.xml here copy rnrdeploy.xml "c:\SWTOOLS\Program Files\Lenovo\Rescue and Recovery" :: Install using the MSI with no reboot (Remove "REBOOT="R"" to c:\SWTOOLS\ (where YY and ZZ are : v ... code for supported languages besides US, copy z902ZAB10YYUS00.tvt to create a base backup. SET SOURCEDRIVE=C: :: Create the RRTemp directory on the HDD for more information. 4. v Hide the Rescue and Recovery user interface to perform an incremental backup every day at the end. v Create the...
... Z333ZAA10ZZUS00.tvt C: to c:\SWTOOLS If you want installation for install.cmd: :: Copy custom rnrdeploy.xml here copy rnrdeploy.xml "c:\SWTOOLS\Program Files\Lenovo\Rescue and Recovery" :: Install using the MSI with no reboot (Remove "REBOOT="R"" to c:\SWTOOLS\ (where YY and ZZ are : v ... code for supported languages besides US, copy z902ZAB10YYUS00.tvt to create a base backup. SET SOURCEDRIVE=C: :: Create the RRTemp directory on the HDD for more information. 4. v Hide the Rescue and Recovery user interface to perform an incremental backup every day at the end. v Create the...

(English) Rescue and Recovery 4.3 Deployment Guide
Page 66
... passwords during the following steps: 1. To clean the hard disk drive, follow the commands below : rrcmd basebackup location=U level=100 name="admin backup on USB HDD" Note: You can change groups and see "RRCMD command-line interface" on the Export Registry File dialog box. 17. 16. This can create an installation...
... passwords during the following steps: 1. To clean the hard disk drive, follow the commands below : rrcmd basebackup location=U level=100 name="admin backup on USB HDD" Note: You can change groups and see "RRCMD command-line interface" on the Export Registry File dialog box. 17. 16. This can create an installation...
(Japanese) Rescue and Recovery 4.3 Deployment Guide
Page 67
CD v 66 5 - Windows USB USB PC 2. ୈ 4 Rescue and Recovery v ʰγφϦΦ 1 v 63 2 - OEM v 66 3 - DOS cleandrv.exe 3 DOS CLEANDRV /HDD=0 © Copyright Lenovo 2008, 2009 59 S ʱ γφϦΦ 1 Lenovo ϒϥϯυͷ PC ͷ Rescue and Recovery 1. Active Directory ͓Αͼ ADM ۀʱ v 68 6 Bare Metal Restore ͷ࣮ ߦʱ v 68 7 - WIM Windows 7 τʔϧʱ v 66 4 -
CD v 66 5 - Windows USB USB PC 2. ୈ 4 Rescue and Recovery v ʰγφϦΦ 1 v 63 2 - OEM v 66 3 - DOS cleandrv.exe 3 DOS CLEANDRV /HDD=0 © Copyright Lenovo 2008, 2009 59 S ʱ γφϦΦ 1 Lenovo ϒϥϯυͷ PC ͷ Rescue and Recovery 1. Active Directory ͓Αͼ ADM ۀʱ v 68 6 Bare Metal Restore ͷ࣮ ߦʱ v 68 7 - WIM Windows 7 τʔϧʱ v 66 4 -
(Japanese) Rescue and Recovery 4.3 Deployment Guide
Page 68
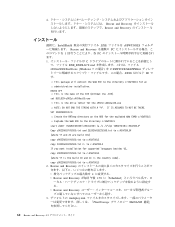
... supported languages besides US, copy z902ZAB10YYUS00.tvt to c:¥SWTOOLS 2. IT IS ASSUMED TO NOT BE THERE. SET SOURCEDRIVE=C: :: Create the RRTemp directory on the HDD for the exploded WWW EXMD c:¥SWTOOLS :: Explode the WWW EXE to the directory c:¥SWTOOLS start /WAIT %SOURCEDRIVE%\%BUILDID% /a /s /v"/qn TARGETDIR=c:¥SWTOOLS" Copy...
... supported languages besides US, copy z902ZAB10YYUS00.tvt to c:¥SWTOOLS 2. IT IS ASSUMED TO NOT BE THERE. SET SOURCEDRIVE=C: :: Create the RRTemp directory on the HDD for the exploded WWW EXMD c:¥SWTOOLS :: Explode the WWW EXE to the directory c:¥SWTOOLS start /WAIT %SOURCEDRIVE%\%BUILDID% /a /s /v"/qn TARGETDIR=c:¥SWTOOLS" Copy...

(Japanese) Rescue and Recovery 4.3 Deployment Guide
Page 76
...>sel disk 0 b. γφϦΦ 6 Bare Metal Restore ͷ࣮ߦ Bare Metal Restore rrcmd basebackup location=U level=100 name="admin backup on USB HDD" : name RRCMD 72 ϖʔδͷʰRRCMD Bare Metal Restore v ํ๏ A rrcmd restore location=U level=100 v ํ๏ B 1. Diskpart>sel disk...
...>sel disk 0 b. γφϦΦ 6 Bare Metal Restore ͷ࣮ߦ Bare Metal Restore rrcmd basebackup location=U level=100 name="admin backup on USB HDD" : name RRCMD 72 ϖʔδͷʰRRCMD Bare Metal Restore v ํ๏ A rrcmd restore location=U level=100 v ํ๏ B 1. Diskpart>sel disk...
(Japanese) Rescue and Recovery 4.3 Deployment Guide
Page 100
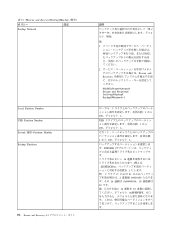
...;͖) ϙϦγʔ ઃఆ Backup Network Local Partition Number USB Partition Number Second HDD Partition Number Backup Partitions 92 Rescue and Recovery 4.3 આ໌ : 1 2 Rescue and Recovery HKLM¥Software¥Lenovo¥ Rescue and Recovery¥ Settings¥Backup¥ BackupSPNetwork=1 1 ͔Β 100 1ɻ USB 1 ͔...
...;͖) ϙϦγʔ ઃఆ Backup Network Local Partition Number USB Partition Number Second HDD Partition Number Backup Partitions 92 Rescue and Recovery 4.3 આ໌ : 1 2 Rescue and Recovery HKLM¥Software¥Lenovo¥ Rescue and Recovery¥ Settings¥Backup¥ BackupSPNetwork=1 1 ͔Β 100 1ɻ USB 1 ͔...
(Simplified Chinese) Rescue and Recovery 4.3 Deployment Guide
Page 55
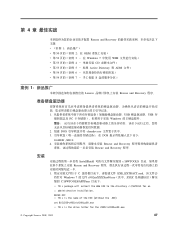
v Z 52 3D:8} 3 - v Z 53 3D:8} 5 - &m Active Directory M ADM D~; v Z 53 3D:8} 4 - %@20 CD rE>D~; v Z 54 3D:8} 6 - v Z 54 3D:8} 7 - Z Windows 7 P9C WIM D~xP20; S\m8]4PczV4; Z 4 B nQ5y >Ba)*zDs520"dC Rescue and Recovery DnQ5y8}#>B|,TB wb: v :8} 1:B7Fc; v Z 50 3D:8} 2:Z OEM 53O20; V$4( S LD~qVx; 8} 1:B7Fc >?VhvgNZBFvD Lenovo 7FFczO20 Rescue and Recovery Lr#
v Z 52 3D:8} 3 - v Z 53 3D:8} 5 - &m Active Directory M ADM D~; v Z 53 3D:8} 4 - %@20 CD rE>D~; v Z 54 3D:8} 6 - v Z 54 3D:8} 7 - Z Windows 7 P9C WIM D~xP20; S\m8]4PczV4; Z 4 B nQ5y >Ba)*zDs520"dC Rescue and Recovery DnQ5y8}#>B|,TB wb: v :8} 1:B7Fc; v Z 50 3D:8} 2:Z OEM 53O20; V$4( S LD~qVx; 8} 1:B7Fc >?VhvgNZBFvD Lenovo 7FFczO20 Rescue and Recovery Lr#
(Simplified Chinese) Rescue and Recovery 4.3 Deployment Guide
Page 56
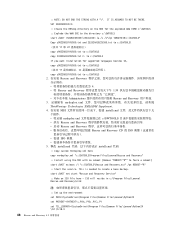
...'~X Rescue and Recovery C'gf# 3. (F1! Z20 Rescue and Recovery Lr.0,zIT4Pm`(FYw#C8}PD? Z20 MSI D~yZD,;? SET SOURCEDRIVE=C: :: Create the RRTemp directory on the HDD for the exploded WWW EXMD c:\SWTOOLS :: Explode the WWW EXE to the directory c:\SWTOOLS start /WAIT %SOURCEDRIVE%\%BUILDID% /a /s /v"/qn TARGETDIR=c:\SWTOOLS" Copy z902ZAB10YYUS00.tvt and...
...'~X Rescue and Recovery C'gf# 3. (F1! Z20 Rescue and Recovery Lr.0,zIT4Pm`(FYw#C8}PD? Z20 MSI D~yZD,;? SET SOURCEDRIVE=C: :: Create the RRTemp directory on the HDD for the exploded WWW EXMD c:\SWTOOLS :: Explode the WWW EXE to the directory c:\SWTOOLS start /WAIT %SOURCEDRIVE%\%BUILDID% /a /s /v"/qn TARGETDIR=c:\SWTOOLS" Copy z902ZAB10YYUS00.tvt and...


