User Manual
Page 4
...Screw notices 73 Retaining serial numbers 74 Removing and replacing a FRU 77 1010 Battery pack 78 1020 Hard disk drive 79 1030 DIMM cover 80 1040 Mini PCI adapter, DIMM, MDC-2, and BMDC-2 81 1050 Keyboard 84 1060 Upper case 87 1070 Backup battery 90 1080 LCD module 91 1090 Hard disk ...2040 Antenna L and antenna R 107 2050 Hinge L and hinge R 111 2060 Bluetooth antenna cable 113 Locations 114 Front view for X40 series 114 Rear view for X40 series 115 Bottom view for X40 series 116 Front View for X4 UltraBase Dock . . . . . 117 Rear View for X4 UltraBase Dock 118 Parts list 119...
...Screw notices 73 Retaining serial numbers 74 Removing and replacing a FRU 77 1010 Battery pack 78 1020 Hard disk drive 79 1030 DIMM cover 80 1040 Mini PCI adapter, DIMM, MDC-2, and BMDC-2 81 1050 Keyboard 84 1060 Upper case 87 1070 Backup battery 90 1080 LCD module 91 1090 Hard disk ...2040 Antenna L and antenna R 107 2050 Hinge L and hinge R 111 2060 Bluetooth antenna cable 113 Locations 114 Front view for X40 series 114 Rear view for X40 series 115 Bottom view for X40 series 116 Front View for X4 UltraBase Dock . . . . . 117 Rear View for X4 UltraBase Dock 118 Parts list 119...
User Manual
Page 42
... utility. 3. How to remove the hard disk password Attention: If User only mode is selected and the user HDP has been forgotten and cannot be replaced for a scheduled fee. To remove a user HDP that you have been saved window, press Enter. 9. Select Power-On Password. 6. In the Changes ...button. 2. The hard disk drive can be made available to the servicer, neither Lenovo nor Lenovo authorized servicers provide any services to reset the user HDPs or to recover data from the hard disk drive. Remove the battery pack. After the POST ends, the password prompt does not appear. Turn on...
... utility. 3. How to remove the hard disk password Attention: If User only mode is selected and the user HDP has been forgotten and cannot be replaced for a scheduled fee. To remove a user HDP that you have been saved window, press Enter. 9. Select Power-On Password. 6. In the Changes ...button. 2. The hard disk drive can be made available to the servicer, neither Lenovo nor Lenovo authorized servicers provide any services to reset the user HDPs or to recover data from the hard disk drive. Remove the battery pack. After the POST ends, the password prompt does not appear. Turn on...

User Manual
Page 51
...occurs only when the port replicator is used, replace the port replicator. v If the problem persists, go to ″Checking operational charging.″ To check the ac adapter, do the following : 1. Checking operational charging To check whether the battery charges properly during operation, go to "Product ... not always indicate a defect. If the charge indicator or icon still does not turn on , replace the battery pack. If the battery status indicator or icon does not turn on , remove the battery pack and let it return to room temperature. If the voltage is not correct...
...occurs only when the port replicator is used, replace the port replicator. v If the problem persists, go to ″Checking operational charging.″ To check the ac adapter, do the following : 1. Checking operational charging To check whether the battery charges properly during operation, go to "Product ... not always indicate a defect. If the charge indicator or icon still does not turn on , replace the battery pack. If the battery status indicator or icon does not turn on , remove the battery pack and let it return to room temperature. If the voltage is not correct...

User Manual
Page 52
... is not correct, replace the battery pack. Checking the battery pack Battery charging does not start until the Power Meter shows that less than +14.4 V dc, measure the resistance between battery terminals 1 (+) and 5 (−). Remove the battery pack and measure the voltage between battery terminals 4 and 5....2370/2371/2372/2382/2386 Remove it from having a shortened life. If the resistance is correct, replace the system board. To get detailed information about the battery, double-click the Power Meter icon. To check the status of the Windows taskbar and wait for ...
... is not correct, replace the battery pack. Checking the battery pack Battery charging does not start until the Power Meter shows that less than +14.4 V dc, measure the resistance between battery terminals 1 (+) and 5 (−). Remove the battery pack and measure the voltage between battery terminals 4 and 5....2370/2371/2372/2382/2386 Remove it from having a shortened life. If the resistance is correct, replace the system board. To get detailed information about the battery, double-click the Power Meter icon. To check the status of the Windows taskbar and wait for ...

User Manual
Page 53
General descriptions 49 v If the backup battery discharges quickly after replacement, replace the system board. v If the voltage is correct, replace the system board. Remove the battery pack (see "Checking the battery pack" on page 78). 4. Remove the backup battery (see "1010 Battery pack" on page 48). 5. Measure the voltage of the backup battery. Turn the computer upside down. 3. See...
General descriptions 49 v If the backup battery discharges quickly after replacement, replace the system board. v If the voltage is correct, replace the system board. Remove the battery pack (see "Checking the battery pack" on page 78). 4. Remove the backup battery (see "1010 Battery pack" on page 48). 5. Measure the voltage of the backup battery. Turn the computer upside down. 3. See...
User Manual
Page 55
...ThinkPad X40 series Product overview 53 Specifications 53 Status indicators for X40 55 FRU tests 57 Fn key combinations 59 Symptom-to-FRU index 61 Numeric error codes 61 Error messages 68 Beep symptoms 70 No-beep symptoms 70 LCD-related symptoms 71 Intermittent problems 72 Undetermined problems 72 FRU replacement.... . . 75 Removing and replacing a FRU 77 1010 Battery pack 78 1020 Hard disk drive... 1060 Upper case 87 1070 Backup battery 90 1080 LCD module 91 1090...Locations 114 Front view for X40 series 114 Rear view for X40 series 115 Bottom view for X40 series 116 Front View ...
...ThinkPad X40 series Product overview 53 Specifications 53 Status indicators for X40 55 FRU tests 57 Fn key combinations 59 Symptom-to-FRU index 61 Numeric error codes 61 Error messages 68 Beep symptoms 70 No-beep symptoms 70 LCD-related symptoms 71 Intermittent problems 72 Undetermined problems 72 FRU replacement.... . . 75 Removing and replacing a FRU 77 1010 Battery pack 78 1020 Hard disk drive... 1060 Upper case 87 1070 Backup battery 90 1080 LCD module 91 1090...Locations 114 Front view for X40 series 114 Rear view for X40 series 115 Bottom view for X40 series 116 Front View ...
User Manual
Page 61
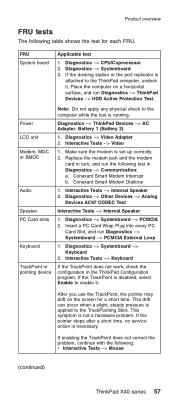
...short time. FRU System board Applicable test 1. Place the computer on the screen for each FRU. Replace the modem jack and the modem card in the ThinkPad Configuration program. Conexant Smart Modem Dialtone 1. If the TrackPoint is applied to enable it . Diagnostics -->..., the pointer may drift on a horizontal surface, and run the following : v Interactive Tests --> Mouse (continued) ThinkPad X40 series 57 Diagnostics --> ThinkPad Devices --> AC Adapter, Battery 1 (Battery 2) 1. Make sure the modem is attached to the computer while the test is necessary. Insert a PC Card Wrap...
...short time. FRU System board Applicable test 1. Place the computer on the screen for each FRU. Replace the modem jack and the modem card in the ThinkPad Configuration program. Conexant Smart Modem Dialtone 1. If the TrackPoint is applied to enable it . Diagnostics -->..., the pointer may drift on a horizontal surface, and run the following : v Interactive Tests --> Mouse (continued) ThinkPad X40 series 57 Diagnostics --> ThinkPad Devices --> AC Adapter, Battery 1 (Battery 2) 1. Make sure the modem is attached to the computer while the test is necessary. Insert a PC Card Wrap...

User Manual
Page 66
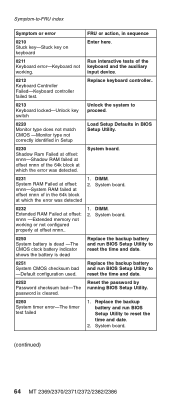
System board. 1. Then save current setting by pressing F10. 2. Replace planar. Battery pack. 1. System board. (continued) 62 MT 2369/2370/2371/2372/2382/2386 Press F9, and Enter to load the default setting. Press F9, and ... System board. System board. System board. EEPROM CRC2 is not correct (block #6). 0189 Invalid RFID configuration information area-EEPROM checksum is not correct (block #0,1). Replace planar. Symptom-to be reinstalled. 1. Then save current setting by pressing F10. 2. Enter BIOS Setup and load Setup defaults. 0187 EAIA data access error-EEPROM...
System board. 1. Then save current setting by pressing F10. 2. Replace planar. Battery pack. 1. System board. (continued) 62 MT 2369/2370/2371/2372/2382/2386 Press F9, and Enter to load the default setting. Press F9, and ... System board. System board. System board. EEPROM CRC2 is not correct (block #6). 0189 Invalid RFID configuration information area-EEPROM checksum is not correct (block #0,1). Replace planar. Symptom-to be reinstalled. 1. Then save current setting by pressing F10. 2. Enter BIOS Setup and load Setup defaults. 0187 EAIA data access error-EEPROM...
User Manual
Page 68
System board. (continued) 64 MT 2369/2370/2371/2372/2382/2386 DIMM. 2. Replace the backup battery and run BIOS Setup Utility to reset the time and date. 2. Replace the backup battery and run BIOS Setup Utility to proceed. 0220 Monitor type does not match CMOS -Monitor type not ... at which the error was detected 1. System board. 0250 System battery is dead -The CMOS clock battery indicator shows the battery is cleared. 0260 System timer error-The timer test failed 1. password is dead Replace the backup battery and run BIOS Setup Utility to reset the time and date....
System board. (continued) 64 MT 2369/2370/2371/2372/2382/2386 DIMM. 2. Replace the backup battery and run BIOS Setup Utility to reset the time and date. 2. Replace the backup battery and run BIOS Setup Utility to proceed. 0220 Monitor type does not match CMOS -Monitor type not ... at which the error was detected 1. System board. 0250 System battery is dead -The CMOS clock battery indicator shows the battery is cleared. 0260 System timer error-The timer test failed 1. password is dead Replace the backup battery and run BIOS Setup Utility to reset the time and date....
User Manual
Page 69
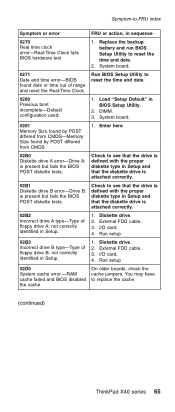
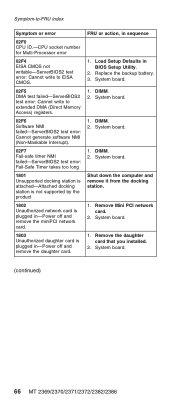
.... 2. Load "Setup Default" in Setup. 1. System board. 0281 Memory Size found by POST differed from CMOS 1. Diskette drive. 2. Replace the backup battery and run BIOS Setup Utility to reset the time and date. 0280 Previous boot incomplete-Default configuration used. 1. Check to see that the ...0270 Real time clock error-Real-Time Clock fails BIOS hardware test 1. External FDD cable. 3. External FDD cable. 3. Symptom-to replace the cache (continued) ThinkPad X40 series 65 I /O card. 4. You may have to -FRU index Symptom or error FRU or action, in Setup. 1.
.... 2. Load "Setup Default" in Setup. 1. System board. 0281 Memory Size found by POST differed from CMOS 1. Diskette drive. 2. Replace the backup battery and run BIOS Setup Utility to reset the time and date. 0280 Previous boot incomplete-Default configuration used. 1. Check to see that the ...0270 Real time clock error-Real-Time Clock fails BIOS hardware test 1. External FDD cable. 3. External FDD cable. 3. Symptom-to replace the cache (continued) ThinkPad X40 series 65 I /O card. 4. You may have to -FRU index Symptom or error FRU or action, in Setup. 1.
User Manual
Page 70
... Defaults in sequence 1. DIMM. 2. System board. 1. System board. (continued) 66 MT 2369/2370/2371/2372/2382/2386 System board. 1. Remove Mini PCI network card. 2. Replace the backup battery. 3. System board. 1. DIMM. 2. Shut down the computer and remove it from the docking station. 1. FRU or action, in BIOS Setup Utility. 2. System board. 1. Symptom...
... Defaults in sequence 1. DIMM. 2. System board. 1. System board. (continued) 66 MT 2369/2370/2371/2372/2382/2386 System board. 1. Remove Mini PCI network card. 2. Replace the backup battery. 3. System board. 1. DIMM. 2. Shut down the computer and remove it from the docking station. 1. FRU or action, in BIOS Setup Utility. 2. System board. 1. Symptom...
User Manual
Page 76
...by the computer. PC Cards 4. Turn on page 46.) 1. If the problem remains, replace the following : 1. System board b. Printer, mouse, and other external devices d. Hard disk drive f. Replace any FRUs. 3. Battery pack e. If the problem does not recur, reconnect the removed devices one at a time...2386 Devices attached to verify that the power supply being used at least 10 times. 2. If no more errors exist. Non-ThinkPad devices b. Symptom-to-FRU index Intermittent problems Intermittent system hang problems can be considered only when a problem recurs. Rerun the ...
...by the computer. PC Cards 4. Turn on page 46.) 1. If the problem remains, replace the following : 1. System board b. Printer, mouse, and other external devices d. Hard disk drive f. Replace any FRUs. 3. Battery pack e. If the problem does not recur, reconnect the removed devices one at a time...2386 Devices attached to verify that the power supply being used at least 10 times. 2. If no more errors exist. Non-ThinkPad devices b. Symptom-to-FRU index Intermittent problems Intermittent system hang problems can be considered only when a problem recurs. Rerun the ...
User Manual
Page 81
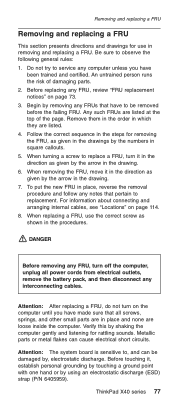
...on the computer until you have to service any computer unless you have made sure that all power cords from electrical outlets, remove the battery pack, and then disconnect any interconnecting cables. Any such FRUs are listed. 4. When removing the FRU, move it in the direction... the page. Attention: The system board is sensitive to replacement. Attention: After replacing a FRU, do not turn it in the direction as shown in the procedures. ThinkPad X40 series 77 Be sure to replace a FRU, turn on page 73. 3. Before replacing any FRUs that pertain to , and can cause electrical short...
...on the computer until you have to service any computer unless you have made sure that all power cords from electrical outlets, remove the battery pack, and then disconnect any interconnecting cables. Any such FRUs are listed. 4. When removing the FRU, move it in the direction... the page. Attention: The system board is sensitive to replacement. Attention: After replacing a FRU, do not turn it in the direction as shown in the procedures. ThinkPad X40 series 77 Be sure to replace a FRU, turn on page 73. 3. Before replacing any FRUs that pertain to , and can cause electrical short...

User Manual
Page 82
Removing and replacing a FRU 1010 Battery pack DANGER Use only the battery specified in ignition or explosion of the battery. The use of an incorrect battery can result in the parts list for your computer. Before processing, seperate main unit from docking first. 3 1 2 Release the lock knob, shown as 1 , and latche knob, shown as 2 , to remove the battery pack. 2 2 3 1 1 78 MT 2369/2370/2371/2372/2382/2386
Removing and replacing a FRU 1010 Battery pack DANGER Use only the battery specified in ignition or explosion of the battery. The use of an incorrect battery can result in the parts list for your computer. Before processing, seperate main unit from docking first. 3 1 2 Release the lock knob, shown as 1 , and latche knob, shown as 2 , to remove the battery pack. 2 2 3 1 1 78 MT 2369/2370/2371/2372/2382/2386

User Manual
Page 83
...v Before removing the drive, have the user make a backup copy of data. v Never remove the drive while the system is operating or is connected firmly. ThinkPad X40 series 79 Incorrect handling can cause damage and permanent loss of all the information on page 78 1 3 2 Step 1 Screw (quantity) M3 × 4 mm...is in suspend mode. The hard disk drive is sensitive to the hard disk drive. For access, remove following FRU: v "1010 Battery pack" on the drive if possible. Removing and replacing a FRU 1020 Hard disk drive Attention v Do not drop or apply any shock to physical shock.
...v Before removing the drive, have the user make a backup copy of data. v Never remove the drive while the system is operating or is connected firmly. ThinkPad X40 series 79 Incorrect handling can cause damage and permanent loss of all the information on page 78 1 3 2 Step 1 Screw (quantity) M3 × 4 mm...is in suspend mode. The hard disk drive is sensitive to the hard disk drive. For access, remove following FRU: v "1010 Battery pack" on the drive if possible. Removing and replacing a FRU 1020 Hard disk drive Attention v Do not drop or apply any shock to physical shock.

User Manual
Page 84
Removing and replacing a FRU 1030 DIMM cover For access, remove following FRU: v "1010 Battery pack" on page 78 Note: Loosen the screws 1 , but do not remove them. 1 1 1 3 2 Step 1 Screw (quantity) M2 ×3 mm (3) Torque 0.157 Nm (1.6 kgfcm) 80 MT 2369/2370/2371/2372/2382/2386
Removing and replacing a FRU 1030 DIMM cover For access, remove following FRU: v "1010 Battery pack" on page 78 Note: Loosen the screws 1 , but do not remove them. 1 1 1 3 2 Step 1 Screw (quantity) M2 ×3 mm (3) Torque 0.157 Nm (1.6 kgfcm) 80 MT 2369/2370/2371/2372/2382/2386

User Manual
Page 85
Removing and replacing a FRU 1040 Mini PCI adapter, DIMM, MDC-2, and BMDC-2 For access, remove following FRUs, in order: v "1010 Battery pack" on page 78 v "1030 DIMM cover" on page 80 Detach antenna and remove Mini PCI adapter. 1 AUX MAIN 2 2 3 Pull over the levers to detach DIMM. 2 1 1 (continued) ThinkPad X40 series 81
Removing and replacing a FRU 1040 Mini PCI adapter, DIMM, MDC-2, and BMDC-2 For access, remove following FRUs, in order: v "1010 Battery pack" on page 78 v "1030 DIMM cover" on page 80 Detach antenna and remove Mini PCI adapter. 1 AUX MAIN 2 2 3 Pull over the levers to detach DIMM. 2 1 1 (continued) ThinkPad X40 series 81

User Manual
Page 88
Removing and replacing a FRU 1050 Keyboard For access, remove following FRU: v "1010 Battery pack" on page 78 Remove 6 screws with keyboard icon to remove keyboard. 1 1 1 1 1 1 Step 1 Screw (quantity) M2 × 6 mm, nylon-coated (6) (continued) Torque 0.196 Nm (2 kgfcm) 84 MT 2369/2370/2371/2372/2382/2386
Removing and replacing a FRU 1050 Keyboard For access, remove following FRU: v "1010 Battery pack" on page 78 Remove 6 screws with keyboard icon to remove keyboard. 1 1 1 1 1 1 Step 1 Screw (quantity) M2 × 6 mm, nylon-coated (6) (continued) Torque 0.196 Nm (2 kgfcm) 84 MT 2369/2370/2371/2372/2382/2386

User Manual
Page 91
Removing and replacing a FRU 1060 Upper case For access, remove following FRUs, in order: v "1010 Battery pack" on page 78 v "1050 Keyboard" on page 84 Remove 6 screws as shown below. 1 1 1 1 1 1a 1 Step 1 Screw (quantity) M2 × 6 mm, nylon-coated (6) (continued) Torque 0.196 Nm (2 kgfcm) ThinkPad X40 series 87
Removing and replacing a FRU 1060 Upper case For access, remove following FRUs, in order: v "1010 Battery pack" on page 78 v "1050 Keyboard" on page 84 Remove 6 screws as shown below. 1 1 1 1 1 1a 1 Step 1 Screw (quantity) M2 × 6 mm, nylon-coated (6) (continued) Torque 0.196 Nm (2 kgfcm) ThinkPad X40 series 87

User Manual
Page 94
Removing and replacing a FRU 1070 Backup battery DANGER Use only the battery specified in order: v "1010 Battery pack" on page 78 v "1020 Hard disk drive" on page 79 v "1030 DIMM cover" on page 80 v "1050 Keyboard" on page 84 2 1 When installing: Make sure that the battery connector is attached firmly. 90 MT 2369/2370/2371/2372/2382/2386 For access, remove following FRUs, in the parts list for your computer. The use of an incorrect battery can result in ignition or explosion of the battery.
Removing and replacing a FRU 1070 Backup battery DANGER Use only the battery specified in order: v "1010 Battery pack" on page 78 v "1020 Hard disk drive" on page 79 v "1030 DIMM cover" on page 80 v "1050 Keyboard" on page 84 2 1 When installing: Make sure that the battery connector is attached firmly. 90 MT 2369/2370/2371/2372/2382/2386 For access, remove following FRUs, in the parts list for your computer. The use of an incorrect battery can result in ignition or explosion of the battery.


