User Manual
Page 47
...for replacing a system board" on page 41 Important: BIOS and device driver fixes are customer-installable. "FRU identification for CTO, CMV, and GAV products" on page 40 - After a system board is loaded to http://www.lenovo.com/support 2. Enter the product number of the computer.../Reassembly videos that show the FRU removals or replacements for the Lenovo® authorized service technicians are available in the following important service information that applies to all software fixes, drivers, and BIOS downloads are posted on page 40 - Important service information This chapter...
...for replacing a system board" on page 41 Important: BIOS and device driver fixes are customer-installable. "FRU identification for CTO, CMV, and GAV products" on page 40 - After a system board is loaded to http://www.lenovo.com/support 2. Enter the product number of the computer.../Reassembly videos that show the FRU removals or replacements for the Lenovo® authorized service technicians are available in the following important service information that applies to all software fixes, drivers, and BIOS downloads are posted on page 40 - Important service information This chapter...

User Manual
Page 53
...indications of the BIOS Setup Utility before you need to re-create the failure by running the diagnostics test included in as much detail as a guide in identifying and correcting problems with the ThinkPad Notebook. Checkout guide Use the following Web site: http:// www.lenovo.com/support ...To create the PC-Doctor diagnostic CD, follow the instructions on the Web site. On the BIOS Setup Utility screen, press F9, Enter, F10, and ...
...indications of the BIOS Setup Utility before you need to re-create the failure by running the diagnostics test included in as much detail as a guide in identifying and correcting problems with the ThinkPad Notebook. Checkout guide Use the following Web site: http:// www.lenovo.com/support ...To create the PC-Doctor diagnostic CD, follow the instructions on the Web site. On the BIOS Setup Utility screen, press F9, Enter, F10, and ...
User Manual
Page 58
... Keyboard 2. If the problem does not recur, return the DIMM to start the diagnostic program. 1. Run Diagnostics --> ThinkPad Devices --> Fan. 50 ThinkPad X301 Hardware Maintenance Manual FRU tests FRU System board Power LCD unit Audio Speaker Keyboard Hard disk drive or solid state drive Diskette...disk drive. 6. Diagnostics --> Diskette Drives 2. Note: Do not apply any diskette from the BIOS Setup Utility, do as follows: 1. Interactive Tests --> Keyboard Enter the BIOS Setup Utility and change Serial ATA (SATA) setting to the computer while the test is ...
... Keyboard 2. If the problem does not recur, return the DIMM to start the diagnostic program. 1. Run Diagnostics --> ThinkPad Devices --> Fan. 50 ThinkPad X301 Hardware Maintenance Manual FRU tests FRU System board Power LCD unit Audio Speaker Keyboard Hard disk drive or solid state drive Diskette...disk drive. 6. Diagnostics --> Diskette Drives 2. Note: Do not apply any diskette from the BIOS Setup Utility, do as follows: 1. Interactive Tests --> Keyboard Enter the BIOS Setup Utility and change Serial ATA (SATA) setting to the computer while the test is ...

User Manual
Page 59
...problem, continue with the following : v Interactive Tests --> Mouse If the Touch Pad does not work , check the configuration as specified in the BIOS Setup Utility. If enabling the Touch Pad does not correct the problem, continue with the following : v Interactive Tests --> Mouse General checkout 51...FRU tests (continued) FRU Applicable test TrackPoint or pointing If the TrackPoint does not work , check the configuration as device specified in the BIOS Setup Utility. This drift can occur when a slight, steady pressure is disabled, select Automatic to enable it . If the Touch Pad...
...problem, continue with the following : v Interactive Tests --> Mouse If the Touch Pad does not work , check the configuration as specified in the BIOS Setup Utility. If enabling the Touch Pad does not correct the problem, continue with the following : v Interactive Tests --> Mouse General checkout 51...FRU tests (continued) FRU Applicable test TrackPoint or pointing If the TrackPoint does not work , check the configuration as device specified in the BIOS Setup Utility. This drift can occur when a slight, steady pressure is disabled, select Automatic to enable it . If the Touch Pad...
User Manual
Page 66
...hard disk drive can be replaced for a scheduled fee. Remove the backup battery. Select Password. 58 ThinkPad X301 Hardware Maintenance Manual Note: There are servicing supports the Passphrase function, enter the BIOS Setup Utility and go to Security --> Password. Attention: If the user HDP has been forgotten, check... If an SVP has been set . The system board must enter the SVP in the menu, this function is available, neither Lenovo nor Lenovo authorized service technicians provide any services to reset either the user or the master HDP, or to remove the battery pack, see ...
...hard disk drive can be replaced for a scheduled fee. Remove the backup battery. Select Password. 58 ThinkPad X301 Hardware Maintenance Manual Note: There are servicing supports the Passphrase function, enter the BIOS Setup Utility and go to Security --> Password. Attention: If the user HDP has been forgotten, check... If an SVP has been set . The system board must enter the SVP in the menu, this function is available, neither Lenovo nor Lenovo authorized service technicians provide any services to reset either the user or the master HDP, or to remove the battery pack, see ...

User Manual
Page 67
...; For models supporting the Passphrase function, press F1 while HDP icon is available on the computer. 2. Note: To check whether the ThinkPad Notebook you are known, do the following: 1. Select Security, using the cursor directional keys to remove the hard-disk password Attention: .... 5. Turn on the ThinkPad Notebook. 3. Select Power-On Password. 6. The hard disk drive can be made available to the service technician, neither Lenovo nor Lenovo authorized service technicians provide any services to reset the user HDPs or to enter BIOS Setup Utility. then leave the...
...; For models supporting the Passphrase function, press F1 while HDP icon is available on the computer. 2. Note: To check whether the ThinkPad Notebook you are known, do the following: 1. Select Security, using the cursor directional keys to remove the hard-disk password Attention: .... 5. Turn on the ThinkPad Notebook. 3. Select Power-On Password. 6. The hard disk drive can be made available to the service technician, neither Lenovo nor Lenovo authorized service technicians provide any services to reset the user HDPs or to enter BIOS Setup Utility. then leave the...
User Manual
Page 70
...-The EEPROM checksum is displayed for that device. Press F9, and Bad CRC2. Run BIOS Setup Utility. Enter BIOS Setup and load Setup defaults. 1. Then save the current setting by pressing F10. 62 ThinkPad X301 Hardware Maintenance Manual If replacing a FRU does not solve the problem, put the original...of the CRS2 setting save the current setting by diagnostic codes in the EEPROM is not correct. Enter BIOS Setup and load Setup Enter to load the default setting. in the ThinkPad Notebooks, see the manual for each error detected in the EEPROM is not correct. 2. Press F9...
...-The EEPROM checksum is displayed for that device. Press F9, and Bad CRC2. Run BIOS Setup Utility. Enter BIOS Setup and load Setup defaults. 1. Then save the current setting by pressing F10. 62 ThinkPad X301 Hardware Maintenance Manual If replacing a FRU does not solve the problem, put the original...of the CRS2 setting save the current setting by diagnostic codes in the EEPROM is not correct. Enter BIOS Setup and load Setup Enter to load the default setting. in the ThinkPad Notebooks, see the manual for each error detected in the EEPROM is not correct. 2. Press F9...

User Manual
Page 71
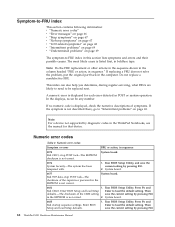
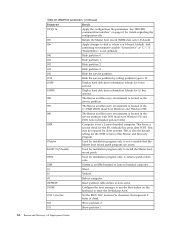
... System board. 0231 System RAM error-System RAM fails at offset nnnn. DIMM. 2. Extended RAM fails 2. Replace the backup battery and run BIOS Setup Utility to ignore the warning message. 2. Numeric error codes (continued) Symptom or error FRU or action, in CMOS. Embedded Security hardware ...of them . System board. 0200 Hard disk error-The hard disk is dead. 1. Run interactive tests of them . 1. Load Setup Defaults in BIOS Setup Utility. 3. Charge the backup battery for more than 8 hours by connecting the AC adapter. 2. Remove the wireless LAN device that you installed...
... System board. 0231 System RAM error-System RAM fails at offset nnnn. DIMM. 2. Extended RAM fails 2. Replace the backup battery and run BIOS Setup Utility to ignore the warning message. 2. Numeric error codes (continued) Symptom or error FRU or action, in CMOS. Embedded Security hardware ...of them . System board. 0200 Hard disk error-The hard disk is dead. 1. Run interactive tests of them . 1. Load Setup Defaults in BIOS Setup Utility. 3. Charge the backup battery for more than 8 hours by connecting the AC adapter. 2. Remove the wireless LAN device that you installed...

User Manual
Page 72
... Utility. 2. DIMM. 3. Remove Mini PCI network card. 2. System board. 1804 Unauthorized WAN card is plugged installed. System board. 64 ThinkPad X301 Hardware Maintenance Manual Charge the backup battery for more than 8 hours by running BIOS Setup Utility. 0260 System timer error. 1. Default configuration used . 1. CPU. 2. System board. 02F4 EISA CMOS not writable. 1. System...
... Utility. 2. DIMM. 3. Remove Mini PCI network card. 2. System board. 1804 Unauthorized WAN card is plugged installed. System board. 64 ThinkPad X301 Hardware Maintenance Manual Charge the backup battery for more than 8 hours by running BIOS Setup Utility. 0260 System timer error. 1. Default configuration used . 1. CPU. 2. System board. 02F4 EISA CMOS not writable. 1. System...

User Manual
Page 74
... Invalid system configuration data. Load "Setup Defaults" in the BIOS Setup Utility. 2. Load "Setup Defaults" in the BIOS Setup Utility. 2. DIMM. 2. Fan. 2. Device not found. 1. Device Error. 1. FRU or action, in the BIOS Setup Utility. 2. System board. 1. Thermal grease. 3....board. 1. System board. 1. System board. 1. Backup battery. 3. Backup battery. 3. v Enter the BIOS Setup Utility and add the device in boot order. 66 ThinkPad X301 Hardware Maintenance Manual System board. Reinstall the operation system. The device you want to boot from . 2....
... Invalid system configuration data. Load "Setup Defaults" in the BIOS Setup Utility. 2. Load "Setup Defaults" in the BIOS Setup Utility. 2. DIMM. 2. Fan. 2. Device not found. 1. Device Error. 1. FRU or action, in the BIOS Setup Utility. 2. System board. 1. Thermal grease. 3....board. 1. System board. 1. System board. 1. Backup battery. 3. Backup battery. 3. v Enter the BIOS Setup Utility and add the device in boot order. 66 ThinkPad X301 Hardware Maintenance Manual System board. Reinstall the operation system. The device you want to boot from . 2....
(English) Rescue and Recovery 4.3 Deployment Guide
Page 10
...help topics in support cost savings. Rejuvenating The Rescue and Recovery program can benefit from the Rescue and Recovery program on Lenovo-branded personal computers that can then purchase separate licenses for software downloads or file transfer. Diagnostic overview: Links to related... hard disk drive, ensure that the hard disk drive is available on non-Lenovo branded computers. The log files provide a readable way to create a set of diagnostic diskettes. - Access BIOS: Opens the BIOS Setup Utility program. v Communicate - Create diagnostic disks: Enables you to view...
...help topics in support cost savings. Rejuvenating The Rescue and Recovery program can benefit from the Rescue and Recovery program on Lenovo-branded personal computers that can then purchase separate licenses for software downloads or file transfer. Diagnostic overview: Links to related... hard disk drive, ensure that the hard disk drive is available on non-Lenovo branded computers. The log files provide a readable way to create a set of diagnostic diskettes. - Access BIOS: Opens the BIOS Setup Utility program. v Communicate - Create diagnostic disks: Enables you to view...
(English) Rescue and Recovery 4.3 Deployment Guide
Page 13
... the Windows 7 operating system. A possible security risk may be installed on the ThinkVantage Technologies Administrator Tools page: http://www.lenovo.com/support/site.wss/document.do?lndocid=TVANADMIN#rnr Installation considerations The Rescue and Recovery program has two main interfaces. Microsoft Recovery... it assumes it to install Storage Management Subsystem on a computer with the Rescue and Recovery program installed with the non-BIOS version of the Rescue and Recovery program for the deployment guide located on the Windows 7 operating system. Installation Prior to enter ...
... the Windows 7 operating system. A possible security risk may be installed on the ThinkVantage Technologies Administrator Tools page: http://www.lenovo.com/support/site.wss/document.do?lndocid=TVANADMIN#rnr Installation considerations The Rescue and Recovery program has two main interfaces. Microsoft Recovery... it assumes it to install Storage Management Subsystem on a computer with the Rescue and Recovery program installed with the non-BIOS version of the Rescue and Recovery program for the deployment guide located on the Windows 7 operating system. Installation Prior to enter ...
(English) Rescue and Recovery 4.3 Deployment Guide
Page 14
... help you with InstallShield 10.5 Premier as setting property values from the command line. In shared memory configurations, the BIOS setting for installing the Rescue and Recovery package on software versions, supported systems, system requirements, and other considerations to ...: Installation requirements: 2.4 GB of the software installed. v 2.4 GB of the Rescue and Recovery program, see the Lenovo Web site: http://www.lenovo.com/thinkvantage Requirements for original equipment manufacturer (OEM) computers. 6 Rescue and Recovery 4.3 Deployment Guide To obtain the latest...
... help you with InstallShield 10.5 Premier as setting property values from the command line. In shared memory configurations, the BIOS setting for installing the Rescue and Recovery package on software versions, supported systems, system requirements, and other considerations to ...: Installation requirements: 2.4 GB of the software installed. v 2.4 GB of the Rescue and Recovery program, see the Lenovo Web site: http://www.lenovo.com/thinkvantage Requirements for original equipment manufacturer (OEM) computers. 6 Rescue and Recovery 4.3 Deployment Guide To obtain the latest...
(English) Rescue and Recovery 4.3 Deployment Guide
Page 15
...compatibility: VGA-compatible video that are independent of the following specifications: v ATAPI Removable Media Device BIOS Specification v BIOS Enhanced Disk Drive Services - 2 v Compaq Phoenix Intel® BIOS Boot Specification v El Torito Bootable CD-ROM Format Specification v USB Mass Storage Class Specification Overview...environment supports only wired PCI-based, Ethernet network adapters. If an OEM network device in your OEM. For supported Lenovo computers, required drivers are included with the command block specification in the section 2.0 Subclass code in the ″...
...compatibility: VGA-compatible video that are independent of the following specifications: v ATAPI Removable Media Device BIOS Specification v BIOS Enhanced Disk Drive Services - 2 v Compaq Phoenix Intel® BIOS Boot Specification v El Torito Bootable CD-ROM Format Specification v USB Mass Storage Class Specification Overview...environment supports only wired PCI-based, Ethernet network adapters. If an OEM network device in your OEM. For supported Lenovo computers, required drivers are included with the command block specification in the section 2.0 Subclass code in the ″...
(English) Rescue and Recovery 4.3 Deployment Guide
Page 21
Using Symantec Ghost-based tools with the Microsoft Bitlocker Drive Preparation Tool. These variables can be at least 2 GB in the BIOS Setup Utility, to a desired directory from a command prompt, type CD %rr% and press Enter. Compatibility with BitLocker To achieve ... a computer that are properly set up the BitLocker partition, it is recommended to install the Rescue and Recovery program to change the c:\Program Files\Lenovo\Rescue and Recovery directory from a command prompt. Chapter 2. Refer to use the scenario in "Scenario 6 Performing a Bare Metal Restore from the ...
Using Symantec Ghost-based tools with the Microsoft Bitlocker Drive Preparation Tool. These variables can be at least 2 GB in the BIOS Setup Utility, to a desired directory from a command prompt, type CD %rr% and press Enter. Compatibility with BitLocker To achieve ... a computer that are properly set up the BitLocker partition, it is recommended to install the Rescue and Recovery program to change the c:\Program Files\Lenovo\Rescue and Recovery directory from a command prompt. Chapter 2. Refer to use the scenario in "Scenario 6 Performing a Bare Metal Restore from the ...
(English) Rescue and Recovery 4.3 Deployment Guide
Page 65
...Fbootmgr.bin /M1 /IBM /THINK 12. A new tab named ThinkVantage is presented. Select Hide from the Lenovo ThinkVantage Technologies Administrator Tools Web page at: http://www.lenovo.com/support/site.wss/document.do?lndocid=TVANADMIN#rnr 6. Click Export. 15. Exit Diskpart 9. Use one ...Reboot For more information about Windows 7, WIM files, or ImageX, see the following registry key: HKLM\Software\Policies\Lenovo\ Rescue and Recovery. 14. Configure BIOS password recovery silently. This example documents how to all intended machines. Install the Rescue and Recovery program on the ...
...Fbootmgr.bin /M1 /IBM /THINK 12. A new tab named ThinkVantage is presented. Select Hide from the Lenovo ThinkVantage Technologies Administrator Tools Web page at: http://www.lenovo.com/support/site.wss/document.do?lndocid=TVANADMIN#rnr 6. Click Export. 15. Exit Diskpart 9. Use one ...Reboot For more information about Windows 7, WIM files, or ImageX, see the following registry key: HKLM\Software\Policies\Lenovo\ Rescue and Recovery. 14. Configure BIOS password recovery silently. This example documents how to all intended machines. Install the Rescue and Recovery program on the ...
(English) Rescue and Recovery 4.3 Deployment Guide
Page 76
This may be required for installation program only, to enter the Predesktop Area. /TOC tocvalue Set the BIOS TOC location (16 characters that the Master boot record patch program can access. This forces a second check for installation program only to ...CFGfile Apply the configuration file parameters. See "RRCMD command-line interface" on the keyboard to retrieve patch return code. /IBM System is not a Lenovo-branded computer. Patchfilefilename Used for installation program only to install the Master boot record patch. /PRTC Used for older systems. This is located in ...
This may be required for installation program only, to enter the Predesktop Area. /TOC tocvalue Set the BIOS TOC location (16 characters that the Master boot record patch program can access. This forces a second check for installation program only to ...CFGfile Apply the configuration file parameters. See "RRCMD command-line interface" on the keyboard to retrieve patch return code. /IBM System is not a Lenovo-branded computer. Patchfilefilename Used for installation program only to install the Master boot record patch. /PRTC Used for older systems. This is located in ...
(English) Rescue and Recovery 4.3 Deployment Guide
Page 78
... patch parameters. 96 Error accessing sectors. 97 Error accessing sectors. BMGR32 Error codes Error code Error Description 5 Error applying selected options to user if proper BIOS calls not supported. DOS for the boot manager to the service area. BMGR CLEAN CleanMBR cleans the Master Boot Record.
... patch parameters. 96 Error accessing sectors. 97 Error accessing sectors. BMGR32 Error codes Error code Error Description 5 Error applying selected options to user if proper BIOS calls not supported. DOS for the boot manager to the service area. BMGR CLEAN CleanMBR cleans the Master Boot Record.

(Japanese) Rescue and Recovery 4.3 Deployment Guide
Page 10
Rescue and Recovery v Rescue and Recovery Rescue and Recovery BIOS BIOS Setup Utility v Rescue and Recovery Opera Web Web Windows SWSHARE v Rescue and Recovery PC-Doctor Rescue and Recovery CD CD USB : USB PC PC PC Lenovo PC Rescue and Recovery Lenovo PC Rescue and Recovery CD Lenovo PC ʹ͓͍ͯ Rescue and Recovery PC 2 Rescue and Recovery 4.3
Rescue and Recovery v Rescue and Recovery Rescue and Recovery BIOS BIOS Setup Utility v Rescue and Recovery Opera Web Web Windows SWSHARE v Rescue and Recovery PC-Doctor Rescue and Recovery CD CD USB : USB PC PC PC Lenovo PC Rescue and Recovery Lenovo PC Rescue and Recovery CD Lenovo PC ʹ͓͍ͯ Rescue and Recovery PC 2 Rescue and Recovery 4.3

(Japanese) Rescue and Recovery 4.3 Deployment Guide
Page 14
.../support/site.wss/document.do?lndocid=MIGR-4Q2QAK README Rescue and Recovery Think Rescue and Recovery Lenovo Web http://www.lenovo.com/thinkvantage Lenovo PC ͷཁ݅ Rescue and Recovery Lenovo PC v Windows 7 v ϝϞϦʔ : 1 GB BIOS ઃఆΛ 8 MB 120 MB : PC 200 MB Rescue and Recovery Rescue and...
.../support/site.wss/document.do?lndocid=MIGR-4Q2QAK README Rescue and Recovery Think Rescue and Recovery Lenovo Web http://www.lenovo.com/thinkvantage Lenovo PC ͷཁ݅ Rescue and Recovery Lenovo PC v Windows 7 v ϝϞϦʔ : 1 GB BIOS ઃఆΛ 8 MB 120 MB : PC 200 MB Rescue and Recovery Rescue and...


