Hardware Maintenance Manual
Page 1
Hardware Maintenance Manual ThinkPad X200, X200s, X200si, X201, X201i, and X201s
Hardware Maintenance Manual ThinkPad X200, X200s, X200si, X201, X201i, and X201s
Hardware Maintenance Manual
Page 3
...replacing FRUs for CTO, CMV, and GAV 30 Product definition 30 FRU identification for DOS diagnostics program 34 System supporting the Lenovo diagnostics programs 39 Power system checkout 41 Checking the ac adapter 41 Checking operational charging 42 Checking the battery pack 42 Checking...30 How to do first 33 Checkout guide 34 System supporting the Lenovo ThinkVantage Toolbox program and the PC-Doctor for CTO, CMV, and GAV products 31 Chapter 3. Removing and replacing a FRU 69 Before servicing ThinkPad X200, X200s, X200si, X201, X201i, and X201s 70 1010 Battery pack 71 1020 Hard...
...replacing FRUs for CTO, CMV, and GAV 30 Product definition 30 FRU identification for DOS diagnostics program 34 System supporting the Lenovo diagnostics programs 39 Power system checkout 41 Checking the ac adapter 41 Checking operational charging 42 Checking the battery pack 42 Checking...30 How to do first 33 Checkout guide 34 System supporting the Lenovo ThinkVantage Toolbox program and the PC-Doctor for CTO, CMV, and GAV products 31 Chapter 3. Removing and replacing a FRU 69 Before servicing ThinkPad X200, X200s, X200si, X201, X201i, and X201s 70 1010 Battery pack 71 1020 Hard...

Hardware Maintenance Manual
Page 5
ThinkPad X200 ThinkPad X200s and X200si ThinkPad X201 and X201i ThinkPad X201s MT 7454, 7455, 7457, 7458, 7459, 2023, and 2024 MT 7462, 7465, 7466, 7469, 7470, 2046, and 2047 MT 3249, 3323, 3357, 3626, 3680, 3712, and 4492 MT 5129, 5143, 5385, 5397, 5413, 5442, and 5446 Use this manual along with ThinkPad..."Safety information" on page 1 and Chapter 2 "Important service information" on page 29. © Copyright Lenovo , 2011 iii Before servicing a ThinkPad product, be sure to troubleshoot problems effectively. About this manual along with the advanced diagnostic tests to troubleshoot ...
ThinkPad X200 ThinkPad X200s and X200si ThinkPad X201 and X201i ThinkPad X201s MT 7454, 7455, 7457, 7458, 7459, 2023, and 2024 MT 7462, 7465, 7466, 7469, 7470, 2046, and 2047 MT 3249, 3323, 3357, 3626, 3680, 3712, and 4492 MT 5129, 5143, 5385, 5397, 5413, 5442, and 5446 Use this manual along with ThinkPad..."Safety information" on page 1 and Chapter 2 "Important service information" on page 29. © Copyright Lenovo , 2011 iii Before servicing a ThinkPad product, be sure to troubleshoot problems effectively. About this manual along with the advanced diagnostic tests to troubleshoot ...

Hardware Maintenance Manual
Page 76
..., X201i, and X201s Removing the SIM card: Some models of the ThinkPad X200, X200s, X200si, X201, X201i, and X201s you are servicing has the SIM card, remove it before you start the servicing. To remove the SIM card, you need ...to remove the battery pack first. (See "1010 Battery pack" on disconnecting the cable from those connectors, do as shown in the ThinkPad X200, X200s, X200si, X201, X201i, and X201s are connected to the flip-lock ZIF connectors. When disconnecting the cable from flip-lock ZIF connector: Some cables used in...
..., X201i, and X201s Removing the SIM card: Some models of the ThinkPad X200, X200s, X200si, X201, X201i, and X201s you are servicing has the SIM card, remove it before you start the servicing. To remove the SIM card, you need ...to remove the battery pack first. (See "1010 Battery pack" on disconnecting the cable from those connectors, do as shown in the ThinkPad X200, X200s, X200si, X201, X201i, and X201s are connected to the flip-lock ZIF connectors. When disconnecting the cable from flip-lock ZIF connector: Some cables used in...

Hardware Maintenance Manual
Page 81
Note: Loosen the screws 1 , but do not remove them. 2 1 1 Note: For ThinkPad X200, X200s, and X200si, if only one DIMM is used on the computer you are servicing, the card must be installed in SLOT-0 ( a ), but not in this figure. For ThinkPad X200, X200s, and X200si: Chapter 8. Removing and replacing a FRU 75 Table 11. Removal steps of dimm Remove the DIMM slot cover as shown in SLOT-1 ( b ).
Note: Loosen the screws 1 , but do not remove them. 2 1 1 Note: For ThinkPad X200, X200s, and X200si, if only one DIMM is used on the computer you are servicing, the card must be installed in SLOT-0 ( a ), but not in this figure. For ThinkPad X200, X200s, and X200si: Chapter 8. Removing and replacing a FRU 75 Table 11. Removal steps of dimm Remove the DIMM slot cover as shown in SLOT-1 ( b ).

Hardware Maintenance Manual
Page 104
Table 23. Removal steps of base cover assembly for ThinkPad X200s, X200si, and X201s ThinPad X200s, X200si and X201s Remove the top shielding assembly at first. 2 1 Step 1 Screw (quantity) M2 × 3 mm, wafer-head, nylon-coated (1) Color Black 3 Torque 0.181 Nm (1.85 kgfcm) Step 3 Screw (quantity) M2 × 3.5 mm, wafer-head, nylon-coated (1) Color Black Torque 0.181 Nm (1.85 kgfcm) 98 Hardware Maintenance Manual
Table 23. Removal steps of base cover assembly for ThinkPad X200s, X200si, and X201s ThinPad X200s, X200si and X201s Remove the top shielding assembly at first. 2 1 Step 1 Screw (quantity) M2 × 3 mm, wafer-head, nylon-coated (1) Color Black 3 Torque 0.181 Nm (1.85 kgfcm) Step 3 Screw (quantity) M2 × 3.5 mm, wafer-head, nylon-coated (1) Color Black Torque 0.181 Nm (1.85 kgfcm) 98 Hardware Maintenance Manual

Hardware Maintenance Manual
Page 105
Chapter 8. Removing and replacing a FRU 99 Removal steps of base cover assembly for ThinkPad X200s, X200si, and X201s (continued) 4 4 45 4 Step 4 5 Screw (quantity) M2 × 3.5 mm, wafer-head, nylon-coated (4) M2 × 3 mm, large-head, nylon-coated (1) Color Silver Silver Torque 0.181 Nm (1.85 kgfcm) 0.181 Nm (1.85 kgfcm) In step 6 and 7 , remove the system board, the DC-in the figure a . a 6 7 When installing: Attach the wireless radio switch as shown in connector, and the fan assembly together from the base cover assembly. Table 23.
Chapter 8. Removing and replacing a FRU 99 Removal steps of base cover assembly for ThinkPad X200s, X200si, and X201s (continued) 4 4 45 4 Step 4 5 Screw (quantity) M2 × 3.5 mm, wafer-head, nylon-coated (4) M2 × 3 mm, large-head, nylon-coated (1) Color Silver Silver Torque 0.181 Nm (1.85 kgfcm) 0.181 Nm (1.85 kgfcm) In step 6 and 7 , remove the system board, the DC-in the figure a . a 6 7 When installing: Attach the wireless radio switch as shown in connector, and the fan assembly together from the base cover assembly. Table 23.
Hardware Maintenance Manual
Page 119
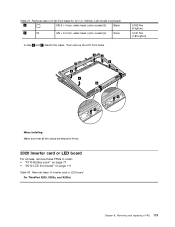
... claws are attached firmly. 2020 Inverter card or LED board For access, remove these FRUs in . Removal steps of inverter card or LED board For ThinkPad X200, X200s, and X200si: Chapter 8.
... claws are attached firmly. 2020 Inverter card or LED board For access, remove these FRUs in . Removal steps of inverter card or LED board For ThinkPad X200, X200s, and X200si: Chapter 8.
Hardware Maintenance Manual
Page 137
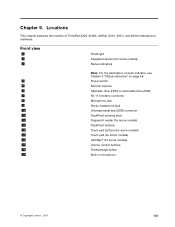
Front view 1 2 3 ThinkLight Integrated camera (for some models) Status indicators Note: For the description of ThinkPad X200, X200s, X200si, X201, X201i, and X201s features and hardware. Chapter 9. Locations This chapter presents the location of each indicator, see Chapter 5 "Status indicators" on page 59. 4 Power ...) 15 Touch pad (for some models) 16 UltraNav® (for some models) 17 Volume control buttons 18 ThinkVantage button 19 Built-in microphone © Copyright Lenovo , 2011 131
Front view 1 2 3 ThinkLight Integrated camera (for some models) Status indicators Note: For the description of ThinkPad X200, X200s, X200si, X201, X201i, and X201s features and hardware. Chapter 9. Locations This chapter presents the location of each indicator, see Chapter 5 "Status indicators" on page 59. 4 Power ...) 15 Touch pad (for some models) 16 UltraNav® (for some models) 17 Volume control buttons 18 ThinkVantage button 19 Built-in microphone © Copyright Lenovo , 2011 131
Hardware Maintenance Manual
Page 226
... list-Overall (continued) No. WXGA TFT" on page 246.) 26 TrackPoint stick caps 91P9642 * - FRU FRU no. WXGA+ TFT" on page 247.) LCD FRUs In ThinkPad X200, X200s, X200si, X201, X201i, and X201s, there are following types of LCDs. • "12.1-in . Non-mercury label (cover the notice for mercury for X201s 60Y5421 ** •...
... list-Overall (continued) No. WXGA TFT" on page 246.) 26 TrackPoint stick caps 91P9642 * - FRU FRU no. WXGA+ TFT" on page 247.) LCD FRUs In ThinkPad X200, X200s, X200si, X201, X201i, and X201s, there are following types of LCDs. • "12.1-in . Non-mercury label (cover the notice for mercury for X201s 60Y5421 ** •...


