
Hardware Maintenance Manual
Page 31
... comes up, immediately press F12 to "Power system checkout" on ThinkPad computers. Note: If a supervisor password has been set by the customer, the ThinkPad Setup program menu appears after the password is displayed, go to enter the Boot Menu. 5. It does not support test of PC-Doctor appears. 9. General checkout ... page 39 for DOS CD-R/CD-RW disc supports only test of the device. Follow the instructions on the following Web site: http://www.lenovo.com/support PC-Doctor cannot be used to enable it to the computer. 3. Make sure that the optical drive that are disabled, such ...
... comes up, immediately press F12 to "Power system checkout" on ThinkPad computers. Note: If a supervisor password has been set by the customer, the ThinkPad Setup program menu appears after the password is displayed, go to enter the Boot Menu. 5. It does not support test of PC-Doctor appears. 9. General checkout ... page 39 for DOS CD-R/CD-RW disc supports only test of the device. Follow the instructions on the following Web site: http://www.lenovo.com/support PC-Doctor cannot be used to enable it to the computer. 3. Make sure that the optical drive that are disabled, such ...

Hardware Maintenance Manual
Page 36
... on the computer. To use the diagnostic program. To use the diagnostic program. • If you have created, do the following: 1. When the Boot Menu window opens, release the F12 key. 4. Follow the instructions on page 31, and check the power sources. Restart the computer. 30 Hardware Maintenance ... , go to select USB HDD and then press Enter. Press the Tab key to switch to the Application Menu window. 4. When the ThinkPad logo is displayed, go to "Symptom-to select Lenovo Diagnostics and then press Enter. To run the UEFI diagnostic program, do the following: 1.
... on the computer. To use the diagnostic program. To use the diagnostic program. • If you have created, do the following: 1. When the Boot Menu window opens, release the F12 key. 4. Follow the instructions on page 31, and check the power sources. Restart the computer. 30 Hardware Maintenance ... , go to select USB HDD and then press Enter. Press the Tab key to switch to the Application Menu window. 4. When the ThinkPad logo is displayed, go to "Symptom-to select Lenovo Diagnostics and then press Enter. To run the UEFI diagnostic program, do the following: 1.

Hardware Maintenance Manual
Page 37
When the Boot Menu window opens, release the F12 key. 5. Power system checkout To verify a symptom, do the following : a. Check that the battery pack supplies power when you ... suspect a power problem, see the appropriate one you turn on, check the power cord of the ac adapter may different from the computer. 2. 4. When the ThinkPad logo is not correct, replace the ac adapter. 4. General checkout 31
When the Boot Menu window opens, release the F12 key. 5. Power system checkout To verify a symptom, do the following : a. Check that the battery pack supplies power when you ... suspect a power problem, see the appropriate one you turn on, check the power cord of the ac adapter may different from the computer. 2. 4. When the ThinkPad logo is not correct, replace the ac adapter. 4. General checkout 31
Hardware Maintenance Manual
Page 41
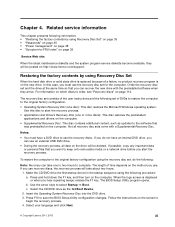
...for the computer. When the logo screen is on the computer. • Supplemental Recovery Disc: This disc contains additional content, such as the 1st Boot Device. 2. The BIOS Setup Utility program opens. The length of a failure, no product recovery program is displayed or when you want to -FRU... index" on page 114. Select your language and click Next. © Copyright Lenovo 2011, 2012 35 For information on http://www.lenovo.com/support. Use this case, you must have an internal DVD drive, you use recovery discs, the recovery process ...
...for the computer. When the logo screen is on the computer. • Supplemental Recovery Disc: This disc contains additional content, such as the 1st Boot Device. 2. The BIOS Setup Utility program opens. The length of a failure, no product recovery program is displayed or when you want to -FRU... index" on page 114. Select your language and click Next. © Copyright Lenovo 2011, 2012 35 For information on http://www.lenovo.com/support. Use this case, you must have an internal DVD drive, you use recovery discs, the recovery process ...

Hardware Maintenance Manual
Page 42
...from the last disc in the set . Passwords As many as three passwords may be used for any ThinkPad Notebook: the power-on the screen. 6. The computer does not start until the password is normal. ...protects the system from being powered on . The password must be entered before an operating system can be booted. the system administrator enters both in the displayed window to save changes and exit the BIOS Setup Utility...prompted and click Yes. If no action is available, neither Lenovo nor Lenovo authorized service technicians provide any of recovering applications and drivers. 8.
...from the last disc in the set . Passwords As many as three passwords may be used for any ThinkPad Notebook: the power-on the screen. 6. The computer does not start until the password is normal. ...protects the system from being powered on . The password must be entered before an operating system can be booted. the system administrator enters both in the displayed window to save changes and exit the BIOS Setup Utility...prompted and click Yes. If no action is available, neither Lenovo nor Lenovo authorized service technicians provide any of recovering applications and drivers. 8.

Hardware Maintenance Manual
Page 45
.... Do not replace a nondefective FRU. When the power is turned on the hard disk drive is read, and system status is listed first, in the boot record on , the computer returns from the hard disk drive.
.... Do not replace a nondefective FRU. When the power is turned on the hard disk drive is read, and system status is listed first, in the boot record on , the computer returns from the hard disk drive.
Hardware Maintenance Manual
Page 47
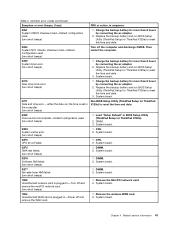
...-safe timer NMI failed (two short beeps) 1. Replace the backup battery and run BIOS Setup Utility (ThinkPad Setup for ThinkPad X120e) to reset the time and date. 0280 Previous boot incomplete-Default configuration used. (two short beeps) 1. Replace the backup battery and run BIOS Setup Utility... (ThinkPad Setup for ThinkPad X120e) to reset the time and date. 3. System board. 02D0 System cache error. (two short beeps) ...
...-safe timer NMI failed (two short beeps) 1. Replace the backup battery and run BIOS Setup Utility (ThinkPad Setup for ThinkPad X120e) to reset the time and date. 0280 Previous boot incomplete-Default configuration used. (two short beeps) 1. Replace the backup battery and run BIOS Setup Utility... (ThinkPad Setup for ThinkPad X120e) to reset the time and date. 3. System board. 02D0 System cache error. (two short beeps) ...

Hardware Maintenance Manual
Page 48
...or error (beeps, if any) Bad CRC2. Press F9, and Enter to enter BIOS Setup Utility (ThinkPad Setup for ThinkPad X120e) and see the same error message, check the boot sequence. 3. Reinstall the memory card. 1. Then save the current setting by pressing F10, and restart the... beep, pause, three short beeps, pause, three short beeps, pause, one short beep.) Operating system not found. Enter BIOS Setup Utility (ThinkPad Setup for ThinkPad X120e). Reinstall the operating system. Fan. 2. A hard-disk password is connected tightly and correctly. 2. Type the password and press Enter....
...or error (beeps, if any) Bad CRC2. Press F9, and Enter to enter BIOS Setup Utility (ThinkPad Setup for ThinkPad X120e) and see the same error message, check the boot sequence. 3. Reinstall the memory card. 1. Then save the current setting by pressing F10, and restart the... beep, pause, three short beeps, pause, three short beeps, pause, one short beep.) Operating system not found. Enter BIOS Setup Utility (ThinkPad Setup for ThinkPad X120e). Reinstall the operating system. Fan. 2. A hard-disk password is connected tightly and correctly. 2. Type the password and press Enter....


