ThinkPad GOBI Mobile Broadband User Guide
Page 7
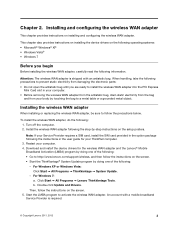
...a SIM card, install the SIM card provided in the option package following the instructions in your body by touching the bag to http://www.lenovo.com/support/wireless, and then follow the precautions below. For Windows 7: a. Double-click Update and Drivers. ... Download and install the device drivers for your computer. 4. Restart your ThinkPad computer. 3. Chapter 2. Attention: The wireless WAN adapter is required. © Copyright Lenovo 2011, 2012 3 Click Start ➙ All Programs ➙ Lenovo ThinkVantage Tools. To install the wireless WAN adapter, do the following ...
...a SIM card, install the SIM card provided in the option package following the instructions in your body by touching the bag to http://www.lenovo.com/support/wireless, and then follow the precautions below. For Windows 7: a. Double-click Update and Drivers. ... Download and install the device drivers for your computer. 4. Restart your ThinkPad computer. 3. Chapter 2. Attention: The wireless WAN adapter is required. © Copyright Lenovo 2011, 2012 3 Click Start ➙ All Programs ➙ Lenovo ThinkVantage Tools. To install the wireless WAN adapter, do the following ...

Hardware Maintenance Manual
Page 8
...electrical circuits with the reflective surface of mat to work on the machine, unplug the power cord. Performing a mechanical inspection - such touching can cause personal injury and machine damage. • Do not service the following parts with the power on when they are in ...hand tools for these hazards are moist floors, nongrounded power extension cables, power surges, and missing safety grounds. • Do not touch live electrical currents. By observing the above This practice ensures correct grounding of these precautions are removed from their equipment, rubber floor ...
...electrical circuits with the reflective surface of mat to work on the machine, unplug the power cord. Performing a mechanical inspection - such touching can cause personal injury and machine damage. • Do not service the following parts with the power on when they are in ...hand tools for these hazards are moist floors, nongrounded power extension cables, power surges, and missing safety grounds. • Do not touch live electrical currents. By observing the above This practice ensures correct grounding of these precautions are removed from their equipment, rubber floor ...

Hardware Maintenance Manual
Page 10
... point. Make sure that meets the specific service requirement. Grounding requirements Electrical grounding of the ac plug on your body. • Prevent the part from touching your clothing. Proper grounding of a grounding system to guard against your skin to eliminate static on ac-operated computers. The mat is desirable but not...
... point. Make sure that meets the specific service requirement. Grounding requirements Electrical grounding of the ac plug on your body. • Prevent the part from touching your clothing. Proper grounding of a grounding system to guard against your skin to eliminate static on ac-operated computers. The mat is desirable but not...

Hardware Maintenance Manual
Page 59
...or vibration. • They are designated as follows: • Plastic to plastic Turn an additional 90 degrees after the screw head touches the surface of the plastic part: • Logic card to use new screws. • It is recommended to plastic Turn an... a list of CRUs in your product can cause a reliability problem. See your Lenovo Limited Warranty documentation for your responsibility; When return is addressed with the replacement CRU; and (2) you . Chapter 7. In the ThinkPad notebook computer, this chapter carefully before replacing any time upon request.
...or vibration. • They are designated as follows: • Plastic to plastic Turn an additional 90 degrees after the screw head touches the surface of the plastic part: • Logic card to use new screws. • It is recommended to plastic Turn an... a list of CRUs in your product can cause a reliability problem. See your Lenovo Limited Warranty documentation for your responsibility; When return is addressed with the replacement CRU; and (2) you . Chapter 7. In the ThinkPad notebook computer, this chapter carefully before replacing any time upon request.

Hardware Maintenance Manual
Page 63
...to customers: Some problems with your product or at http://www.lenovo.com/CRUs. You may request that Lenovo installs an Optional-service CRU according to replace a FRU, turn it , establish personal grounding by touching a ground point with the replacement CRU; This chapter presents ...directions and drawings for full details. When turning a screw to the warranty service for your Lenovo Limited Warranty documentation for use the correct screw as given ...
...to customers: Some problems with your product or at http://www.lenovo.com/CRUs. You may request that Lenovo installs an Optional-service CRU according to replace a FRU, turn it , establish personal grounding by touching a ground point with the replacement CRU; This chapter presents ...directions and drawings for full details. When turning a screw to the warranty service for your Lenovo Limited Warranty documentation for use the correct screw as given ...

Hardware Maintenance Manual
Page 99
... 3 14 12 11 1 Integrated camera 2 Built-in microphone 3 Status indicators 4 5 6 7 8 9 10 Note: For the description of ThinkPad X1 and X1 Hybrid features and hardware. Locations This chapter presents the location of each indicator, see Chapter 5 "Status indicators" on page 47. 4 Power switch... control buttons 7 4-in-1 Media Card Reader 8 Built-in stereo speaker (right) 9 Wireless radio switch 10 Fingerprint reader 11 Touch pad 12 TrackPoint buttons 13 TrackPoint pointing stick 14 UltraNav® pointing device © Copyright Lenovo 2011, 2012 93 Chapter 9.
... 3 14 12 11 1 Integrated camera 2 Built-in microphone 3 Status indicators 4 5 6 7 8 9 10 Note: For the description of ThinkPad X1 and X1 Hybrid features and hardware. Locations This chapter presents the location of each indicator, see Chapter 5 "Status indicators" on page 47. 4 Power switch... control buttons 7 4-in-1 Media Card Reader 8 Built-in stereo speaker (right) 9 Wireless radio switch 10 Fingerprint reader 11 Touch pad 12 TrackPoint buttons 13 TrackPoint pointing stick 14 UltraNav® pointing device © Copyright Lenovo 2011, 2012 93 Chapter 9.

(English) User Guide
Page 3
... Volume and mute buttons 28 Windows key and other function keys . . . . 30 Using the UltraNav pointing device 30 © Copyright Lenovo 2011 Using the TrackPoint pointing device . . . . 31 Using the touch pad 32 Behavior of Authenticity label 14 Features 14 Specifications 16 Operating environment 16 ThinkVantage Technologies 17 Accessing applications in Windows...
... Volume and mute buttons 28 Windows key and other function keys . . . . 30 Using the UltraNav pointing device 30 © Copyright Lenovo 2011 Using the TrackPoint pointing device . . . . 31 Using the touch pad 32 Behavior of Authenticity label 14 Features 14 Specifications 16 Operating environment 16 ThinkVantage Technologies 17 Accessing applications in Windows...

(English) User Guide
Page 18
...™wireless antennas (left and the top right portions of the UltraConnect wireless antennas" on page 150. 2 Integrated camera Your computer has an integrated camera. ThinkPad X1 front view 1 3 UltraConnect wireless antennas The built-in antennas for the wireless communication are located at the top left ) 3 UltraConnect wireless antennas (right) 5 Built-in...-upgrade slot 2 Integrated camera 4 Computer display 6 Status indicators 8 ThinkVantage® button 10 PCI Express Mini Card slot for wireless LAN/WiMAX 12 Bluetooth antenna 14 Touch pad 16 TrackPoint pointing stick Figure 1.
...™wireless antennas (left and the top right portions of the UltraConnect wireless antennas" on page 150. 2 Integrated camera Your computer has an integrated camera. ThinkPad X1 front view 1 3 UltraConnect wireless antennas The built-in antennas for the wireless communication are located at the top left ) 3 UltraConnect wireless antennas (right) 5 Built-in...-upgrade slot 2 Integrated camera 4 Computer display 6 Status indicators 8 ThinkVantage® button 10 PCI Express Mini Card slot for wireless LAN/WiMAX 12 Bluetooth antenna 14 Touch pad 16 TrackPoint pointing stick Figure 1.

(English) User Guide
Page 20
...models) Your computer might include a PCI Express Mini Card in the PCI Express Mini Card slot which enables wireless WAN communications. UltraNav 14 Touch pad 15 TrackPoint buttons 16 TrackPoint pointing stick The keyboard contains the unique TrackPoint pointing device. Memory modules are all part of a single ...increase the amount of memory in your computer by installing a memory module in the memory bay. Move your fingertip across the UltraNav® touch pad to those of a mouse and its buttons. 17 Memory-upgrade slot You can perform without moving your fingers from the typing position. ...
...models) Your computer might include a PCI Express Mini Card in the PCI Express Mini Card slot which enables wireless WAN communications. UltraNav 14 Touch pad 15 TrackPoint buttons 16 TrackPoint pointing stick The keyboard contains the unique TrackPoint pointing device. Memory modules are all part of a single ...increase the amount of memory in your computer by installing a memory module in the memory bay. Move your fingertip across the UltraNav® touch pad to those of a mouse and its buttons. 17 Memory-upgrade slot You can perform without moving your fingers from the typing position. ...

(English) User Guide
Page 31
...; Integrated camera • Built-in digital dual array microphones • Built-in stereo speakers Keyboard • 6-row full size backlit keyboard • UltraNav (TrackPoint and touch pad) • Fn key function • ThinkVantage button • Volume control buttons • Speaker mute button • Microphone mute button Interface • External monitor connectors...
...; Integrated camera • Built-in digital dual array microphones • Built-in stereo speakers Keyboard • 6-row full size backlit keyboard • UltraNav (TrackPoint and touch pad) • Fn key function • ThinkVantage button • Volume control buttons • Speaker mute button • Microphone mute button Interface • External monitor connectors...

(English) User Guide
Page 46
3. Function keys in the Windows 7 operating system. The UltraNav pointing device consists of the TrackPoint and the touch pad, each of the active application. Click OK. Using the UltraNav pointing device Your computer may come with both basic and extended functions. If ..., the System Properties window or the Computer window is itself a pointing device with the UltraNav pointing device. You can configure both the TrackPoint and the touch pad as pointing devices. 30 User Guide The Setting for Windows 7 only) Press this key to take a snapshot of your computer screen and copy ...
3. Function keys in the Windows 7 operating system. The UltraNav pointing device consists of the TrackPoint and the touch pad, each of the active application. Click OK. Using the UltraNav pointing device Your computer may come with both basic and extended functions. If ..., the System Properties window or the Computer window is itself a pointing device with the UltraNav pointing device. You can configure both the TrackPoint and the touch pad as pointing devices. 30 User Guide The Setting for Windows 7 only) Press this key to take a snapshot of your computer screen and copy ...

(English) User Guide
Page 47
... tray. The TrackPoint center button 3 , called the scroll bar, enables you apply to the pointing stick. If you are not familiar with the touch pad while limiting the use of the TrackPoint to those of the left and right mouse buttons on the pressure you to scroll Web pages...and right 2 click buttons correspond to scrolling and Magnifying Glass functions. • Set the TrackPoint as the main pointing device, and disable the touch pad. • Set the touch pad as the main pointing device, and disable the TrackPoint. To move the pointer, press the pointing stick away from you to move...
... tray. The TrackPoint center button 3 , called the scroll bar, enables you apply to the pointing stick. If you are not familiar with the touch pad while limiting the use of the TrackPoint to those of the left and right mouse buttons on the pressure you to scroll Web pages...and right 2 click buttons correspond to scrolling and Magnifying Glass functions. • Set the TrackPoint as the main pointing device, and disable the touch pad. • Set the touch pad as the main pointing device, and disable the TrackPoint. To move the pointer, press the pointing stick away from you to move...

(English) User Guide
Page 48
...: If you can make the TrackPoint pointing stick function the same as follows: 1. Changing the cap The cap 1 on the new one. Using the touch pad The touch pad is a pad 1 below the TrackPoint buttons at the bottom of the TrackPoint pointing stick is shipped with either thumb and move the pointer...
...: If you can make the TrackPoint pointing stick function the same as follows: 1. Changing the cap The cap 1 on the new one. Using the touch pad The touch pad is a pad 1 below the TrackPoint buttons at the bottom of the TrackPoint pointing stick is shipped with either thumb and move the pointer...

(English) User Guide
Page 49
... a right click on a mouse, press the right click zone 2 once. • Left click and drag: To mimic a left click on a mouse, tap anywhere on the touch pad, and release both fingers. • Right click and drag: To mimic a right click and drag on a mouse, press the right click zone 2 and hold... zone 3 and a right click zone 2 . Before interacting with which you want to operate. • Left click: To mimic a single left click and drag on the touch pad, whichever is an active area sensitive to the Help in , zoom out, scroll or rotate on the mouse. The bottom area of the...
... a right click on a mouse, press the right click zone 2 once. • Left click and drag: To mimic a left click on a mouse, tap anywhere on the touch pad, and release both fingers. • Right click and drag: To mimic a right click and drag on a mouse, press the right click zone 2 and hold... zone 3 and a right click zone 2 . Before interacting with which you want to operate. • Left click: To mimic a single left click and drag on the touch pad, whichever is an active area sensitive to the Help in , zoom out, scroll or rotate on the mouse. The bottom area of the...

(English) User Guide
Page 50
... Click the UltraNav tab and proceed to open the Mouse properties window. 3. Click the UltraNav tab. 3. Click Manage Settings to customizing the touch pad. Different computer components consume power at different rates. A panel for Show UltraNav icon on the system tray, do as follows: 1. ... access to the UltraNav properties, you want to customize the settings. You can also open the Mouse properties window. 3. To disable the touch pad, clear the check box for Enable TrackPoint. The UltraNav icon is displayed. Click Start ➙ Control Panel ➙ Hardware and Sound...
... Click the UltraNav tab and proceed to open the Mouse properties window. 3. Click the UltraNav tab. 3. Click Manage Settings to customizing the touch pad. Different computer components consume power at different rates. A panel for Show UltraNav icon on the system tray, do as follows: 1. ... access to the UltraNav properties, you want to customize the settings. You can also open the Mouse properties window. 3. To disable the touch pad, clear the check box for Enable TrackPoint. The UltraNav icon is displayed. Click Start ➙ Control Panel ➙ Hardware and Sound...

(English) User Guide
Page 62
... it is shown only on the primary display. • You cannot use the Extend desktop function without changing any relative position, but the icons must touch each other display as follows: 1. With the Extend desktop function, you are in the Extend desktop mode. If the function does not work, refer to... desktop function • If your computer supports audio as well as follows: 1. This compact connector enables a plug-and-play setup and supports adaptors that they touch. To change the resolution for the secondary display, the external display). 5.
... it is shown only on the primary display. • You cannot use the Extend desktop function without changing any relative position, but the icons must touch each other display as follows: 1. With the Extend desktop function, you are in the Extend desktop mode. If the function does not work, refer to... desktop function • If your computer supports audio as well as follows: 1. This compact connector enables a plug-and-play setup and supports adaptors that they touch. To change the resolution for the secondary display, the external display). 5.

(English) User Guide
Page 65
... sleep or hibernation mode before it is not Plug and Play, do the following : 1. Click Device Manager. Note: If you start installing a flash media card, touch a metal table or a grounded metal object. The Add Hardware Wizard starts. 5. Open Control Panel. 2. From the Action menu, select Add legacy hardware. For more information...
... sleep or hibernation mode before it is not Plug and Play, do the following : 1. Click Device Manager. Note: If you start installing a flash media card, touch a metal table or a grounded metal object. The Add Hardware Wizard starts. 5. Open Control Panel. 2. From the Action menu, select Add legacy hardware. For more information...

(English) User Guide
Page 68
...your working surface to accommodate many places, it is a light and mobile system; If your work with all of these options: http://www.lenovo.com/accessories/services/index.html. Chair: Use a chair that gives you to see , yet easy on your desired posture. remember that it...Making minor voluntary postural changes and taking short frequent work tools to accommodate your office furniture so that you with a soft touch without pounding the keys. ThinkPad notebook's visual display screens are designed to meet the highest standards and to provide you know how to adjust your work ...
...your working surface to accommodate many places, it is a light and mobile system; If your work with all of these options: http://www.lenovo.com/accessories/services/index.html. Chair: Use a chair that gives you to see , yet easy on your desired posture. remember that it...Making minor voluntary postural changes and taking short frequent work tools to accommodate your office furniture so that you with a soft touch without pounding the keys. ThinkPad notebook's visual display screens are designed to meet the highest standards and to provide you know how to adjust your work ...

(English) User Guide
Page 81
...of the reader is attached. • Security Mode: Specifies the settings of the ThinkPad Setup offers the following choices: • Predesktop Authentication: Enables or disables fingerprint authentication... stored in the fingerprint submenu: 1. If you must take your computer to a Lenovo authorized servicer or a marketing representative to exit. 10. You must turn your computer...finger. Print these instructions. Turn your fingernail or anything hard. • Using or touching the reader with a hard, pointed object. • Scraping the surface of the fingerprint...
...of the reader is attached. • Security Mode: Specifies the settings of the ThinkPad Setup offers the following choices: • Predesktop Authentication: Enables or disables fingerprint authentication... stored in the fingerprint submenu: 1. If you must take your computer to a Lenovo authorized servicer or a marketing representative to exit. 10. You must turn your computer...finger. Print these instructions. Turn your fingernail or anything hard. • Using or touching the reader with a hard, pointed object. • Scraping the surface of the fingerprint...

(English) User Guide
Page 91
...8226; When you install a static-sensitive option or CRU, touch the static-protective package containing the part to install it.... replacing the PCI Express Mini Card for at least two seconds. The submenu will be displayed. © Copyright Lenovo 2011 75 When you unpack an option or CRU, do as following the procedures in this section. •... battery" on it down. Press F1 to build up around you , can cause static electricity to enter ThinkPad Setup when the ThinkPad logo appears. 3. Chapter 6. This reduces static electricity in device with an optional one. Handle adapters, memory...
...8226; When you install a static-sensitive option or CRU, touch the static-protective package containing the part to install it.... replacing the PCI Express Mini Card for at least two seconds. The submenu will be displayed. © Copyright Lenovo 2011 75 When you unpack an option or CRU, do as following the procedures in this section. •... battery" on it down. Press F1 to build up around you , can cause static electricity to enter ThinkPad Setup when the ThinkPad logo appears. 3. Chapter 6. This reduces static electricity in device with an optional one. Handle adapters, memory...


