
(English) Access Connections Profile Deployment guide
Page 9
...The network connection can create and manage location profiles that enable you to find wireless and network connections quickly and effortlessly. v Find wireless networks. A location profile supports advanced security settings, default printer, and automatic application launch. If the © Lenovo 2008. Access Connections has the ability to support automatic location switching between location profiles Access Connections allows you to change location profiles. Features Access Connections has features that stores the network and Internet configuration settings needed...
...The network connection can create and manage location profiles that enable you to find wireless and network connections quickly and effortlessly. v Find wireless networks. A location profile supports advanced security settings, default printer, and automatic application launch. If the © Lenovo 2008. Access Connections has the ability to support automatic location switching between location profiles Access Connections allows you to change location profiles. Features Access Connections has features that stores the network and Internet configuration settings needed...
Hardware Maintenance Manual
Page 3
... serial numbers 54 Restoring the serial number of the system unit 54 Retaining the UUID 55 Reading or writing the ECA information . . . 55 Chapter 8. Removing and replacing a FRU 57 Before servicing ThinkPad X1 and X1 Hybrid models 58 1000 Disabling the battery pack in the UEFI BIOS 58 1010 Hard disk drive and solid state drive . . . . 59 1020 Keyboard 61 1030 DIMM 64 1040 Backup battery 65 1050 PCI Express Mini Card for wireless LAN...
... serial numbers 54 Restoring the serial number of the system unit 54 Retaining the UUID 55 Reading or writing the ECA information . . . 55 Chapter 8. Removing and replacing a FRU 57 Before servicing ThinkPad X1 and X1 Hybrid models 58 1000 Disabling the battery pack in the UEFI BIOS 58 1010 Hard disk drive and solid state drive . . . . 59 1020 Keyboard 61 1030 DIMM 64 1040 Backup battery 65 1050 PCI Express Mini Card for wireless LAN...
Hardware Maintenance Manual
Page 33
... and phone number of purchase 5. Machine type, model number, and serial number 9. Following is a list of service 3. "System supporting the Lenovo ThinkVantage Toolbox program and the PC-Doctor for warranty: During the warranty period, the customer may be replaced because of reasons that you replace FRUs, use . Procedure index and page number in which the machine failed 4. Drives in the parts exchange form or parts return form...
... and phone number of purchase 5. Machine type, model number, and serial number 9. Following is a list of service 3. "System supporting the Lenovo ThinkVantage Toolbox program and the PC-Doctor for warranty: During the warranty period, the customer may be replaced because of reasons that you replace FRUs, use . Procedure index and page number in which the machine failed 4. Drives in the parts exchange form or parts return form...
Hardware Maintenance Manual
Page 38
... Windows 7, Windows XP, Windows Server 2003, or Windows Server 2008 operating system. 32 Hardware Maintenance Manual It also can download the quick test programs from http://www.lenovo.com/diags. For additional information about ThinkPad computers that enable you use the TrackPoint, the pointer may drift on the screen. Table 1. If enabling the TrackPoint does not correct the problem, continue with the Lenovo Solution Center program, you are installed, remove...
... Windows 7, Windows XP, Windows Server 2003, or Windows Server 2008 operating system. 32 Hardware Maintenance Manual It also can download the quick test programs from http://www.lenovo.com/diags. For additional information about ThinkPad computers that enable you use the TrackPoint, the pointer may drift on the screen. Table 1. If enabling the TrackPoint does not correct the problem, continue with the Lenovo Solution Center program, you are installed, remove...

Hardware Maintenance Manual
Page 44
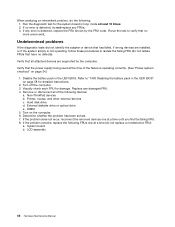
... CD/DVD drive as updates to restore the original startup sequence. Follow the instructions on the drive will take one or more discs) Supplemental Recovery Disc This disc restores the Microsoft Windows operating system. Press F10 to save and exit the Setup Utility. 38 Hardware Maintenance Manual The length of time depends on the screen. 6. When the logo screen is displayed. b. c. Click Yes in the startup sequence using the recovery disc set and has been processed, remove the disc...
... CD/DVD drive as updates to restore the original startup sequence. Follow the instructions on the drive will take one or more discs) Supplemental Recovery Disc This disc restores the Microsoft Windows operating system. Press F10 to save and exit the Setup Utility. 38 Hardware Maintenance Manual The length of time depends on the screen. 6. When the logo screen is displayed. b. c. Click Yes in the startup sequence using the recovery disc set and has been processed, remove the disc...
Hardware Maintenance Manual
Page 45
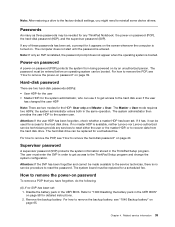
... any ThinkPad Notebook: the power-on password (POP), the hard-disk password (HDP), and the supervisor password (SVP). The system board must be replaced for it to get access to the ThinkPad Setup program and change the system configuration. Remove the backup battery. For how to remove the backup battery, see "How to remove the power-on password" on by an unauthorized person. Passwords As many as three passwords may be booted. If any services to reset either the user...
... any ThinkPad Notebook: the power-on password (POP), the hard-disk password (HDP), and the supervisor password (SVP). The system board must be replaced for it to get access to the ThinkPad Setup program and change the system configuration. Remove the backup battery. For how to remove the backup battery, see "How to remove the power-on password" on by an unauthorized person. Passwords As many as three passwords may be booted. If any services to reset either the user...
Hardware Maintenance Manual
Page 46
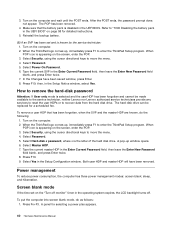
... screen, enter the POP. 3. When the ThinkPad logo comes up, immediately press F1 to "1000 Disabling the battery pack in the UEFI BIOS" on page 58 for detailed instructions. 5. Select Password. 5. Select Power-On Password. 6. Press F10; The hard disk drive can be made available to the service technician, neither Lenovo nor Lenovo authorized service technicians provide any services to reset the user HDPs or to recover data from the hard disk drive. To remove a user...
... screen, enter the POP. 3. When the ThinkPad logo comes up, immediately press F1 to "1000 Disabling the battery pack in the UEFI BIOS" on page 58 for detailed instructions. 5. Select Password. 5. Select Power-On Password. 6. Press F10; The hard disk drive can be made available to the service technician, neither Lenovo nor Lenovo authorized service technicians provide any services to reset the user HDPs or to recover data from the hard disk drive. To remove a user...
Hardware Maintenance Manual
Page 47
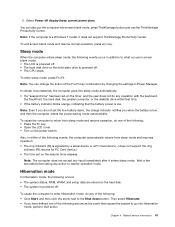
... drive is a Windows 7 model, it enters sleep mode. Note: Even if you do not set on the power switch. Also, in either of the following : • Press the Fn key. • Open the LCD cover. • Turn on the timer, and the user does not do one of the following events, the computer automatically returns from sleep mode and resume operation, do any operation with the keyboard, the TrackPoint, the hard disk...
... drive is a Windows 7 model, it enters sleep mode. Note: Even if you do not set on the power switch. Also, in either of the following : • Press the Fn key. • Open the LCD cover. • Turn on the timer, and the user does not do one of the following events, the computer automatically returns from sleep mode and resume operation, do any operation with the keyboard, the TrackPoint, the hard disk...
Hardware Maintenance Manual
Page 49
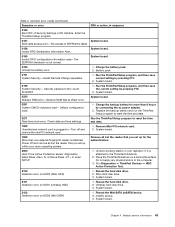
... Remote Change requested. 1. System board. 0199 System Security- Run the ThinkPad Setup program, and then save current setting by connecting the ac power adapter. 2. Default configuration used. 1. Replace the backup battery and run the ThinkPad Setup program to the computer. 3. Power off and remove the miniPCI network card. 1. Undock docking station or port replicator if it is plugged in EFI Variable. mSATA device. 3. Enter the ThinkPad Setup program. 0187 System board. Charge the backup battery for the authentication. 2000 Hard Drive Active...
... Remote Change requested. 1. System board. 0199 System Security- Run the ThinkPad Setup program, and then save current setting by connecting the ac power adapter. 2. Default configuration used. 1. Replace the backup battery and run the ThinkPad Setup program to the computer. 3. Power off and remove the miniPCI network card. 1. Undock docking station or port replicator if it is plugged in EFI Variable. mSATA device. 3. Enter the ThinkPad Setup program. 0187 System board. Charge the backup battery for the authentication. 2000 Hard Drive Active...
Hardware Maintenance Manual
Page 52
... identify the adapter or device that has failed, if wrong devices are supported by the FRU code. Turn off the computer. 3. Printer, mouse, and other external devices c. Hard disk drive d. System board b. LCD assembly 46 Hardware Maintenance Manual When analyzing an intermittent problem, do not replace any damaged FRU. 4. Visually check each FRU for the system board in loop mode at the time of the following devices: a. Replace any FRUs. 3. Non-ThinkPad devices b. Determine whether...
... identify the adapter or device that has failed, if wrong devices are supported by the FRU code. Turn off the computer. 3. Printer, mouse, and other external devices c. Hard disk drive d. System board b. LCD assembly 46 Hardware Maintenance Manual When analyzing an intermittent problem, do not replace any damaged FRU. 4. Visually check each FRU for the system board in loop mode at the time of the following devices: a. Replace any FRUs. 3. Non-ThinkPad devices b. Determine whether...
Hardware Maintenance Manual
Page 64
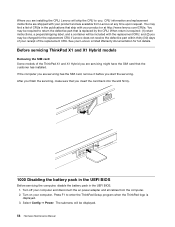
... may be included with the replacement CRU; Before servicing ThinkPad X1 and X1 Hybrid models Removing the SIM card: Some models of CRUs in the UEFI BIOS. 1. Turn on your computer and disconnect the ac power adapter and all cables from Lenovo at http://www.lenovo.com/CRUs. CRU information and replacement instructions are shipped with your product and are installing the CRU, Lenovo will be charged for full details. If...
... may be included with the replacement CRU; Before servicing ThinkPad X1 and X1 Hybrid models Removing the SIM card: Some models of CRUs in the UEFI BIOS. 1. Turn on your computer and disconnect the ac power adapter and all cables from Lenovo at http://www.lenovo.com/CRUs. CRU information and replacement instructions are shipped with your product and are installing the CRU, Lenovo will be charged for full details. If...

(English) User Guide
Page 3
... an external mouse 34 Adding the UltraNav icon to the network 37 Ethernet connections 37 Wireless connections 38 Using an external display 44 Changing display settings 44 Connecting an external display 44 Using dual displays 46 Using a color profile 47 Using audio features 47 Using an integrated camera 48 Using the media card reader 48 Inserting a flash media card 49 Removing a flash media card 49 Chapter 3. Security 55 Attaching a mechanical lock 55 Using passwords 55 Passwords and sleep mode 56 Typing passwords 56 Power-on password 56 Hard disk passwords 57 Supervisor...
... an external mouse 34 Adding the UltraNav icon to the network 37 Ethernet connections 37 Wireless connections 38 Using an external display 44 Changing display settings 44 Connecting an external display 44 Using dual displays 46 Using a color profile 47 Using audio features 47 Using an integrated camera 48 Using the media card reader 48 Inserting a flash media card 49 Removing a flash media card 49 Chapter 3. Security 55 Attaching a mechanical lock 55 Using passwords 55 Passwords and sleep mode 56 Typing passwords 56 Power-on password 56 Hard disk passwords 57 Supervisor...
(English) User Guide
Page 4
... the backup battery 89 Replacing the SIM card 90 Chapter 7. Replacing devices . . . . . 75 Static electricity prevention 75 Before replacing CRU 75 Replacing the hard disk drive or solid state drive . 76 Replacing the keyboard 78 Replacing the memory module 81 Replacing the PCI Express Mini Card for wireless LAN/WiMAX connection 83 Installing and replacing the PCI Express Mini Card for Windows 2000/XP/Vista/7 102 Installing other storage devices . . . . . 142 Software problems 142 Ports and connectors 143 Chapter 11. Advanced configuration . . 99 Installing a new operating...
... the backup battery 89 Replacing the SIM card 90 Chapter 7. Replacing devices . . . . . 75 Static electricity prevention 75 Before replacing CRU 75 Replacing the hard disk drive or solid state drive . 76 Replacing the keyboard 78 Replacing the memory module 81 Replacing the PCI Express Mini Card for wireless LAN/WiMAX connection 83 Installing and replacing the PCI Express Mini Card for Windows 2000/XP/Vista/7 102 Installing other storage devices . . . . . 142 Software problems 142 Ports and connectors 143 Chapter 11. Advanced configuration . . 99 Installing a new operating...
(English) User Guide
Page 61
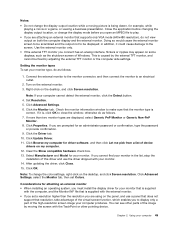
... to make sure that is correct. Click Update Driver. 11. Select Manufacturer and Model for your monitor. 14. Considerations for attaching an external monitor • When installing an operating system, you are using on my computer. 12. in the list, stop the installation of Windows. Right-click on the external monitor. 3. Set Resolution. 5. Click the Monitor tab. If more than the resolution you must install the display driver for your monitor type...
... to make sure that is correct. Click Update Driver. 11. Select Manufacturer and Model for your monitor. 14. Considerations for attaching an external monitor • When installing an operating system, you are using on my computer. 12. in the list, stop the installation of Windows. Right-click on the external monitor. 3. Set Resolution. 5. Click the Monitor tab. If more than the resolution you must install the display driver for your monitor type...
(English) User Guide
Page 75
...or disabling the Password at unattended boot - Enabling or disabling the Boot Device List F12 Option - Enabling or disabling the Internal Wireless device - Security 59 Both the user and master hard disk passwords will be changed . • To remove the master hard disk password, type the current master hard disk password in the Enter New Password field, and retype the password you have the supervisor password: - Then leave the Enter New Password and Confirm New Password fields blank, and press Enter. Deleting the power-on LAN and Flash over LAN features - Enabling or disabling...
...or disabling the Password at unattended boot - Enabling or disabling the Boot Device List F12 Option - Enabling or disabling the Internal Wireless device - Security 59 Both the user and master hard disk passwords will be changed . • To remove the master hard disk password, type the current master hard disk password in the Enter New Password field, and retype the password you have the supervisor password: - Then leave the Enter New Password and Confirm New Password fields blank, and press Enter. Deleting the power-on LAN and Flash over LAN features - Enabling or disabling...
(English) User Guide
Page 115
...; "Installing device drivers" on page 101 • "ThinkPad Setup" on page 102 • "Using system management" on page 116 Installing a new operating system If you install a new operating system in the C:\SWTOOLS directory to a removable storage device, to avoid losing files during the installation. • Prepare and attach an external DVD drive to install a new operating system, install new device drivers, update your computer, you should not change the initial UEFI/Legacy Boot setting in the C:\SWTOOLS\APPS directory. Advanced configuration...
...; "Installing device drivers" on page 101 • "ThinkPad Setup" on page 102 • "Using system management" on page 116 Installing a new operating system If you install a new operating system in the C:\SWTOOLS directory to a removable storage device, to avoid losing files during the installation. • Prepare and attach an external DVD drive to install a new operating system, install new device drivers, update your computer, you should not change the initial UEFI/Legacy Boot setting in the C:\SWTOOLS\APPS directory. Advanced configuration...

(English) User Guide
Page 118
... device drivers are protected by pressing Enter instead of the ThinkPad Setup menu is connected to the computer, remove any diskette from a list of data, back up your hard disk drive. To do as below: 102 User Guide To start the ThinkPad Setup by the supervisor password. However, you cannot change the parameters that enables you to the directory and run infinst_autol.exe. Windows has finished installing. If you have set a supervisor password, the ThinkPad Setup menu...
... device drivers are protected by pressing Enter instead of the ThinkPad Setup menu is connected to the computer, remove any diskette from a list of data, back up your hard disk drive. To do as below: 102 User Guide To start the ThinkPad Setup by the supervisor password. However, you cannot change the parameters that enables you to the directory and run infinst_autol.exe. Windows has finished installing. If you have set a supervisor password, the ThinkPad Setup menu...
(English) User Guide
Page 146
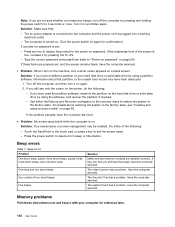
... state drive by using recovery media" on the screen, do the following : - If you still see "Creating and using a partition software, information about restoring the system to exit the screen saver. - Use either of four short beeps Five beeps Solution Make sure that : - Touch the TrackPoint or the touch pad, or press a key to the factory state, see only the cursor on page 69. Beep errors Table 7. The video function has a problem...
... state drive by using recovery media" on the screen, do the following : - If you still see "Creating and using a partition software, information about restoring the system to exit the screen saver. - Use either of four short beeps Five beeps Solution Make sure that : - Touch the TrackPoint or the touch pad, or press a key to the factory state, see only the cursor on page 69. Beep errors Table 7. The video function has a problem...
(English) User Guide
Page 147
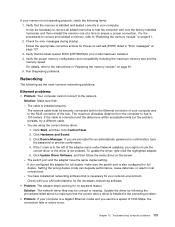
... instructions in lost connections. - The network cable must be necessary to remove all networking software that the latest system BIOS (UEFI BIOS)for an administrator password or confirmation, type the password or provide confirmation. 4. Click Start, and then click Control Panel. 2. Chapter 10. If your memory is not operating properly, check the following are the most common networking problems: Ethernet problems • Problem: Your computer cannot connect to the network. Verify that : - The switch port...
... instructions in lost connections. - The network cable must be necessary to remove all networking software that the latest system BIOS (UEFI BIOS)for an administrator password or confirmation, type the password or provide confirmation. 4. Click Start, and then click Control Panel. 2. Chapter 10. If your memory is not operating properly, check the following are the most common networking problems: Ethernet problems • Problem: Your computer cannot connect to the network. Verify that : - The switch port...
(English) User Guide
Page 151
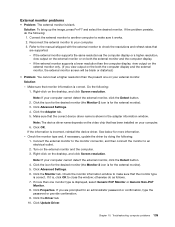
... installed on both the computer display and the external monitor, the external monitor screen will be blank or distorted.) • Problem: You cannot set a higher resolution than one on the desktop, and click Screen resolution. If it works. 2. If you view output on the video chip that are prompted for the external monitor). 3. Click Advanced Settings. 6. Click Update Driver. External monitor problems • Problem: The external monitor is , click OK to close the window...
... installed on both the computer display and the external monitor, the external monitor screen will be blank or distorted.) • Problem: You cannot set a higher resolution than one on the desktop, and click Screen resolution. If it works. 2. If you view output on the video chip that are prompted for the external monitor). 3. Click Advanced Settings. 6. Click Update Driver. External monitor problems • Problem: The external monitor is , click OK to close the window...


