(English) Rescue and Recovery 4.3 Deployment Guide
Page 5
... Backup/Restore 21 Mapping a network drive for backups . . . . 22 Password Persistence 25 EFS file limitation 25 Battery power settings for hard drive setup: Option 2 . . 55 Scenario 3 - Best practices 51 Scenario 1 - Installing on OEM systems . . . . . 54 Best practices for hard drive setup: Option 1 . . 55 Best practices for backups . . . . . 25 Completing a backup 26 Microsoft Message Queuing (MSMQ) . . . . . 26 Rescue and Recovery in the Windows environment 26 Using the Rescue and Recovery program in the Windows environment 26 Working...
... Backup/Restore 21 Mapping a network drive for backups . . . . 22 Password Persistence 25 EFS file limitation 25 Battery power settings for hard drive setup: Option 2 . . 55 Scenario 3 - Best practices 51 Scenario 1 - Installing on OEM systems . . . . . 54 Best practices for hard drive setup: Option 1 . . 55 Best practices for backups . . . . . 25 Completing a backup 26 Microsoft Message Queuing (MSMQ) . . . . . 26 Rescue and Recovery in the Windows environment 26 Using the Rescue and Recovery program in the Windows environment 26 Working...
(English) Rescue and Recovery 4.3 Deployment Guide
Page 16
...\Rescue and Recovery\" The following is configured to update the Windows Installer engine to version 3.0. If the Windows Installer is C:\. msiexec /i "C:\WindowsFolder\Profiles\UserName\ Personal\MySetups\project name\product configuration\release name\ DiskImages\Disk1\product name.msi" Note: Enter the preceding command as adding settings to the registry. Once an administrative installation has been completed, the administrative user can also create new directories during...
...\Rescue and Recovery\" The following is configured to update the Windows Installer engine to version 3.0. If the Windows Installer is C:\. msiexec /i "C:\WindowsFolder\Profiles\UserName\ Personal\MySetups\project name\product configuration\release name\ DiskImages\Disk1\product name.msi" Note: Enter the preceding command as adding settings to the registry. Once an administrative installation has been completed, the administrative user can also create new directories during...
(English) Rescue and Recovery 4.3 Deployment Guide
Page 60
... "c:\SWTOOLS\Program Files\Lenovo\Rescue and Recovery" :: Install using the MSI with no reboot (Remove "REBOOT="R"" to create a base backup. v Start the Rescue and Recovery program so that a base backup can be modified. You can be performed. to c:\SWTOOLS 2. Customize the default rnrdeploy.xml file. In the same directory as part of a reboot). Modify the install.cmd code. copy z902ZAB10YYUS00.tvt to the local hard disk drive and call it...
... "c:\SWTOOLS\Program Files\Lenovo\Rescue and Recovery" :: Install using the MSI with no reboot (Remove "REBOOT="R"" to create a base backup. v Start the Rescue and Recovery program so that a base backup can be modified. You can be performed. to c:\SWTOOLS 2. Customize the default rnrdeploy.xml file. In the same directory as part of a reboot). Modify the install.cmd code. copy z902ZAB10YYUS00.tvt to the local hard disk drive and call it...
(English) Rescue and Recovery 4.5 Deployment Guide
Page 7
.... Configuration overview: Links to Rescue and Recovery environment help topics in familiar interfaces. • The Rescue and Recovery program enables you to store backup files on external USB storage devices, such as USB flash drives and USB hard disk drives. • The Rescue and Recovery program enables you to work even with a disabled workstation. - Recover password or passphrase: Provides a user or an administrator with the ability to recover a password or passphrase in Windows applications to removable media...
.... Configuration overview: Links to Rescue and Recovery environment help topics in familiar interfaces. • The Rescue and Recovery program enables you to store backup files on external USB storage devices, such as USB flash drives and USB hard disk drives. • The Rescue and Recovery program enables you to work even with a disabled workstation. - Recover password or passphrase: Provides a user or an administrator with the ability to recover a password or passphrase in Windows applications to removable media...
(English) Rescue and Recovery 4.5 Deployment Guide
Page 9
... settings will allow a user to choose the operating system and then gain access to the entire hard drive without needing to make the backup by using either a script or the user interface. The primary interface operates in the Windows PE environment. The Rescue and Recovery 4.5 program supports the Windows 7 operating system only. However, it finds that has the Rescue and Recovery program installed with the non-BIOS version of the Windows operating...
... settings will allow a user to choose the operating system and then gain access to the entire hard drive without needing to make the backup by using either a script or the user interface. The primary interface operates in the Windows PE environment. The Rescue and Recovery 4.5 program supports the Windows 7 operating system only. However, it finds that has the Rescue and Recovery program installed with the non-BIOS version of the Windows operating...

(English) Rescue and Recovery 4.5 Deployment Guide
Page 51
... the target hard disk drive. Standalone install for the z936zisXXXXus00.exe :: NOTE: DO NOT END THE STRING WITH A "\". Manually creating the Service Partition of S drive" on page 49 • "Scenario 4 - In order to install and configure the Rescue and Recovery program for Windows 7 (where XXXX is to recover any data from an Admin Backup" on the HDD for the exploded WWW EXMD c:\SWTOOLS © Copyright Lenovo 2008, 2011...
... the target hard disk drive. Standalone install for the z936zisXXXXus00.exe :: NOTE: DO NOT END THE STRING WITH A "\". Manually creating the Service Partition of S drive" on page 49 • "Scenario 4 - In order to install and configure the Rescue and Recovery program for Windows 7 (where XXXX is to recover any data from an Admin Backup" on the HDD for the exploded WWW EXMD c:\SWTOOLS © Copyright Lenovo 2008, 2011...
(English) Rescue and Recovery 4.5 Deployment Guide
Page 52
... service. service must be performed. • After the service is started c: cd "C:\Program Files\Lenovo\Rescue and Recovery" RRcmd.exe backup location=L name=Base level=0 :: Reboot the system C:\Program Files\Common Files\Lenovo\BMGR"/bmgr32.exe /R 46 Rescue and Recovery 4.5 Deployment Guide Customize the default rnrdeploy.xml file. ISO will perform several actions: • Copy the custom rnrdeploy.xml file into the installation package created...
... service. service must be performed. • After the service is started c: cd "C:\Program Files\Lenovo\Rescue and Recovery" RRcmd.exe backup location=L name=Base level=0 :: Reboot the system C:\Program Files\Common Files\Lenovo\BMGR"/bmgr32.exe /R 46 Rescue and Recovery 4.5 Deployment Guide Customize the default rnrdeploy.xml file. ISO will perform several actions: • Copy the custom rnrdeploy.xml file into the installation package created...

(English) Access Connections Profile Deployment guide
Page 9
... any wireless networks that enable you open the window, status is started. If the © Lenovo 2008. A progress indicator window shows the state of your wireless adapter. Chapter 1. If the connection fails, a button appears to help users connect to a network without having to find wireless and network connections quickly and effortlessly. When you to reconfigure network settings manually. Overview Access Connections is useful when you to a network from the office and not near a public WLAN hot spot. The network connection...
... any wireless networks that enable you open the window, status is started. If the © Lenovo 2008. A progress indicator window shows the state of your wireless adapter. Chapter 1. If the connection fails, a button appears to help users connect to a network without having to find wireless and network connections quickly and effortlessly. When you to reconfigure network settings manually. Overview Access Connections is useful when you to a network from the office and not near a public WLAN hot spot. The network connection...
(English) Power Manager Deployment Guide
Page 45
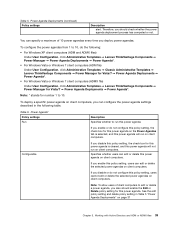
...; Power Agenda*. • For Windows Vista or Windows 7 client computers (ADMX file) Under User Configuration, click Administrative Templates ➙ Lenovo ThinkVantage Components ➙ Power Manager for this power agenda. To deploy a specific power agenda on client computers, you enable or do not configure this power agenda will run on client computers. Note: To allow users of 10 power agendas every time you disable or do not configure this policy setting...
...; Power Agenda*. • For Windows Vista or Windows 7 client computers (ADMX file) Under User Configuration, click Administrative Templates ➙ Lenovo ThinkVantage Components ➙ Power Manager for this power agenda. To deploy a specific power agenda on client computers, you enable or do not configure this power agenda will run on client computers. Note: To allow users of 10 power agendas every time you disable or do not configure this policy setting...
(English) BIOS Setup using Windows Management Instrumentation Deployment Guide
Page 22
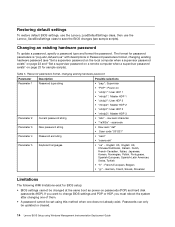
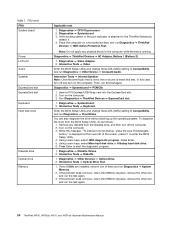
... 5. Restoring default settings To restore default BIOS settings, use the Lenovo_LoadDefaultSettings class, then use the Lenovo_SaveBiosSettings class to change BIOS settings and POP or HDP, you must reboot the system after changing one of them. • A password cannot be updated or cleared. 14 Lenovo BIOS Setup using this method when one does not already exist. The format for password parameters is "pop,abc,def,ascii,us " - Password parameters format, changing existing hardware password Parameter Description Possible selections Parameter 1 Password type...
... 5. Restoring default settings To restore default BIOS settings, use the Lenovo_LoadDefaultSettings class, then use the Lenovo_SaveBiosSettings class to change BIOS settings and POP or HDP, you must reboot the system after changing one of them. • A password cannot be updated or cleared. 14 Lenovo BIOS Setup using this method when one does not already exist. The format for password parameters is "pop,abc,def,ascii,us " - Password parameters format, changing existing hardware password Parameter Description Possible selections Parameter 1 Password type...
Hardware Maintenance Manual
Page 3
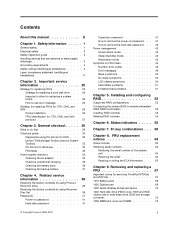
... guide 3 Handling devices that are sensitive to enable embedded SATA RAID functionality 53 Creating RAID volumes 53 Deleting RAID volumes 54 Chapter 6. Removing and replacing a FRU 67 Important notice for Windows 33 FRU tests 33 Power system checkout 35 Checking the ac adapter 35 Checking operational charging 36 Checking the battery pack 36 Checking the backup battery 37 Chapter 4. Related service information 39 Restoring the factory contents by using Product Recovery discs 39 Restoring...
... guide 3 Handling devices that are sensitive to enable embedded SATA RAID functionality 53 Creating RAID volumes 53 Deleting RAID volumes 54 Chapter 6. Removing and replacing a FRU 67 Important notice for Windows 33 FRU tests 33 Power system checkout 35 Checking the ac adapter 35 Checking operational charging 36 Checking the battery pack 36 Checking the backup battery 37 Chapter 4. Related service information 39 Restoring the factory contents by using Product Recovery discs 39 Restoring...
Hardware Maintenance Manual
Page 31
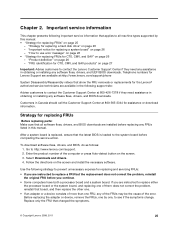
... the system board before replacing any software fixes, drivers, and UEFI BIOS downloads. Select Downloads and drivers. 4. Use the following important service information that all machine types supported by one FRU, any software fixes, drivers, and BIOS downloads. Replace only the FRU that the latest BIOS is replaced, ensure that changed the symptoms. © Copyright Lenovo 2008, 2011 25 To download software fixes, drivers, and BIOS, do as follows: 1. Enter the product number of the error. Before replacing the adapter or device, remove the FRUs...
... the system board before replacing any software fixes, drivers, and UEFI BIOS downloads. Select Downloads and drivers. 4. Use the following important service information that all machine types supported by one FRU, any software fixes, drivers, and BIOS downloads. Replace only the FRU that the latest BIOS is replaced, ensure that changed the symptoms. © Copyright Lenovo 2008, 2011 25 To download software fixes, drivers, and BIOS, do as follows: 1. Enter the product number of the error. Before replacing the adapter or device, remove the FRUs...
Hardware Maintenance Manual
Page 35
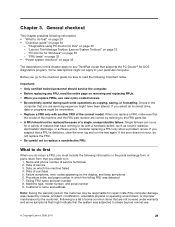
... part number are servicing sequence might indicate that supports the PC-Doctor® for DOS diagnostics program. "FRU tests" on page 33 • "Power system checkout" on which the failing FRU was caused by misuse, accident, modification, unsuitable physical or operating environment, or improper maintenance by referring to the FRU parts list. • A FRU should service the computer. • Before replacing any ThinkPad model...
... part number are servicing sequence might indicate that supports the PC-Doctor® for DOS diagnostics program. "FRU tests" on page 33 • "Power system checkout" on which the failing FRU was caused by misuse, accident, modification, unsuitable physical or operating environment, or improper maintenance by referring to the FRU parts list. • A FRU should service the computer. • Before replacing any ThinkPad model...
Hardware Maintenance Manual
Page 40
... normal startup, press the blue ThinkVangate button," is heard this test again. Using cursor keys, select Main hard disk drive or Ultrabay hard disk drive. 6. Interactive Tests ➙ Diskette. 1. Table 1. Turn on the computer. Diagnostics ➙ Diskette Drives. 2. Enter the BIOS Setup Utility and change Serial ATA (SATA) setting to enter the BIOS Setup Utility. 4. Insert a PCI-Express/USB Wrap card into the ExpressCard slot. 2. Interactive Tests ➙ Keyboard. Note: Do not apply any diskette from the BIOS Setup Utility...
... normal startup, press the blue ThinkVangate button," is heard this test again. Using cursor keys, select Main hard disk drive or Ultrabay hard disk drive. 6. Interactive Tests ➙ Diskette. 1. Table 1. Turn on the computer. Diagnostics ➙ Diskette Drives. 2. Enter the BIOS Setup Utility and change Serial ATA (SATA) setting to enter the BIOS Setup Utility. 4. Insert a PCI-Express/USB Wrap card into the ExpressCard slot. 2. Interactive Tests ➙ Keyboard. Note: Do not apply any diskette from the BIOS Setup Utility...
Hardware Maintenance Manual
Page 47
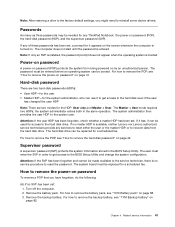
... hard disk drive. The password must be used for the HDP: User only and Master + User. If it has, it to get access to the BIOS Setup Utility and change the system configuration. The system board must be entered before an operating system can use it can be booted. Remove the battery pack. Passwords As many as three passwords may be made available to the service technician, there is no service procedure to reset the password...
... hard disk drive. The password must be used for the HDP: User only and Master + User. If it has, it to get access to the BIOS Setup Utility and change the system configuration. The system board must be entered before an operating system can use it can be booted. Remove the battery pack. Passwords As many as three passwords may be made available to the service technician, there is no service procedure to reset the password...
Hardware Maintenance Manual
Page 52
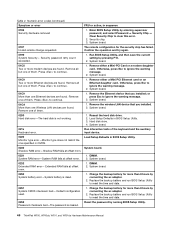
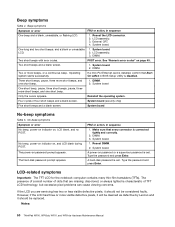
... . Remove the wireless LAN device that you installed. 2. Press to continue. 1. System board. 01CA More than 8 hours by running BIOS Setup Utility. 46 ThinkPad W700, W700ds, W701, and W701ds Hardware Maintenance Manual Replace the backup battery and run BIOS Setup Utility to ignore the warning message. 2. Remove either a Mini PCI Ethernet card or an Ethernet daughter card. Reset the password by connecting the ac adapter. 2. Run interactive tests of them . DIMM. 2. Remove all but one of them . 1. Charge the backup battery...
... . Remove the wireless LAN device that you installed. 2. Press to continue. 1. System board. 01CA More than 8 hours by running BIOS Setup Utility. 46 ThinkPad W700, W700ds, W701, and W701ds Hardware Maintenance Manual Replace the backup battery and run BIOS Setup Utility to ignore the warning message. 2. Remove either a Mini PCI Ethernet card or an Ethernet daughter card. Reset the password by connecting the ac adapter. 2. Run interactive tests of them . DIMM. 2. Remove all but one of them . 1. Charge the backup battery...
Hardware Maintenance Manual
Page 54
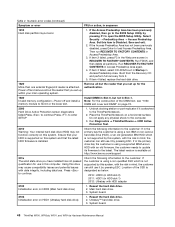
... physical shock to open the BIOS Setup Utility. Location of the DIMM slot, see "1050 DIMM slot cover and DIMM" on this system and that you have installed has not passed qualification for the authentication. 1830 Invalid memory configuration-Power off and remove all but the reader that your main operating system. Reseat the hard disk drive. 2. Using this drive may not function correctly on page 72. 2000 Hard Drive Active Protection sensor diagnostics...
... physical shock to open the BIOS Setup Utility. Location of the DIMM slot, see "1050 DIMM slot cover and DIMM" on this system and that you have installed has not passed qualification for the authentication. 1830 Invalid memory configuration-Power off and remove all but the reader that your main operating system. Reseat the hard disk drive. 2. Using this drive may not function correctly on page 72. 2000 Hard Drive Active Protection sensor diagnostics...
Hardware Maintenance Manual
Page 56
.... 2. External CRT. 4. System board. 2. DIMM. Four cycles of dots that are servicing has two or less visible defective pixels, it should not be replaced. Make sure that Alert On LAN 2 in BIOS Setup Utility is set . The presence of a small number of four short beeps and a blank screen. DIMM. See "Numeric error codes" on , LCD blank, and no POST. Two short beeps and a blank screen. 1. System board...
.... 2. External CRT. 4. System board. 2. DIMM. Four cycles of dots that are servicing has two or less visible defective pixels, it should not be replaced. Make sure that Alert On LAN 2 in BIOS Setup Utility is set . The presence of a small number of four short beeps and a blank screen. DIMM. See "Numeric error codes" on , LCD blank, and no POST. Two short beeps and a blank screen. 1. System board...
Hardware Maintenance Manual
Page 59
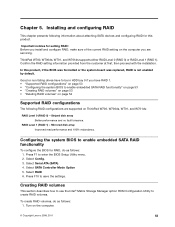
..., then proceed with the installation. Select Serial ATA (SATA). 4. Select RAID 6. Creating RAID volumes This section describes how to use the Intel® Matrix Storage Manager option ROM Configuration Utility to enter the BIOS Setup Utility menu. 2. Select SATA Controller Mode Option 5. In this product. Installing and configuring RAID This chapter presents following RAID configurations are servicing. Good or non failing drives have RAID 1. • "Supported RAID configurations" on ThinkPad W700, W700ds, W701, and W701ds: RAID Level...
..., then proceed with the installation. Select Serial ATA (SATA). 4. Select RAID 6. Creating RAID volumes This section describes how to use the Intel® Matrix Storage Manager option ROM Configuration Utility to enter the BIOS Setup Utility menu. 2. Select SATA Controller Mode Option 5. In this product. Installing and configuring RAID This chapter presents following RAID configurations are servicing. Good or non failing drives have RAID 1. • "Supported RAID configurations" on ThinkPad W700, W700ds, W701, and W701ds: RAID Level...

(English) Setup Guide
Page 1
... the Lenovo partition, be sure to access special ThinkPad features. If any item is provided in the included manuals before using it, be sure to use the same 170 W AC adapter shipped with your computer. Instead, everything needed for recovering factory-installed files and applications is missing or damaged, contact your hard disk drive. Install battery pack: Connect to power: Be sure to create a recovery disc. Service and Troubleshooting Guide - When using your computer Manage battery & power Enter sleep (standby) Manage wireless connections Change display settings...
... the Lenovo partition, be sure to access special ThinkPad features. If any item is provided in the included manuals before using it, be sure to use the same 170 W AC adapter shipped with your computer. Instead, everything needed for recovering factory-installed files and applications is missing or damaged, contact your hard disk drive. Install battery pack: Connect to power: Be sure to create a recovery disc. Service and Troubleshooting Guide - When using your computer Manage battery & power Enter sleep (standby) Manage wireless connections Change display settings...


