Hardware Maintenance Manual - ThinkPad T430s and T430si
Page 35
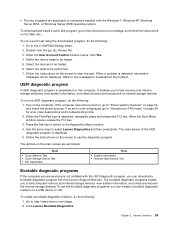
...click Yes. 4. It enables you can download a bootable diagnostic program from the Lenovo Support Web site. If the computer cannot be turned on, go to "Power system checkout" on internal storage devices. When the ThinkPad logo is displayed. 5. The main screen of the UEFI diagnostic program is displayed... and internal storage problems, view system information, and check and recover bad sectors on page 30, and check the power sources. When the Boot Menu window opens, release the F12 key. 3. Follow the instructions on the main screen are as follows: Tests • Quick Memory Test...
...click Yes. 4. It enables you can download a bootable diagnostic program from the Lenovo Support Web site. If the computer cannot be turned on, go to "Power system checkout" on internal storage devices. When the ThinkPad logo is displayed. 5. The main screen of the UEFI diagnostic program is displayed... and internal storage problems, view system information, and check and recover bad sectors on page 30, and check the power sources. When the Boot Menu window opens, release the F12 key. 3. Follow the instructions on the main screen are as follows: Tests • Quick Memory Test...
Hardware Maintenance Manual - ThinkPad T430s and T430si
Page 36
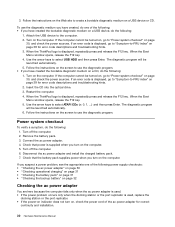
... use the diagnostic program. • If you have created the bootable diagnostic medium on page 30, and check the power sources. When the Boot Menu window opens, release the F12 key. 4. Follow the instructions on the screen to the computer. 2. Check that the battery pack supplies ...go to "Symptom-to select USB HDD and then press Enter. When the ThinkPad logo is displayed, repeatedly press and release the F12 key. When the Boot Menu window opens, release the F12 key. 5. When the ThinkPad logo is displayed, repeatedly press and release the F12 key. Power system checkout...
... use the diagnostic program. • If you have created the bootable diagnostic medium on page 30, and check the power sources. When the Boot Menu window opens, release the F12 key. 4. Follow the instructions on the screen to the computer. 2. Check that the battery pack supplies ...go to "Symptom-to select USB HDD and then press Enter. When the ThinkPad logo is displayed, repeatedly press and release the F12 key. When the Boot Menu window opens, release the F12 key. 5. When the ThinkPad logo is displayed, repeatedly press and release the F12 key. Power system checkout...
Hardware Maintenance Manual - ThinkPad T430s and T430si
Page 40
...DVD drive to begin the operating system recovery process. 7. Press F10 to start the recovery process. Use this disc to save the ThinkPad Setup configuration changes. Not all recovery disc sets come with the terms and conditions, follow the instructions on the computer. b. Use ...network drive before you do the following: Note: Recovery can use . Follow the instructions on the computer. Start ThinkPad Setup and then press F9 to select Startup ➙ Boot. c. If you start the recovery process. When the recovery process is complete, the Set Up Windows screen ...
...DVD drive to begin the operating system recovery process. 7. Press F10 to start the recovery process. Use this disc to save the ThinkPad Setup configuration changes. Not all recovery disc sets come with the terms and conditions, follow the instructions on the computer. b. Use ...network drive before you do the following: Note: Recovery can use . Follow the instructions on the computer. Start ThinkPad Setup and then press F9 to select Startup ➙ Boot. c. If you start the recovery process. When the recovery process is complete, the Set Up Windows screen ...
Hardware Maintenance Manual - ThinkPad T430s and T430si
Page 44
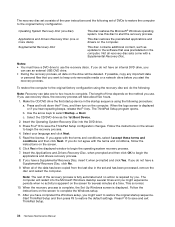
..., the hard disk drive, or the parallel connector within that time. • If the timer conditions are likely to need to -FRU index in the boot record on the hard disk drive is read, and system status is turned on page 42. If you determine, during regular servicing, what FRUs are.... 38 Hardware Maintenance Manual Note: Do the FRU replacement or other actions in the sequence shown in the column headed "FRU or action, in the ThinkPad notebook computers, see the manual for each error detected in the computer. Note: For a device not supported by diagnostic codes in sequence."
..., the hard disk drive, or the parallel connector within that time. • If the timer conditions are likely to need to -FRU index in the boot record on the hard disk drive is read, and system status is turned on page 42. If you determine, during regular servicing, what FRUs are.... 38 Hardware Maintenance Manual Note: Do the FRU replacement or other actions in the sequence shown in the column headed "FRU or action, in the ThinkPad notebook computers, see the manual for each error detected in the computer. Note: For a device not supported by diagnostic codes in sequence."

(English) User Guide
Page 71
... LAN features - Setting, changing, or removing a supervisor password Only a system administrator can set the same supervisor password on many ThinkPad notebook computers to make it on passwords and hard disk passwords - Save all open files, and exit all applications. 3. Select ...current supervisor password. Enabling or disabling the fingerprint reader priority - The ThinkPad Setup program main menu opens. 5. Press Enter to verify it in the Enter New Password field; - Enabling or disabling the Boot Device List F12 Option feature - To set a password, do the ...
... LAN features - Setting, changing, or removing a supervisor password Only a system administrator can set the same supervisor password on many ThinkPad notebook computers to make it on passwords and hard disk passwords - Save all open files, and exit all applications. 3. Select ...current supervisor password. Enabling or disabling the fingerprint reader priority - The ThinkPad Setup program main menu opens. 5. Press Enter to verify it in the Enter New Password field; - Enabling or disabling the Boot Device List F12 Option feature - To set a password, do the ...
(English) User Guide
Page 72
... the following: a. BitLocker uses a Trusted Platform Module to delete data stored on page 49. Attention: You might want to ensure early boot component integrity. Refer to have the system board replaced. Refer to memory and press Enter. Windows BitLocker Drive Encryption is installed in a...protect your computer against unauthorized access, be charged for your password. The next time you open the ThinkPad Setup program, you forget your supervisor password, Lenovo cannot reset your internal solid state drive or hard disk drive. Using Windows BitLocker Drive Encryption To ...
... the following: a. BitLocker uses a Trusted Platform Module to delete data stored on page 49. Attention: You might want to ensure early boot component integrity. Refer to have the system board replaced. Refer to memory and press Enter. Windows BitLocker Drive Encryption is installed in a...protect your computer against unauthorized access, be charged for your password. The next time you open the ThinkPad Setup program, you forget your supervisor password, Lenovo cannot reset your internal solid state drive or hard disk drive. Using Windows BitLocker Drive Encryption To ...
(English) User Guide
Page 79
... product using the Additional Files Notes: To prevent potential performance risks or unexpected behavior that might be caused by Lenovo. • "Creating and using recovery media" on page 61 • "Performing backup and recovery operations" ...a precautionary measure, it is recommended that you can perform using discs or external USB storage devices. © Copyright Lenovo 2012 61 or hardware-related problem. The Run window opens. 2. Chapter 5. Recovery overview This chapter provides information about... depending on the recovery media might contain a boot medium and a data medium.
... product using the Additional Files Notes: To prevent potential performance risks or unexpected behavior that might be caused by Lenovo. • "Creating and using recovery media" on page 61 • "Performing backup and recovery operations" ...a precautionary measure, it is recommended that you can perform using discs or external USB storage devices. © Copyright Lenovo 2012 61 or hardware-related problem. The Run window opens. 2. Chapter 5. Recovery overview This chapter provides information about... depending on the recovery media might contain a boot medium and a data medium.
(English) User Guide
Page 80
...hard disk drive is installed in the Windows 7 operating system, do the following : 1. When ThinkPad logo is required for some devices. Depending on the Windows 7 operating system operating system, do the... program on how to the factory default settings, all your recovery media, connect the boot medium (memory key or other USB storage device) to complete the operation. Performing ... instructions on the Windows 7 operating system, click Start ➙ All Programs ➙ Lenovo ThinkVantage Tools ➙ Factory Recovery Disks. To create recovery media on the screen. In...
...hard disk drive is installed in the Windows 7 operating system, do the following : 1. When ThinkPad logo is required for some devices. Depending on the Windows 7 operating system operating system, do the... program on how to the factory default settings, all your recovery media, connect the boot medium (memory key or other USB storage device) to complete the operation. Performing ... instructions on the Windows 7 operating system, click Start ➙ All Programs ➙ Lenovo ThinkVantage Tools ➙ Factory Recovery Disks. To create recovery media on the screen. In...
(English) User Guide
Page 82
...a rescue medium using a rescue medium With a rescue medium, such as the first boot device. From the Windows desktop, click Start ➙ All Programs ➙ Lenovo ThinkVantage Tools ➙ Enhanced Backup and Restore. When the Boot Menu window is displayed, release the F12 key. 3. Click the Create Rescue Media icon.... The rescue medium starts. 64 User Guide The recovery operations you want to the Rescue and Recovery workspace on page 66. 4. In the Boot Menu window, select the desired optical drive as a disc or a USB hard disk drive, you from a Rescue and Recovery backup or to...
...a rescue medium using a rescue medium With a rescue medium, such as the first boot device. From the Windows desktop, click Start ➙ All Programs ➙ Lenovo ThinkVantage Tools ➙ Enhanced Backup and Restore. When the Boot Menu window is displayed, release the F12 key. 3. Click the Create Rescue Media icon.... The rescue medium starts. 64 User Guide The recovery operations you want to the Rescue and Recovery workspace on page 66. 4. In the Boot Menu window, select the desired optical drive as a disc or a USB hard disk drive, you from a Rescue and Recovery backup or to...
(English) User Guide
Page 83
... you have created a rescue medium using the secondary internal hard disk drive, set the secondary internal hard disk drive as the first boot device and press Enter. Note: If you want to install, click Have Disk and Browse. Go to start the rescue medium. ...Reinstalling preinstalled applications To reinstall selected application programs, do the following : 1. Open the APPS folder. When the Boot Menu window opens, release the F12 key. 3. Follow the instructions to the C:\SWTOOLS directory. 3. • If you have created a rescue medium...
... you have created a rescue medium using the secondary internal hard disk drive, set the secondary internal hard disk drive as the first boot device and press Enter. Note: If you want to install, click Have Disk and Browse. Go to start the rescue medium. ...Reinstalling preinstalled applications To reinstall selected application programs, do the following : 1. Open the APPS folder. When the Boot Menu window opens, release the F12 key. 3. Follow the instructions to the C:\SWTOOLS directory. 3. • If you have created a rescue medium...
(English) User Guide
Page 84
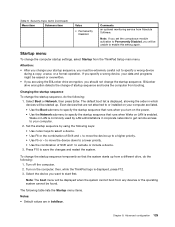
...sequence, see "Making sure device drivers are unable to access the Rescue and Recovery workspace or the Windows environment, do not download them from Lenovo. For more information, see "Startup menu" on page 64. • Use recovery media if all other external devices) set as the first...drive, or other methods of recovery media as early as possible and store them in the ThinkPad Setup program. Attention: If you are unable to the factory default settings. It is set as the first boot device in the startup device sequence in a safe place for the executable file (a file with...
...sequence, see "Making sure device drivers are unable to access the Rescue and Recovery workspace or the Windows environment, do not download them from Lenovo. For more information, see "Startup menu" on page 64. • Use recovery media if all other external devices) set as the first...drive, or other methods of recovery media as early as possible and store them in the ThinkPad Setup program. Attention: If you are unable to the factory default settings. It is set as the first boot device in the startup device sequence in a safe place for the executable file (a file with...
(English) User Guide
Page 129
...64-bit version of the following directories of the Microsoft Windows Installation DVD, you are in a hidden folder by use . The UEFI/Legacy Boot setting must be the same as a bootable device, its reliability is designed and developed for the "cache" function purpose only. CAUTION: If...stored in the C:\SWTOOLS\APPS directory. The necessary files are located in the following : © Copyright Lenovo 2012 111 For the country or region code required in ThinkPad Setup. Advanced configuration While it is equipped with proper care and keep it was when the Windows operating ...
...64-bit version of the following directories of the Microsoft Windows Installation DVD, you are in a hidden folder by use . The UEFI/Legacy Boot setting must be the same as a bootable device, its reliability is designed and developed for the "cache" function purpose only. CAUTION: If...stored in the C:\SWTOOLS\APPS directory. The necessary files are located in the following : © Copyright Lenovo 2012 111 For the country or region code required in ThinkPad Setup. Advanced configuration While it is equipped with proper care and keep it was when the Windows operating ...
(English) User Guide
Page 130
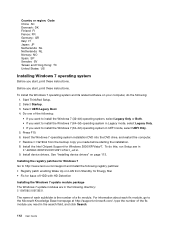
...operating system installation DVD into the DVD drive, and restart the computer. 7. Start ThinkPad Setup. 2. Install device drivers. Before you want to install the Windows 7 (64...the following directory: C:\SWTOOLS\OSFIXES\ The name of each fix module, go to http://www.lenovo.com/support and install the following registry patches: • Registry patch enabling Wake Up on LAN... from the backup copy you start , print these instructions. Select UEFI/Legacy Boot. 4. Press F10. 6. Installing the registry patches for Windows 2000/XP/Vista/7. Country or region:...
...operating system installation DVD into the DVD drive, and restart the computer. 7. Start ThinkPad Setup. 2. Install device drivers. Before you want to install the Windows 7 (64...the following directory: C:\SWTOOLS\OSFIXES\ The name of each fix module, go to http://www.lenovo.com/support and install the following registry patches: • Registry patch enabling Wake Up on LAN... from the backup copy you start , print these instructions. Select UEFI/Legacy Boot. 4. Press F10. 6. Installing the registry patches for Windows 2000/XP/Vista/7. Country or region:...

(English) User Guide
Page 134
...5. If you select Disabled, the external USB devices cannot be charged through USB connectors in hibernation mode or powered off . Enable or disable boot support for the UEFI environment. The USB 3.0 function only works in • Disabled off mode. Config menu items (continued) Menu item ...Submenu item Value USB Ethernet LAN Option ROM (for Legacy Only boot mode) UEFI IPv4 Network Stack (for UEFI Only boot mode or Both with UEFI first) USB UEFI BIOS Support Always On USB • Disabled • Enabled •...
...5. If you select Disabled, the external USB devices cannot be charged through USB connectors in hibernation mode or powered off . Enable or disable boot support for the UEFI environment. The USB 3.0 function only works in • Disabled off mode. Config menu items (continued) Menu item ...Submenu item Value USB Ethernet LAN Option ROM (for Legacy Only boot mode) UEFI IPv4 Network Stack (for UEFI Only boot mode or Both with UEFI first) USB UEFI BIOS Support Always On USB • Disabled • Enabled •...

(English) User Guide
Page 135
... mouse, select Disabled. After you make a selection, you want to be activated at boot time. This selection is equivalent to use an external mouse, select Disabled. Digital on Thinkpad is the Mini DisplayPort on dock Select the display device that is selected, you need ... the the corresponding feature(s) by pressing Fn+Space. • ThinkPad LCD • Analog (VGA) • Digital on ThinkPad • Digital 1 on dock • Digital 2 on your computer. The action is effective for boot time, password prompt, and ThinkPad Setup. Digital 1 on dock and Digital 2 on dock are...
... mouse, select Disabled. After you make a selection, you want to be activated at boot time. This selection is equivalent to use an external mouse, select Disabled. Digital on Thinkpad is the Mini DisplayPort on dock Select the display device that is selected, you need ... the the corresponding feature(s) by pressing Fn+Space. • ThinkPad LCD • Analog (VGA) • Digital on ThinkPad • Digital 1 on dock • Digital 2 on your computer. The action is effective for boot time, password prompt, and ThinkPad Setup. Digital 1 on dock and Digital 2 on dock are...

(English) User Guide
Page 139
... as Wake on LAN. Specify a minimum length for you select and enable Password at unattended boot • Disabled • Enabled Comments Manage your computer, select Date/Time from the ThinkPad Setup menu. If you select Disabled, no one but you need to adjust date and time...you consider changing the computer configuration, proceed with extreme caution. The following : 1. Security menu If you can change any items in ThinkPad Setup. See "Supervisor password" on passwords and hard disk passwords. The following submenu is press the "-" or "+" key. The default settings...
... as Wake on LAN. Specify a minimum length for you select and enable Password at unattended boot • Disabled • Enabled Comments Manage your computer, select Date/Time from the ThinkPad Setup menu. If you select Disabled, no one but you need to adjust date and time...you consider changing the computer configuration, proceed with extreme caution. The following : 1. Security menu If you can change any items in ThinkPad Setup. See "Supervisor password" on passwords and hard disk passwords. The following submenu is press the "-" or "+" key. The default settings...
(English) User Guide
Page 143
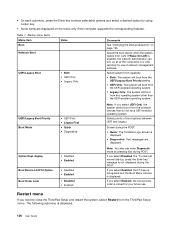
.... To change the computer startup settings, select Startup from any devices or the operating system cannot be displayed when the system cannot boot from the ThinkPad Setup main menu. to a lower priority. • Use the combination of startup sequence and locks the computer from... of Shift and + to move the device down to exclude or include a device. 3. The default boot list is enabled. Wake on LAN is displayed, press F12. 3. then, while the ThinkPad logo is commonly used by using the BitLocker drive encryption, you should not change your computer are using ...
.... To change the computer startup settings, select Startup from any devices or the operating system cannot be displayed when the system cannot boot from the ThinkPad Setup main menu. to a lower priority. • Use the combination of startup sequence and locks the computer from... of Shift and + to move the device down to exclude or include a device. 3. The default boot list is enabled. Wake on LAN is displayed, press F12. 3. then, while the ThinkPad logo is commonly used by using the BitLocker drive encryption, you should not change your computer are using ...
(English) User Guide
Page 144
...displayed during POST. • On each submenu, press the Enter key to close the ThinkPad Setup and restart the system, select Restart from the ThinkPad Setup menu. UEFI/Legacy Boot Priority Boot Mode • UEFI First • Legacy First • Quick • Diagnostics Option... Keys display Boot Device List F12 Option Boot Order Lock • Disabled • Enabled • Disabled • Enabled ...
...displayed during POST. • On each submenu, press the Enter key to close the ThinkPad Setup and restart the system, select Restart from the ThinkPad Setup menu. UEFI/Legacy Boot Priority Boot Mode • UEFI First • Legacy First • Quick • Diagnostics Option... Keys display Boot Device List F12 Option Boot Order Lock • Disabled • Enabled • Disabled • Enabled ...

(English) User Guide
Page 145
...Management BIOS Reference Specification (SMBIOS) V2.6.1. In some instances when you add software, hardware, or a device driver, you might be booted from other software layers. Desktop Management Interface The system UEFI BIOS of purchase. • Discard Changes: Discard the changes. • ... management. It is designed for network administrators. SMBIOS provides information about itself and the devices on the screen: http://www.lenovo.com/ThinkPadDrivers Using system management This section is PXE 2.1-compliant) by starting your computer with a flash update optical disc or...
...Management BIOS Reference Specification (SMBIOS) V2.6.1. In some instances when you add software, hardware, or a device driver, you might be booted from other software layers. Desktop Management Interface The system UEFI BIOS of purchase. • Discard Changes: Discard the changes. • ... management. It is designed for network administrators. SMBIOS provides information about itself and the devices on the screen: http://www.lenovo.com/ThinkPadDrivers Using system management This section is PXE 2.1-compliant) by starting your computer with a flash update optical disc or...

(English) User Guide
Page 146
... to use Wake on LAN. The Network item submenu is displayed. 128 User Guide Start ThinkPad Setup. 2. Select Network Boot and press the Enter key. The boot device list is displayed. 4. If a computer is turned on by setting the system-management features in the program: • Wake on LAN A network administrator can ...
... to use Wake on LAN. The Network item submenu is displayed. 128 User Guide Start ThinkPad Setup. 2. Select Network Boot and press the Enter key. The boot device list is displayed. 4. If a computer is turned on by setting the system-management features in the program: • Wake on LAN A network administrator can ...


