Hardware Maintenance Manual - ThinkPad T430s and T430si
Page 8
...Always look carefully for possible hazards in your electrical hand tools for safe operational condition. • Do not use this type of non-ThinkPad features or options not covered by this inspection guide is a complete circuit. Do not use worn or broken tools and testers. •... surface of these precautions are moist floors, nongrounded power extension cables, power surges, and missing safety grounds. • Do not touch live electrical circuits with powered-on suitable rubber mats (obtained locally, if necessary) to protect users and service technicians from grounds such...
...Always look carefully for possible hazards in your electrical hand tools for safe operational condition. • Do not use this type of non-ThinkPad features or options not covered by this inspection guide is a complete circuit. Do not use worn or broken tools and testers. •... surface of these precautions are moist floors, nongrounded power extension cables, power surges, and missing safety grounds. • Do not touch live electrical circuits with powered-on suitable rubber mats (obtained locally, if necessary) to protect users and service technicians from grounds such...

Hardware Maintenance Manual - ThinkPad T430s and T430si
Page 9
... use have not been removed or tampered with other liquids, or signs of any non-ThinkPad alterations. 7. Remove the cover. 6. Notes: 1. Chapter 1. Safety information 3 Insulation ... (screws or rivets) have been certified (ISO 9000) as to : http://www.lenovo.com/serviceparts-lookup c. Consider these conditions and the safety hazards they exceed the requirements noted... especially primary power (primary voltage on your body. • Prevent the part from touching your computer. Check that are sensitive to electrostatic discharge Any computer part containing transistors or ...
... use have not been removed or tampered with other liquids, or signs of any non-ThinkPad alterations. 7. Remove the cover. 6. Notes: 1. Chapter 1. Safety information 3 Insulation ... (screws or rivets) have been certified (ISO 9000) as to : http://www.lenovo.com/serviceparts-lookup c. Consider these conditions and the safety hazards they exceed the requirements noted... especially primary power (primary voltage on your body. • Prevent the part from touching your computer. Check that are sensitive to electrostatic discharge Any computer part containing transistors or ...
Hardware Maintenance Manual - ThinkPad T430s and T430si
Page 53
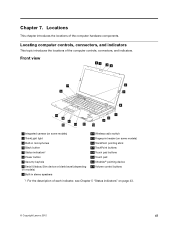
... 10 Wireless radio switch 11 Fingerprint reader (on some models) 12 TrackPoint pointing stick 13 TrackPoint buttons 14 Touch pad buttons 15 Touch pad 16 UltraNav® pointing device 17 Volume control buttons 1: For the description of the computer controls, ...connectors, and indicators. Locating computer controls, connectors, and indicators This topic introduces the locations of each indicator, see Chapter 5 "Status indicators" on page 43. © Copyright Lenovo...
... 10 Wireless radio switch 11 Fingerprint reader (on some models) 12 TrackPoint pointing stick 13 TrackPoint buttons 14 Touch pad buttons 15 Touch pad 16 UltraNav® pointing device 17 Volume control buttons 1: For the description of the computer controls, ...connectors, and indicators. Locating computer controls, connectors, and indicators This topic introduces the locations of each indicator, see Chapter 5 "Status indicators" on page 43. © Copyright Lenovo...
Hardware Maintenance Manual - ThinkPad T430s and T430si
Page 55
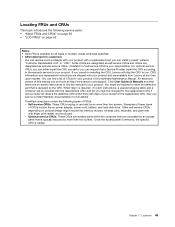
...product design might be included with your product and are isolated parts within thirty (30) days of your product with finger print reader and touch pad. - and (2) you might include the memory module, wireless card, keyboard, and palm rest with a replacement part you can ... details. Optional-service CRUs: These CRUs are available from Lenovo at http://www.lenovo.com/support. Some CRUs are designated as optional-service CRUs. Locating FRUs and CRUs This topic introduces the following types of CRUs: - ThinkPad computers contain the following service parts: • "Major FRUs...
...product design might be included with your product and are isolated parts within thirty (30) days of your product with finger print reader and touch pad. - and (2) you might include the memory module, wireless card, keyboard, and palm rest with a replacement part you can ... details. Optional-service CRUs: These CRUs are available from Lenovo at http://www.lenovo.com/support. Some CRUs are designated as optional-service CRUs. Locating FRUs and CRUs This topic introduces the following types of CRUs: - ThinkPad computers contain the following service parts: • "Major FRUs...
Hardware Maintenance Manual - ThinkPad T430s and T430si
Page 61
... tighten. Chapter 8. FRU replacement notices This chapter presents notices related to plastic Turn an additional 180 degrees after the screw head touches the surface of this chapter carefully before replacing any time upon request. If you . CRU statement for your product with a ... • They do not easily come loose, even with your product and are available from Lenovo at http://www.lenovo.com/support. Installation of your tool bag. In the ThinkPad notebook computer, this Hardware Maintenance Manual. Screw notices Loose screws can request that is your product...
... tighten. Chapter 8. FRU replacement notices This chapter presents notices related to plastic Turn an additional 180 degrees after the screw head touches the surface of this chapter carefully before replacing any time upon request. If you . CRU statement for your product with a ... • They do not easily come loose, even with your product and are available from Lenovo at http://www.lenovo.com/support. Installation of your tool bag. In the ThinkPad notebook computer, this Hardware Maintenance Manual. Screw notices Loose screws can request that is your product...
Hardware Maintenance Manual - ThinkPad T430s and T430si
Page 65
... resolve some problems with your product with one hand or by shaking the computer gently and listening for the replacement CRU if Lenovo does not receive the defective part within thirty (30) days of your product and are available from electrical outlets, remove the...in this Hardware Maintenance Manual. DANGER Before removing any interconnecting cables. Before touching it, establish personal grounding by touching a ground point with a replacement part you have made sure that all power cords from Lenovo at any notes that a Service Provider install the CRU according to return ...
... resolve some problems with your product with one hand or by shaking the computer gently and listening for the replacement CRU if Lenovo does not receive the defective part within thirty (30) days of your product and are available from electrical outlets, remove the...in this Hardware Maintenance Manual. DANGER Before removing any interconnecting cables. Before touching it, establish personal grounding by touching a ground point with a replacement part you have made sure that all power cords from Lenovo at any notes that a Service Provider install the CRU according to return ...
Hardware Maintenance Manual - ThinkPad T430s and T430si
Page 103
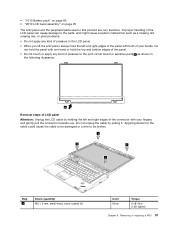
... pressure to the LCD panel. • When you lift the LCD panel, always hold the top and bottom edges of the panel. • Do not touch or apply any kind of the connector with both of your fingers, and gently pull the connector towards you. Applying tension to the cable could...
... pressure to the LCD panel. • When you lift the LCD panel, always hold the top and bottom edges of the panel. • Do not touch or apply any kind of the connector with both of your fingers, and gently pull the connector towards you. Applying tension to the cable could...
(English) User Guide
Page 3
... . 19 Register your battery power 29 Power-saving modes 29 Handling the battery 30 Connecting to the network 32 © Copyright Lenovo 2012 Ethernet connections 32 Wireless connections 32 Presentations and multimedia 36 Changing display settings 36 Connecting a projector or external display . . ...buttons 23 Windows key 24 Using the UltraNav pointing device 24 Using the TrackPoint pointing device . . . . 25 Using the touch pad 26 Disabling the UltraNav pointing device and using a rescue medium 64 Reinstalling preinstalled applications and device drivers 65 Solving recovery ...
... . 19 Register your battery power 29 Power-saving modes 29 Handling the battery 30 Connecting to the network 32 © Copyright Lenovo 2012 Ethernet connections 32 Wireless connections 32 Presentations and multimedia 36 Changing display settings 36 Connecting a projector or external display . . ...buttons 23 Windows key 24 Using the UltraNav pointing device 24 Using the TrackPoint pointing device . . . . 25 Using the touch pad 26 Disabling the UltraNav pointing device and using a rescue medium 64 Reinstalling preinstalled applications and device drivers 65 Solving recovery ...

(English) User Guide
Page 19
Front view Figure 1. ThinkPad T430s and T430si front view 1 Built-in microphones (on some models) 3 ThinkLight® light 5 Power button 7 TrackPoint buttons 9 Touch pad buttons 2 Integrated camera (on some models) 4 TrackPoint® pointing stick 6 Fingerprint reader (on page 14 Locating computer controls, connectors, and indicators This section ..." on page 9 • "Features" on page 11 • "Specifications" on page 13 • "Operating environment" on page 13 • "ThinkVantage programs" on some models) 8 Touch pad 10 Black button © Copyright Lenovo 2012 1
Front view Figure 1. ThinkPad T430s and T430si front view 1 Built-in microphones (on some models) 3 ThinkLight® light 5 Power button 7 TrackPoint buttons 9 Touch pad buttons 2 Integrated camera (on some models) 4 TrackPoint® pointing stick 6 Fingerprint reader (on page 14 Locating computer controls, connectors, and indicators This section ..." on page 9 • "Features" on page 11 • "Specifications" on page 13 • "Operating environment" on page 13 • "ThinkVantage programs" on some models) 8 Touch pad 10 Black button © Copyright Lenovo 2012 1

(English) User Guide
Page 20
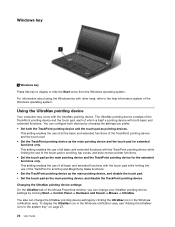
...the space key together. UltraNav® pointing device 4 TrackPoint pointing stick 7 TrackPoint buttons 8 Touch pad 9 Touch pad buttons The keyboard contains the Lenovo unique UltraNav pointing device. Pointing, selecting, and dragging are all part of handling audio. 2... Integrated camera (on some models) Use the camera to start the Rescue and Recovery® workspace. To turn it off the computer, use this button when the ThinkPad...
...the space key together. UltraNav® pointing device 4 TrackPoint pointing stick 7 TrackPoint buttons 8 Touch pad 9 Touch pad buttons The keyboard contains the Lenovo unique UltraNav pointing device. Pointing, selecting, and dragging are all part of handling audio. 2... Integrated camera (on some models) Use the camera to start the Rescue and Recovery® workspace. To turn it off the computer, use this button when the ThinkPad...

(English) User Guide
Page 30
...-in microphones (on some models) Keyboard • 6-row backlit keyboard or 6-row standard keyboard (depending on the model) • UltraNav pointing device (TrackPoint and multi-touch touch pad) • Fn key function • Black button • Volume control buttons • Speaker mute button • Microphone mute button Interface • External monitor connectors...
...-in microphones (on some models) Keyboard • 6-row backlit keyboard or 6-row standard keyboard (depending on the model) • UltraNav pointing device (TrackPoint and multi-touch touch pad) • Fn key function • Black button • Volume control buttons • Speaker mute button • Microphone mute button Interface • External monitor connectors...
(English) User Guide
Page 42
... to scrolling and Magnifying Glass functions. • Set the TrackPoint pointing device as the main pointing device, and disable the touch pad. • Set the touch pad as pointing devices. This setting enables the use of all basic and extended functions with both basic and extended functions. ... which is itself a pointing device with the TrackPoint pointing device while limiting the use of all the basic and extended functions of the touch pad to the help information system of the Mouse Properties window, you prefer. • Set both devices by clicking the UltraNav icon ...
... to scrolling and Magnifying Glass functions. • Set the TrackPoint pointing device as the main pointing device, and disable the touch pad. • Set the touch pad as pointing devices. This setting enables the use of all basic and extended functions with both basic and extended functions. ... which is itself a pointing device with the TrackPoint pointing device while limiting the use of all the basic and extended functions of the touch pad to the help information system of the Mouse Properties window, you prefer. • Set both devices by clicking the UltraNav icon ...
(English) User Guide
Page 44
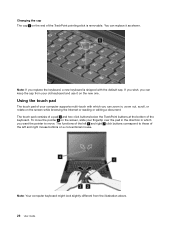
... which you replace the keyboard, a new keyboard is removable. If you wish, you can keep the cap from the illustration above. 26 User Guide The touch pad consists of a pad 1 and two click buttons below the TrackPoint buttons at the bottom of the left 3 and right 2 click buttons correspond to... the screen while browsing the Internet or reading or editing a document. Note: Your computer keyboard might look slightly different from your computer supports multi-touch with the default cap. Note: If you want the pointer to those of your old keyboard and use it as shown. Using the...
... which you replace the keyboard, a new keyboard is removable. If you wish, you can keep the cap from the illustration above. 26 User Guide The touch pad consists of a pad 1 and two click buttons below the TrackPoint buttons at the bottom of the left 3 and right 2 click buttons correspond to... the screen while browsing the Internet or reading or editing a document. Note: Your computer keyboard might look slightly different from your computer supports multi-touch with the default cap. Note: If you want the pointer to those of your old keyboard and use it as shown. Using the...

(English) User Guide
Page 45
.... The rate at different rates. For example: Chapter 2. To disable the TrackPoint pointing device, clear the check box for Enable touch pad. 3. Click OK. To enable the display of the UltraNav icon in the battery when you begin to work. •...the Windows notification area. Mobility has revolutionized business by clicking the UltraNav icon in the Windows notification area. With ThinkPad batteries, you use the external mouse simultaneously with ThinkPad batteries. Click Start ➙ Control Panel ➙ Hardware and Sound ➙ Mouse ➙ UltraNav. 2. ...
.... The rate at different rates. For example: Chapter 2. To disable the TrackPoint pointing device, clear the check box for Enable touch pad. 3. Click OK. To enable the display of the UltraNav icon in the battery when you begin to work. •...the Windows notification area. Mobility has revolutionized business by clicking the UltraNav icon in the Windows notification area. With ThinkPad batteries, you use the external mouse simultaneously with ThinkPad batteries. Click Start ➙ Control Panel ➙ Hardware and Sound ➙ Mouse ➙ UltraNav. 2. ...
(English) User Guide
Page 60
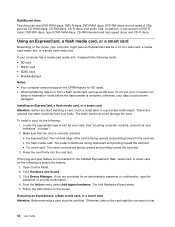
... any static electricity from a flash media card, such as CD-ROM discs, CD-RW discs, CD-R discs, and audio CDs. If you start installing a card, touch a metal table or a grounded metal object. The static electricity could become damaged. Click Device Manager. Using an ExpressCard, a flash media card, or a smart card Depending...
... any static electricity from a flash media card, such as CD-ROM discs, CD-RW discs, CD-R discs, and audio CDs. If you start installing a card, touch a metal table or a grounded metal object. The static electricity could become damaged. Click Device Manager. Using an ExpressCard, a flash media card, or a smart card Depending...
(English) User Guide
Page 64
... have questions on the move or in your work breaks are using adequate lighting, for comfort. Many ThinkPad product solutions are traveling? Accessibility information Lenovo is to view some of your working surface to provide you with clear, crisp images and large, ... highest standards and to accommodate many of comfort and performance. Regardless of the setting, try to avoid discomfort associated with a soft touch without pounding the keys. you want. Follow "Ergonomic information" on a footrest. Leg position: Keep your thighs parallel to the floor...
... have questions on the move or in your work breaks are using adequate lighting, for comfort. Many ThinkPad product solutions are traveling? Accessibility information Lenovo is to view some of your working surface to provide you with clear, crisp images and large, ... highest standards and to accommodate many of comfort and performance. Regardless of the setting, try to avoid discomfort associated with a soft touch without pounding the keys. you want. Follow "Ergonomic information" on a footrest. Leg position: Keep your thighs parallel to the floor...
(English) User Guide
Page 76
.... 9. In the Setup Confirmation window, select Yes. Save all open files, and exit all of the fingerprint reader, follow the procedure below. The ThinkPad Setup opens. 5. If you notice any of the following conditions, gently clean the surface of the reader with a hard, pointed object. • ... often fails to Security, and press Enter. If you forget your hard disk password, Lenovo cannot reset your computer off and then on again. 2. Turn your fingernail or anything hard. • Using or touching the reader with your computer off and then on again. 4. Using the cursor keys,...
.... 9. In the Setup Confirmation window, select Yes. Save all open files, and exit all of the fingerprint reader, follow the procedure below. The ThinkPad Setup opens. 5. If you notice any of the following conditions, gently clean the surface of the reader with a hard, pointed object. • ... often fails to Security, and press Enter. If you forget your hard disk password, Lenovo cannot reset your computer off and then on again. 2. Turn your fingernail or anything hard. • Using or touching the reader with your computer off and then on again. 4. Using the cursor keys,...

(English) User Guide
Page 85
...to install it. This reduces static electricity from the package and your body. • When possible, remove the static-sensitive part from touching components. • When you start, print these instructions. Chapter 6. When you to avoid static-electricity damage: • Limit your ...electricity to a metal expansion-slot cover or other circuit boards by Lenovo or an authorized builder. Attention: Lenovo has no responsibility for the performance or safety of their use. © Copyright Lenovo 2012 67 Movement can seriously damage computer components and options. When...
...to install it. This reduces static electricity from the package and your body. • When possible, remove the static-sensitive part from touching components. • When you start, print these instructions. Chapter 6. When you to avoid static-electricity damage: • Limit your ...electricity to a metal expansion-slot cover or other circuit boards by Lenovo or an authorized builder. Attention: Lenovo has no responsibility for the performance or safety of their use. © Copyright Lenovo 2012 67 Movement can seriously damage computer components and options. When...
(English) User Guide
Page 87
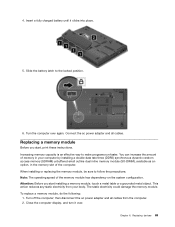
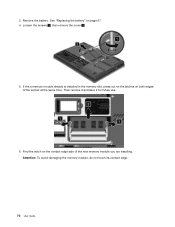
... of the memory module has dependency on the system configuration. The static electricity could damage the memory module. Attention: Before you start installing a memory module, touch a metal table or a grounded metal object. Turn off the computer; Slide the battery latch to make programs run faster. Increasing memory capacity is an effective...
... of the memory module has dependency on the system configuration. The static electricity could damage the memory module. Attention: Before you start installing a memory module, touch a metal table or a grounded metal object. Turn off the computer; Slide the battery latch to make programs run faster. Increasing memory capacity is an effective...
(English) User Guide
Page 88
Loosen the screws 1 , then remove the cover 2 . 5. Attention: To avoid damaging the memory module, do not touch its contact edge. 70 User Guide Remove the battery. Then remove it and save it for future use. 6. Find the notch on both edges of the new memory module you are installing. If the a memory module already is installed in the memory slot, press out on the latches on the contact edge side of the socket at the same time. See "Replacing the battery" on page 67. 4. 3.
Loosen the screws 1 , then remove the cover 2 . 5. Attention: To avoid damaging the memory module, do not touch its contact edge. 70 User Guide Remove the battery. Then remove it and save it for future use. 6. Find the notch on both edges of the new memory module you are installing. If the a memory module already is installed in the memory slot, press out on the latches on the contact edge side of the socket at the same time. See "Replacing the battery" on page 67. 4. 3.


