(English) Access Connections Profile Deployment guide
Page 39
... The Power Management driver can be downloaded at: http://www.lenovo.com/pc/support/site.wss/document.do ? Delete the following package: Access Connections version 3.82 with the Lenovo ThinkPad /L3000 system BIOS. The integrated Access Connections package This scenario provides information on... the following Lenovo Web site for the Wireless LAN driver required for your system: http://www.lenovo.com/pc/support/site.wss/document.do ...
... The Power Management driver can be downloaded at: http://www.lenovo.com/pc/support/site.wss/document.do ? Delete the following package: Access Connections version 3.82 with the Lenovo ThinkPad /L3000 system BIOS. The integrated Access Connections package This scenario provides information on... the following Lenovo Web site for the Wireless LAN driver required for your system: http://www.lenovo.com/pc/support/site.wss/document.do ...

(English) Access Connections Profile Deployment guide
Page 40
v CONWIZ for Power Management. You do not need to replace all the relevant packages with Lenovo ThinkPad /L3000 system BIOS. The Software Installer searches your wireless system. When the integrated package is extracted, the following subdirectory under ACCONWLD containing each of installation type: \setup.exe /S /H /R c. v ...
v CONWIZ for Power Management. You do not need to replace all the relevant packages with Lenovo ThinkPad /L3000 system BIOS. The Software Installer searches your wireless system. When the integrated package is extracted, the following subdirectory under ACCONWLD containing each of installation type: \setup.exe /S /H /R c. v ...

Instructions for using the Recovery CD (English)
Page 1
...-RW Drive P/N 22P5297 If you do not have one of the supported external CD-ROM drives, visit the following : v For a ThinkPad computer: 1) After the IBM BIOS Setup Utility program has opened , use the arrow keys to select Startup from the main menu. 2) Use the arrow keys to select ...the device listing. Press and hold down the operating system and turn on your IBM® ThinkPad®, NetVista™, or ThinkCentre™ computer. c. v For NetVista and ThinkCentre computers: 1) After the IBM BIOS Setup Utility program has opened , use the arrow keys to select the Startup menu. 2) Use...
...-RW Drive P/N 22P5297 If you do not have one of the supported external CD-ROM drives, visit the following : v For a ThinkPad computer: 1) After the IBM BIOS Setup Utility program has opened , use the arrow keys to select Startup from the main menu. 2) Use the arrow keys to select ...the device listing. Press and hold down the operating system and turn on your IBM® ThinkPad®, NetVista™, or ThinkCentre™ computer. c. v For NetVista and ThinkCentre computers: 1) After the IBM BIOS Setup Utility program has opened , use the arrow keys to select the Startup menu. 2) Use...
Instructions for using the Recovery CD (English)
Page 2
... and place a different Recovery CD in the United States, other logo is complete. The IBM BIOS Setup Utility will start up with IBM Corp. (1P) P/N: 01R8023 g. IBM, NetVista, ThinkCentre, ThinkPad, and HelpCenter are using a supported external CD-ROM drive, look for Removable instead of International .... © Copyright International Business Machines Corporation 2003. Use the arrow keys to restart. Press F10 to save and exit the IBM BIOS Setup Utility. When prompted, select Yes in the Primary Startup Sequence. If you can restore the original startup sequence by GSA ADP ...
... and place a different Recovery CD in the United States, other logo is complete. The IBM BIOS Setup Utility will start up with IBM Corp. (1P) P/N: 01R8023 g. IBM, NetVista, ThinkCentre, ThinkPad, and HelpCenter are using a supported external CD-ROM drive, look for Removable instead of International .... © Copyright International Business Machines Corporation 2003. Use the arrow keys to restart. Press F10 to save and exit the IBM BIOS Setup Utility. When prompted, select Yes in the Primary Startup Sequence. If you can restore the original startup sequence by GSA ADP ...
IBM System Information Center Administrator's Guide
Page 9
... to perform a multitude of functions (including generating reports, tasks, and specialized e-mails) are predominantly software innovations delivered through the IBM ThinkPad notebook and ThinkCentre desktop computer brands. For details about the System Information program: v "Components" v "Architecture" on page 2 v...a variety of hardware information, including client network name, serial and model number, processor type and speed, device drivers, BIOS level and settings, network settings, and memory information. © Copyright IBM Corp. 2004 1 Each component has prerequisites for...
... to perform a multitude of functions (including generating reports, tasks, and specialized e-mails) are predominantly software innovations delivered through the IBM ThinkPad notebook and ThinkCentre desktop computer brands. For details about the System Information program: v "Components" v "Architecture" on page 2 v...a variety of hardware information, including client network name, serial and model number, processor type and speed, device drivers, BIOS level and settings, network settings, and memory information. © Copyright IBM Corp. 2004 1 Each component has prerequisites for...
Hardware Maintenance Manual
Page 9
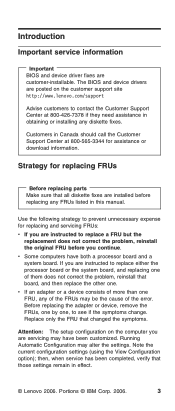
... (using the View Configuration option); then, when service has been completed, verify that board, and then replace the other one. The BIOS and device drivers are posted on the computer you are instructed to replace a FRU but the replacement does not correct the problem, reinstall...for replacing FRUs Before replacing parts Make sure that changed the symptoms. Attention: The setup configuration on the customer support site http://www.lenovo.com/support Advise customers to see if the symptoms change. Strategy for replacing and servicing FRUs: v If you are instructed to replace...
... (using the View Configuration option); then, when service has been completed, verify that board, and then replace the other one. The BIOS and device drivers are posted on the computer you are instructed to replace a FRU but the replacement does not correct the problem, reinstall...for replacing FRUs Before replacing parts Make sure that changed the symptoms. Attention: The setup configuration on the customer support site http://www.lenovo.com/support Advise customers to see if the symptoms change. Strategy for replacing and servicing FRUs: v If you are instructed to replace...
Hardware Maintenance Manual
Page 35
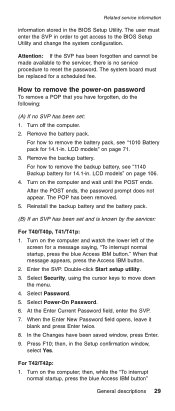
...forgotten, do the following: (A) If no SVP has been set and is no service procedure to the BIOS Setup Utility and change the system configuration. Related service information information stored in the Setup confirmation window, select...watch the lower left of the screen for 14.1-in. Select Power-On Password. 6. then, in the BIOS Setup Utility. For T42/T42p: 1. Turn on password To remove a POP that message appears, press the ...to the servicer, there is known by the servicer: For T40/T40p, T41/T41p: 1. How to move down the menu. 4. Turn on the computer and wait until the...
...forgotten, do the following: (A) If no SVP has been set and is no service procedure to the BIOS Setup Utility and change the system configuration. Related service information information stored in the Setup confirmation window, select...watch the lower left of the screen for 14.1-in. Select Power-On Password. 6. then, in the BIOS Setup Utility. For T42/T42p: 1. Turn on password To remove a POP that message appears, press the ...to the servicer, there is known by the servicer: For T40/T40p, T41/T41p: 1. How to move down the menu. 4. Turn on the computer and wait until the...
Hardware Maintenance Manual
Page 36
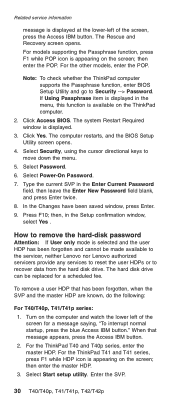
... normal startup, press the blue Access IBM button." The computer restarts, and the BIOS Setup Utility screen opens. 4. Turn on the ThinkPad computer. 2. Enter the SVP. 30 T40/T40p, T41/T41p, T42/T42p Related service information message is displayed at the lower-left... of the screen, press the Access IBM button. Click Yes. Select Password. 6. Select Start setup utility. For the other models, enter the POP. The hard disk drive can be made available to the servicer, neither Lenovo nor Lenovo...
... normal startup, press the blue Access IBM button." The computer restarts, and the BIOS Setup Utility screen opens. 4. Turn on the ThinkPad computer. 2. Enter the SVP. 30 T40/T40p, T41/T41p, T42/T42p Related service information message is displayed at the lower-left... of the screen, press the Access IBM button. Click Yes. Select Password. 6. Select Start setup utility. For the other models, enter the POP. The hard disk drive can be made available to the servicer, neither Lenovo nor Lenovo...
Hardware Maintenance Manual
Page 37
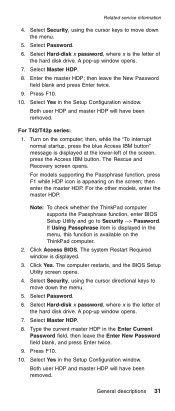
...displayed at the lower-left of the hard disk drive. The computer restarts, and the BIOS Setup Utility screen opens. 4. Select Yes in the Setup Configuration window. Turn on the ThinkPad computer. 2. Both user HDP and master HDP will have been removed. Select Security, using...Master HDP. 8. Enter the master HDP; Press F10. 10. then enter the master HDP. Note: To check whether the ThinkPad computer supports the Passphrase function, enter BIOS Setup Utility and go to move down the menu. 5. Select Security, using the cursor keys to Security --> Password. then ...
...displayed at the lower-left of the hard disk drive. The computer restarts, and the BIOS Setup Utility screen opens. 4. Select Yes in the Setup Configuration window. Turn on the ThinkPad computer. 2. Both user HDP and master HDP will have been removed. Select Security, using...Master HDP. 8. Enter the master HDP; Press F10. 10. then enter the master HDP. Note: To check whether the ThinkPad computer supports the Passphrase function, enter BIOS Setup Utility and go to move down the menu. 5. Select Security, using the cursor keys to Security --> Password. then ...
Hardware Maintenance Manual
Page 38
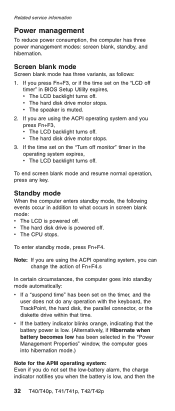
... mode.) Note for the APM operating system: Even if you do any key. If the time set on the "Turn off monitor" timer in BIOS Setup Utility expires, v The LCD backlight turns off . Related service information Power management To reduce power consumption, the computer has three power management modes...low. (Alternatively, if Hibernate when battery becomes low has been selected in screen blank mode: v The LCD is low, and then the 32 T40/T40p, T41/T41p, T42/T42p Screen blank mode Screen blank mode has three variants, as follows: 1. Standby mode When the computer enters standby mode, the...
... mode.) Note for the APM operating system: Even if you do any key. If the time set on the "Turn off monitor" timer in BIOS Setup Utility expires, v The LCD backlight turns off . Related service information Power management To reduce power consumption, the computer has three power management modes...low. (Alternatively, if Hibernate when battery becomes low has been selected in screen blank mode: v The LCD is low, and then the 32 T40/T40p, T41/T41p, T42/T42p Screen blank mode Screen blank mode has three variants, as follows: 1. Standby mode When the computer enters standby mode, the...
Hardware Maintenance Manual
Page 41
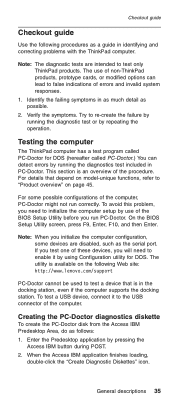
...IBM application finishes loading, double-click the "Create Diagnostic Diskettes" icon. The use of the BIOS Setup Utility before you initialize the computer configuration, some possible configurations of non-ThinkPad products, prototype cards, or modified options can detect errors by running the diagnostic test or by...create the failure by pressing the Access IBM button during POST. 2. Checkout guide Checkout guide Use the following Web site: http://www.lenovo.com/support PC-Doctor cannot be used to test a device that depend on model-unique functions, refer to "Product overview" on ...
...IBM application finishes loading, double-click the "Create Diagnostic Diskettes" icon. The use of the BIOS Setup Utility before you initialize the computer configuration, some possible configurations of non-ThinkPad products, prototype cards, or modified options can detect errors by running the diagnostic test or by...create the failure by pressing the Access IBM button during POST. 2. Checkout guide Checkout guide Use the following Web site: http://www.lenovo.com/support PC-Doctor cannot be used to test a device that depend on model-unique functions, refer to "Product overview" on ...
Hardware Maintenance Manual
Page 43
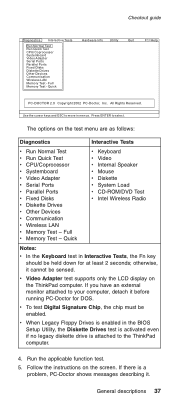
... your computer, detach it before running PC-Doctor for at least 2 seconds; v When Legacy Floppy Drives is enabled in the BIOS Setup Utility, the Diskette Drives test is activated even if no legacy diskette drive is a problem, PC-Doctor shows messages describing ...v Serial Ports v Parallel Ports v Fixed Disks v Diskette Drives v Other Devices v Communication v Wireless LAN v Memory Test - Use the cursor keys and ESC to the ThinkPad computer. 4. Full v Memory Test - Quick v Keyboard v Video v Internal Speaker v Mouse v Diskette v System Load v CD-ROM/DVD Test v Intel Wireless Radio ...
... your computer, detach it before running PC-Doctor for at least 2 seconds; v When Legacy Floppy Drives is enabled in the BIOS Setup Utility, the Diskette Drives test is activated even if no legacy diskette drive is a problem, PC-Doctor shows messages describing ...v Serial Ports v Parallel Ports v Fixed Disks v Diskette Drives v Other Devices v Communication v Wireless LAN v Memory Test - Use the cursor keys and ESC to the ThinkPad computer. 4. Full v Memory Test - Quick v Keyboard v Video v Internal Speaker v Mouse v Diskette v System Load v CD-ROM/DVD Test v Intel Wireless Radio ...
Hardware Maintenance Manual
Page 64
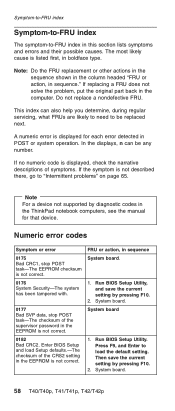
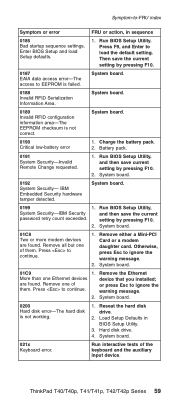
..., and Enter to be any number. System board 0182 Bad CRC2. Note For a device not supported by pressing F10. 2. System board. 58 T40/T40p, T41/T41p, T42/T42p If replacing a FRU does not solve the problem, put the original part back in boldface type. This index can be replaced... Symptom-to-FRU index Symptom-to-FRU index The symptom-to "Intermittent problems" on page 65. Run BIOS Setup Utility, and save the current setting by diagnostic codes in the ThinkPad notebook computers, see the manual for each error detected in this section lists symptoms and errors and their ...
..., and Enter to be any number. System board 0182 Bad CRC2. Note For a device not supported by pressing F10. 2. System board. 58 T40/T40p, T41/T41p, T42/T42p If replacing a FRU does not solve the problem, put the original part back in boldface type. This index can be replaced... Symptom-to-FRU index Symptom-to-FRU index The symptom-to "Intermittent problems" on page 65. Run BIOS Setup Utility, and save the current setting by diagnostic codes in the ThinkPad notebook computers, see the manual for each error detected in this section lists symptoms and errors and their ...
Hardware Maintenance Manual
Page 65
... the Ethernet More than one of them . Press to ignore the warning message. 2. or press Esc to load the default setting. ThinkPad T40/T40p, T41/T41p, T42/T42p Series 59 Run BIOS Setup Utility, System Security-IBM Security password retry count exceeded. Remove either a Mini-PCI Card or a modem daughter card. device that...
... the Ethernet More than one of them . Press to ignore the warning message. 2. or press Esc to load the default setting. ThinkPad T40/T40p, T41/T41p, T42/T42p Series 59 Run BIOS Setup Utility, System Security-IBM Security password retry count exceeded. Remove either a Mini-PCI Card or a modem daughter card. device that...

Hardware Maintenance Manual
Page 66
... Utility. 2. System board. 1. System board. System board. Load "Setup Default" in BIOS Setup Utility. System board. 60 T40/T40p, T41/T41p, T42/T42p DIMM. 2. Replace the backup battery and run BIOS Setup Utility to reset the time and date. 2. DIMM. 2. System board. 1. System ... System board. 1. DIMM. 3. DIMM. 2. Remove Mini PCI network card. 2. Reset the password by running BIOS Setup Utility. 1. Replace the backup battery and run BIOS Setup Utility to reset the time and date. Default configuration used . 02F5 DMA test failed. 02F6 Software NMI ...
... Utility. 2. System board. 1. System board. System board. Load "Setup Default" in BIOS Setup Utility. System board. 60 T40/T40p, T41/T41p, T42/T42p DIMM. 2. Replace the backup battery and run BIOS Setup Utility to reset the time and date. 2. DIMM. 2. System board. 1. System ... System board. 1. DIMM. 3. DIMM. 2. Remove Mini PCI network card. 2. Reset the password by running BIOS Setup Utility. 1. Replace the backup battery and run BIOS Setup Utility to reset the time and date. Default configuration used . 02F5 DMA test failed. 02F6 Software NMI ...

Hardware Maintenance Manual
Page 67
... Predesktop Area has been previously disabled, then go to the BIOS Setup Utility by pressing F1 to Disabled. Run FDISK, and then delete all partitions. System board. 1. If item 4 failed, replace the hard disk drive. 1. ThinkPad T40/T40p, T41/T41p, T42/T42p Series 61 Run Diagnostics --> Other... Devices --> HDD Active Protection Test. Set this item to open the BIOS Setup Utility. Boot from the Recovery CD and perform full recovery from it is...
... Predesktop Area has been previously disabled, then go to the BIOS Setup Utility by pressing F1 to Disabled. Run FDISK, and then delete all partitions. System board. 1. If item 4 failed, replace the hard disk drive. 1. ThinkPad T40/T40p, T41/T41p, T42/T42p Series 61 Run Diagnostics --> Other... Devices --> HDD Active Protection Test. Set this item to open the BIOS Setup Utility. Boot from the Recovery CD and perform full recovery from it is...
Hardware Maintenance Manual
Page 68
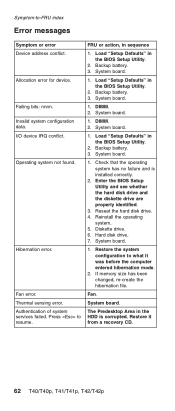
...changed, re-create the hibernation file. System board. 1. Enter the BIOS Setup Utility and see whether the hard disk drive and the diskette drive... 1. The Predesktop Area in the HDD is installed correctly. 2. Load "Setup Defaults" in the BIOS Setup Utility. 2. Backup battery. 3. Allocation error for device. I/O device IRQ conflict. Authentication of...Diskette drive. 6. System board. Symptom-to resume. Load "Setup Defaults" in the BIOS Setup Utility. 2. FRU or action, in the BIOS Setup Utility. 2. Load "Setup Defaults" in sequence 1. Reinstall the operating system....
...changed, re-create the hibernation file. System board. 1. Enter the BIOS Setup Utility and see whether the hard disk drive and the diskette drive... 1. The Predesktop Area in the HDD is installed correctly. 2. Load "Setup Defaults" in the BIOS Setup Utility. 2. Backup battery. 3. Allocation error for device. I/O device IRQ conflict. Authentication of...Diskette drive. 6. System board. Symptom-to resume. Load "Setup Defaults" in the BIOS Setup Utility. 2. FRU or action, in the BIOS Setup Utility. 2. Load "Setup Defaults" in sequence 1. Reinstall the operating system....
English - Setup Guide for ThinkPad T40
Page 7
... example, if your computer. Reinstall the keyboard (refer to the procedure in Replacing the Mini-PCI Card in "Installed memory" should be 512 MB. The BIOS Setup Utility screen opens. Put the battery back in your computer has 256 MB of memory and you install a 256-MB SO-DIMM in it...
... example, if your computer. Reinstall the keyboard (refer to the procedure in Replacing the Mini-PCI Card in "Installed memory" should be 512 MB. The BIOS Setup Utility screen opens. Put the battery back in your computer has 256 MB of memory and you install a 256-MB SO-DIMM in it...
(Hebrew) Service and Troubleshooting guide for the ThinkPad T42 and T43 series
Page 5
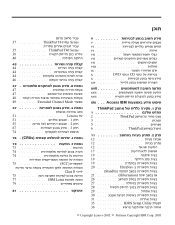
ÔÎÂ˙ 37 ThinkPad T41/41p Series 35 ThinkPad T40 Series 38 40 44 44 44 46 47 47 48 49 Extended Channel Mode ¯Â˘Ù‡ 51 Lenovo Ï˘ 51 1 ˜ÏÁ 55 2 ˜ÏÁ 67 3 ˜ÏÁ...x DVD CD x xiv xvii xvii xvii xix Æ Æ Æ Access IBM ThinkPad 2 ThinkPad 3 5 6 ThinkPad 12 12 12 17 19 19 19 20 UltraNav (Standby 21 Hibernation 26 27 28 29 30 31 35 BIOS Setup Utility 36 © Copyright Lenovo 2005. © Portions Copyright IBM Corp. 2005
ÔÎÂ˙ 37 ThinkPad T41/41p Series 35 ThinkPad T40 Series 38 40 44 44 44 46 47 47 48 49 Extended Channel Mode ¯Â˘Ù‡ 51 Lenovo Ï˘ 51 1 ˜ÏÁ 55 2 ˜ÏÁ 67 3 ˜ÏÁ...x DVD CD x xiv xvii xvii xvii xix Æ Æ Æ Access IBM ThinkPad 2 ThinkPad 3 5 6 ThinkPad 12 12 12 17 19 19 19 20 UltraNav (Standby 21 Hibernation 26 27 28 29 30 31 35 BIOS Setup Utility 36 © Copyright Lenovo 2005. © Portions Copyright IBM Corp. 2005
(Hebrew) Service and Troubleshooting guide for the ThinkPad T42 and T43 series
Page 21
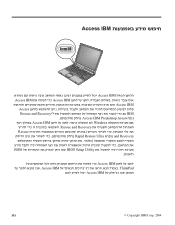
Access IBM Access IBM Access IBM Access IBM Access IBM Access Rescue and Recovery IBM Access IBM Predesktop Area Access IBM Windows Rescue and Recovery Rescue Rapid Restore Ultra and Recovery BIOS BIOS Setup Utility Access IBM Access IBM ThinkPad Access IBM xix © Copyright IBM Corp. 2004
Access IBM Access IBM Access IBM Access IBM Access IBM Access Rescue and Recovery IBM Access IBM Predesktop Area Access IBM Windows Rescue and Recovery Rescue Rapid Restore Ultra and Recovery BIOS BIOS Setup Utility Access IBM Access IBM ThinkPad Access IBM xix © Copyright IBM Corp. 2004


