User Manual
Page 5
..., and GAV products 41 General checkout 43 What to do first 44 Checkout guide 45 Diagnostics using PC-Doctor for DOS . . . . 45 Lenovo ThinkVantage Toolbox (Lenovo System Toolbox 48 PC-Doctor for Windows 48 PC-Doctor for Rescue and Recovery . . . . . 49 FRU tests 50 Power system checkout 52... . . . 94 1080 Intel Turbo Memory Minicard 98 1090 Backup battery 99 1100 Keyboard bezel and speakers 100 1110 Fan assembly 103 1120 CPU 107 1130 LCD assembly 108 1140 Base cover and PC Card/ExpressCard (or ExpressCard/Smart Card) bezel assembly . . . . 111 1150 Structure frame and IEEE 1394 sub...
..., and GAV products 41 General checkout 43 What to do first 44 Checkout guide 45 Diagnostics using PC-Doctor for DOS . . . . 45 Lenovo ThinkVantage Toolbox (Lenovo System Toolbox 48 PC-Doctor for Windows 48 PC-Doctor for Rescue and Recovery . . . . . 49 FRU tests 50 Power system checkout 52... . . . 94 1080 Intel Turbo Memory Minicard 98 1090 Backup battery 99 1100 Keyboard bezel and speakers 100 1110 Fan assembly 103 1120 CPU 107 1130 LCD assembly 108 1140 Base cover and PC Card/ExpressCard (or ExpressCard/Smart Card) bezel assembly . . . . 111 1150 Structure frame and IEEE 1394 sub...

User Manual
Page 6
Parts list 141 Overall 142 LCD FRUs 179 Keyboard 190 Miscellaneous parts 192 AC adapters 194 Power cords 195 Recovery discs 196 Windows XP Professional (32 bit) DVDs . . . 196 Windows Vista ... (64 bit) DVDs . . 209 Windows Professional (32 bit) DVDs . . . . 210 Windows Professional (64 bit) DVDs . . . . 212 Common service tools 213 Notices 215 Trademarks 216 iv ThinkPad R500 Hardware Maintenance Manual
Parts list 141 Overall 142 LCD FRUs 179 Keyboard 190 Miscellaneous parts 192 AC adapters 194 Power cords 195 Recovery discs 196 Windows XP Professional (32 bit) DVDs . . . 196 Windows Vista ... (64 bit) DVDs . . 209 Windows Professional (32 bit) DVDs . . . . 210 Windows Professional (64 bit) DVDs . . . . 212 Common service tools 213 Notices 215 Trademarks 216 iv ThinkPad R500 Hardware Maintenance Manual

User Manual
Page 16
... small parts are in the appropriate parts listing. Use only the battery in place and are not left loose inside the LCD gets into your eyes or on after washing. 8 ThinkPad R500 Hardware Maintenance Manual Verify this by local ordinances or regulations. Metallic parts or metal flakes can cause a fire, an explosion, or...
... small parts are in the appropriate parts listing. Use only the battery in place and are not left loose inside the LCD gets into your eyes or on after washing. 8 ThinkPad R500 Hardware Maintenance Manual Verify this by local ordinances or regulations. Metallic parts or metal flakes can cause a fire, an explosion, or...

User Manual
Page 49
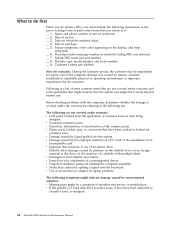
...CTO" (Example: 1829-CTO). v The PEW record is a special bid offering. GAVs are hard disk drives, system boards, microprocessors, Liquid Crystal Displays (LCDs), and memory. An example of key commodities are announced and offered to identify which FRUs are PEW, eSupport, and the HMM. Input the MT and... Dynamic Configure To Order (CTO) This provides the ability for CTO, CMV and GAV products at the following Web site: http://www.lenovo.com/support/site.wss/document.do?lndocid=LOOK-WARNTY Select Warranty lookup. Custom Model Variant (CMV) This is NOT generally announced. FRU ...
...CTO" (Example: 1829-CTO). v The PEW record is a special bid offering. GAVs are hard disk drives, system boards, microprocessors, Liquid Crystal Displays (LCDs), and memory. An example of key commodities are announced and offered to identify which FRUs are PEW, eSupport, and the HMM. Input the MT and... Dynamic Configure To Order (CTO) This provides the ability for CTO, CMV and GAV products at the following Web site: http://www.lenovo.com/support/site.wss/document.do?lndocid=LOOK-WARNTY Select Warranty lookup. Custom Model Variant (CMV) This is NOT generally announced. FRU ...
User Manual
Page 50
...PARTS INFORMATION. Using the HMM For Key Commodities (Examples - hard disk drive, system board, microprocessor, LCD, and memory) Use the HMM as a back-up to PEW and eSupport to view the list ... FRUs, type in the model type and serial number. hard disk drive, system board, microprocessor, LCD, and memory) v eSupport can be displayed. v To view the complete list of key commodities ...at the MT Model level) v eSupport can be accessed at the MT Model level. 42 ThinkPad R500 Hardware Maintenance Manual v Business Partners using Eclaim will be returned in the eSupport record under PARTS...
...PARTS INFORMATION. Using the HMM For Key Commodities (Examples - hard disk drive, system board, microprocessor, LCD, and memory) Use the HMM as a back-up to PEW and eSupport to view the list ... FRUs, type in the model type and serial number. hard disk drive, system board, microprocessor, LCD, and memory) v eSupport can be displayed. v To view the complete list of key commodities ...at the MT Model level) v eSupport can be accessed at the MT Model level. 42 ThinkPad R500 Hardware Maintenance Manual v Business Partners using Eclaim will be returned in the eSupport record under PARTS...
User Manual
Page 52
... are not covered under warranty: v LCD panel cracked from the application of excessive force or from being dropped v Scratched (cosmetic) parts v Distortion, deformation, or discoloration of the cosmetic parts v Plastic parts, latches, pins, or connectors that have been subjected to excessive force, or dropped. 44 ThinkPad R500 Hardware Maintenance Manual Failing FRU name...
... are not covered under warranty: v LCD panel cracked from the application of excessive force or from being dropped v Scratched (cosmetic) parts v Distortion, deformation, or discoloration of the cosmetic parts v Plastic parts, latches, pins, or connectors that have been subjected to excessive force, or dropped. 44 ThinkPad R500 Hardware Maintenance Manual Failing FRU name...

User Manual
Page 55
... Physical Disk Drives v Logical Disk Drives v VGA Information v IDE Drive Info v PCI Information v PNPISA Info v SMBIOS Info v VESA LCD Info v Hardware Events Log Utility v Run External Tests v Surface Scan Hard Disk v Benchmark System General checkout 47 v To test Digital ... Test v Run Quick Test v CPU/Coprocessor v Systemboard v Video Adapter v Serial Ports v Parallel Ports v Fixed Disks v Diskette Drives v Other Devices v ThinkPad Devices v Communication v Wireless LAN v Advanced Memory Tests v Keyboard v Video v Internal Speaker v Mouse v Diskette v System Load v Optical Drive Test v ...
... Physical Disk Drives v Logical Disk Drives v VGA Information v IDE Drive Info v PCI Information v PNPISA Info v SMBIOS Info v VESA LCD Info v Hardware Events Log Utility v Run External Tests v Surface Scan Hard Disk v Benchmark System General checkout 47 v To test Digital ... Test v Run Quick Test v CPU/Coprocessor v Systemboard v Video Adapter v Serial Ports v Parallel Ports v Fixed Disks v Diskette Drives v Other Devices v ThinkPad Devices v Communication v Wireless LAN v Advanced Memory Tests v Keyboard v Video v Internal Speaker v Mouse v Diskette v System Load v Optical Drive Test v ...

User Manual
Page 58
...Speaker Note: Once Modem/Audio test is done, the no sound is attached to the ThinkPad computer, detach it. Turn on the computer. 3. Interactive Tests --> Optical Drive Test 50 ThinkPad R500 Hardware Maintenance Manual FRU tests The following table shows the test for each FRU. FRU... tests FRU System board Power LCD unit Audio Speaker PC Card slot ExpressCard slot Keyboard Hard disk drive Diskette...
...Speaker Note: Once Modem/Audio test is done, the no sound is attached to the ThinkPad computer, detach it. Turn on the computer. 3. Interactive Tests --> Optical Drive Test 50 ThinkPad R500 Hardware Maintenance Manual FRU tests The following table shows the test for each FRU. FRU... tests FRU System board Power LCD unit Audio Speaker PC Card slot ExpressCard slot Keyboard Hard disk drive Diskette...

User Manual
Page 68
...a "suspend time" has been set on the timer, and the user does not do not set on the power switch. 60 ThinkPad R500 Hardware Maintenance Manual v Open the LCD cover. To put the computer into screen blank mode, press ThinkVantage button and use the ThinkVantage Productivity Center. v The hard disk...Select Power off . To cause the computer to what occurs in screen blank mode: v The LCD is powered off . v Turn on the "Turn off monitor" timer in the operating system expires, the LCD backlight turns off display (keep current power plan) (in Power Manager. Press Fn+F3. Note...
...a "suspend time" has been set on the timer, and the user does not do not set on the power switch. 60 ThinkPad R500 Hardware Maintenance Manual v Open the LCD cover. To put the computer into screen blank mode, press ThinkVantage button and use the ThinkVantage Productivity Center. v The hard disk...Select Power off . To cause the computer to what occurs in screen blank mode: v The LCD is powered off . v Turn on the "Turn off monitor" timer in the operating system expires, the LCD backlight turns off display (keep current power plan) (in Power Manager. Press Fn+F3. Note...

User Manual
Page 70
... information: v "Numeric error codes" v "Error messages" on page 66 v "Beep symptoms" on page 67 v "No-beep symptoms" on page 67 v "LCD-related symptoms" on page 68 v "Intermittent problems" on page 69 v "Undetermined problems" on page 69. Note: Do the FRU replacement or other actions in the...are likely to need to -FRU index in the computer. Run BIOS Setup Utility, and save the current setting by pressing F10. 62 ThinkPad R500 Hardware Maintenance Manual Run BIOS Setup Utility. in the EEPROM is not described there, go to "Intermittent problems" on page 69 The symptom-...
... information: v "Numeric error codes" v "Error messages" on page 66 v "Beep symptoms" on page 67 v "No-beep symptoms" on page 67 v "LCD-related symptoms" on page 68 v "Intermittent problems" on page 69 v "Undetermined problems" on page 69. Note: Do the FRU replacement or other actions in the...are likely to need to -FRU index in the computer. Run BIOS Setup Utility, and save the current setting by pressing F10. 62 ThinkPad R500 Hardware Maintenance Manual Run BIOS Setup Utility. in the EEPROM is not described there, go to "Intermittent problems" on page 69 The symptom-...

User Manual
Page 75
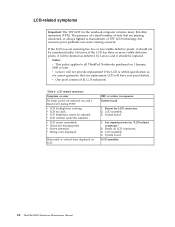
... cursor appears. connected tightly and correctly. 2. DIMM. 3. No beep, power-on indicator on , LCD blank, 1. Beep symptoms Table 4. LCD assembly. 3. LCD assembly. 3. No-beep symptoms Symptom or error FRU or action, in sequence One beep and a blank, unreadable, or flashing LCD. 1. System board. 2. See "Numeric error codes" on password prompt appears. Two short beeps...
... cursor appears. connected tightly and correctly. 2. DIMM. 3. No beep, power-on indicator on , LCD blank, 1. Beep symptoms Table 4. LCD assembly. 3. LCD assembly. 3. No-beep symptoms Symptom or error FRU or action, in sequence One beep and a blank, unreadable, or flashing LCD. 1. System board. 2. See "Numeric error codes" on password prompt appears. Two short beeps...
User Manual
Page 76
... dark. v Wrong color displayed. LCD assembly. 68 ThinkPad R500 Hardware Maintenance Manual The presence of a small number of dots that are servicing has two or less visible defective pixels, it should not be replaced. If the LCD you are missing, discolored, or always lighted is within specification as defective by Lenovo and it should be...
... dark. v Wrong color displayed. LCD assembly. 68 ThinkPad R500 Hardware Maintenance Manual The presence of a small number of dots that are servicing has two or less visible defective pixels, it should not be replaced. If the LCD you are missing, discolored, or always lighted is within specification as defective by Lenovo and it should be...
User Manual
Page 77
...operating, follow these procedures to isolate the failing FRU (do not isolate FRUs that have nothing to a variety of the following : 1. LCD assembly Related service information 69 Run the diagnostic test for damage. If any error is detected, do not replace a nondefective FRU): a. ... has failed, if wrong devices are supported by the FRU code. Turn off the computer. 2. System board b. Replace any FRUs. 3. Non-ThinkPad devices b. Determine whether the problem has been solved. 6. External diskette drive or optical drive g. FRU replacement should be due to do the following...
...operating, follow these procedures to isolate the failing FRU (do not isolate FRUs that have nothing to a variety of the following : 1. LCD assembly Related service information 69 Run the diagnostic test for damage. If any error is detected, do not replace a nondefective FRU): a. ... has failed, if wrong devices are supported by the FRU code. Turn off the computer. 2. System board b. Replace any FRUs. 3. Non-ThinkPad devices b. Determine whether the problem has been solved. 6. External diskette drive or optical drive g. FRU replacement should be due to do the following...

User Manual
Page 84
...the computer is a windows 7 model, it does not support the EasyEject Utility function. 76 ThinkPad R500 Hardware Maintenance Manual For Windows 7: Switch a display output location v Computer display only (LCD) v Computer display and external monitor (same image) v Computer display and external monitor (... and Windows XP: Switch a display output location v External monitor v Computer display (LCD) and external monitor v Computer display (LCD) Notes: 1. This function is also available. Open the ThinkPad EasyEject Utility screen. The computer can be detached from the port replicator.
...the computer is a windows 7 model, it does not support the EasyEject Utility function. 76 ThinkPad R500 Hardware Maintenance Manual For Windows 7: Switch a display output location v Computer display only (LCD) v Computer display and external monitor (same image) v Computer display and external monitor (... and Windows XP: Switch a display output location v External monitor v Computer display (LCD) and external monitor v Computer display (LCD) Notes: 1. This function is also available. Open the ThinkPad EasyEject Utility screen. The computer can be detached from the port replicator.
User Manual
Page 98
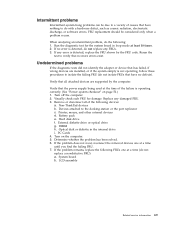
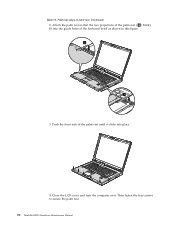
Removal steps of the palm rest ( a ) firmly fit into place. 4. a a 3. Push the front side of the palm rest until it clicks into the guide holes of the keyboard bezel as shown in this figure. Close the LCD cover and turn the computer over. Attach the palm rest so that the two projections of palm rest (continued) 2. Then fasten the four screws to secure the palm rest. 90 ThinkPad R500 Hardware Maintenance Manual Table 12.
Removal steps of the palm rest ( a ) firmly fit into place. 4. a a 3. Push the front side of the palm rest until it clicks into the guide holes of the keyboard bezel as shown in this figure. Close the LCD cover and turn the computer over. Attach the palm rest so that the two projections of palm rest (continued) 2. Then fasten the four screws to secure the palm rest. 90 ThinkPad R500 Hardware Maintenance Manual Table 12.

User Manual
Page 116
1130 LCD assembly For access, remove these FRUs, in order: v "1010 Battery pack" on page 84 v "1040 Palm rest or palm rest with fingerprint reader" on page 88 v "1060 Keyboard" on page 92 v "1070 PCI Express Mini Card for wireless LAN" on page 94 v "1100 Keyboard bezel and speakers" on page 100 Table 21. Removal steps of LCD assembly 1 1 Step 1 Screw (quantity) M2 × 9.5 mm, flat-head, nylon-coated (2) Color Black Torque 0.167 Nm (1.7 kgfcm) 108 ThinkPad R500 Hardware Maintenance Manual
1130 LCD assembly For access, remove these FRUs, in order: v "1010 Battery pack" on page 84 v "1040 Palm rest or palm rest with fingerprint reader" on page 88 v "1060 Keyboard" on page 92 v "1070 PCI Express Mini Card for wireless LAN" on page 94 v "1100 Keyboard bezel and speakers" on page 100 Table 21. Removal steps of LCD assembly 1 1 Step 1 Screw (quantity) M2 × 9.5 mm, flat-head, nylon-coated (2) Color Black Torque 0.167 Nm (1.7 kgfcm) 108 ThinkPad R500 Hardware Maintenance Manual

User Manual
Page 117
Removal steps of LCD assembly (continued) 44 4 3 2 3 Step 3 Screw (quantity) Color M2.5 × 6.5 mm, flat-head, nylon-coated (2) Black Torque 0.167 Nm (1.7 kgfcm) In step 4 , strip off the tapes securing the antenna cables, and release the cables from the cable guides of the frame. Removing and replacing a FRU 109 Table 21.
Removal steps of LCD assembly (continued) 44 4 3 2 3 Step 3 Screw (quantity) Color M2.5 × 6.5 mm, flat-head, nylon-coated (2) Black Torque 0.167 Nm (1.7 kgfcm) In step 4 , strip off the tapes securing the antenna cables, and release the cables from the cable guides of the frame. Removing and replacing a FRU 109 Table 21.

User Manual
Page 118
Route the antenna cables along the cable guides and secure them with the tapes. Make sure that they are not subjected to be damaged by the cable guides, or a wire to any tension. Removal steps of LCD assembly (continued) 5 5 When installing: 1. As you route the cables, make sure that the LCD connector is attached firmly. 110 ThinkPad R500 Hardware Maintenance Manual Tension could cause the cables to be broken. 2. Table 21.
Route the antenna cables along the cable guides and secure them with the tapes. Make sure that they are not subjected to be damaged by the cable guides, or a wire to any tension. Removal steps of LCD assembly (continued) 5 5 When installing: 1. As you route the cables, make sure that the LCD connector is attached firmly. 110 ThinkPad R500 Hardware Maintenance Manual Tension could cause the cables to be broken. 2. Table 21.

User Manual
Page 119
... v "1060 Keyboard" on page 92 v "1070 PCI Express Mini Card for wireless LAN" on page 94 v "1100 Keyboard bezel and speakers" on page 100 v "1130 LCD assembly" on page 108 Table 22.
... v "1060 Keyboard" on page 92 v "1070 PCI Express Mini Card for wireless LAN" on page 94 v "1100 Keyboard bezel and speakers" on page 100 v "1130 LCD assembly" on page 108 Table 22.

User Manual
Page 126
... you also need to the new base cover. When you replace the base cover, you need to apply the following figure: 1 1a 23 4 5 10 9 8 7 6 118 ThinkPad R500 Hardware Maintenance Manual if it has one or two FCC labels. For the location of each label, refer the following label: 1 Product label 1a Non...-mercury label Note: If the computer you are servicing is an LED-backlight LCD model, you need to paste this label so that the notice for mercury on the product label is shipped with a kit containing labels of them...
... you also need to the new base cover. When you replace the base cover, you need to apply the following figure: 1 1a 23 4 5 10 9 8 7 6 118 ThinkPad R500 Hardware Maintenance Manual if it has one or two FCC labels. For the location of each label, refer the following label: 1 Product label 1a Non...-mercury label Note: If the computer you are servicing is an LED-backlight LCD model, you need to paste this label so that the notice for mercury on the product label is shipped with a kit containing labels of them...


