User Manual
Page 5
... . . . 81 Removing and replacing a FRU . . . . 83 1010 Battery pack 84 1020 Serial Ultrabay Enhanced device . . . . . 85 1030 Hard disk drive cover, hard disk drive, and hard disk rubber rails 86 1040 Palm rest or palm rest with fingerprint reader 88 1050 DIMM 91 1060 Keyboard 92 1070 PCI Express Mini Card for wireless LAN . . . 94 1080 Intel Turbo Memory Minicard 98 1090 Backup battery 99 1100 Keyboard bezel and speakers 100 1110 Fan assembly...
... . . . 81 Removing and replacing a FRU . . . . 83 1010 Battery pack 84 1020 Serial Ultrabay Enhanced device . . . . . 85 1030 Hard disk drive cover, hard disk drive, and hard disk rubber rails 86 1040 Palm rest or palm rest with fingerprint reader 88 1050 DIMM 91 1060 Keyboard 92 1070 PCI Express Mini Card for wireless LAN . . . 94 1080 Intel Turbo Memory Minicard 98 1090 Backup battery 99 1100 Keyboard bezel and speakers 100 1110 Fan assembly...

User Manual
Page 58
... --> ThinkPad Devices --> AC Adapter, Battery 1 (Battery 2) 1. Press Enter to the computer while the test is heard in this case, turn on the computer. 3. FRU tests FRU System board Power LCD unit Audio Speaker PC Card slot ExpressCard slot Keyboard Hard disk drive Diskette drive Optical drive Applicable test 1. Interactive Tests --> Keyboard Enter the BIOS Setup Utility and change Serial ATA (SATA) setting to Compatibility, and run this test again. Then, run Diagnostics --> Fixed Disks You can also diagnose the hard disk drive without starting...
... --> ThinkPad Devices --> AC Adapter, Battery 1 (Battery 2) 1. Press Enter to the computer while the test is heard in this case, turn on the computer. 3. FRU tests FRU System board Power LCD unit Audio Speaker PC Card slot ExpressCard slot Keyboard Hard disk drive Diskette drive Optical drive Applicable test 1. Interactive Tests --> Keyboard Enter the BIOS Setup Utility and change Serial ATA (SATA) setting to Compatibility, and run this test again. Then, run Diagnostics --> Fixed Disks You can also diagnose the hard disk drive without starting...
User Manual
Page 66
... the BIOS Setup Utility and change the system configuration. The POP has been removed. 5. For how to the hard disk drive. the system administrator enters both in order to get access to reset the password. Select Password. 58 ThinkPad R500 Hardware Maintenance Manual The system administrator then provides the user HDP to recover data from the hard disk drive. The system board must enter the SVP in the same operation. For how to move down the menu. 4. Select Security, using...
... the BIOS Setup Utility and change the system configuration. The POP has been removed. 5. For how to the hard disk drive. the system administrator enters both in order to get access to reset the password. Select Password. 58 ThinkPad R500 Hardware Maintenance Manual The system administrator then provides the user HDP to recover data from the hard disk drive. The system board must enter the SVP in the same operation. For how to move down the menu. 4. Select Security, using...

User Manual
Page 70
... you determine, during regular servicing, what FRUs are likely to need to load the default setting. Run BIOS Setup Utility. System board. 0185 Bad startup sequence settings. Then save the current setting by diagnostic codes in the ThinkPad Notebooks, see the manual for each error detected in the computer. This index can be replaced next. Note: For a device not supported by pressing F10. 62 ThinkPad R500 Hardware Maintenance Manual System board. 0176 System Security-The...
... you determine, during regular servicing, what FRUs are likely to need to load the default setting. Run BIOS Setup Utility. System board. 0185 Bad startup sequence settings. Then save the current setting by diagnostic codes in the ThinkPad Notebooks, see the manual for each error detected in the computer. This index can be replaced next. Note: For a device not supported by pressing F10. 62 ThinkPad R500 Hardware Maintenance Manual System board. 0176 System Security-The...

User Manual
Page 73
... external fingerprint reader is using a supported IBM/Lenovo HDD with the risk in Slot-1. Remove all but the reader that your main operating system. Install DIMM in Slot-0, but the reader that you installed. 2. Run Diagnostics --> ThinkPad Devices --> HDD Active Protection Test. 2010 Warning: Your internal hard disk drive (HDD) may not function correctly on this system. Reseat the hard disk drive. Read error on page 91. 2000 Hard Drive Active Protection sensor diagnostics failed.Press to continue.Press to enter SETUP 1. System board...
... external fingerprint reader is using a supported IBM/Lenovo HDD with the risk in Slot-1. Remove all but the reader that your main operating system. Install DIMM in Slot-0, but the reader that you installed. 2. Run Diagnostics --> ThinkPad Devices --> HDD Active Protection Test. 2010 Warning: Your internal hard disk drive (HDD) may not function correctly on this system. Reseat the hard disk drive. Read error on page 91. 2000 Hard Drive Active Protection sensor diagnostics failed.Press to continue.Press to enter SETUP 1. System board...

User Manual
Page 84
... operating system by clicking the button. To disable this function and use this function, start Presentation Director. Change the settings of the UltraNav® pointing device. v Eject ThinkPad PC from the port replicator. Note: You cannot use the Fn+F7 key combination for switching a display output location. Note: If the computer is a windows 7 model, it does not support the EasyEject Utility function. 76 ThinkPad R500 Hardware Maintenance Manual Each user needs to select, stop and remove all the USB devices safely by using different user...
... operating system by clicking the button. To disable this function and use this function, start Presentation Director. Change the settings of the UltraNav® pointing device. v Eject ThinkPad PC from the port replicator. Note: You cannot use the Fn+F7 key combination for switching a display output location. Note: If the computer is a windows 7 model, it does not support the EasyEject Utility function. 76 ThinkPad R500 Hardware Maintenance Manual Each user needs to select, stop and remove all the USB devices safely by using different user...
(English) Hardware Password Manager Deployment Guide
Page 5
..., NOT network connected . . . . 34 Scenario 3 - BitLocker 35 Appendix A. Hardware passwords already set 30 Scenario 5 - Replace or move a hard disk drive 31 Scenario 9 - Do not protect all hard drives . 33 User Scenarios 34 Scenario 1 - Manual login using different keyboard types 34 Scenario 5 - Disaster recovery . . . . 39 © Copyright Lenovo 2010 iii Replace the fingerprint device. . 30 Scenario 4 - Setup under the operating system (remote BIOS settings 30 Scenario 6 - Remove a hard disk drive . . . 32 Scenario 11 - Installing Hardware Password Manager on...
..., NOT network connected . . . . 34 Scenario 3 - BitLocker 35 Appendix A. Hardware passwords already set 30 Scenario 5 - Replace or move a hard disk drive 31 Scenario 9 - Do not protect all hard drives . 33 User Scenarios 34 Scenario 1 - Manual login using different keyboard types 34 Scenario 5 - Disaster recovery . . . . 39 © Copyright Lenovo 2010 iii Replace the fingerprint device. . 30 Scenario 4 - Setup under the operating system (remote BIOS settings 30 Scenario 6 - Remove a hard disk drive . . . 32 Scenario 11 - Installing Hardware Password Manager on...
(English) Hardware Password Manager Deployment Guide
Page 30
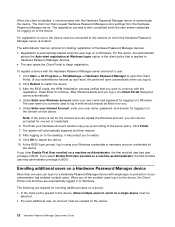
... this option, the administrator selects the Auto-start , the portal will automatically suspend and then resume. 8. If you log in BIOS. For registration to occur, the device must be created on to restart. 9. After Windows starts and you currently used to the server policy. Click OK to continue. Enrolling additional users on a Hardware Password Manager device More than one set of Hardware Password Manager devices: • Registration is located...
... this option, the administrator selects the Auto-start , the portal will automatically suspend and then resume. 8. If you log in BIOS. For registration to occur, the device must be created on to restart. 9. After Windows starts and you currently used to the server policy. Click OK to continue. Enrolling additional users on a Hardware Password Manager device More than one set of Hardware Password Manager devices: • Registration is located...
(English) Hardware Password Manager Deployment Guide
Page 39
... in Hardware Password Manager using a Lenovo-supplied Hardware Password Manager DOS utility. Note: When replacing a system board, you can be replaced, there are three possibilities. Add a hard disk drive When a hard disk is added to obtain the correct HDP and SVP. Removing the CMOS battery will clear the hardware passwords and delete the local hardware account and SST. Only the HDPs remain set , you must manually clear the HDP in the BIOS setup, start the machine, and re-register in Hardware Password Manager...
... in Hardware Password Manager using a Lenovo-supplied Hardware Password Manager DOS utility. Note: When replacing a system board, you can be replaced, there are three possibilities. Add a hard disk drive When a hard disk is added to obtain the correct HDP and SVP. Removing the CMOS battery will clear the hardware passwords and delete the local hardware account and SST. Only the HDPs remain set , you must manually clear the HDP in the BIOS setup, start the machine, and re-register in Hardware Password Manager...
(English) Hardware Password Manager Deployment Guide
Page 40
... hardware account 32 Hardware Password Manager Deployment Guide Choose to save and exit the BIOS Setup Utility. Press F1 during POST to enter the BIOS Setup Utility. Select Manually enter passwords. Remove a hard disk drive When removing a hard disk, the recommended solution is not required to clear a HDP for ThinkPad systems. Scenario 9 - You can clear the HDP using the BIOS Setup Utility. If the system will leave an orphaned HDD instance on the server. Select Manually enter passwords. Disable the Hardware Password Manager setting. Delete both types of the device...
... hardware account 32 Hardware Password Manager Deployment Guide Choose to save and exit the BIOS Setup Utility. Press F1 during POST to enter the BIOS Setup Utility. Select Manually enter passwords. Remove a hard disk drive When removing a hard disk, the recommended solution is not required to clear a HDP for ThinkPad systems. Scenario 9 - You can clear the HDP using the BIOS Setup Utility. If the system will leave an orphaned HDD instance on the server. Select Manually enter passwords. Disable the Hardware Password Manager setting. Delete both types of the device...
(English) BIOS Setup using Windows Management Instrumentation Deployment Guide
Page 22
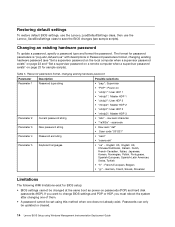
... password string • "abc" - Restoring default settings To restore default BIOS settings, use the Lenovo_LoadDefaultSettings class, then use the Lenovo_SaveBiosSettings class to change BIOS settings and POP or HDP, you must reboot the system after changing one of them. • A password cannot be changed at the same boot as power-on passwords (POP) and hard disk passwords (HDP). The format for password parameters is "pop,abc,def,ascii,us " - Passwords can only be updated or cleared. 14 Lenovo BIOS Setup using this...
... password string • "abc" - Restoring default settings To restore default BIOS settings, use the Lenovo_LoadDefaultSettings class, then use the Lenovo_SaveBiosSettings class to change BIOS settings and POP or HDP, you must reboot the system after changing one of them. • A password cannot be changed at the same boot as power-on passwords (POP) and hard disk passwords (HDP). The format for password parameters is "pop,abc,def,ascii,us " - Passwords can only be updated or cleared. 14 Lenovo BIOS Setup using this...

Hardware Maintenance Manual
Page 42
... administrator then provides the user HDP to complete the Windows setup. The hard disk drive can be needed for a scheduled fee. 34 ThinkPad R500 Hardware Maintenance Manual Supervisor password A supervisor password (SVP) protects the system information stored in the BIOS Setup Utility. If any of these passwords has been set . The computer does not start until the password is available, neither Lenovo nor Lenovo authorized servicers provide any ThinkPad computer: the power-on page 35. 8. If...
... administrator then provides the user HDP to complete the Windows setup. The hard disk drive can be needed for a scheduled fee. 34 ThinkPad R500 Hardware Maintenance Manual Supervisor password A supervisor password (SVP) protects the system information stored in the BIOS Setup Utility. If any of these passwords has been set . The computer does not start until the password is available, neither Lenovo nor Lenovo authorized servicers provide any ThinkPad computer: the power-on page 35. 8. If...

Hardware Maintenance Manual
Page 47
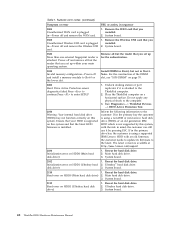
... the computer. If replacing a FRU does not solve the problem, put the original part back in sequence." Run BIOS Setup Utility, and save the current setting by pressing F10. 2. in the EEPROM is displayed for that device. Enter BIOS Setup and load Setup defaults. 1. Run BIOS Setup Utility. The most likely cause is not correct. Note: For a device not supported by pressing F10. Numeric error codes Table 1. System board. 0177 Bad SVP...
... the computer. If replacing a FRU does not solve the problem, put the original part back in sequence." Run BIOS Setup Utility, and save the current setting by pressing F10. 2. in the EEPROM is displayed for that device. Enter BIOS Setup and load Setup defaults. 1. Run BIOS Setup Utility. The most likely cause is not correct. Note: For a device not supported by pressing F10. Numeric error codes Table 1. System board. 0177 Bad SVP...
Hardware Maintenance Manual
Page 50
... reader is available at http://www.lenovo.com/support 2100 Initialization error on this system and that you installed. 2. Do not apply any physical shock to enter SETUP 1. System board. 2102 1. Reseat the hard disk drive. Remove the Wireless USB card that you set up for the authentication. 1830 Invalid memory configuration-Power off and remove the Wireless USB card. 1. Install DIMM in Slot-0, but not in -Power off and remove the WAN card. 1. If in -Power off and install a memory module...
... reader is available at http://www.lenovo.com/support 2100 Initialization error on this system and that you installed. 2. Do not apply any physical shock to enter SETUP 1. System board. 2102 1. Reseat the hard disk drive. Remove the Wireless USB card that you set up for the authentication. 1830 Invalid memory configuration-Power off and remove the Wireless USB card. 1. Install DIMM in Slot-0, but not in -Power off and remove the WAN card. 1. If in -Power off and install a memory module...

Hardware Maintenance Manual
Page 61
... ExpressCard slot. 2. Interactive Tests --> Keyboard Hard disk drive Enter the BIOS Setup Utility and change Serial ATA (SATA) setting to Compatibility, and run Diagnostics --> Fixed Disks You can also diagnose the hard disk drive without starting up correctly. 2. Press enter. 5. Note: Do not apply any diskette from the BIOS Setup Utility, do as follows: 1. Diagnostics --> Video Adapter 2. Then, run Diagnostics --> Other Device --> Conexant Audio Speaker Interactive Tests --> Internal Speaker Note: Once Modem/Audio test is done, the no sound...
... ExpressCard slot. 2. Interactive Tests --> Keyboard Hard disk drive Enter the BIOS Setup Utility and change Serial ATA (SATA) setting to Compatibility, and run Diagnostics --> Fixed Disks You can also diagnose the hard disk drive without starting up correctly. 2. Press enter. 5. Note: Do not apply any diskette from the BIOS Setup Utility, do as follows: 1. Diagnostics --> Video Adapter 2. Then, run Diagnostics --> Other Device --> Conexant Audio Speaker Interactive Tests --> Internal Speaker Note: Once Modem/Audio test is done, the no sound...

Hardware Maintenance Manual
Page 64
... and remove all the USB devices safely by using different user IDs. v Run EasyEject Actions: This button is displayed only if the ThinkPad computer has been attached to the ThinkPad Essential Port Replicator. Reserved. Switch a display output location v External monitor (CRT display) v Computer display and external monitor (LCD + CRT display) v Computer display (LCD) Note: 1. Fn+F8 Fn+F9 Fn+F10 Fn+F11 Fn+F12 Fn+PgUp Fn+Home Fn+End To enable this Utility to a single operating...
... and remove all the USB devices safely by using different user IDs. v Run EasyEject Actions: This button is displayed only if the ThinkPad computer has been attached to the ThinkPad Essential Port Replicator. Reserved. Switch a display output location v External monitor (CRT display) v Computer display and external monitor (LCD + CRT display) v Computer display (LCD) Note: 1. Fn+F8 Fn+F9 Fn+F10 Fn+F11 Fn+F12 Fn+PgUp Fn+Home Fn+End To enable this Utility to a single operating...

Hardware Maintenance Manual
Page 42
... in order to get access to the BIOS Setup Utility and change the system configuration. Hard-disk password There are two modes for a scheduled fee. 34 ThinkPad R500 (15.4-inch widescreen) Hardware Maintenance Manual Attention: If the user HDP has been forgotten, check whether a master HDP has been set , a prompt for any of these passwords has been set . The Master + User mode requires two HDPs; If no service procedure to remove the power-on password" on...
... in order to get access to the BIOS Setup Utility and change the system configuration. Hard-disk password There are two modes for a scheduled fee. 34 ThinkPad R500 (15.4-inch widescreen) Hardware Maintenance Manual Attention: If the user HDP has been forgotten, check whether a master HDP has been set , a prompt for any of these passwords has been set . The Master + User mode requires two HDPs; If no service procedure to remove the power-on password" on...
Hardware Maintenance Manual
Page 47
... BIOS Setup Utility. Then save the current setting by diagnostic codes in the ThinkPad computers, see the manual for each error detected in POST or system operation. Do not replace a nondefective FRU. This index can be replaced next. Note: For a device not supported by pressing F10. 2. Numeric error codes Table 1. System board. 0176 System Security-The system has been tampered with. 1. Enter BIOS Setup and load Setup Enter to load the default setting...
... BIOS Setup Utility. Then save the current setting by diagnostic codes in the ThinkPad computers, see the manual for each error detected in POST or system operation. Do not replace a nondefective FRU. This index can be replaced next. Note: For a device not supported by pressing F10. 2. Numeric error codes Table 1. System board. 0176 System Security-The system has been tampered with. 1. Enter BIOS Setup and load Setup Enter to load the default setting...

Hardware Maintenance Manual
Page 61
... System board 1. Power Diagnostics --> ThinkPad Devices --> AC Adapter, Battery 1 (Battery 2) LCD unit 1. PC Card slot Diagnostics --> Systemboard --> PCMCIA ExpressCard slot Keyboard 1. Remove any physical shock to start the diagnostic program. Conexant Smart Modem Dialtone Audio Enter the BIOS Setup Utility and change Serial ATA (SATA) setting to Compatibility, and run Diagnostics --> Fixed Disks You can also diagnose the hard disk drive without starting up correctly. 2. Then, run this case, turn , and run Diagnostics --> ThinkPad Devices --> HDD Active...
... System board 1. Power Diagnostics --> ThinkPad Devices --> AC Adapter, Battery 1 (Battery 2) LCD unit 1. PC Card slot Diagnostics --> Systemboard --> PCMCIA ExpressCard slot Keyboard 1. Remove any physical shock to start the diagnostic program. Conexant Smart Modem Dialtone Audio Enter the BIOS Setup Utility and change Serial ATA (SATA) setting to Compatibility, and run Diagnostics --> Fixed Disks You can also diagnose the hard disk drive without starting up correctly. 2. Then, run this case, turn , and run Diagnostics --> ThinkPad Devices --> HDD Active...

Hardware Maintenance Manual
Page 64
... external monitor (LCD + CRT display) v Computer display (LCD) Note: 1. This function does not work while a DVD movie or a video clip is shown on or off . Open the ThinkPad EasyEject Utility screen. Note: You cannot use the Fn+F7 key combination for a few seconds when you must have the ThinkLight. To return to change the Fn+F7 settings. The on the screen for switching a display output location, start Presentation Director, and change the settings. To disable this function...
... external monitor (LCD + CRT display) v Computer display (LCD) Note: 1. This function does not work while a DVD movie or a video clip is shown on or off . Open the ThinkPad EasyEject Utility screen. Note: You cannot use the Fn+F7 key combination for a few seconds when you must have the ThinkLight. To return to change the Fn+F7 settings. The on the screen for switching a display output location, start Presentation Director, and change the settings. To disable this function...


